- Installing uWSGI
- Installing from a distribution package
- Installing from source
- Alternative build profiles
- Modular builds
- Quickstart for Python/WSGI applications
- Installing uWSGI with Python support
- The first WSGI application
- Deploy it on HTTP port 9090В
- Adding concurrency and monitoring
- Putting behind a full webserver
- Automatically starting uWSGI on boot
- Deploying Django
- Deploying Flask
- Deploying web2py
- A note on Python threads
- Virtualenvs
- Security and availability
- Offloading
- Bonus: multiple Python versions for the same uWSGI binary
- And now…
- Введение в WSGI-серверы: Часть первая
- Краткая история серверов WSGI Python
- Сервер и веб-приложение
- Принцип работы:
- Почему именно WSGI?
- Bjoern
- uWSGI
- mod_wsgi
- Meinheld
- CherryPy
- Gunicorn
Installing uWSGI
Installing from a distribution package
uWSGI is available as a package in several OS/distributions.
Installing from source
To build uWSGI you need Python and a C compiler ( gcc and clang are supported). Depending on the languages you wish to support you will need their development headers. On a Debian/Ubuntu system you can install them (and the rest of the infrastructure required to build software) with:
And if you want to build a binary with python/wsgi support (as an example)
On a Fedora/Redhat system you can install them with:
For python/wsgi support:
If you have a variant of make available in your system you can simply run make . If you do not have make (or want to have more control) simply run:
You can also use pip to install uWSGI (it will build a binary with python support).
Or you can use ruby gems (it will build a binary with ruby/rack support).
At the end of the build, you will get a report of the enabled features. If something you require is missing, just add the development headers and rerun the build. For example to build uWSGI with ssl and perl regexp support you need libssl-dev and pcre headers.
Alternative build profiles
For historical reasons when you run вЂmake’, uWSGI is built with Python as the only supported language. You can build customized uWSGI servers using build profiles, located in the buildconf/ directory. You can use a specific profile with:
Or you can pass it via an environment variable:
Modular builds
This is the approach your distribution should follow, and this is the approach you MUST follow if you want to build a commercial service over uWSGI (see below). The vast majority of uWSGI features are available as plugins. Plugins can be loaded using the –plugin option. If you want to give users the maximum amount of flexibility allowing them to use only the minimal amount of resources, just create a modular build. A build profile named “core” is available.
This will build a uWSGi binary without plugins. This is called the “server core”. Now you can start building all of the plugins you need. Check the plugins/ directory in the source distribution for a full list.
Remember to always pass the build profile (вЂcore’ in this case) as the third argument.
© Copyright 2012-2016, uWSGI Revision a650304d .
Quickstart for Python/WSGI applications
This quickstart will show you how to deploy simple WSGI applications and common web frameworks.
Python here is meant as CPython, for PyPy you need to use the specific plugin: The PyPy plugin , Jython support is under construction.
You need at least uWSGI 1.4 to follow the quickstart. Anything older is no longer maintained and is highly buggy!
Installing uWSGI with Python support
When you start learning uWSGI, try to build from official sources: using distribution-supplied packages may bring you plenty of headaches. When things are clear, you can use modular builds (like the ones available in your distribution).
uWSGI is a (big) C application, so you need a C compiler (like gcc or clang) and the Python development headers.
On a Debian-based distro an
You have various ways to install uWSGI for Python:
using the network installer
(this will install the uWSGI binary into /tmp/uwsgi , feel free to change it).
via downloading a source tarball and “making” it
(after the build you will have a uwsgi binary in the current directory).
Installing via your package distribution is not covered (would be impossible to make everyone happy), but all of the general rules apply.
One thing you may want to take into account when testing this quickstart with distro-supplied packages, is that very probably your distribution has built uWSGI in modular way (every feature is a different plugin that must be loaded). To complete this quickstart, you have to prepend —plugin python,http to the first series of examples, and —plugin python when the HTTP router is removed (if this doesn’t make sense to you, just continue reading).
The first WSGI application
Let’s start with a simple “Hello World” example:
(save it as foobar.py ).
As you can see, it is composed of a single Python function. It is called “application” as this is the default function that the uWSGI Python loader will search for (but you can obviously customize it).
Deploy it on HTTP port 9090В
Now start uWSGI to run an HTTP server/router passing requests to your WSGI application:
Do not use —http when you have a frontend webserver or you are doing some form of benchmark, use —http-socket . Continue reading the quickstart to understand why.
Adding concurrency and monitoring
The first tuning you would like to make is adding concurrency (by default uWSGI starts with a single process and a single thread).
You can add more processes with the —processes option or more threads with the —threads option (or you can have both).
This will spawn 4 processes (each with 2 threads), a master process (will respawn your processes when they die) and the HTTP router (seen before).
One important task is monitoring. Understanding what is going on is vital in production deployment. The stats subsystem allows you to export uWSGI’s internal statistics as JSON:
Make some request to your app and then telnet to the port 9191, you’ll get lots of fun information. You may want to use “uwsgitop” (just pip install it), which is a top-like tool for monitoring instances.
Bind the stats socket to a private address (unless you know what you are doing), otherwise everyone could access it!
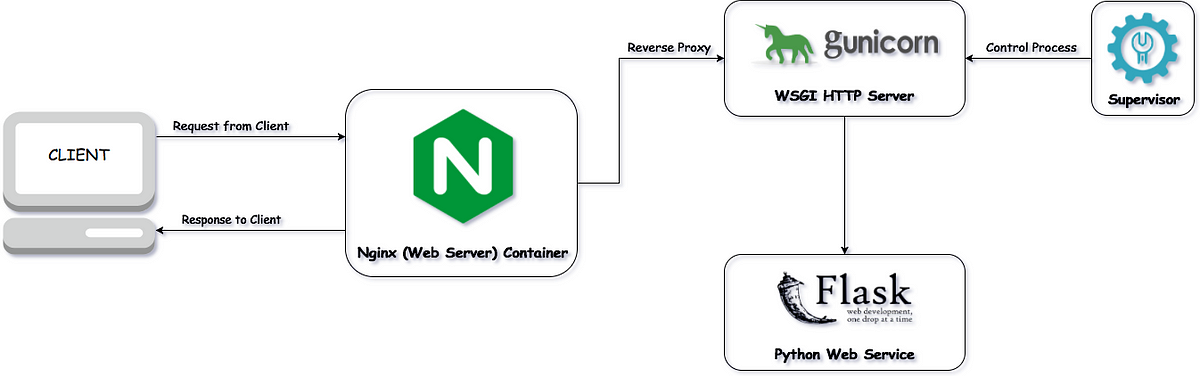
Putting behind a full webserver
Even though uWSGI HTTP router is solid and high-performance, you may want to put your application behind a fully-capable webserver.
uWSGI natively speaks HTTP, FastCGI, SCGI and its specific protocol named “uwsgi” (yes, wrong naming choice). The best performing protocol is obviously uwsgi, already supported by nginx and Cherokee (while various Apache modules are available).
A common nginx config is the following:
This means “pass every request to the server bound to port 3031 speaking the uwsgi protocol”.
Now we can spawn uWSGI to natively speak the uwsgi protocol:
If you’ll run ps aux , you will see one process less. The HTTP router has been removed as our “workers” (the processes assigned to uWSGI) natively speak the uwsgi protocol.
If your proxy/webserver/router speaks HTTP, you have to tell uWSGI to natively speak the http protocol (this is different from –http that will spawn a proxy by itself):
Automatically starting uWSGI on boot
If you are thinking about firing up vi and writing an init.d script for spawning uWSGI, just sit (and calm) down and make sure your system doesn’t offer a better (more modern) approach first.
Each distribution has chosen a startup system ( Upstart , Systemd …) and there are tons of process managers available (supervisord, god, monit, circus…).
uWSGI will integrate very well with all of them (we hope), but if you plan to deploy a big number of apps check the uWSGI Emperor — it is more or less the dream of every devops engineer.
Deploying Django
Django is very probably the most used Python web framework around. Deploying it is pretty easy (we continue our configuration with 4 processes with 2 threads each).
We suppose the Django project is in /home/foobar/myproject :
(with —chdir we move to a specific directory). In Django this is required to correctly load modules.
Argh! What the hell is this?! Yes, you’re right, you’re right… dealing with such long command lines is unpractical, foolish and error-prone. Never fear! uWSGI supports various configuration styles. In this quickstart we will use .ini files.
If the file /home/foobar/myproject/myproject/wsgi.py (or whatever you have called your project) does not exist, you are very probably using an old ( env , module and the pythonpath ( .. allow us to reach the myproject.settings module).
Deploying Flask
Flask is a popular Python web microframework.
Save the following example as myflaskapp.py :
Flask exports its WSGI function (the one we called “application” at the beginning of this quickstart) as “app”, so we need to instruct uWSGI to use it. We still continue to use the 4 processes/2 threads and the uwsgi socket as the base:
(the only addition is the —callable option).
Deploying web2py
Again a popular choice. Unzip the web2py source distribution on a directory of choice and write a uWSGI config file:
On recent web2py releases you may need to copy the wsgihandler.py script out of the handlers directory.
We used the HTTP router again. Just go to port 9090 with your browser and you will see the web2py welcome page.
Click on the administrative interface and… oops, it does not work as it requires HTTPS. Do not worry, the uWSGI router is HTTPS-capable (be sure you have OpenSSL development headers: install them and rebuild uWSGI, the build system will automatically detect it).
First of all generate your key and certificate:
Now you have 2 files (well 3, counting the foobar.csr ), foobar.key and foobar.crt . Change the uWSGI config:
Re-run uWSGI and connect to port 9090 using https:// with your browser.
A note on Python threads
If you start uWSGI without threads, the Python GIL will not be enabled, so threads generated by your application will never run. You may not like that choice, but remember that uWSGI is a language-independent server, so most of its choices are for maintaining it “agnostic”.
But do not worry, there are basically no choices made by the uWSGI developers that cannot be changed with an option.
If you want to maintain Python threads support without starting multiple threads for your application, just add the —enable-threads option (or enable-threads = true in ini style).
Virtualenvs
uWSGI can be configured to search for Python modules in a specific virtualenv.
Just add virtualenv =
to your options.
Security and availability
Always avoid running your uWSGI instances as root. You can drop privileges using the uid and gid options:
If you need to bind to privileged ports (like 443 for HTTPS), use shared sockets. They are created before dropping privileges and can be referenced with the =N syntax, where N is the socket number (starting from 0):
A common problem with webapp deployment is “stuck requests”. All of your threads/workers are stuck (blocked on request) and your app cannot accept more requests. To avoid that problem you can set a harakiri timer. It is a monitor (managed by the master process) that will destroy processes stuck for more than the specified number of seconds (choose harakiri value carefully). For example, you may want to destroy workers blocked for more than 30 seconds:
In addition to this, since uWSGI 1.9, the stats server exports the whole set of request variables, so you can see (in realtime) what your instance is doing (for each worker, thread or async core).
Offloading
The uWSGI offloading subsystem allows you to free your workers as soon as possible when some specific pattern matches and can be delegated to a pure-c thread. Examples are sending static file from the file system, transferring data from the network to the client and so on.
Offloading is very complex, but its use is transparent to the end user. If you want to try just add —offload-threads where is the number of threads to spawn (1 per CPU is a good value to start with).
When offload threads are enabled, all of the parts that can be optimized will be automatically detected.
Bonus: multiple Python versions for the same uWSGI binary
As we have seen, uWSGI is composed of a small core and various plugins. Plugins can be embedded in the binary or loaded dynamically. When you build uWSGI for Python, a series of plugins plus the Python one are embedded in the final binary.
This could be a problem if you want to support multiple Python versions without building a binary for each one.
The best approach would be having a little binary with the language-independent features built in, and one plugin for each Python version that will be loaded on-demand.
In the uWSGI source directory:
This will build a uwsgi binary with all the default plugins built-in except the Python one.
Now, from the same directory, we start building Python plugins:
You will end up with three files: python34_plugin.so , python27_plugin.so , python26_plugin.so . Copy these into your desired directory. (By default, uWSGI searches for plugins in the current working directory.)
Now in your configurations files you can simply add (at the very top) the plugins-dir and plugin directives.
This will load the python26_plugin.so plugin library from the directory into which you copied the plugins.
And now…
You should already be able to go into production with such few concepts, but uWSGI is an enormous project with hundreds of features and configurations. If you want to be a better sysadmin, continue reading the full docs.
© Copyright 2012-2016, uWSGI Revision a650304d .
Введение в WSGI-серверы: Часть первая
Данная статья является переводом статьи Кевина Голдберга «An Introduction to Python WSGI Servers: Part 1» blog.appdynamics.com/engineering/an-introduction-to-python-wsgi-servers-part-1 с небольшими дополнениями от переводчика

Краткая история серверов WSGI Python
WSGI-серверы появились потому, что веб-серверы в то время не умели взаимодействовать с приложениями, написанными на языке Python. WSGI (произносится как «whiz-gee» с твердым «g») был разработан Филиппом Дж. Эби (вместе с Ян Бикинг и др.) В начале 2000-х годов. Модуль Apache, известный как mod_python, разработанный Григорием Трубецким в конце 90-х годов, на тот момент обрабатывал большую часть Python-приложений. Однако mod_python не был официальной спецификацией. Он был просто создан, чтобы разработчики могли запускать код Python на сервере. К сожалению, такой подход был небезопасным и разработчики начали искать новое решение.
WSGI(Web-Server Gateway Interface) является потомком CGI(Common Gateway Interface). Когда веб начал развиваться, CGI разрастался из-за поддержки огромного количества языков и из-за отсутствия других решений. Однако, такое решение было медленным и ограниченным. WSGI был разработан как интерфейс для маршрутизации запросов от веб-серверов(Apache, Nginx и т.д.) на веб-приложения.
Сервер и веб-приложение
В простейшем случае WSGI состоит из двух основных сущностей:
- Веб-сервер (Nginx, Apache и т. д.);
- Веб-приложение, написанное на языке Python.
Принцип работы:
Веб-сервер исполняет код и отправляет связанную с http-запросом информацию и callback-функцию в веб-приложение. Затем запрос на стороне приложения обрабатывается и высылается ответ на веб-сервер.
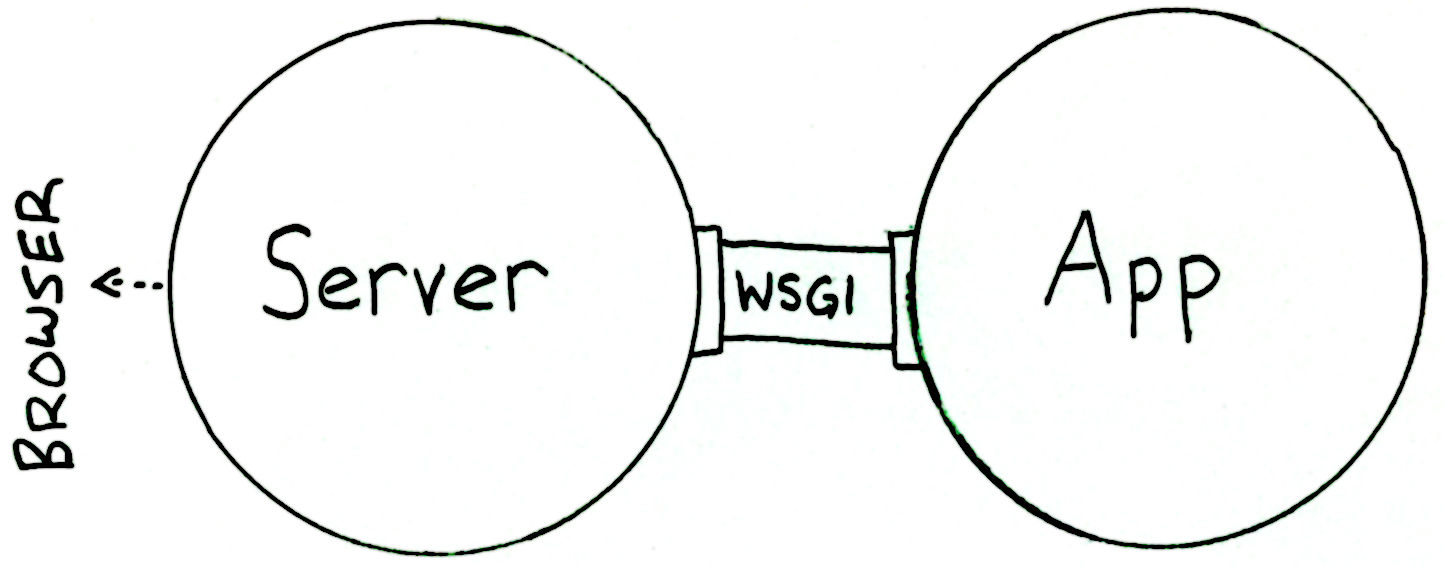
Периодически между веб-сервером и веб-приложением существуют одна или несколько промежуточных прослоек. Такие прослойки позволяют осуществить, например, балансировку между несколькими веб-приложениеми или предпроцессинг(предобработку) отдаваемого контента.
Вот примеры фреймворков, поддерживающих WSGI:
Почему именно WSGI?
Возможно Вы спросите «Хорошо, но почему именно WSGI?». На это есть несколько причин:
- WSGI-сервера были разработаны чтобы обрабатывать множество запросов одновременно. А фреймворки не предназначены для обработки тысяч запросов и не дают решения того, как наилучшим образом маршрутизировать их(запросы) с веб-сервера.
- WSGI ускоряет разработку веб-приложений написанных на языке Python. Если в разработке веб-приложения Вы используете фреймворк(Django или что-то ещё) Вам не нужно беспокоиться о том, как Ваша конкретная инфраструктура использует стандарт WSGI.
- WSGI дает Вам гибкость в изменении компонентов веб-стека без изменения приложения, которое работает с WSGI.
WSGI-серверы выпускаются в различных вариациях. Одни нацелены на fullstack-решение, в то время как другие хорошо подходят для конкретных фреймворков. Например, Gunicorn работает с Django прямо из коробки. Вот более пристальный взгляд на шесть WSGI-серверов на рынке сегодня: Bjoern, uWSGI, mod_wsgi, Meinheld, CherryPy и Gunicorn.
Bjoern
Bjoern — это асинхронный WSGI-сервер, написанный на C. Написанный с нуля, чтобы быть небольшим и быстрым, он был разработан с использованием http_parser от Райана Даля (создателя Node.js) и цикла событий Libev от Марка Леманна.
С размером загрузки всего 18 КБ он состоит из менее 800 строк кода. Он занимает менее 1 МБ оперативной памяти и не использует корутины или потоки. Bjoern полностью совместим с WSGI и считается одним из самых высокопроизводительных WSGI-серверов.
Bjoern поддерживает постоянные соединения и может привязываться к Unix-сокетам или TCP-адресам. Bjoern считается более быстрым, чем Gunicorn, и менее раздутым, чем uWSGI и Meinheld. Один из недостатков данного сервера — отсутствие нормальной документации с понятными примерами.
uWSGI

uWSGI был разработан компанией Unbit(Италия) с целью стать fullstack-решением, способным создавать услуги хостинга. Он назван в честь стандарта WSGI и создавался как плагин для одного из проектов компании.
Широкий и постоянно развивающийся проект, uWSGI позволяет делать гораздо больше, чем веб-приложения для хостинга. Многие находят uWSGI мощным инструментом, в то время как другие считают его несколько раздутым. Начиная с версии 2.0 uWSGI поддерживает также запуск веб-приложений на языках Lua, Perl, Ruby и других.
mod_wsgi
mod_wsgi — модуль HTTP-сервера Apache, разработанный Грэмом Дамплтоном (ранее, один из разработчиков mod_python), предоставляет интерфейс WSGI для веб-приложений. Совместим с версиями языка Python2 и Python3. Создан в качестве альтернативы другим решениям для интеграции веб-приложений, таких как CGI, FastCGI и mod_python. Может быть установлен как модуль Apache или через mod_wsgi express. Второй способ упрощает установку для разработчиков Python, которые не так хорошо знакомы с Apache. Другие преимущества:
• Вы не нуждаетесь в root-правах при полной установке.
• Создается локальная среда, что снижает риск негативного воздействия на существующие настройки.
Развитие mod_wsgi как проекта может показаться медленным из-за того, что модуль разрабатывается одним разработчиком. Другим недостатком является то, что документация в настоящее время плохо организована и может быть устаревшей.
В настоящее время основное внимание уделяется упрощению реализации Apache с использованием mod_wsgi в средах с использованием Docker.
Meinheld
Созданный Ютака Мацубара, Meinheld является сервером, совместимым с WSGI, который использует мощь picoev и greenlet для выполнения асинхронных операций ввода-вывода. Он может использоваться с автономным HTTP-сервером или через Gunicorn.
Meinheld имеет зависимость от стороннего компонента, называемого greenlet.
Репозиторий с исходным кодом расположен на GitHub. Meinheld поддерживает веб-сокеты и включает в себя несколько monkeypatches над другими модулями для расширения функциональности.
CherryPy
CherryPy — более известен как минималистичный Python-фреймворк для написания веб-приложений, CherryPy также поставляется с WSGI thread-pooled веб-сервером и поддержкой протокола HTTP / 1.1. Команда разработчиков CherryPy описывает свой веб-сервер как production-ready, высокоскоростной, thread-pooled HTTP-сервер. Он имеет:
• Быструю, простую настройку;
• Возможность масштабирования;
• Небольшое и простое в использовании решение для ваших приложений Python;
• Поддержка SSL.
CherryPy отличает себя от более известных WSGI-серверов из-за простоты использования и удобства для разработчиков. Вы можете написать небольшое веб-приложение в течении нескольких минут, запустив его в несколько процессов и создав только один файл с именем server.py. Объединив CherryPy с Nginx в качестве прокси-сервера, Вы получите надежный способ обслуживания своих веб-приложений. CherryPy был создан Реми Делоном. Он хотел создать структуру, которая была бы максимально близка к главным принципам разработки на языке Python.
Gunicorn
Gunicorn — это WSGI-сервер, созданный для использования в UNIX-системах. Название — сокращенная и комбинированная версия слов «Green Unicorn». На самом сайте проекта есть зеленый единорог. Gunicorn был перенесен из проекта «Unicorn» из языка Ruby. Он относительно быстрый, ресурсоёмкий, легко запускается и работает с широким спектром веб-фреймворков.
Команда разработчиков рекомендует использовать Gunicorn в связке с Nginx, где Nginx используется в качестве прокси-сервера.


