- Install virtualbox extension pack kali linux
- Kali Linux & VirtualBox Guest Addition (Legacy)
- Preparing
- Installing
- Creating Shared Folders with the Host System
- Install virtualbox extension pack kali linux
- Preparation
- Download
- Setup
- Install virtualbox extension pack kali linux
- Wizard
- Как установить Oracle VM VirtualBox Extension Pack
- Установка Oracle VM VirtualBox Extension Pack
- Шаг 1. Версия VirtualBox
- Шаг 2. Загрузка Extension Pack
- Шаг 3. Установка Extension Pack
- Оцените статью:
- Об авторе
- 6 комментариев
Install virtualbox extension pack kali linux
This will NOT show up in the index or search.
It is kept around for historical reasons and may no longer be accurate.
Kali Linux & VirtualBox Guest Addition (Legacy)
This page is dated. You can find the latest version here: Install VirtualBox Guest Additions.
If you run Kali Linux as a “guest” within VirtualBox, this article will help you to successfully install the “Guest Addition” tools.
You must use VirtualBox 4.2.xx or higher in order to take advantage of the improvements, including compatibility updates, and enhanced stability of both the core application and the Guest Additions.
Preparing
Start up your Kali Linux virtual machine, open a terminal window and issue the following command to install the Linux kernel headers.
Once this is complete you can now attach the Guest Additions CD-ROM image. This can be done by selecting Devices from the VirtualBox menu and then select Install Guest Additions.
This will mount the Guest Additions ISO in the virtual CD drive in your Kali Linux virtual machine. When prompted to autorun the CD, click the Cancel button.

Installing
From a terminal window, copy the VboxLinuxAdditions.run file from the Guest Additions CD-ROM to a path on your local system. Ensure it is executable and run the file to begin the installation.
Reboot the Kali Linux VM to complete the Guest Additions installation. You should now have full mouse and screen integration as well as the ability to share folders with the host system.
Creating Shared Folders with the Host System
This section explains how to share folders on your host system with your Kali Linux VirtualBox “guest”.
From the VirtualBox Manager, select your Kali Linux VM instance and click on the Shared Folders link in the right window pane. This will launch a pop up window for adding shared folders. Within this window click the Add Folders icon.
In the Folder Path text box, provide the path to the folder you would like to share, or click the drop-down arrow to browse your host system for the path to the folder. Select the check boxes that allow for Auto-mount and Make Permanent and click the OK button both times when prompted.

Your shared folders will now be available in the media directory. You can create a bookmark or link for easier access to the directory.

Updated on: 2021-Sep-27
Author: g0tmi1k
Источник
Install virtualbox extension pack kali linux
You can install VirtualBox on Kali Linux, allowing you to use virtual machines (VMs) inside of Kali Linux. However if you are wanting to install Kali Linux as a VM, you want our Kali Linux Guest VirtualBox guide.
VMs are great. There are many upsides with using them. One of the being, able to run multiple Operating Systems (OSs) at the same time. You can have your host machine “untouched”, and then only interact with the guest VMs. Another is when something is going right, take a snapshot. When something goes wrong, revert back.
VirtualBox is free and open source. There are a few other software such as QEMU, KVM/Xen with virt-manager. Then there is also VMware Workstation & Fusion, which is a commercial software (there is VMware Player which is free but it is limited in features).
Preparation
Before trying to install VirtualBox, please make sure your version of Kali Linux is up-to-date, and if required, reboot the machine.
Download
The first thing we are going to do is import VirtualBox’s repository key.
We then move onto adding VirtualBox’s repository. We add this to a separate file, so it does not interfere with Kali Linux’s main repository. We also will be making sure to state where the keyring is at so the files can be properly signed. Our CPU architecture is amd64. You may need to alter the example below if yours is different.
One thing to bare in mind, Kali Linux is based on Debian, so we need to use Debian’s current stable version (even though Kali Linux is a rolling distribution). At the time of writing, its “buster”:
As we have altered our network repository, we need to re-build the cache.
As VirtualBox has various kernel modules (e.g. vboxdrv , vboxnetflt and vboxnetadp ), we need to make sure they are kept up-to-date when Kali Linux’s kernel gets updated. This can be achieved using dkms.
Setup
Now its time to install VirtualBox itself (along with its Extension Pack to expand VirtualBox’s advanced features).
When prompted, read and accept the license.
You can now find VirtualBox in the menu or start it via the command line.
If you now wish, you are able to install Kali Linux in a VirtualBox VM (on Kali Linux).
Updated on: 2021-Sep-27
Author: g0tmi1k
Источник
Install virtualbox extension pack kali linux
This guide is about virtualizing Kali Linux inside of VirtualBox, allowing you to have a Kali VM. This is a great way to use Kali, as it is completely separate from the host, allows you to interact with other VMs (as well as the host machine and other machines on the network), and allows you to revert to snapshots.
You may wish to follow our other guide if you are trying to install VirtualBox on Kali Linux (as a host).
The guide below is what we use to generate our pre-made Kali Linux VirtualBox images. You may alter this to your needs. We always generate the images using the latest version of VirtualBox.
You may need to enable virtualization in your BIOS/UEFI for (e.g. Intel VT-x/AMD-V)
Wizard
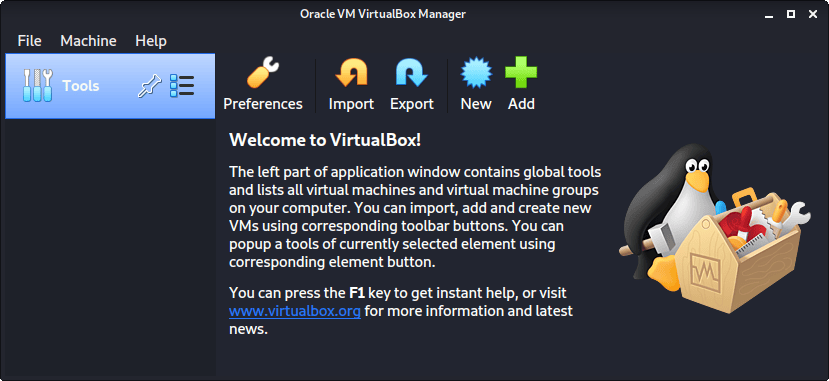
Upon starting up VirtualBox, select “New” (Machine -> New).
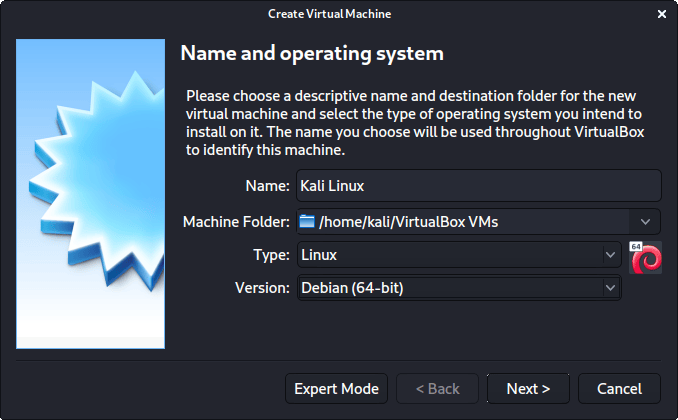
The next screen is “Name and operating system” which is where you name the VM. This name is also used in any filenames (such as the configuration, hard disk and snapshot — which isn’t changed from this point).
We are keeping it generic in this guide (as Kali is a rolling distribution, and we update it), however for our releases, we use the version number in the name as it is a fixed release ( kali-linux-YYYY.N-vbox-ARCH . Example: kali-linux-2021.3-vbox-amd64 ).
For the “Type”, we set it as Linux . For the “Version”, we are going to be using the x64 desktop image, so we are going to select Debian (64-bit) .
“Memory size” is the next section, where we can define how much RAM to use. Again, the higher the amount of RAM, the more applications can be open and at increased performance. Various tools inside of Kali can be demanding of resources. When we make the general VMs, we select 2048 MB (2GB) for RAM, but we often increase this for our personal machines as we have high-performing devices with spare RAM which Kali can utilize.

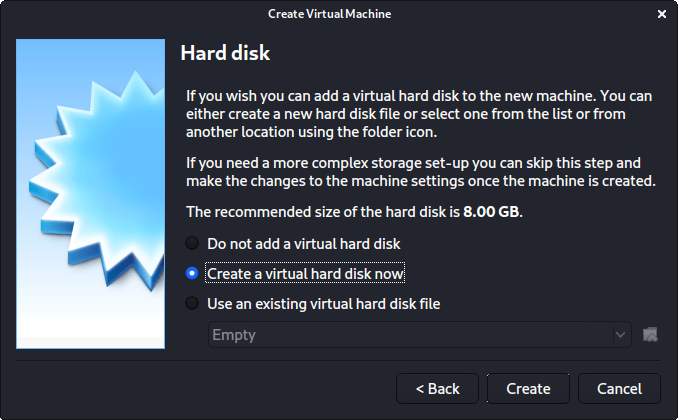
This screen below, “Hard disk”, allows us to Create a new virtual disk now .
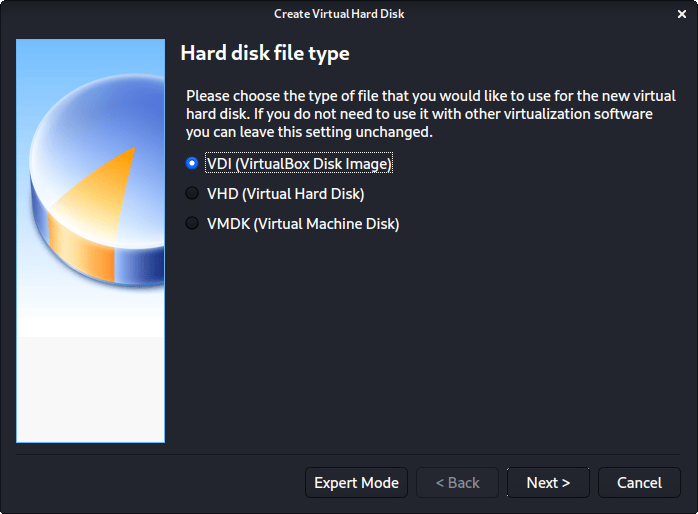
For the “Hard disk file type”, we select VDI (VirtualBox Disk Image) (and its the default option).
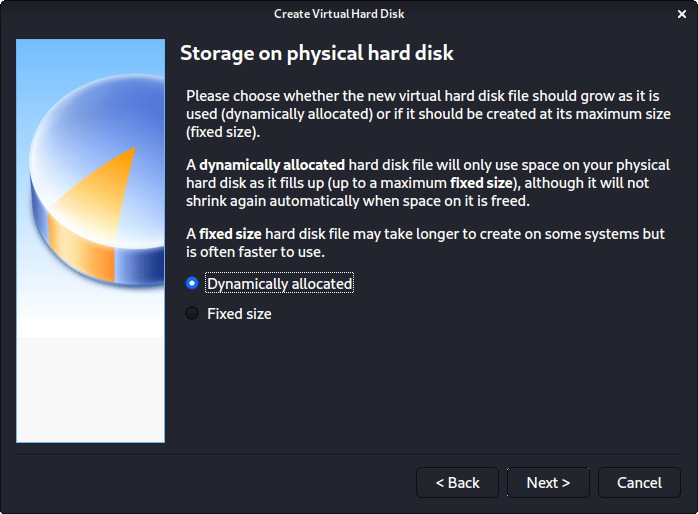
For the following screen, “Storage on physical hard disk”, we go with the default option of Dynamically allocated .
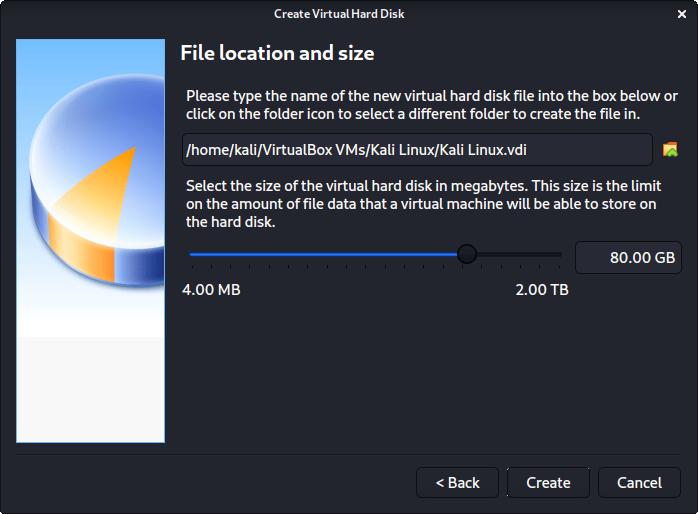
Now with “File location and size”, we can now define how large the virtual hard disk will be. We use 80.00 GB for our VMs.
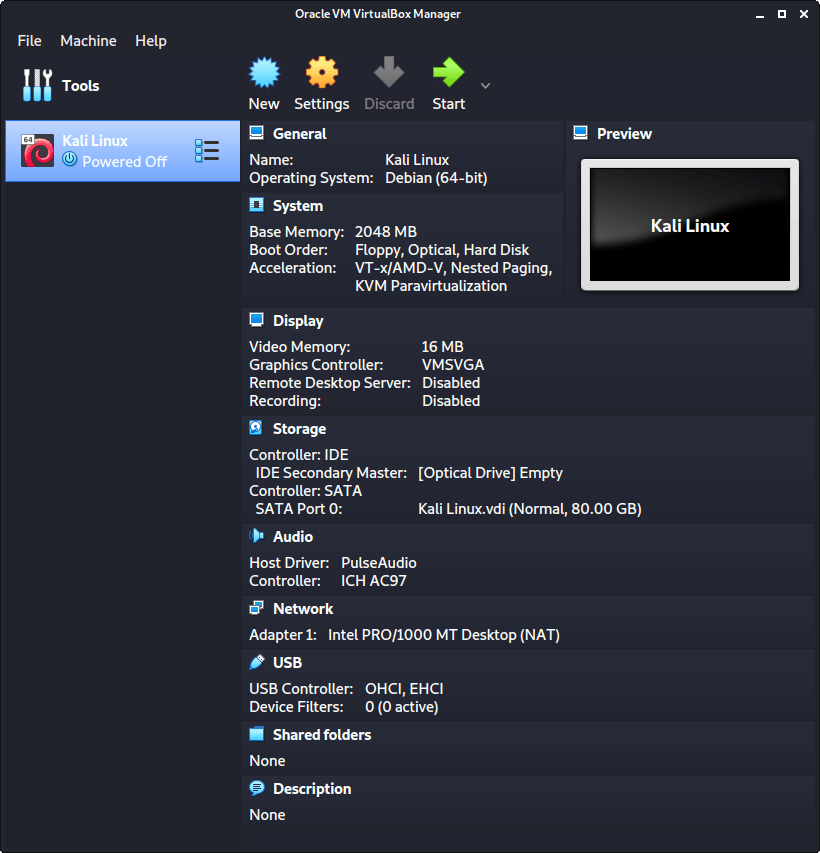
After clicking on “Create”, the wizard is complete.
Now we click on “Settings”, to customize the VM further.
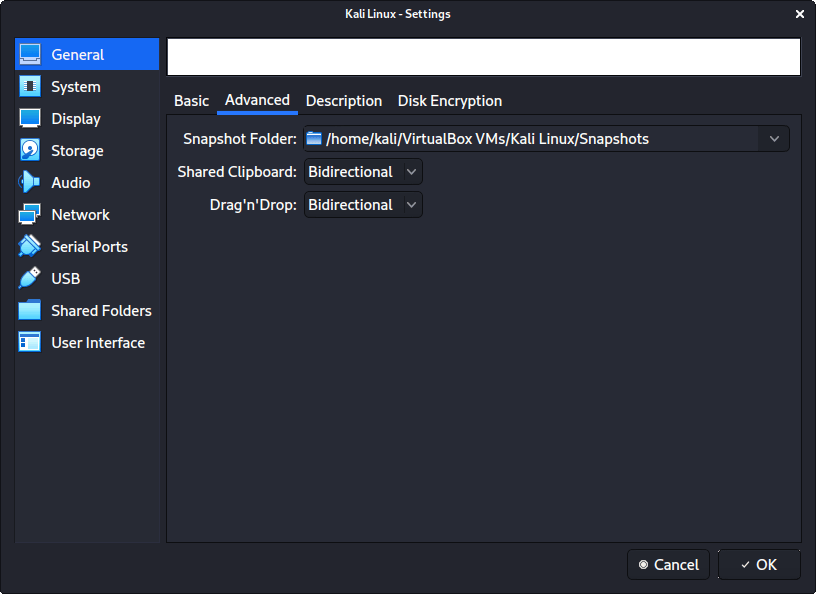
In “General” -> “Advanced”, we make sure to set “Shared Clipboard” to bidirectional , as well as “Drag’n’Drop” to bidirectional
In “System” -> “Motherboard”, we change the “Boot Order” to make sure Hard Disk is top and Optical is the second. Everything else is disabled.
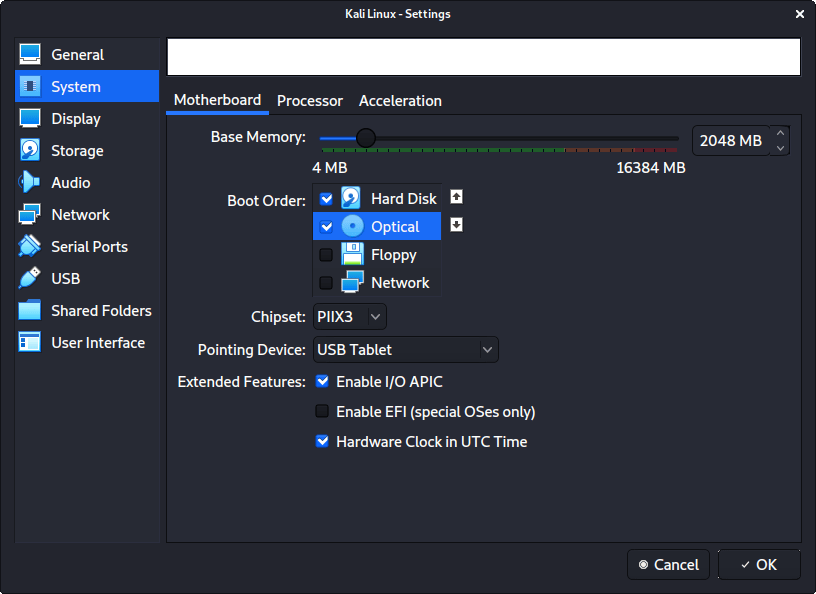
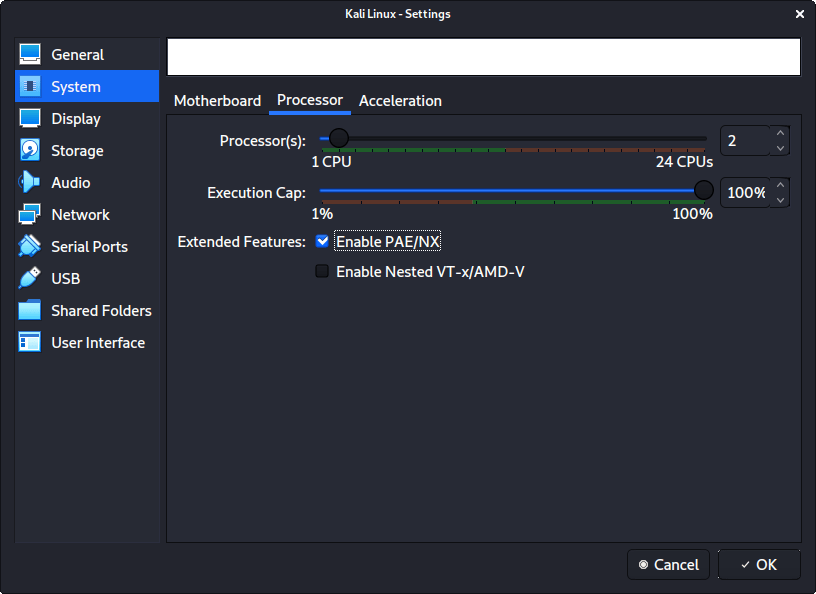
In “System” -> “Processor”, we increase the “Processor(s)” to be 2 .
At the same time, we also enable “Extended Features” for Enable PAE/NX .
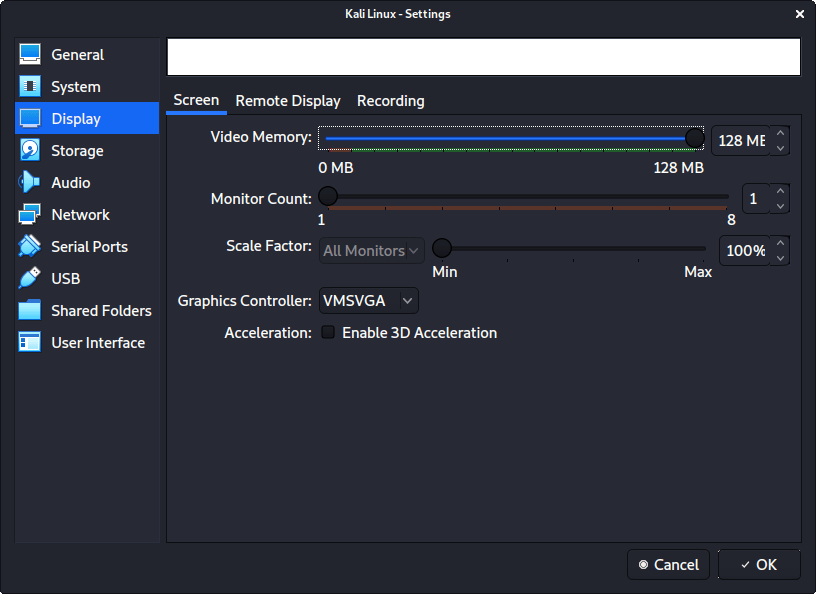
In “Display” -> “Screen”, we make sure to have “Video Memory” set to 128 MB
Another item to point out is to make sure that “Accelerated 3D graphics” is disabled, as people have reported that causes issues.
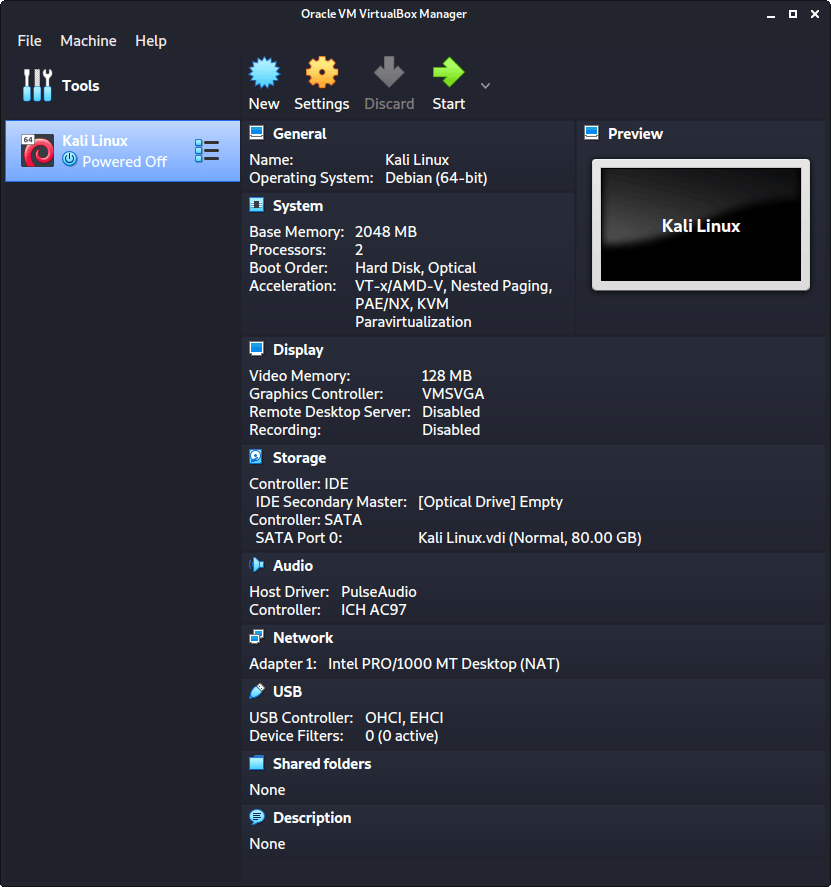
The final settings view looks like the following:
When we are ready to go, press “Start”.
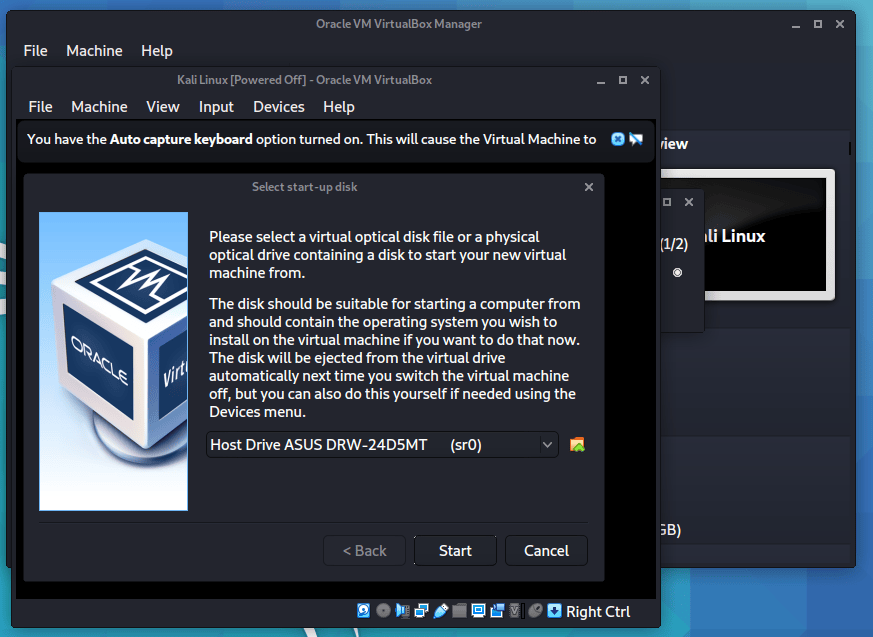
The first time we run it, we will get a prompt saying do we wish to mount an image to use as a “start-up disk”. We want to use our Kali image, rather than a physical drive, so we select the icon to the side of the drop down.
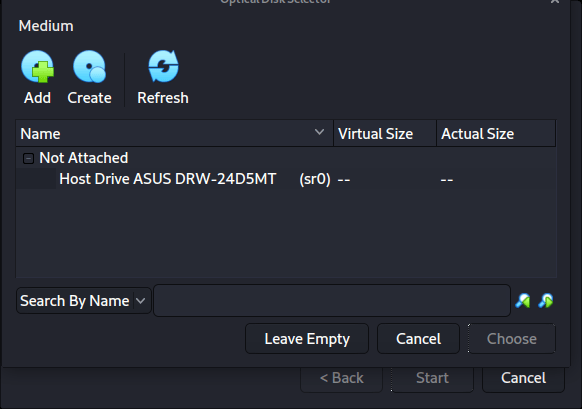
A new pop up will open, “Optical Disk Selector”. We will now press “Add”, then navigate to where our ISO is located.
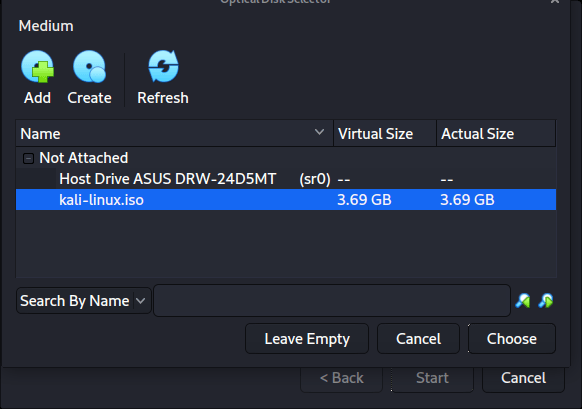
After pressing “Open”, we can see its been added, so we make sure its selected and press “Choose”.
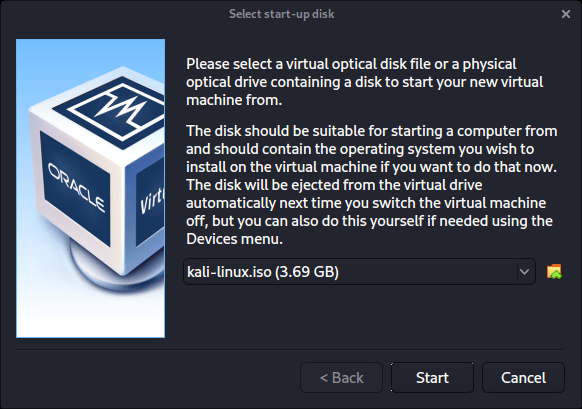
All that is left now to do is press “Start”.
After all this is done, we save, start up the VM, and then continue installing Kali Linux as we normally would for a bare metal install.
During Kali Linux setup process, the install wizard should detect if its inside a VM. If it is, should then automatically install any additional tools (such as virtualbox-guest-x11 ) to give a better user experience. If you want to manually re-install it, you can see our VirtualBox Guest Guide.
Updated on: 2021-Sep-27
Author: g0tmi1k
Источник
Как установить Oracle VM VirtualBox Extension Pack
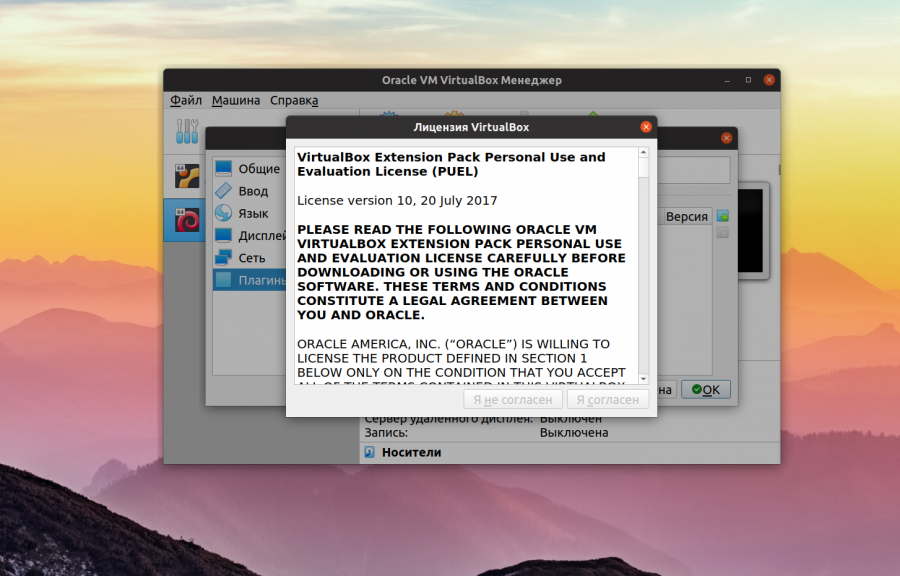
Виртуальная машина VirtualBox распространяется с открытым исходным кодом. Однако у неё есть набор проприетарных модулей, которые добавляют дополнительные возможности. Например, поддержку USB 2.0, подключение к машине по VNC или RDP, а также возможность загрузки PXE в виртуальной машине. После установки этого плагина вы получаете возможность пробрасывать вашу мышь и клавиатуру прямо в виртуальную машину.
В этой небольшой статье мы рассмотрим как установить Oracle VM VirtualBox Extension Pack на примере операционной системы Ubuntu.
Установка Oracle VM VirtualBox Extension Pack
Шаг 1. Версия VirtualBox
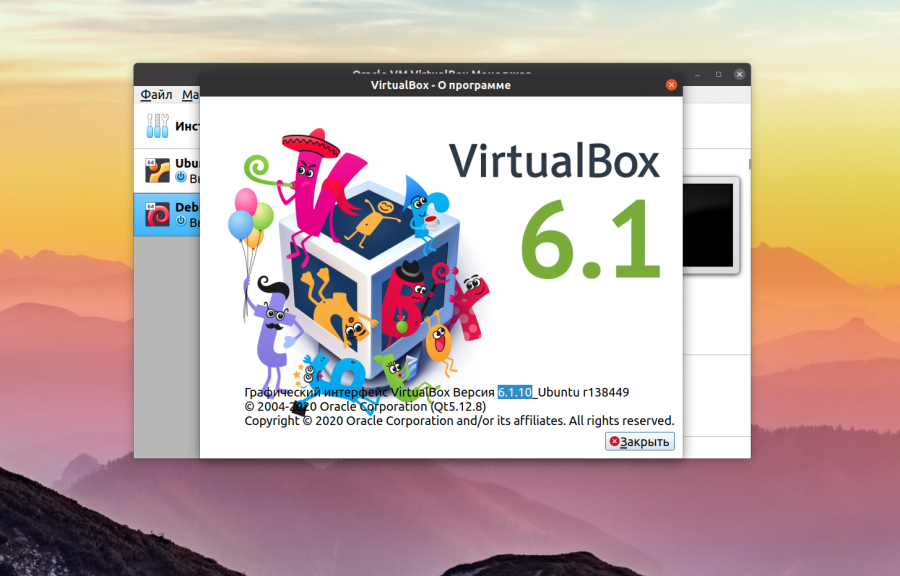
Плагин VirtualBox Exetension Pack выпускается для каждой версии VirtualBox, поэтому сначала надо узнать какая версия у вас установлена. Для этого запустите программу, кликните по меню Справка, а в нём выберите О программе:

В открывшемся окне вы можете видеть версию VirtualBox, в данном случае это 6.1:
Шаг 2. Загрузка Extension Pack
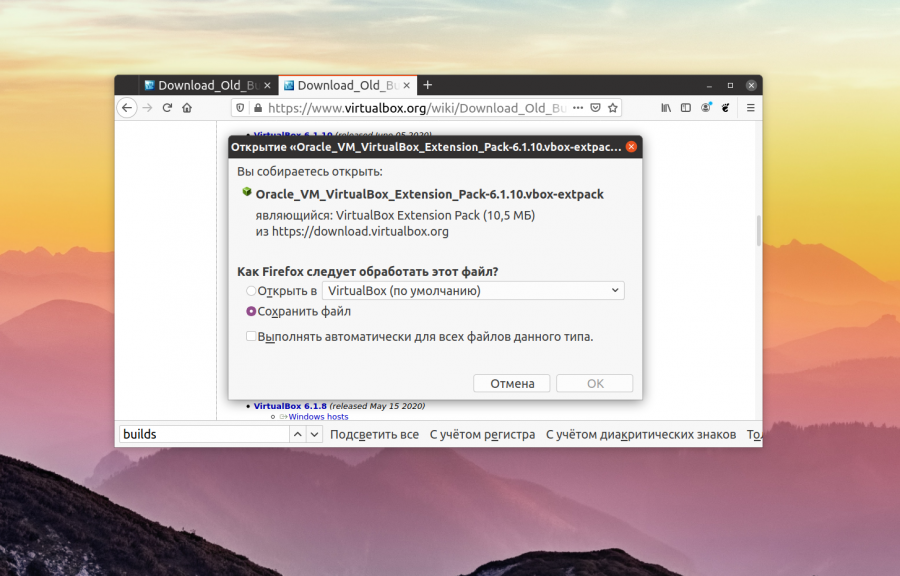
Скачать VirtualBox Extension Pack можно с официального сайта VirtualBox. Если у вас самая последняя версия VirtualBox, которая есть на этой странице, можно скачивать Extension Pack прямо отсюда. Но в данном случае, нам надо не 6.1.16, а 6.1.10. Поэтому надо найти ссылку на страницу Older builds:

Здесь вы берите нужную мажорную версию виртуальной машины, а уже на самой странице старых сборок VirtualBox найдите свою минорную версию:

Здесь есть ссылка на Extension Pack. Просто кликните по ней, затем выберите Сохранить файл в чтобы скачать плагин в папку Загрузки.
Шаг 3. Установка Extension Pack
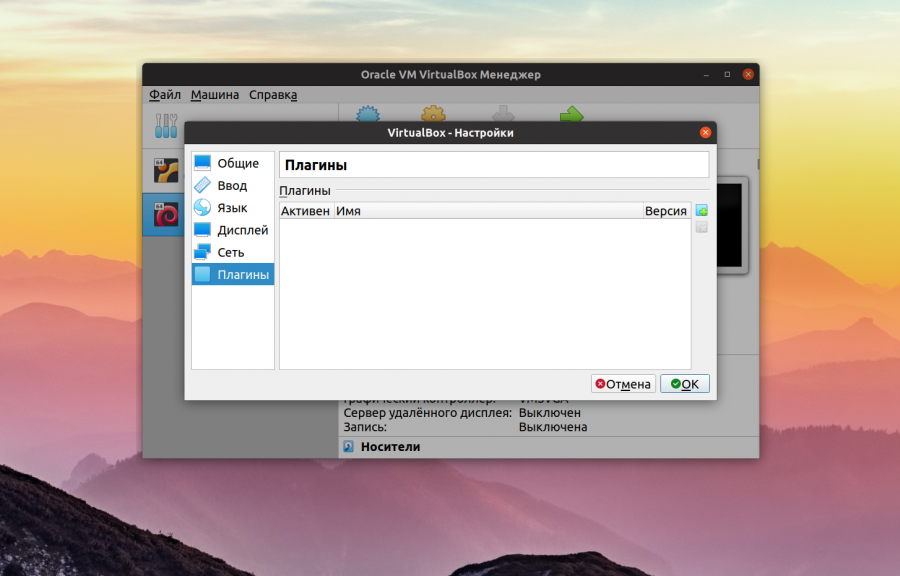
Теперь осталось только установить Extension Pack. Для этого в главном окне VirtualBox откройте меню Файл, а затем Настройки. В открывшемся окне выберите Плагины:
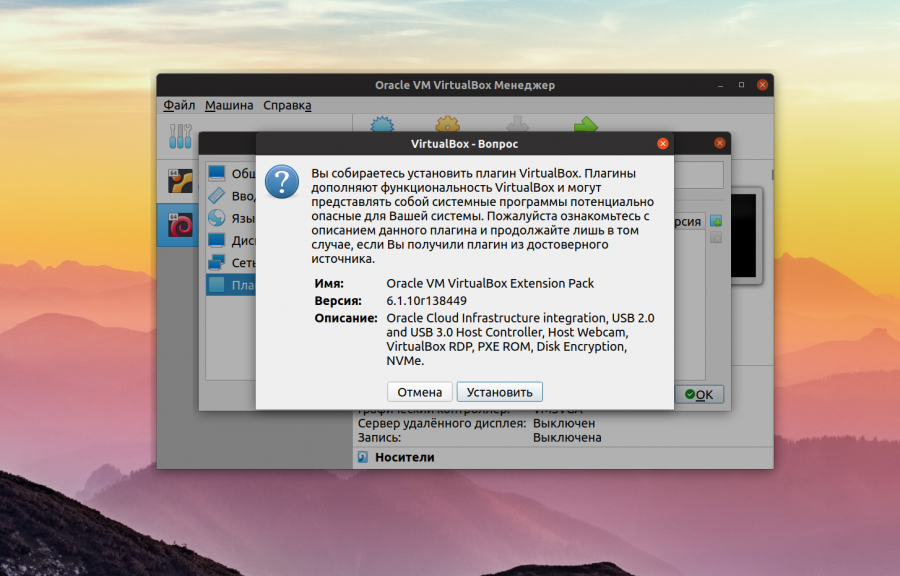
В этом окне кликните по кнопке с зелёным плюсом и выберите файл плагина. Затем подтвердите установку с помощью кнопки Установить:
Спустя несколько мгновений программа сообщит, что VirtualBox Extension Pack успешно установлен:

Теперь вы можете использовать USB 2.0, пробрасывать свою мышь или клавиатуру в виртуальную машину, а также подключаться к виртуальной машине по RDP.
Нет похожих записей
Оцените статью:
Об авторе
Основатель и администратор сайта losst.ru, увлекаюсь открытым программным обеспечением и операционной системой Linux. В качестве основной ОС сейчас использую Ubuntu. Кроме Linux, интересуюсь всем, что связано с информационными технологиями и современной наукой.
6 комментариев
Нет, я понимаю, что надо популизировать линукс , что статьи разные нужны и статьи разные важны . Но Losst , вы опускаетесь до уровня Ответы.Mail.ru . Вам нечем наполнить контент ? Сделайте опросник, тем накидают кучу. С уважением , старый ваш читатель.
Отлично! Теперь ждем новость, как то-же самое проделать на QEMU, общий буфер обмена, масштабирование, открытие виртуальной машины в полный экран, подключение локальных дисков, папок, подключение съемных носителей, usb, и. т. д .
Всё хорошо, но никак не могу создать общую папку. Приходится чесать правой рукой левое ухо: передавать данные из системы в виртуальную машину с помощью флешки (((
samba тебе в помощь. Расшарь папку и лазь по сетке
Лет пять назад написал себе скрип:
VBOX_VER=`VBoxManage —version|awk -Fr ‘
EXTPACK_FILENAME=Oracle_VM_VirtualBox_Extension_Pack-$VBOX_VER.vbox-extpack
gfile=http://download.virtualbox.org/virtualbox/$VBOX_VER/$EXTPACK_FILENAME
al=—accept-license=33d7284dc4a0ece381196fda3cfe2ed0e1e8e7ed7f27b9a9ebc4ee22e24bd23c
echo $EXTPACK_FILENAME
if [ -e $EXTPACK_FILENAME ]; then
echo «Файл $EXTPACK_FILENAME обнаружен.»
echo «Устанавливаем файл $EXTPACK_FILENAME. »
VBoxManage extpack install —replace $EXTPACK_FILENAME $al
exit 0
else
echo «Файл $EXTPACK_FILENAME не обнаружен.»
echo «Загружаем файл $EXTPACK_FILENAME. »
wget $gfile
echo «Устанавливаем файл $EXTPACK_FILENAME. »
VBoxManage extpack install —replace $EXTPACK_FILENAME $al
fi
#========================================================
Источник


