Как установить VMware Tools на Windows 2008 Server Core
Зачем нужны VMware Tools в Windows 2008 Server Core, если из GUI там доступна только командная строчка? Наиболее важным преимуществом является расширенные драйвера мыши VMware. Они позволяют перемещать мышь в и из окна виртуальной машины без необходимости нажимать Ctrl-Alt для освобождения курсора.
Установка VMware Tools – процесс несложный, но как же быть, если вам доступна только командная строка?
Вот как можно установить VMware Tools на Server Core:
Решение 1
1) Войдите на свою виртуальную машину (ВМ) Windows Server 2008 Server Core с учетной записью администратора
2) В консоли VMware выберите в меню пункт установить VMware Tools (Install VMware Tools). В результате в виртуальный привод CD-Rom подключится диск с VMware Tools.
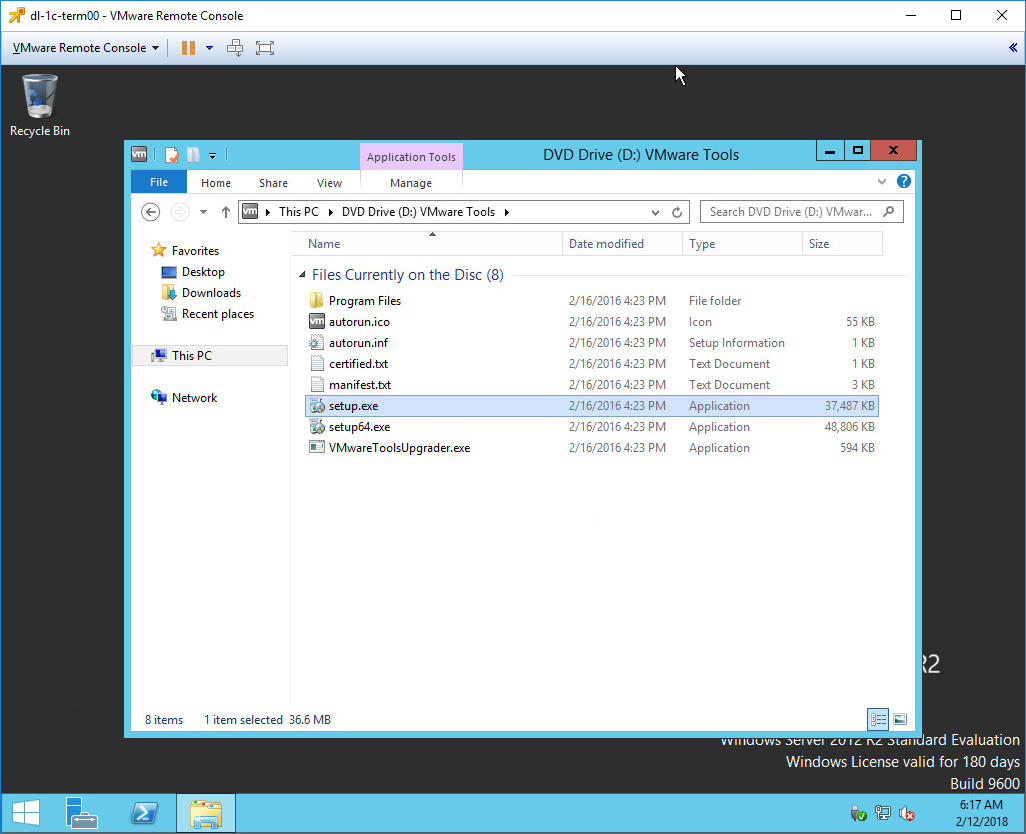
3) В командной строке, перейти на диск D: (или на другую букву вашего привода)
4) Наберите Setup и нажмите Ввод
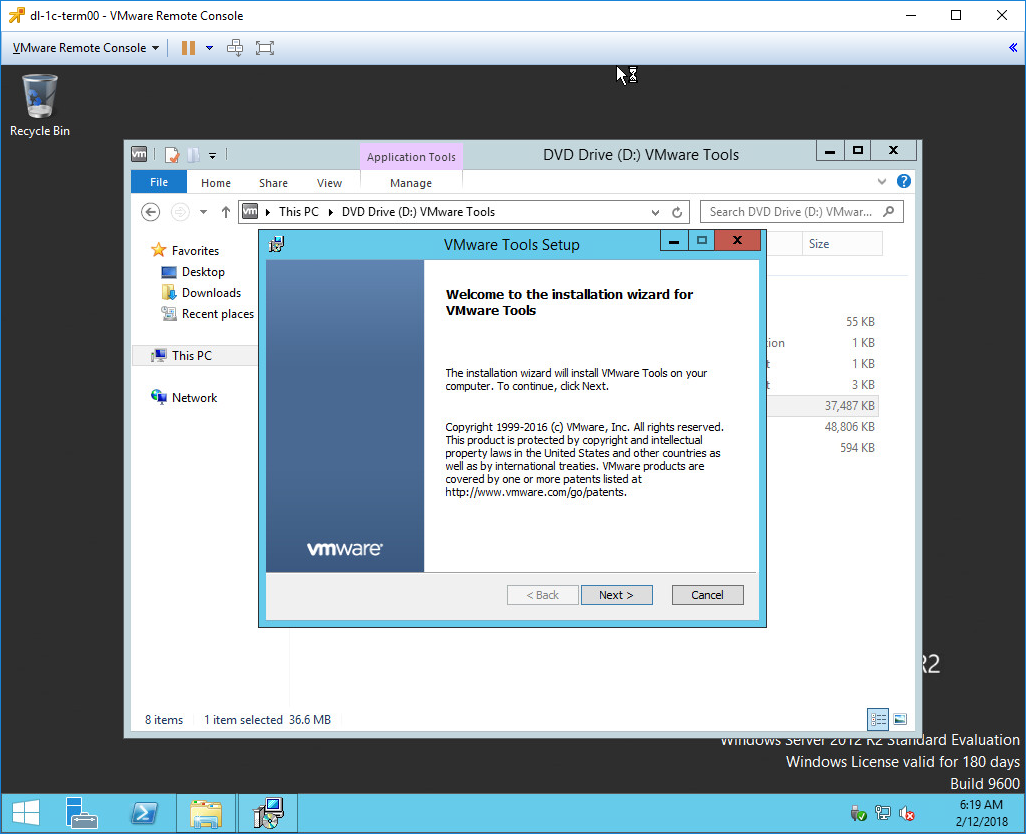
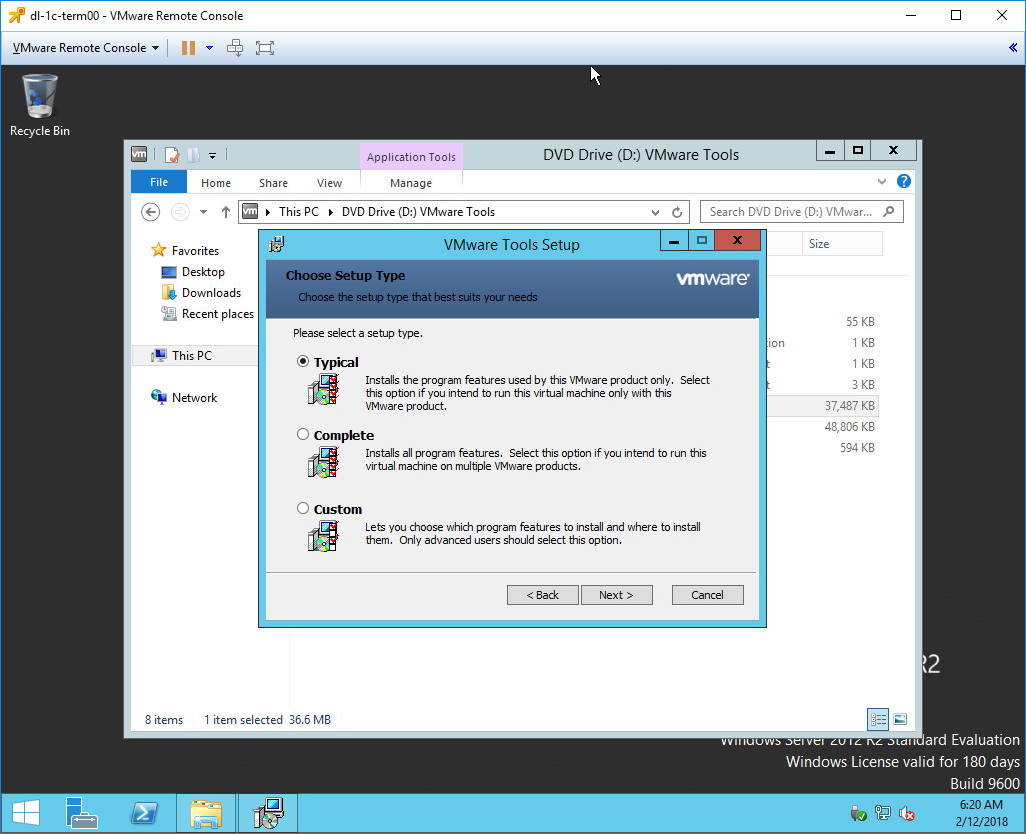
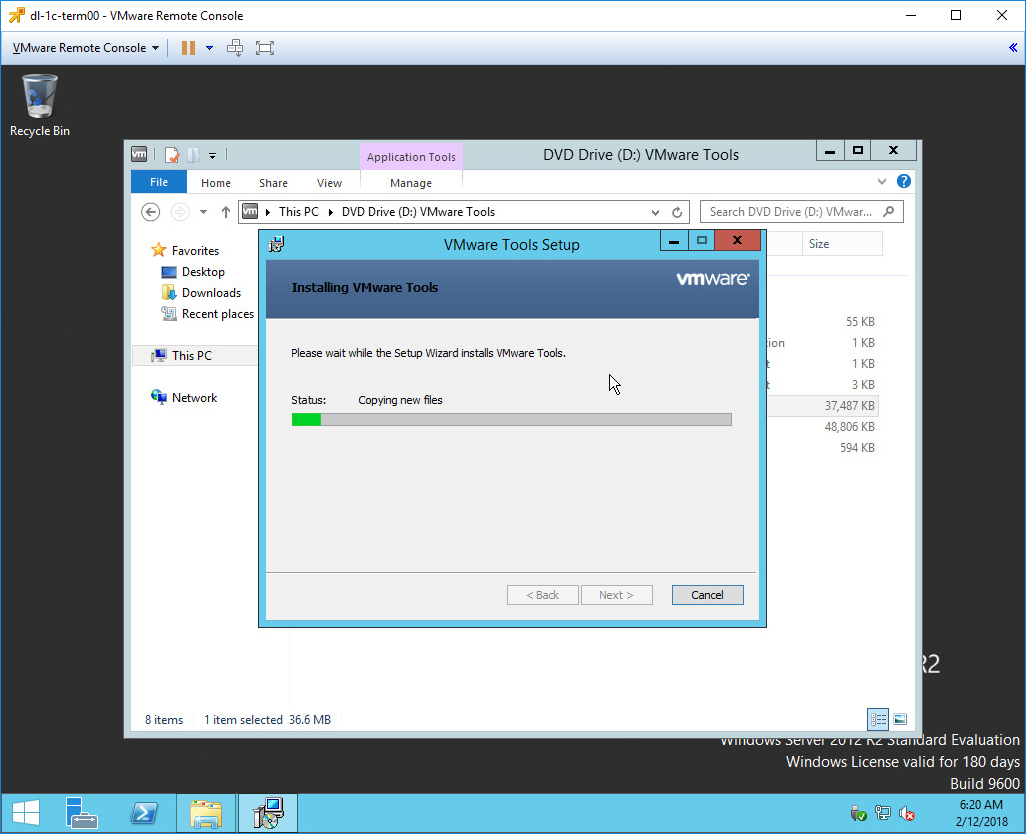
5) Нажмите кнопку Next, затем Typical setup и в конце Install, и начнется установка VMware Tools.
6) Когда статус-бар перестанет двигаться, откройте диспетчер задач (Ctrl-Alt-Ins Start Task Manager)
7) Перейдите на вкладку Приложения(Applications), выберите процесс RUNDLL и выберите «Завершить задачу»(End Task)
8) Закройте диспетчер задач и жмите кнопку OK при появлении любого сообщения об ошибке. Установка продолжится в обычном режиме.
9) Нажмите кнопку Готово и нажмите кнопку Yes, чтобы перезагрузить сервер
Решение 2
Подключите iso с дистрибутивом VMware Tools на Server Core, выбрав команду «Install VMware Tools» из меню клиента VMware, а затем наберите команду в окне консоли:
Установка сетевых драйверов на VMWare в Server Core
Чтобы ваш Server Core, функционирующий в среде VMware, работал полноценно, нужно установить драйвера на сетевые карты. Эти драйвера также идут в комплекте установки VMware Tools
Для начала нужно скопировать VMWareTools (содержится в файле с именем windows.iso) с вашего сервера ESX на локальный диск. Это можно сделать с помощью WinSCP. Используйте Virtual Center, чтобы смонтировать файл windows.iso как CD-диск в виртуальную машину Server Core. Файлы драйверов находятся на диске windows.iso в папке \Program Files\VMWare\VMWare Tools\Drivers\VMXNet\w2k. Для установки сетевого драйвера используется следующая команда
Microsoft PnP Utility
Processing inf : vmxnet.inf
Successfully installed the driver on a device on the system.
Driver package added successfully.
Published name : oem2.inf
Далее удостоверьтесь, что сетевые драйвера установились. Vmxnet должен быть отображен в конце списка.
ws2ifsl Winsock IFS driver Kernel 23/03/2010 04:52:40
vmxnet VMware Ethernet Adapte Kernel 22/04/2010 23:13:11
Install vmware tools windows server
You are using an outdated browser. Please upgrade your browser to improve your experience.
—> share-line
—> —> —> —> plus
Installing VMware Tools is part of the process of creating a new virtual machine, and upgrading VMware Tools is part of the process of keeping your virtual machine up to current standards. Although your guest operating systems can run without VMware Tools, many VMware features are not available until you install VMware Tools. When you install VMware Tools, the utilities in the suite enhance the performance of the guest operating system in your virtual machine and improve the management of your virtual machines.
For information about creating virtual machines, see the documentation for the applicable VMware product.
The installers for VMware Tools are ISO image files. The CD-ROM in your guest operating system detects the ISO image file. Each type of guest operating system, including Windows, Linux, and Mac OS X, has an ISO image file. When you select the command to install or upgrade VMware Tools, the virtual machine’s first virtual CD-ROM disk drive temporarily connects to the VMware Tools ISO file for your guest operating system.
You can use the Windows Easy Install or Linux Easy Install feature to install VMware Tools as soon as the operating system is finished installing.
The most recent versions of the ISO files are stored on a VMware Web site. When you select the command to install or upgrade VMware Tools, the VMware product determines whether it has downloaded the most recent version of the ISO file for the specific operating system. If the latest version has not been downloaded or if no VMware Tools ISO file for that operating system has ever been downloaded, you are prompted to download the file.
Install vmware tools windows server
Guest operating system Windows 2000 and earlier, Windows XP, Windows Server 2003, Windows Vista, and later support VMware Tools.
For Windows 2000 and later, VMware Tools installs a virtual machine upgrade helper tool. This tool restores the network configuration if you upgrade the virtual machine compatibility from ESX/ESXi 3.5 to ESX/ESXi 4.0 and later or from Workstation 5.5 to Workstation 6.0 and later.
Prerequisites
- Power on the virtual machine.
- Verify that the guest operating system is running.
- If you connected the virtual machine’s virtual CD/DVD drive to an ISO image file when you installed the operating system, change the setting so that the virtual CD/DVD drive is configured to autodetect a physical drive.
The autodetect setting enables the virtual machine’s first virtual CD/DVD drive to detect and connect to the VMware Tools ISO file for a VMware Tools installation. This ISO file is detected as a physical CD by your guest operating system. Use the virtual machine settings editor to set the CD/DVD drive to autodetect a physical drive.
Procedure
- On the host, from the Workstation Pro menu bar, select VM > Install VMware Tools .
Results
What to do next
If a new virtual hardware version is available for the virtual machine, upgrade the virtual hardware.
Установка VMware Tools на Windows Server 2012 R2

VMware Tools — бесплатный набор утилит для улучшения взаимодействия виртуальной машины и платформы VMware. Если у вас Windows Server, то рекомендую установить VMware Tools для смены сетевой карты на vmxnet3, меньше глюков. Как показала практика, другие сетевые карты работают не очень стабильно.
Про сбой сети на виртуальной машине Windows Server 2012 R2 в среде VMware можно почитать здесь.
Про установку VMware Tools на Ubuntu можно почитать здесь.
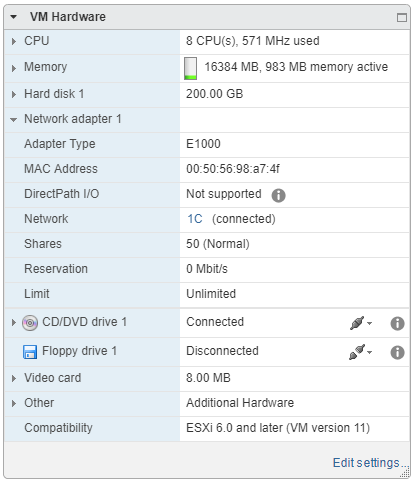
Стандартный тип сетевого адаптера в vCenter 6.0 — E1000.
После долгой эксплуатации на сервере начинаются проблемы — неожиданно пропадает сеть, хотя ОС показывает, что всё в порядке. Но пинги не идут. Помогает disable-enable сетевого адаптера, но для этого необходимо войти на сервер через консоль VMware. Также иногда помогает смена vlan сети, но не всегда. Если заменить сетевой адаптер на vmxnet3 никак нельзя, можно написать простой скрипт, который будет пинговать контроллер домена, и если шлюз недоступен, то передёргивать сеть на сервере.
Проще изменить сетевой адаптер на vmxnet3. Но для этого необходимо установить VMware Tools, что мы и будем делать.
vCenter показывает, если на сервере не стоит утилита:
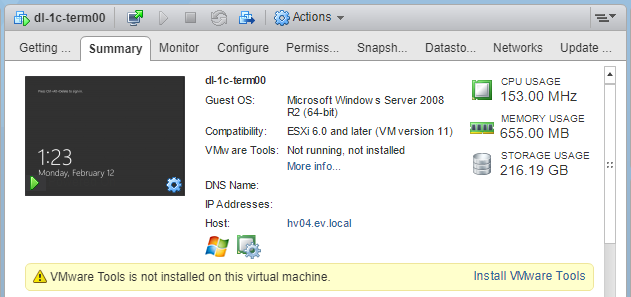
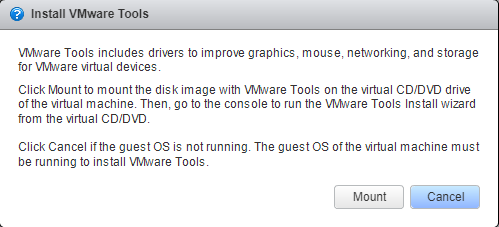
Кликаем Install VMware Tools. vCenter переспрашивает, действительно ли мы хотим примаунтить инсталляционный диск. Соглашаемся.
На виртуальном сервере появляется новый диск.
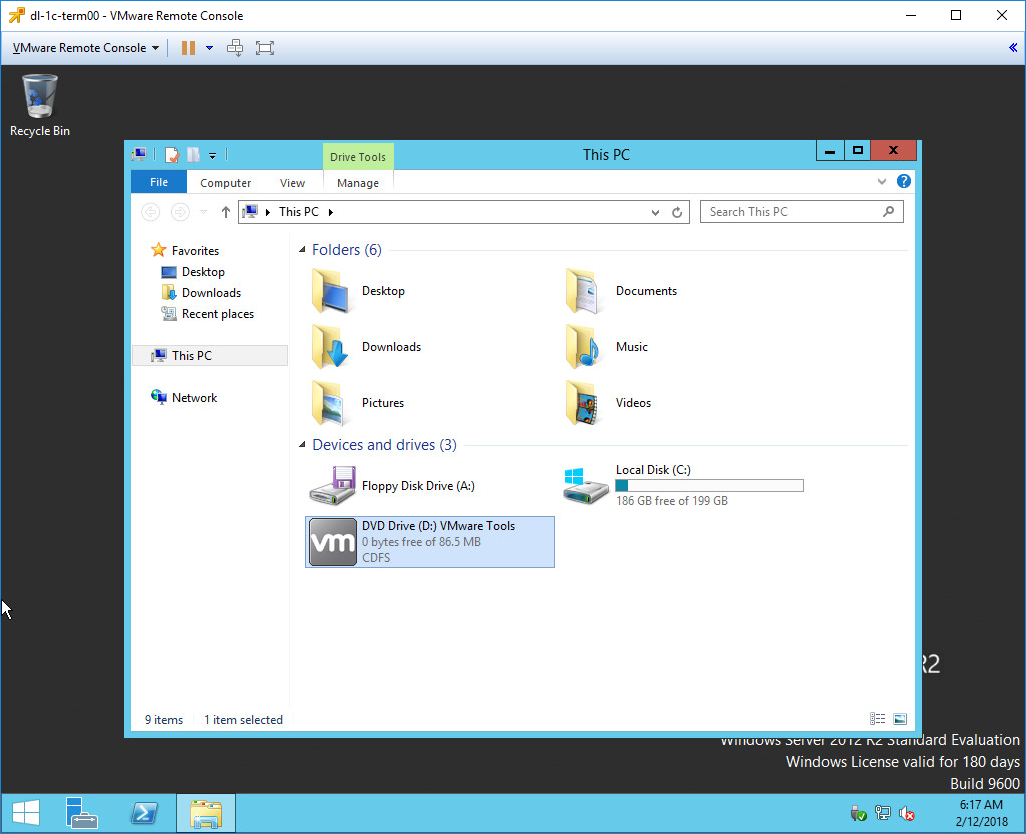
Раскрываем диск и запускаем setup.exe.
Запускается инсталлятор, нажимаем Next.
Выбираем тип установки. Я выбираю Typical — меньше телодвижений. Кастомизация в данном случае меня не интересует, но вы можете при желании выбрать другие типы установки.
Начинается процесс установки.
После окончания установки мы видим экран Completed the VMware Tools Setup Wizard.
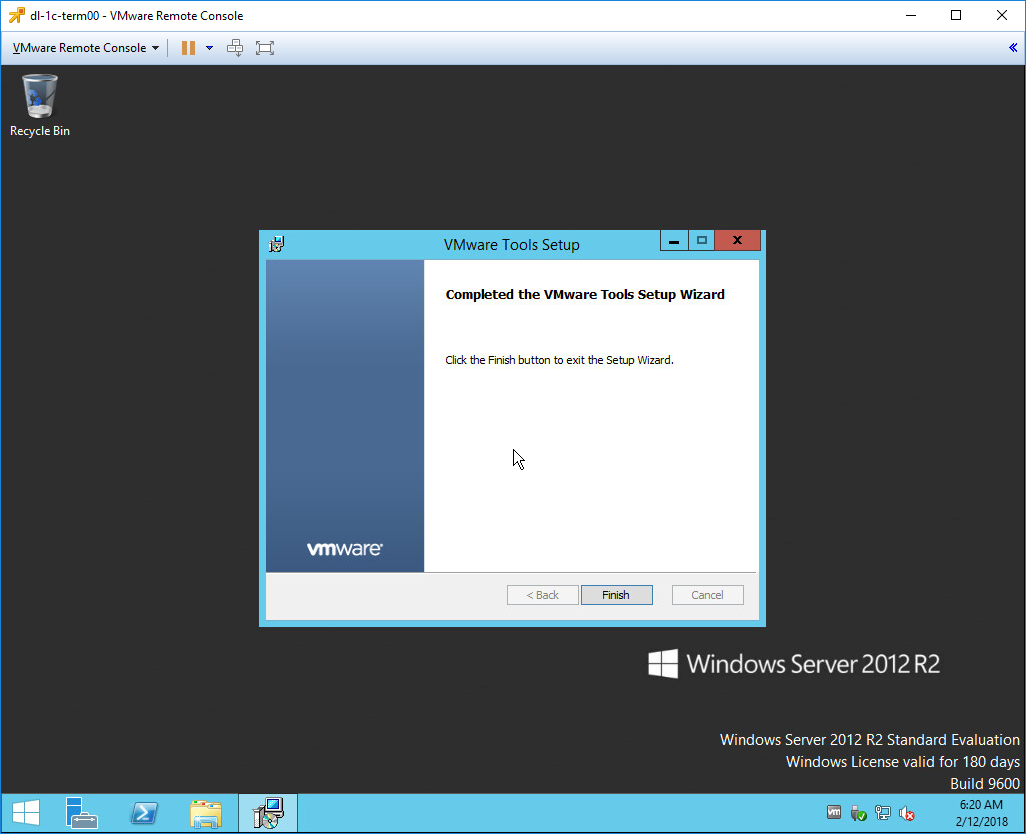
После нажатия на Finish инсталлятор попросит перезагрузку.
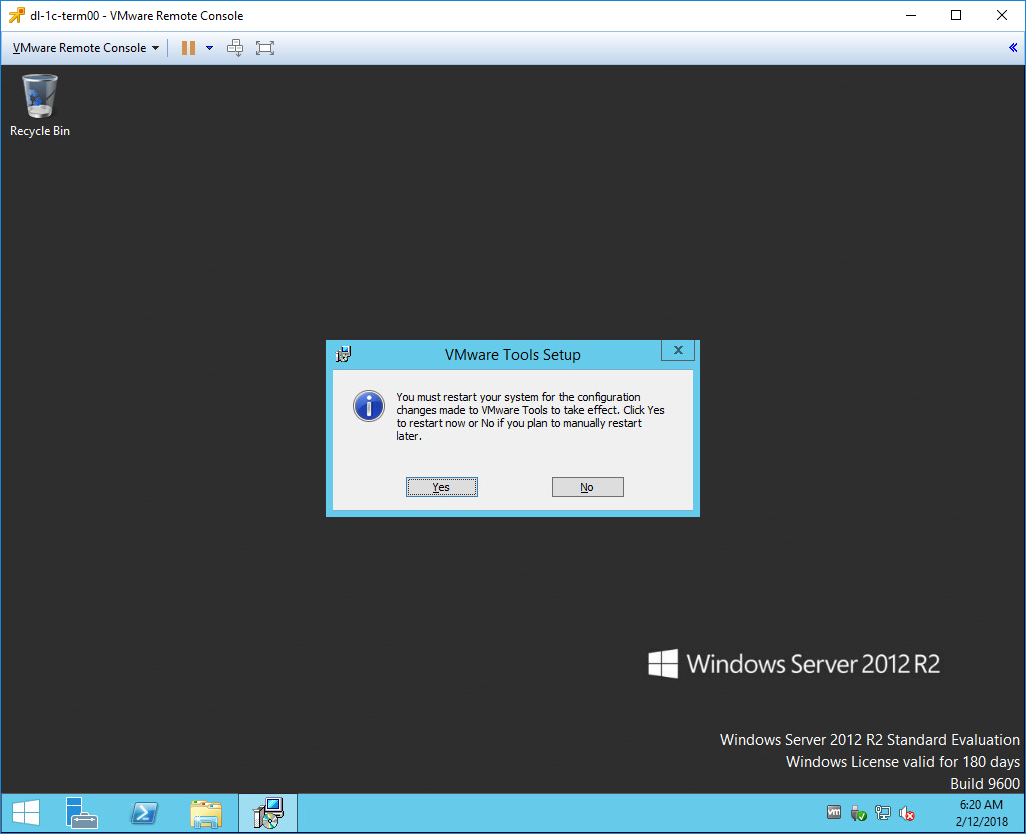
На этом установка VMware Tools на Windows Server 2012 R2 завершена.
VMware Workstation 4
Installing VMware Tools
Installing VMware Tools
The following sections describe how to install VMware Tools:
Don’t Forget VMware Tools
It is very important that you install VMware Tools in the guest operating system.
With the VMware Tools SVGA driver installed, Workstation supports significantly faster graphics performance.
The VMware Tools package provides support required for shared folders and for drag and drop operations.
Other tools in the package support synchronization of time in the guest operating system with time on the host, automatic grabbing and releasing of the mouse cursor, copying and pasting between guest and host, and improved mouse performance in some guest operating systems.
The installers for VMware Tools for Windows, Linux, FreeBSD and NetWare guest operating systems are built into VMware Workstation as ISO image files. (An ISO image file looks like a CD-ROM to your guest operating system and even appears as a CD-ROM in Windows Explorer. You do not use an actual CD-ROM to install VMware Tools, nor do you need to download the CD-ROM image or burn a physical CD-ROM of this image file.)
VMware Tools for Windows supports Windows 95, Windows 98, Windows Me, Windows NT 4.0, Windows 2000, Windows XP and Windows Server 2003 guest operating systems.
When you choose File > Install VMware Tools from the VMware Workstation menu, VMware Workstation temporarily connects the virtual machine’s first virtual CD-ROM drive to the ISO image file that contains the VMware Tools installer for your guest operating system and begins the installation process.
VMware Tools for Windows Guests
VMware Tools for Windows Guests
The detailed steps for installing VMware Tools depend on the version of Windows you are running. The steps that follow show how to install VMware Tools in a Windows XP guest. Some steps that are automated in newer versions of Windows must be performed manually in Windows 9x and Windows NT.
Note: If you are running VMware Workstation on a Windows host, and your virtual machine has only one CD-ROM drive, the CD-ROM drive must be configured as an IDE or SCSI CD-ROM drive. It cannot be configured as a generic SCSI device.
Installing VMware Tools in a Windows Guest Operating System
Installing VMware Tools in a Windows Guest Operating System
- Power on the virtual machine.
- When the guest operating system starts, prepare your virtual machine to install VMware Tools.
Choose File > Install VMware Tools.
The remaining steps take place inside the virtual machine.
- If you have autorun enabled in your guest operating system (the default setting for Windows operating systems), a dialog box appears after a few seconds. It asks if you want to install VMware Tools. Click Yes to launch the InstallShield wizard.
If autorun is not enabled, the dialog box does not appear automatically. If it doesn’t appear, run the VMware Tools installer. Click Start > Run and enter D:\setup\setup.exe where D: is your first virtual CD-ROM drive.
Note: You do not use an actual CD-ROM to install VMware Tools, nor do you need to download the CD-ROM image or burn a physical CD-ROM of this image file. The VMware Workstation software contains an ISO image that looks like a CD-ROM to your guest operating system and even appears as a CD-ROM in Windows Explorer. This image contains all the files needed to install VMware Tools in your guest operating system. When you finish installing VMware Tools, this image file no longer appears in your CD-ROM drive.

Additional Steps for Some Versions of Windows When Migrating from Old Disk Versions
Additional Steps for Some Versions of Windows When Migrating from Old Disk Versions
If you are migrating a VMware Workstation 2 disk to VMware Workstation 4 and your guest operating system is Windows NT, Windows Me, Windows 98 or Windows 95, you need to configure the video driver by hand. Instructions open automatically in Notepad at the end of the installation process. If the Notepad window is hidden, bring it to the front by clicking the Notepad button on the Windows taskbar.
For details, see the steps below that correspond to your guest operating system.
- After installing VMware Tools, click Finish. The Display Properties dialog box appears.
- Click the Display Type button. The Display Type dialog box appears.
- Click the Change button. The Change Display dialog box appears.
- Select VMware, Inc. from the Manufacturer list.
- Select VMware SVGA as the display adapter and click OK.
- Click Yes in response to the on-screen question about third-party drivers to install the driver, then click OK to confirm the drivers were installed.
- Click Close from the Display Type dialog box, then click Close from the Display Properties dialog box.
- Click Yes to restart Windows NT and start using the new video driver.
- The VMware Tools background application is launched automatically when you reboot your virtual machine.
Windows Me
- After installing VMware Tools, click Finish. The Display Settings dialog box appears.
- Click the Advanced button.
- Click the Adapter tab.
- Click the Change button. This starts the Update Device Driver Wizard.
- The wizard now presents two options. Choose the second option to Specify the location of the driver.
Check the Specify a location checkbox. Enter the following path:
D: is the drive letter for the first virtual CD-ROM drive in your virtual machine.
If you are upgrading a virtual machine created under VMware Workstation 2, you may see a dialog box that warns, «The driver you are installing is not specifically designed for the hardware you have. Do you wish to continue?» Click Yes.
After the driver is installed, click Finish.
Windows 98
- After installing VMware Tools, click Finish. The Display Settings dialog box appears.
- Click the Advanced button. The Standard Display Adapter (VGA) Properties dialog box appears. If you are upgrading from a previous version of the VMware drivers, this dialog box is titled VMware SVGA Properties.
- Click the Adapter tab.
- Click the Change button. This starts the Update Device Driver Wizard. Click Next.
- The wizard presents two options. Choose the option to Display a list of all drivers in a specific location. Click Next.
- Select Have Disk. The Install From Disk dialog box appears.
- Enter the following path:
D: is the drive letter for the first virtual CD-ROM drive in your virtual machine.
Windows 95
- After installing VMware Tools, click Finish. The Display Settings dialog box appears.
- Click the Advanced Properties button. The Advanced Display Properties dialog box appears.
- Click the Change button. The Select Device dialog box appears.
- Select Have Disk.
- Enter the following path:
D: is the drive letter for the first virtual CD-ROM drive in your virtual machine.
VMware Tools for Linux Guests
VMware Tools for Linux Guests
- Power on the virtual machine.
- After the guest operating system has started, prepare your virtual machine to install VMware Tools.
Choose File > Install VMware Tools.
The remaining steps take place inside the virtual machine.
- Be sure the guest operating system is running in text mode. You cannot install VMware Tools while X is running.
- As root (su -), mount the VMware Tools virtual CD-ROM image, change to a working directory (for example, /tmp), uncompress the installer, then unmount the CD-ROM image.
Note: You do not use an actual CD-ROM to install VMware Tools, nor do you need to download the CD-ROM image or burn a physical CD-ROM of this image file. The VMware Workstation software contains an ISO image that looks like a CD-ROM to your guest operating system. This image contains all the files needed to install VMware Tools in your guest operating system.
Note: Some Linux distributions use different device names or organize the /dev directory differently. If your CD-ROM drive is not /dev/cdrom, modify the following commands to reflect the conventions used by your distribution.
mount /dev/cdrom /mnt
cd /tmp
tar zxf /mnt/vmware-linux-tools.tar.gz
umount /mnt
Run the VMware Tools installer.
Log out of the root account.
Note: You may run VMware Tools as root or as a normal user. To shrink virtual disks, you must run VMware Tools as root (su -).
Starting VMware Tools Automatically
Starting VMware Tools Automatically
You may find it helpful to configure your guest operating system so VMware Tools starts when you start your X server. The steps for doing so vary depending on your Linux distribution and your desktop environment. Check your operating system documentation for the appropriate steps to take.
For example, in a Red Hat Linux 7.1 guest using GNOME, follow these steps.
- Open the Startup Programs panel in the GNOME Control Center.
Main Menu (click the foot icon in the lower left corner of the screen) > Programs > Settings > Session > Startup Programs
The next time you start X, VMware Tools starts automatically.
Uninstalling VMware Tools
Uninstalling VMware Tools
If you need to remove VMware Tools from your Linux guest operating system, log on as root (su -) and run the following command:
VMware Tools for FreeBSD Guests
VMware Tools for FreeBSD Guests
- Power on the virtual machine.
- Prepare your virtual machine to install VMware Tools.
Choose File > Install VMware Tools.
The remaining steps take place inside the virtual machine, not on the host computer.
- Be sure the guest operating system is running in text mode. You cannot install VMware Tools while X is running.
- As root (su -), mount the VMware Tools virtual CD-ROM image, change to a working directory (for example, /tmp), uncompress the installer, then unmount the CD-ROM image.
Note: You do not use an actual CD-ROM to install VMware Tools, nor do you need to download the CD-ROM image or burn a physical CD-ROM of this image file. The VMware Workstation software contains an ISO image that looks like a CD-ROM to your guest operating system. This image contains all the files needed to install VMware Tools in your guest operating system.
mount /cdrom
cd /tmp
tar zxf /cdrom/vmware-freebsd-tools.tar.gz
umount /cdrom
Run the VMware Tools installer.
Log out of the root account.
Note: You may run VMware Tools as root or as a normal user. To shrink virtual disks, you must run VMware Tools as root (su -).
Note: In a FreeBSD 4.5 guest operating system, sometimes VMware Tools does not start after you install VMware Tools, reboot the guest operating system or start VMware Tools on the command line in the guest. An error message appears:
Shared object 'libc.so.3' not found.
The required library was not installed. This does not happen with full installations of FreeBSD 4.5, but does occur for minimal installations. To fix the problem of the missing library, take the following steps:
- Insert and mount the FreeBSD 4.5 installation CD or access the ISO image file.
- Change directories and run the installation script.
Installing VMware Tools in a NetWare Virtual Machine
Installing VMware Tools in a NetWare Virtual Machine
- Power on the virtual machine.
- Prepare your virtual machine to install VMware Tools.
Choose File > Install VMware Tools.
The remaining steps take place inside the virtual machine.
Load the CD9660.NSS driver so the CD-ROM device mounts the ISO image as a volume. In the system console, type
When the driver finishes loading, you can begin installing VMware Tools. In the system console, type
Restart the guest operating system. In the system console, type


