- Packages and Binaries:
- tightvncserver
- xtightvncviewer
- Установка VNC на Raspberry Pi с установленной ОС Kali Linux
- Install VNC Viewer on Raspberry Pi with Kali Linux
- HOW TO INSTALL VNC VIEWER ON RASPBERRY PI WITH KALI LINUX
- INSTALL VNC VIEWER ON RASPBERRY PI WITH KALI LINUX – CONNECTING
- ENABLING AUTO-START FOR X11VNC
- INSTALL VNC VIEWER ON RASPBERRY PI WITH KALI LINUX – OPTIONAL INSTALL
- удаленный доступ к кали
- s unity
- Pushy
- Pushy
- Pushy
Packages and Binaries:
tightvncserver
VNC stands for Virtual Network Computing. It is, in essence, a remote display system which allows you to view a computing `desktop’ environment not only on the machine where it is running, but from anywhere on the Internet and from a wide variety of machine architectures.
This package provides a server to which X clients can connect and the server generates a display that can be viewed with a vncviewer.
The difference between the tightvncserver and the normal vncserver is the data encoding, optimized for low bandwidth connections. If the client do not support jpeg or zlib encoding it can use the default one. Later versions of vncserver (> 3.3.3r2) support a new automatic encoding that should be equally good as the tightvnc encoding.
Note: This server does not support or need a display. You need a vncviewer to see something. However, this viewer may also be on a computer running other operating systems in the local net.
Installed size: 1.71 MB
How to install: sudo apt install tightvncserver
- libc6
- libjpeg62-turbo
- libx11-6
- perl
- x11-common | xserver-common
- x11-utils
- xauth
- zlib1g
Xtightvnc
An X server providing VNC connectivity
tightvncconnect
Connect a VNC server to a VNC viewer
tightvncpasswd
Set passwords for VNC server
tightvncserver
A wrapper to launch an X server for VNC.
xtightvncviewer
VNC stands for Virtual Network Computing. It is, in essence, a remote display system which allows you to view a computing `desktop’ environment not only on the machine where it is running, but from anywhere on the Internet and from a wide variety of machine architectures.
It is implemented in a client/server model. This package provides a client for X, with this you can connect to a vncserver somewhere in the network and display its content in a window. There are vncserver available for other operating systems.
The difference between the xtightvncviewer and the normal vncviewer is the data encoding, optimized for low bandwidth connections. If the client do not support jpeg or zlib encoding it can use the default one. Later versions of xvncviewer (> 3.3.3r2) support a new automatic encoding that should be equally good as the tightvnc encoding.
Installed size: 192 KB
How to install: sudo apt install xtightvncviewer
- libc6
- libjpeg62-turbo
- libx11-6
- libxaw7
- libxext6
- libxmu6
- libxt6
- zlib1g
Источник
Установка VNC на Raspberry Pi с установленной ОС Kali Linux
 Сегодня мы установим Tight VNC на Raspberry Pi с установленной операционной системой Kali Linux для визуального контроля за системой. Для установки Tight VNC необходимо проделать следующие шаги:
1. Подключиться по SSH к Raspberry Pi введя ip адрес, логин и пароль

2. Далее необходимо вписать команду для загрузки:

Внимание: во время установки будет задан вопрос об установке программы без проверки подлинности (Install these packages without verification [y/N]?). Понадобится ответить «y» на этот вопрос.
3. После окончания установки VNC сервер нужно запустить команду:

Эта команда запустила VNC сервер! В данном случае запущена виртуальная X-сессия, абсолютно аналогично тому, как по команде startx при загрузке при подключенном мониторе. Теперь, когда вы запустите клиент VNC и подключитесь, то будете подключены именно к этому виртуальному рабочему столу.
Наиболее важная часть этой команды- параметр :1. Он определяет номер порта на котором будет запущен процесс VNC . Номер порта может быть любым, но нужно запомнить его, он понадобится при подключении. Еще один важный параметр, это разрешение (в данном случае размер) виртуального рабочего стола. Его можно указать любым, однако не стоит указывать больше, чем реальное разрешение компьютера, с которого осуществляется удаленный доступ.
При первом запуске VNC сервер попросит ввести пароль. Этот пароль нужен будет при подключении к удаленному рабочему столу.
4.Для подключения можно использовать программу UtlraVNC. Введите IP адрес, номер порта (1) и нажмите кнопку Connect
Для автоматического запуска VNC сервера необходимо:
1. ввести следущию команду:
Откроется текстовый редактор в нем добавьте

Только в Kali Linux пользователь “root” в стандартной ОС Rasbian пользователь “ pi ”
Для выхода из nano нажмите Ctrl-X. Затем последует вопрос о необходимости сохранения файла — ответьте Y. И, наконец, подтвердите имя файла нажатием клавиши Enter.
Теперь необходимо установить правильные атрибуты, т.е. сделать файл исполняемым
Источник
Install VNC Viewer on Raspberry Pi with Kali Linux
Using a Raspberry Pi with Kali Linux installed on it can be a powerful, yet portable tool for ethical hackers and security analysts alike. If you are new to the game then you obviously have a bit to learn and fortunately you are in the right place.
Accessing your device remotely can add convenience along with portability. Imagine leaving your Raspberry Pi at a location or building where you plan on testing the vulnerability of the network. You can then access that Raspberry Pi if you install VNC Viewer on Raspberry Pi with Kali Linux. You could be sitting in the comfort of your own home or office while testing the vulnerability of a network miles away from you.
HOW TO INSTALL VNC VIEWER ON RASPBERRY PI WITH KALI LINUX

Since we are performing an action that requires you to have a Raspberry Pi along with an SD card with Kali Linux installed on it we are going to assume that you already viewed our article about how to install Kali Linux on Raspberry Pi 3 with 3.5 inch LCD Screen.
When your Raspberry Pi is properly configured with your Kali Linux installation the first thing that you need to do is make sure your installation is updated. You can update your Kali Linux installation by opening up a terminal and typing:
Now that everything is updated we need to install x11vnc. To install you just need to type into your terminal:
apt-get install x11vnc
After x11vnc is installed we are going to set a password that you will use to access your Raspberry Pi remotely. To set a password type in:

You will be prompted to enter your password and then verify it. It will ask if you want to write the password to /root/.vnc/passwd and you select yes.
After your password is set you need to run x11vnc before you can actually connect to your Raspberry Pi remotely. To start x11vnc you need to type the following into your open terminal:
x11vnc -ncache 10 -auth guess -nap -forever -loop -repeat -rfbauth /root/.vnc/passwd -rfbport 5900
I know what you are thinking. What do all these commands mean and why do I need them? We will go over the commands we use here but if you need to use other commands then you can visit this site for a full list of command line options.
- -ncache: Caches the screen content for rapid retrieval which reduces “lag”.
- -auth guess: Used to guess the XAUTHORITY file for the display
- -nap: Monitors activity and if it is low take longer naps
- -forever: Keeps listening for more connections rather than exiting as soon as the first client(s) disconnect.
- -repeat: VNC clients are connected and VNC keyboard input is not idle for more than 5 minutes. This works around a repeating keystrokes bug (triggered by long processing delays between key down and key up client events: either from large screen changes or high latency).
- -rfbauth passwd-file: Authenticates the password file
- -rfbport port: TCP port for RFB protocol
Now that we have x11vnc running on our Raspberry Pi we need to download a program on our computer that we will be using to access our Raspberry Pi remotely. Head on over to RealVNC and download VNC Viewer and make sure that you download the correct version that corresponds to your operating system. After VNC Viewer is downloaded open it up and enter the details required to connect to your Raspberry Pi. You will need to enter the IP address of your device, followed by a colon, and the port that we will be connecting to.

INSTALL VNC VIEWER ON RASPBERRY PI WITH KALI LINUX – CONNECTING
If you do not know the IP address of your Raspberry Pi you can use the following command in your terminal:
Now that we have details entered into the VNC Viewer GUI we will connect. When you connect you will first see a prompt regarding an unencrypted connection and you can just press “continue”. If you want a secure connection see securing VNC connection on Kali Linux with SSH.
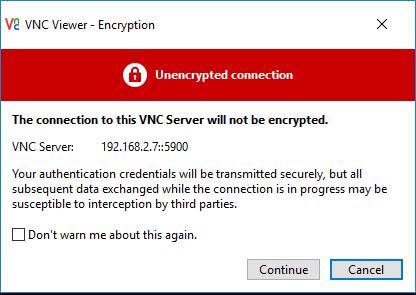
Keep note that your VNC connection is not secure
ENABLING AUTO-START FOR X11VNC
Install VNC Viewer on Raspberry Pi with Kali Linux is now successful but what if you don’t want to manually run x11vnc every time you plan on accessing your Raspberry Pi remotely? If you want x11vnc to auto-start every time you boot up your Raspberry Pi then we need create a new file.
Open up a terminal in Kali and navigate to the “bin” folder by typing:
Now we will create a new file by typing:
With our new file open we need to enter the following:
x11vnc -ncache 10 -auth guess -repeat -nap -loop -forever -rfbauth
# comment this out if you dont want a pop up telling you which port you’re using
zenity —info —text=»Your VNC port is ‘cat
After you have included the above text you need to save the file by pressing “Ctrl+x”, then press “y”, then “Enter”. This file will automatically run x11vnc when your Raspberry Pi boots up. Now we need to set permissions on this file that we just created by using the following command:
chmod 755 /usr/local/bin/sharex11vnc
Now we have to set x11vnc to auto-start on boot using the file we just created. In Kali navigate to Applications >> Settings >> Session and Startup.

When the “Session and Startup” box appears you need to click on the “Application Autostart” tab and click the “add” button. When the “Add application” box appears you need to enter a name (VNC Viewer or a name of your choice), a description (optional), and the command. The command needs to be entered as “x11vnc” without the quotes. When finished click the “OK” button and make sure that “x11vnc” is checked in the “Application Autostart” list. Then close the “Session and Startup” dialog box.

This means a little chunk of extra screen makes the phone just less than 4mm wider, and around 2mm shorter, than the Note 4.
INSTALL VNC VIEWER ON RASPBERRY PI WITH KALI LINUX – OPTIONAL INSTALL
There is another application that you can install that allows you to copy and paste text between applications. This can be very beneficial and time-saving if you plan on using the copy and paste commands frequently.
You can install this application by opening up a terminal session in Kali and entering:
apt-get install autocutsel
After it is installed you need to navigate to Applications >> Settings >> Session and Startup again and add “autocutsel” to the list of auto-start applications using the same procedure for adding x11vnc.
Источник
удаленный доступ к кали

s unity
Pushy
Pushy
УСТАНАВЛИВАЕМ СЕРВЕР OpenSSH
# apt-get install openssh-server
Есть два варианта запуска службы SSH:
ssh.service — служба SSH всегда будет запущена
ssh.socket — система откроет для прослушивания 22-й порт и будет ожидать подключение к нему.
Второй вариант является более предпочтительным.
Для запуска службы SSH в Kali Linux:
$ sudo systemctl start ssh.socket
Для добавления службы в автозагрузку:
$ sudo systemctl enable ssh.socket
Для проверки состояния службы:
$ systemctl status ssh.socket
Ключи SSH, которые устанавливаются по умолчанию, представляют собой огромную уязвимость,
так как каждый может их угадать.
Давайте изменим их, выполнив в терминале следующие команды:
Меняем ключи при помощи следующей команды:
Для пересоздания ключей сначала удалим старые ключи:
# cd /etc/ssh/
# rm /etc/ssh/ssh_host_*
Переконфигурируем пакет SSH сервера:
# dpkg-reconfigure openssh-server
Перезапустим SSH сервер:
$ sudo /etc/init.d/ssh restart
или
$ sudo service ssh reload
Теперь перенастроим SSH — ЗАПРЕТИМ ДОСТУП ПО ПАРОЛЮ И РАЗРЕШИМ ПО КЛЮЧУ:
Редактируем стандартный конфиг:
# nano /etc/ssh/sshd_config
Нас интересуют следующие строчки, они должны быть раскоментированы (Без знака # в начале)
и иметь соответствующие значения:
PermitRootLogin — в целях безопасности предпочитаемое значение — no.
Параметр позволяющий или запрещающий вход на сервер пользователем root.
PermitRootLogin yes
либо
PermitRootLogin no
Запрещать заходить пользователю root на машину можно после того, как создан другой пользователь.
Иначе на машину невозможно будет зайти по протоколу ssh,
придётся управлять малинкой непосредственно с клавиатуры и монитора.
Теперь надо бы перезапустить сервер SSH, чтобы он подтянул новые изменения.
$ sudo service ssh reload
# ssh -l ИМЯПОЛЬЗОВАТЕЛЯ ip -pПОРТ
либо
# ssh [email protected] -pПОРТ
АВТОРИЗАЦИЯ SSH ПО КЛЮЧУ
ОТКЛЮЧАЕМСЯ ОТ RaspberryPI.
И на локальной машине (с которой заходим) выполняем команду:
ssh-keygen -t rsa
Опять без предварительного подключения, выполняем команду на удалённой машине (IP и имя пользователя поменяйте на свои):
ssh [email protected] mkdir .ssh
Теперь нам нужно скопировать содержимое файла id_rsa.pub на удалённую машину.
Сделать это очень просто (не забываем менять данные на свои):
cat .ssh/id_rsa.pub | ssh [email protected] ‘cat >> .ssh/authorized_keys’
После этого подключаемся как обычно, но вход уже не будет требовать пароль:
ssh [email protected]
]
└──╼ $ssh [email protected]
Linux kali 4.19.66-Re4son-v8+ #1 SMP PREEMPT Sun Aug 18 12:14:35 UTC 2019 aarch64
ПРИМЕЧАНИЕ:
Загрузить ключ на сервер: id_rsa.pub и переименовать его в .ssh/authorized_keys:
cat .ssh/id_rsa.pub | ssh [email protected] ‘cat >> .ssh/authorized_keys’
(На клиенте) Получить закрытый ключ с сервера
scp [email protected]:.ssh/authorized_keys
scp [email protected]:
Pushy
УСТАНОВКА VNC СЕРВЕРА, и настройка его работы.
Проверим, установлен ли ?
Ищем в репозиториях
# apt-cache search vnc
Устанавливем сервер на малине
# apt-get install x11vnc
После установки x11vnc мы установим пароль, который вы будете использовать для удаленного доступа к Raspberry Pi.
Чтобы задать тип пароля, введите:
# x11vnc -storepasswd
Вам будет предложено ввести пароль, а затем проверить его.
Он спросит, хотите ли вы написать пароль в /root/.vnc / passwd и вы выбираете y.
После того, как ваш пароль установлен, вам нужно запустить x11vnc,
прежде чем вы сможете удаленно подключиться к Raspberry Pi.
Чтобы запустить x11vnc, вам нужно ввести следующее в ваш открытый терминал:
# x11vnc -ncache 10 -auth guess -nap -forever -loop -repeat -rfbauth /root/.vnc/passwd -rfbport 5900
— — ncache: кэширует содержимое экрана для быстрого извлечения, что уменьшает «отставание».
— auth guess: используется для угадывания файла XAUTHORITY для отображения
— nap: контролирует активность, и если она низкая, возьмите более длительный сон
— forever: продолжает прослушивать больше соединений, а не выходить, как только первый клиент(ы) отключится.
— repeat: клиенты VNC подключены, и ввод клавиатуры VNC не простаивает более 5 минут. Это работает вокруг повторяющейся ошибки нажатия клавиш (вызванной длительными задержками обработки между событиями клиента key down и key up: либо от больших изменений экрана, либо с высокой задержкой).
— rfbauth passwd-file: аутентифицирует файл пароля
— rfbport: порт TCP для протокола RFB
Теперь, когда у нас есть x11vnc работает на нашем Raspberry Pi
нам нужно скачать программу на вашем компьютере, который мы будем использовать
для удаленного доступа к нашей Raspberry Pi.
Перейдите к RealVNC и загрузите VNC Viewer и убедитесь, что вы загружаете правильную версию,
соответствующую вашей операционной системе.
После загрузки VNC Viewer откройте его и введите сведения, необходимые для подключения к Raspberry Pi.
Вам нужно будет ввести IP-адрес вашего устройства,
а затем двоеточие и порт, к которому мы будем подключаться.
Cкачать пакет отсюда:
Выбрать 64 битную архитектуру.
Установить пакет командой:
# sudo dpkg -i VNC-Viewer-6.19.715-Linux-x64.deb
# sudo dpkg -i имя_пакета.deb
Подключиться командой:
# vncviewer
ВКЛЮЧЕНИЕ АВТОЗАПУСКА ДЛЯ X11VNC
Установка VNC Viewer на Raspberry Pi с Kali Linux теперь успешна,
но что делать, если вы не хотите вручную запускать x11vnc каждый раз,
когда вы планируете удаленно получить доступ к Raspberry Pi?
Если вы хотите, чтобы x11vnc автоматически запускался каждый раз,
когда вы загружаете свой Raspberry Pi, нам нужно создать новый файл.
Откройте терминал в Кали и перейдите в папку “bin”, введя:
# cd /usr/local/bin
Теперь мы создадим новый файл, введя:
# nano sharex11vnc
С нашим новым открытым файлом нам нужно ввести следующее:
#!/bin/sh
x11vnc -ncache 10 -auth guess -repeat -nap -loop -forever -rfbauth
/.vnc/port.txt
# прокомментируйте это, если вы не хотите, чтобы всплывающее окно сообщало вам, какой порт вы используете
zenity —info —text=»Your VNC port is ‘cat
/.vnc/port.txt'»
После того, как вы включили вышеуказанный текст, вам нужно сохранить файл, нажав “Ctrl+x”,
затем нажмите “y”, затем “Enter”.
Этот файл будет автоматически запускаться x11vnc, когда ваш Raspberry Pi загружается.
Теперь нам нужно установить разрешения на этот файл, который мы только что создали
с помощью следующей команды:
# chmod 755 /usr/local/bin/sharex11vnc
Теперь мы должны установить x11vnc для автозапуска при загрузке с помощью файла, который мы только что создали.
В Kali перейдите к Applications >> Settings >> Session and Startup.
Когда появится окно «сеанс и запуск», вам нужно нажать на вкладку «автозапуск приложения “ и нажать кнопку” Добавить».
Когда появится поле «добавить приложение», вам нужно ввести имя x11vnc
(VNC Viewer или имя по вашему выбору), описание (необязательно)
и команду /usr/bin/x11vnc.
Команда должна быть введена как «x11vnc» без кавычек.
После завершения нажмите кнопку «ОК “и убедитесь, что” x11vnc “проверяется в списке” автозапуск приложения».
Затем закройте диалоговое окно «сеанс и запуск».
Существует еще одно приложение, которое можно установить,
что позволяет копировать и вставлять текст между приложениями.
Это может быть очень полезно и экономит время, если вы планируете использовать команды копирования
и вставки часто.
Вы можете установить это приложение, открыв сеанс терминала в Кали и введя
# apt-get install autocutsel
После его установки вам нужно перейти к Applications >> Settings >> Session and Startup
снова и добавить «autocutsel» в список автоматически запускаемых приложений,
используя ту же процедуру для добавления x11vnc.
ВНИМАНИЕ:
Добавлять в автозагрузку нужно для каждого пользователя отдельно .
Отдельно для root
и отдельно для user.
Источник


