- Установка Windows после Ubuntu 18.04
- Первые проблемы от монтирования коренного dev/sda1
- Самый простой и безотказный способ создать новый раздел
- Установка еще одной версии Ubuntu и создания нового раздела
- Загрузчик Windows
- Куда пропал GRUB после установки windows
- Ubuntu Documentation
- Using the Ubuntu CD (Recommended)
- The graphical way
- The terminal way
- Using the Ubuntu Alternate CD
- See also
- Can I install Windows after installing Ubuntu on UEFI? [duplicate]
- Ubuntu Documentation
- Introduction
- Back Up Your Data
- Have a Windows recovery CD/DVD available
- Getting Recovery Media
- Install Ubuntu after Windows
- Install Ubuntu
- Automatic partition resizing (not recommended)
- Manual partitioning
- Master Boot Record and Boot Manager
- Installing Windows After Ubuntu
- Recovering GRUB after reinstalling Windows
- Master Boot Record backup and replacement
- Also see
Установка Windows после Ubuntu 18.04
Всем привет! Хочу поделиться опытом по установки windows после ubuntu, с возможностью оставить загрузчик GRUB и вашу версию Ubuntu.
Вообще я очень люблю Linux, и когда я только с ним познакомился, не совсем понимал его особенности, но все как говориться приходит с опытом. Не давно я купил новый компьютер и по старой традиции решил установить на весь жесткий диск Ubuntu, за долгое время работы на Linux я абсолютно разучился делать что то серьезное на Windows, я думаю что есть люди которые меня поймут)) В какой то момент мне понадобился Adobe XD для UX и UI дизайна мобильных интерфейсов, но вот задачка он идет только на MAC И Windows.
Первые проблемы от монтирования коренного dev/sda1
Перед установкой загрузчика windows нужно разметить диск, есть стандартная и пожалуй лучшая утилита GParted. Для начала нужно разметки диска его нужно от монтировать sda1, и тут возникает ошибка:

В этой ситуации я пробовал от монтировать его через терминал использую различные методы прочитанные в интернете, но все оказалось без полезно. Дело в том что это- корневой диск, и на нем запущен процесс, если бы у меня было несколько разделов, то все должно было бы получиться. Я так же пробовал использовать swap подкачку, но и это не дало результатов, кто то скажет «чувак это можно сделать через BIOS». Да согласен но моя версия BIOS старая и на ней нет возможности вносить изменения в жесткий диск.
Самый простой и безотказный способ создать новый раздел
Не доводя дело до фанатизма я смекнул, что будет если установлю еще одно версию Ubuntu, с помощью установщика выделю отдельный раздел, после установки форматирую его, поменяю файловую систему раздела под windows, и наконец установлю загрузчик windows. Ну как вам идейка? По моему не плохо.
Установка еще одной версии Ubuntu и создания нового раздела
Для начала выберите версию ubuntu, посмотрите их здесь После того как вы загрузите iso файл, его можно распаковать с помощью стандартной программы ‘ загрузочный диск ‘. вам тут даже флешка не нужна, но рекомендую на нее записать iso файл, позже я скажу зачем.
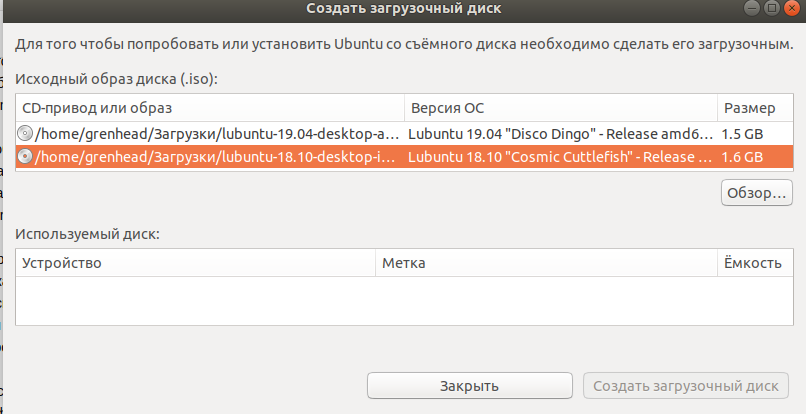
Теперь когда вы при установки Ubuntu дошли до раздела, » разметка жесткого диска » Выберите сколько места вам нужно в разделе sda2. После установки ubuntu, в утилите GParted вы увидите 2 раздела, sda1, sd2. Скорее всего новый раздел будет sda2, вам нужно будет выбрать пункт в меню GParted ‘ форматировать в ‘.
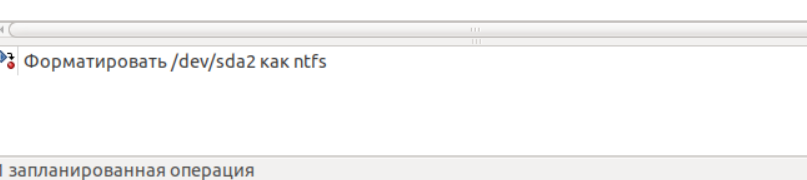
На рисунки выше показан формат ntfs, он как раз рассчитан под файловую систему windows.
Загрузчик Windows
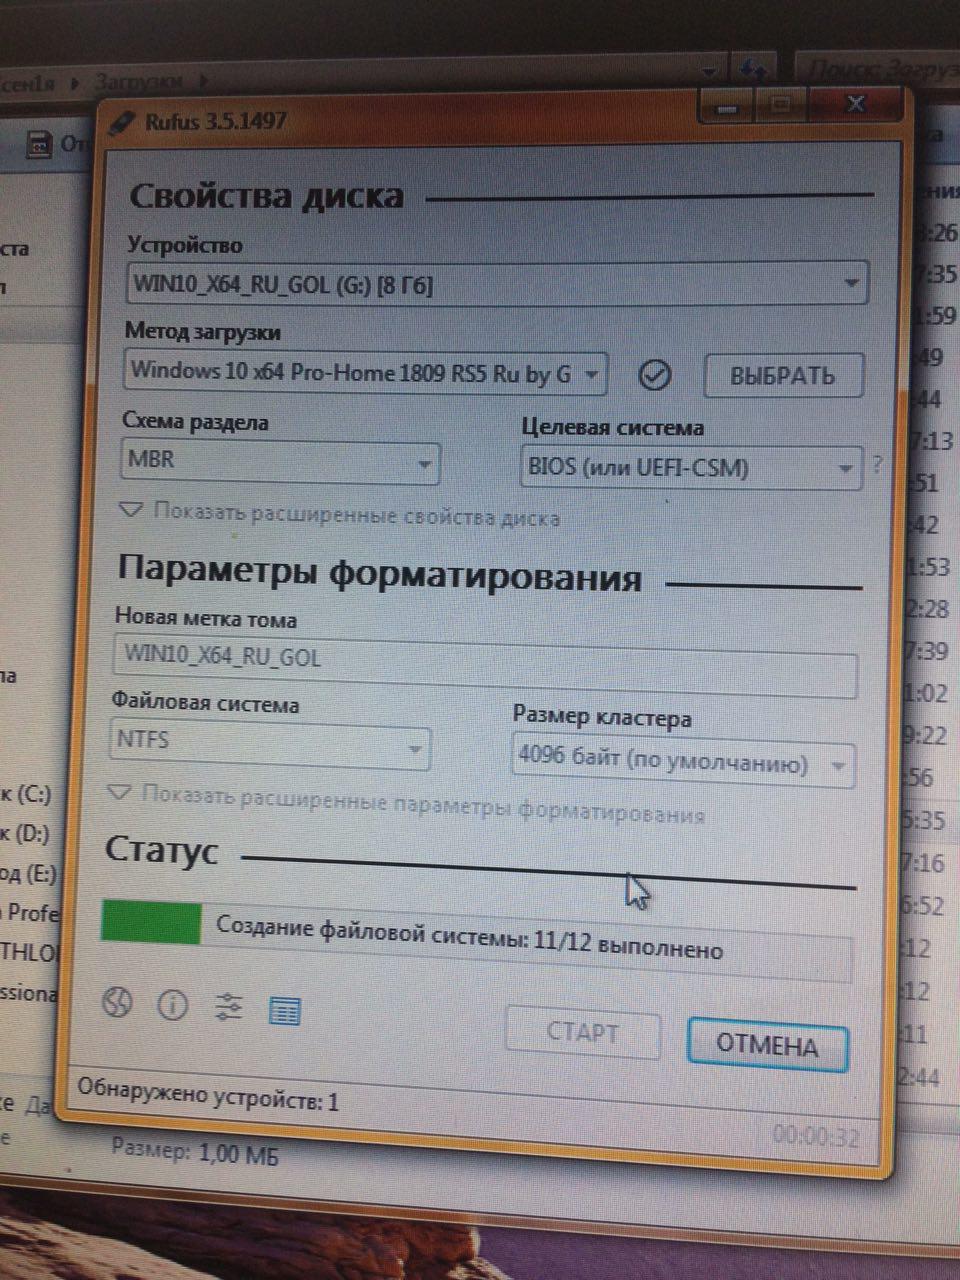
Теперь возьмите другою флешку, и запишите на нее iso файл, для распаковки iso файлов под linux существуют различные утилиты. например DD, UNETBOOTIN, ETCHER, YUMI, но так как у моей сестры был windows, я не стал сильно в них разбираться и воспользовался Rufus. Эта утилита идет только на windows, но она самая простая в использовании, очень важный момент при записи загрузочного диска ubuntu, на рисунки ниже показано как должны выглядеть настройки, потому что вы с linux на windows записываете, а не на оборот, иначе при запуски загрузчика windows, BIOS его не уведет ubuntu, и не забудьте в BIOS указать приоритет USB.
Куда пропал GRUB после установки windows
Когда вы начали установку Windows не забудьте установить его рядом с ubuntu в раздел 2, не небу подробно говорить об установки windows. Я расскажу о том как вернуть GRUB, так как вы установили windows при включении компьютера, он вам почему то не предлагает выбрать операционную систему, а автоматически заходит windows. Помните я говорил о первой флешки, тут то она и нужна, есть 2 варианта. Первый выделить 10-15 GB под вторую Ubuntu, а после установки форматировать этот раздел, второй вариант, если же основная ubuntu для вас не важна, просто установите ее заново рядом с windows.
Надеюсь эта статья была для вас полезной, если вам что то не понятно или у вас есть способ на много проще, пишите обсудим
Данная статья не подлежит комментированию, поскольку её автор ещё не является полноправным участником сообщества. Вы сможете связаться с автором только после того, как он получит приглашение от кого-либо из участников сообщества. До этого момента его username будет скрыт псевдонимом.
Ubuntu Documentation
This page documents how to restore or recover the boot-loader (GRUB) after installing Windows. Some reasons to repair your boot-loader might include installing Microsoft Windows after you have installed Ubuntu, adding or removing a hard drive, or changing hard drive settings.
Note: this tutorial does not apply if you had installed Ubuntu inside Windows (via the Wubi installer). In this case, please read this page.
Using the Ubuntu CD (Recommended)
The graphical way
- Insert your Ubuntu CD, reboot your computer and set it to boot from CD in the BIOS and boot into a live session. You can also use a LiveUSB if you have created one in the past.
Install and run Boot-Repair
The terminal way
* Open a terminal. As of Ubuntu 11.10 and 11.04, this can be done by opening the Unity Dash (you can click the Ubuntu logo in the top panel or use the Windows key on your keyboard) and typing in «Terminal», and clicking what comes up. On earlier versions, you can achieve this by going to Applications -> Accessories -> Terminal. Alternately use the Keyboard Shortcut: CTRL + ALT + T.
For full details on using terminal to fix grub on hard drive from Live Installer DVD or Flash: https://help.ubuntu.com/community/Grub2/Installing#via_the_LiveCD_terminal
- You are then presented with a standard bash prompt, type — this only works to reinstall to MBR of a working system:
where XXX is the device of your Ubuntu install. (eg: grub-install /dev/sdb). Hint: You can also use /dev/disk/by-label/ if the partition you installed on has a label. You can determine the /dev node for such a device by running:
This will give the output of something like:
You can also use fdisk if you do not see the /dev/disk/by-label:
From here, find only the drive name, ignore the partition number, that is, for partitions labeled «root», «data2», «fat», «home» and «swap» it’s all still just sda. This is due to the fact that GRUB is installed in the MBR of the drive, and not on a partition.
Trouble? If other things are messed up, e.g. if you have deleted the partition from where Grub was previously installed, grub-install may return an error message such as «cannot find a device for /. (is /dev mounted?)». You may have to do grub-install a bit differently. Refer to the handy guide on fixing a broken system
Now reboot your system. The usual GRUB boot menu should appear. If it does not, hold Left Shift while booting. You will be able to choose between Ubuntu and Windows.
Using the Ubuntu Alternate CD
- Boot your system from the Ubuntu Alternate CD.
When the Ubuntu splash screen comes up with the boot: prompt, type in rescue and press enter.
At this stage you are presented with a screen where you can select which partition is your root partition (there is a list of the partitions on your hard drive, so you are required to know which partition number Ubuntu is on). This will be dev/discs/discY/partX, where the X is a partition number and Y is the number of the drive.
See also
RecoveringUbuntuAfterInstallingWindows (последним исправлял пользователь mcchots 2015-01-27 14:44:04)
The material on this wiki is available under a free license, see Copyright / License for details
You can contribute to this wiki, see Wiki Guide for details
Can I install Windows after installing Ubuntu on UEFI? [duplicate]
Can I do this? I’ve heard that you’re supposed to install Ubuntu after Windows, as Windows will destroy the bootloader and try to shove itself in as THE OS.
In BIOS, you could only have one bootloader in the MBR, and Windows would obviously overwrite it with its bootloader, and then I would have to get my Ubuntu DVD or USB and use the boot-repair tool from a ppa or do the repair manually.
In the UEFI though, I’ve heard it can support multiple bootloaders, all stored in a proper partition called the EFI partition, formatted with a proper filesystem, FAT32. Could Windows just add its bootloader into the EFI partition and be done, no overwriting? Or will it still force itself and destroy or not recognize the partition? Will I need to do a boot-repair (or chroot) or not?
EDIT: This is not a duplicate of «How can I install Windows after I’ve installed Ubuntu?» because that question and topic mostly handled MBR/BIOS booting. While I added my answer on there, the original question, and how it was mostly answered, mostly covered MBR/BIOS booting, which is quite different from UEFI/GPT booting. This allows a specific question and answer dedicated to the topic of UEFI booting, which in this context is so rarely covered. Doesn’t help that I feel many newer Ubuntu users install in UEFI only if forced by Windows in a dual boot, and many will avoid it in a single-boot situation to deal with the more familiar concept of BIOS/MBR booting.
Ubuntu Documentation
Introduction
This page describes how to set up your computer in order to dual boot Ubuntu and Windows. While there are some benefits to dual-booting (e.g. better performance for a native install), it is not recommended. Instead, it is best to do a native install of Ubuntu, and then virtualize the other operating system.
Back Up Your Data
Although this may seem obvious, it is important to back up your files to an external backup medium before attempting a dual-boot installation (or any other hard drive manipulation), in case your hard drive becomes corrupted during the process. External hard drives, USB flash drives, and multiple DVDs or CDs are all useful for this purpose.
Have a Windows recovery CD/DVD available
Some computer manufacturers that pre-install Windows provide a Windows recovery/re-installation CD or DVD with the computer. However, many companies no longer ship a physical disc but instead create a hidden partition on the hard drive in which the recovery-disk information is stored. A utility is then usually provided which allows the user to burn a recovery/re-installation CD or DVD from it. If you are buying a new computer and intend on dual-booting, make sure you have (or can make) a physical Windows recovery/re-installation CD or DVD. If neither a CD/DVD nor a recovery partition/burning utility is provided by your computer manufacturer, you may need to contact your vendor and ask for a CD or DVD (to which you are normally entitled under the Windows EULA).
Getting Recovery Media
You may need to request a physical recovery/re-installation CD or DVD directly from your computer manufacturer. See WindowsRecoveryCd.
Once you have created a physical backup disc from a restore-image partition on the hard-drive, the restore-image partition can either be removed or left in place. Ubuntu can be installed with it intact without problems.
Install Ubuntu after Windows
A Windows OS should be installed first, because its bootloader is very particular and the installer tends to overwrite the entire hard drive, wiping out any data stored on it. If Windows isn’t already installed, install it first. If you are able to partition the drive prior to installing Windows, leave space for Ubuntu during the initial partitioning process. Then you won’t have to resize your NTFS partition to make room for Ubuntu later, saving a bit of time.
When a Windows installation already occupies the entire hard drive, its partition needs to be shrunk, creating free space for the Ubuntu partition. You can do this during the Ubuntu installation procedure, or you can see How to Resize Windows Partitions for other options.
If you have resized a Windows 7 or Vista partition and cannot boot up Windows, you can use the instructions from WindowsRecovery to fix it.
Install Ubuntu
Download an Ubuntu LiveCD image (.iso) from Ubuntu Downloads and burn it to a disc (see BurningIsoHowto).
Automatic partition resizing (not recommended)
- Choose the first option, which should say «Install them side by side, choosing between them each startup».
- Specify the size of the new partition by dragging the slider at the bottom of the window.
- Click on «Forward».
Manual partitioning
- Choose «Manually edit partition table».
- Listed will be your current partitions.
- Select the partition you want to resize and press Enter.
- Select «Size:», press Enter.
- Select Yes, press Enter.
- Type in a new size in gigabytes for your partition, it’s recommended you free up at least 10 GB of free space for your Ubuntu install. Press Enter when happy with your changes. It may take some time to apply the changes.
Create a swap partition of at least your amount of RAM (if you don’t know, 8000 MB is a good value).
Create a partition for your Ubuntu installation.
Create other partitions if necessary: see DiskSpace
Master Boot Record and Boot Manager
GRUB2 is the boot manager installed in Ubuntu by default. GRUB2 is an open source boot manager that install the main parts of the boot loaders inside Ubuntu. This means Ubuntu is independent and avoids any need for writing to other operating systems. To accomplish this, the only thing in your computer outside of Ubuntu that needs to be changed is a small code in the MBR (Master Boot Record) of the first hard disk, or the EFI partition. The boot code is changed to point to the boot loader in Ubuntu. You will be presented with a list of operating systems and you can choose one to boot. If you do nothing the first option will boot after a ten second countdown. If you select Windows then GRUB or LILO will chain-load Windows for you at the Windows boot sector, which is the first sector of the Windows partition.
Windows Vista no longer utilizes boot.ini, ntdetect.com, and ntldr when booting. Instead, Vista stores all data for its new boot manager in a boot folder. Windows Vista ships with an command line utility called bcdedit.exe, which requires administrator credentials to use. You may want to read http://go.microsoft.com/fwlink/?LinkId=112156 about it.
Using a command line utility always has its learning curve, so a more productive and better job can be done with a free utility called EasyBCD, developed and mastered during the times of Vista Beta. EasyBCD is very user friendly and many Vista users highly recommend it.
Installing Windows After Ubuntu
There are two different approaches:
Recovering GRUB after reinstalling Windows
Please refer to the Reinstalling GRUB2 guide.
Master Boot Record backup and replacement
This method does not work for computers with UEFI boot. In consequence, it won’t work for pre-installed Windows 8 and some pre-installed with Windows 7.
Back-up the existing MBR, install Windows, replace your backup overwriting the Windows boot code:
- Create an NTFS partition for Windows (using fdisk, GParted or whatever tool you are familiar with)
Backup the MBR e.g. dd if=/dev/sda of=/mbr.bin bs=446 count=1
Install Windows
Boot into a LiveCD
Mount your root partition in the LiveCD
Restore the MBR e.g. dd if=/media/sda/mbr.bin of=/dev/sda bs=446 count=1
Also see
MultiOSBoot — How to boot more than two operating systems from a single hard drive.
WindowsDualBoot (последним исправлял пользователь tobefree 2015-06-29 08:09:22)
The material on this wiki is available under a free license, see Copyright / License for details
You can contribute to this wiki, see Wiki Guide for details


