- Установка приложений с помощью менеджера пакетов PowerShell
- Модуль PackageManagement
- Провайдеры пакетов
- Установка приложений из репозитория Chocolatey
- Удаление пакета
- Restore Windows Store in Windows 10 after uninstalling it with PowerShell
- Reinstall the Microsoft Store app
- Method 1: Using PowerShell
- Method 2: Download the Microsoft Store installer (Appx package)
- Getting the error 0x80073D05?
- Verify the Microsoft Store app info using PowerShell (Optional)
- Install Windows 10 apps using PowerShell
- How to reinstall windows 10 apps using PowerShell:
- 10 steps to install Windows 10 Apps Using PowerShell :
- Verdict:
Установка приложений с помощью менеджера пакетов PowerShell
В состав Windows 10 разработчики включили новый PowerShell модуль с именем PackageManagement. Модуль PackageManagement (ранее назывался OneGet) позволяет из консоли PoSh устанавливать, управлять и удалять приложения и программы из некого внешнего (или локального) репозитория, а также управлять списком подключенных репозиториев. Проще говоря, в Windows 10/ Windows Server 2016 появилась возможность устанавливать программы из командной строки по аналогии с известной командой Linux apt-get install.
Модуль менеджера пакетов PackageManagement позволяет существенно упростить процедуру установки нового ПО. Вся установка по сути сводиться к выполнению одной команды PowerShell, и, самое главное, пользователю не нужно самостоятельно искать в интернете и выкачивать дистрибутивы софта, рискуя скачать устаревшую или зараженную версию. Установка проводится из доверенного источника программ. При обновлении программного обеспечения в репозитории, оно может быть автоматически обновлено на клиентах.
Модуль PackageManagement
Модуль PackageManagement уже встроен в Windows 10, а для его работы требуется PowerShell 5. Поэтому для работы менеджера пакетов в Windows 8.1 нужно сначала установить Windows Management Framework 5.0. Также Microsoft выпустила отдельный модуль для работы менеджера пакетов и на PowerShell версий 3 и 4.
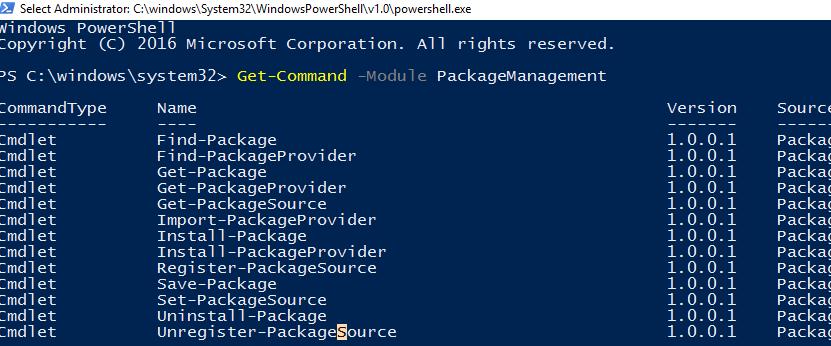
Выведем список доступных командлетов PowerShell в модуле PackageManagement:
Get-Command -Module PackageManagement
В текущей версии модуля (v 1.0.0.1) имеются такие команды:
- Find-Package — поиск пакета (программы) в доступных репозиториях
- Get-Package — получить список установленных пакетов
- Get-PackageProvider — список провайдеров (поставщиков пакетов), доступных на компьютере
- Get-PackageSource — список доступных источников пакетов
- Install-Package — установить пакет (программу) на компьютере
- Register-PackageSource — добавить источник пакетов для провайдера
- Save-Package — сохранить пакет локально без его установки
- Set-PackageSource — задать провайдер в качестве источника пакетов
- Uninstall-Package — удалить программу (пакет)
- Unregister-PackageSource — удалить поставщика из списка источников пакетов
Провайдеры пакетов
Пакеты обслуживаются различными провайдерам, которые могут получать пакеты из разных источников. Чтобы вывести список всех доступных провайдеров, выполните:
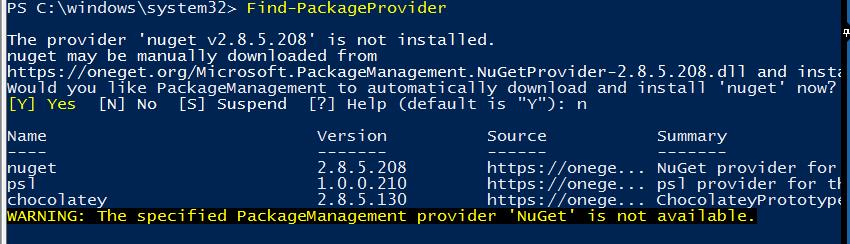 По умолчанию в системе имеются 2 установленных источника пакетов: nuget.org и PSGallery (официальная онлайн галерея скриптов PowerShell от MSFT). Но они предназначены в первую очередь для программистов и системных администраторов.
Чтобы получить доступ к каталогу прикладного ПО, подключим популярный репозитарий ПО – Chocolatey, содержащий на данный момент более 4500 различных программ.
Установим новый провайдер Chocolatey:
Подтвердим установку провайдера, нажав Y.
 Сделаем Chocolatey доверенным источником пакетов, чтобы каждый раз при установке пакета не приходилось подтверждать установку.
Set-PackageSource -Name chocolatey -Trusted
Убедимся, что Chocolatey теперь присутствует среди доступных репозитариев приложений:

Name ProviderName IsTrusted Location
—- ———— ——— ———
PSGallery PowerShellGet False https://www.powershellgallery.com/api/v2/
chocolatey Chocolatey True http://chocolatey.org/api/v2/
Установка приложений из репозитория Chocolatey
Рассмотрим теперь, как установить приложение (пакет) из репозитория Chocolatey.
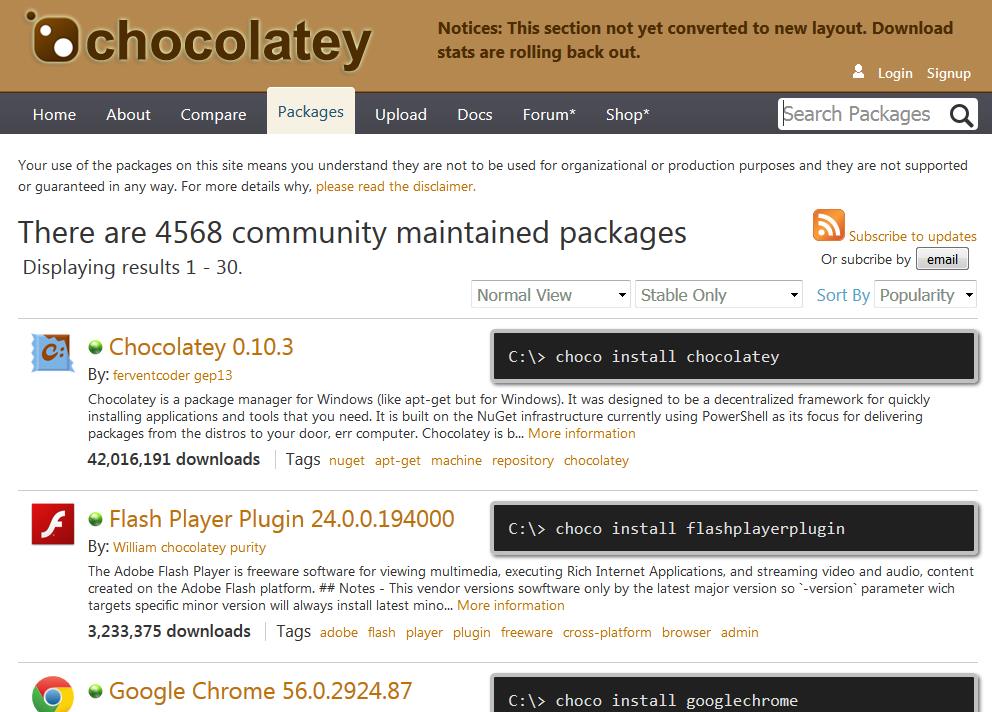
Список доступных для установки приложения можно получить непосредственно на официальном веб сайте Chocolatey (https://chocolatey.org/packages)
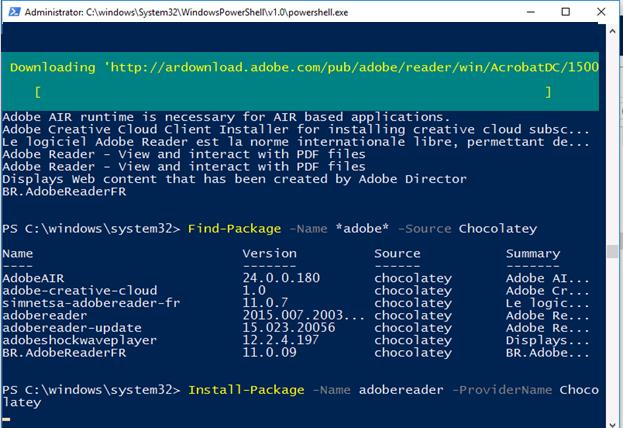
Также можно найти и установить нужное приложение прямо из консоли PowerShell. Например, для просмотра pdf файлов нам понадобилось установить приложение Adobe Acrobat Reader. Т.к. мы не знаем полного названия приложения, для его установки нам нужно получить имя пакета в каталоге. Выполним поиск в репозитории по ключевому слову ‘adobe’:
Find-Package -Name *adobe* -Source Chocolatey
В консоли появится список всех пакетов по данному ключу. Нам нужен пакет adobereader (нужно использовать именно имя пакета из столбца Name).
Запускаем установку пакета Adobe Reader:
Install-Package -Name adobereader -ProviderName Chocolatey
 Вверху окна PowerShell появится ползунок, свидетельствующий о начале загрузки пакета Adobe Reader. Сразу после окончания загрузки, приложение установится в системе.
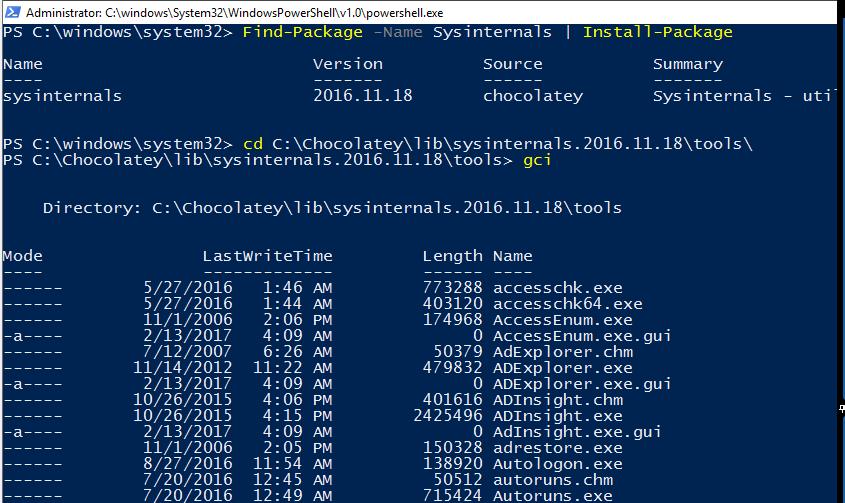
Еще один пример. Допустим, нам понадобилось иметь на компьютере набор утилит SysInternals. Чтобы не качать его вручную, найдем пакет SysInternals в репозитарии Chocolatey и установим его.
Find-Package -Name Sysinternals | Install-Package
Т.к. пакет не требует установки, он сохраняется на компьютер и хранится в каталоге C:\Chocolatey\lib\. В нашем примере это каталог C:\Chocolatey\lib\sysinternals.2016.11.18\tools
Сразу несколько приложений можно установить всего одной командой:
Find-Package -Name firefox, winrar, notepadplusplus, putty, dropbox | Install-Package
Удаление пакета
Удаление приложения на компьютере выполняется также одной командой. К примеру, для удаления Adobe Reader, выполните команду:
Итак, мы рассмотрели новые возможности установки приложений в Windows из командной строки PowerShell. В ближайшем будущем, вероятно, появятся графические надстройки над модулем PackageManagement, позволяющие легко управлять установкой/удалением ПО и простым пользователям без навыков работы с CLI.
Restore Windows Store in Windows 10 after uninstalling it with PowerShell
Windows 10 comes with many built-in Modern apps of which some of which may not be useful to you. PowerShell, as you may have known, allows you to uninstall individual apps or all apps using a single command.
If you had used the following command to uninstall all bundled apps in Windows 10, you should have noticed that the much useful “Windows Store” app (now known as “Microsoft Store”) is one of those removed apps.
Without the “Windows Store” app, you won’t be able to install or update Store apps. This post tells you how to get back the Microsoft Store app after uninstalling it accidentally using PowerShell.
Reinstall the Microsoft Store app
Here is how to reinstall Microsoft Store. The 1st method applies if the Microsoft Store app package folder is intact. The 2nd method should be used if the Microsoft Store provisioned app package folder doesn’t exist.
Method 1: Using PowerShell
To restore or reinstall Windows Store in Windows 10, start PowerShell as Administrator. Click Start, type Powershell. In the search results, right-click “PowerShell” and click Run as administrator.
In the PowerShell window, type the following command and press ENTER : Restore Windows Store using Add-AppxPackage command
That reinstalls the Microsoft Store app.
If you wish to reinstall or restore all the built-in Windows 10 apps (including Microsoft Store), use this command:
However, for some users, the above commands may throw one of the following errors and Store does not get reinstated:
The above errors if the Microsoft Store package folder is missing (or incomplete) from the C:\Program Files\WindowsApps folder. In those cases, you’ll need to download the Microsoft Store appx bundle/package from Microsoft, and then install it. The instructions are given in Method 2 below.
Method 2: Download the Microsoft Store installer (Appx package)
You can download the Microsoft Store app and its dependencies in the form of .Appx and .AppxBundle package or installers from Microsoft’s servers. Follow these steps to do so:
- Visit the following website:
The above third-party site is capable of generating download links (to app installers) for the chosen app. These are direct download links pointing at the official Microsoft servers.
Run each .appx installers first, as they’re the dependencies of Microsoft Store. Alternatively, you can use PowerShell to install each package. The PowerShell command-line syntax is below:
If you get the error Deployment failed with HRESULT: 0x80073D02 , skip the package. It’s most likely because the package or dependency is already installed and currently in use by some other app.
Also, you can run the following command to check if an app package is already installed or not:
If the package (of the same version) is already installed, you don’t have to install it again.
Getting the error 0x80073D05?
You may receive the following error when installing a package (e.g., VCLibs)
The error code 0x80073D05 denotes “An error occurred while deleting the package’s previously existing application data.”
Restart Windows and try installing the app again. Hopefully, this time around, the installer should be able to clear the application data successfully.
If the same error occurs, this could be due to corrupted files within the app’s folder.
Open the C:\Users\(Your Username)\AppData\Local\Packages folder and try renaming the folder related to the app (e.g., Microsoft.VCLibs.140.00_8wekyb3d8bbwe ) you’re trying to install. If Windows doesn’t let you delete the folder, try moving it to another folder or drive. Or, you may use other methods to delete the stubborn folder.
Verify the Microsoft Store app info using PowerShell (Optional)
After installing the Microsoft Store appx package, it would have restored the following folders under the Program Files\WindowsApps folder:
Optionally, to verify the Microsoft Store app info, open the PowerShell (administrator) window and run the following command:
You’ll see that the Microsoft Store app is fully installed along with its dependencies.
Install Windows 10 apps using PowerShell
In this post, we are going to see how to install Windows 10 apps using Powershell. Windows 10 apps are very secure and so Microsoft allows the users to install it through the store only.
This might cause minor inconvenience for users who do not have a good internet connection and would like to have the ability to install the software from a setup file. This can be achieved using Add-AppPackage command in PowerShell.
People also search for:
The store file is available in .appxbundle format. We have the latest .appxbundle package of a sample application in our hard drive as shown in the figure.
![]() appxbundle file
appxbundle file
We will go ahead and install this app using the below steps. Please follow along the below steps to install your app of choice.
How to reinstall windows 10 apps using PowerShell:
Sometimes we might delete windows 10 apps accidentally. In situations like that, we would like to recover the deleted apps even if we do not know which one was deleted. Fortunately for us, we can easily recover all the deleted apps with just one command.
Follow the below steps to install all the removed apps in windows 10.
- Open PowerShell in administrator mode.
 PowerShell as Administrators
 - Enter the below command as shown in the image.
There you go these steps will easily restore all the deleted apps in windows 10.
10 steps to install Windows 10 Apps Using PowerShell :
- Press the start button and enter settings and press enter. launch settings
- In settings, go to Update & Security. Update and security
- Near the bottom, you will see For developers settings, click and open it. For Developers
- In the menu shown below, choose Developer mode. Developer mode
- Choose Yes in the pop-up. Choose yes
- Restart the computer.
- Run PowerShell with administrator privileges. PowerShell in admin privileges
- Enter the following command. Do not forget to replace the path with your full path of the .appx package.
The above steps will install the .appx package.
Verdict:
Here we learned how to install a .appxbundle file in Windows 10. We learned how to install an app using PowerShell. Windows 10 is a secure operating system that prevents the installation of software outside the Windows Store. But we are able to install the Software using a PowerShell command.
If you have any doubts or questions, please let us know in the comments below. For more awesome posts, stay tuned to TecKangaroo.


