- UEFI/GPT-based hard drive partitions
- Partition Requirements
- System partition
- Microsoft reserved partition (MSR)
- Other utility partitions
- To set partitions as utility partitions
- To verify that system and utility partitions exist
- Windows partition
- Recovery tools partition
- Data partitions
- Partition layout
- Sample files: configure drive partitions by using WindowsВ PE and DiskPart scripts
- To partition hard drives and prepare to apply images
- Next steps
- Как создать загрузочный EFI-раздел Windows на GPT-диске вручную
- 1. Создание EFI-раздела на пустом жёстком диске в командной строке
- 2. Создание EFI-раздела на пустом жёстком диске утилитой Bootice
- 3. Создание EFI-раздела в конце Windows
- 4. Создание EFI-раздела перед Windows
UEFI/GPT-based hard drive partitions
Create custom partition layouts for your hard disk drives (HDDs), solid-state drives (SSDs), and other drives when deploying Windows to Unified Extensible Firmware Interface (UEFI)–based devices.
If you use a custom partition layout on WindowsВ 10 for desktop editions (Home, Pro, Enterprise, and Education), update the push-button recovery script so the recovery tools can recreate the custom partition layout when needed.
Partition Requirements
When you deploy Windows to a UEFI-based device, you must format the hard drive that includes the Windows partition by using a GUID partition table (GPT) file system. Additional drives may use either the GPT or the master boot record (MBR) file format.
A GPT drive may have up to 128 partitions.
Each partition can have a maximum of 18 exabytes (
18.8 million terabytes) of space.
System partition
The device must contain a system partition. On GPT drives, this is known as the EFI System Partition, or the ESP. This partition is usually stored on the primary hard drive. The device boots to this partition.
The minimum size of this partition is 100 MB, and must be formatted using the FAT32 file format.
This partition is managed by the operating system, and should not contain any other files, including Windows RE tools.
For Advanced Format 4K Native drives (4-KB-per-sector) drives, the minimum size is 260 MB, due to a limitation of the FAT32 file format. The minimum partition size of FAT32 drives is calculated as sector size (4KB) x 65527 = 256 MB.
Advanced Format 512e drives are not affected by this limitation, because their emulated sector size is 512 bytes. 512 bytes x 65527 = 32 MB, which is less than the 100 MB minimum size for this partition.
Microsoft reserved partition (MSR)
In WindowsВ 10, the size of the MSR is 16 MB.
Add an MSR to each GPT drive to help with partition management. The MSR is a reserved partition that does not receive a partition ID. It cannot store user data.
Other utility partitions
Any other utility partitions not managed by Windows must be located before the Windows, data, and recovery image partitions. This allows end users to perform actions such as resizing the Windows partition without affecting system utilities.
Protect end users from accidentally modifying utility partitions by identifying them using a GPT attribute. This prevents these partitions from appearing in File Explorer.
To set partitions as utility partitions
- When you’re deploying Windows by using DiskPart, use the attributes volume set GPT_ATTRIBUTE_PLATFORM_REQUIRED command after you create the partition to identify the partition as a utility partition. For more information, see the MSDN topic: PARTITION_INFORMATION_GPT structure.
To verify that system and utility partitions exist
- Click Start, right-click This PC, and then click Manage. The Computer Management window opens.
- Click Disk Management. The list of available drives and partitions appears.
- In the list of drives and partitions, confirm that the system and utility partitions are present and are not assigned a drive letter.
Windows partition
- The partition must have at least 20 gigabytes (GB) of drive space for 64-bit versions, or 16 GB for 32-bit versions.
- The Windows partition must be formatted using the NTFS file format.
- The Windows partition must have 16 GB of free space after the user has completed the Out Of Box Experience (OOBE) and Automatic Maintenance has completed.
Recovery tools partition
This partition must be at least 300 MB.
The Windows Recovery Environment (Windows RE) tools require additional free space:
- A minimum of 52 MB is required but 250 MB is recommended, to accomodate future updates, especially with custom partition layouts.
When calculating free space, note:
- The recovery image, winre.wim, is typically between 250-300MB, depending on what drivers, languages, and customizations you add.
- The file system itself can take up additional space. For example, NTFS may reserve 5-15MB or more on a 750MB partition.
This partition must use the Type ID: DE94BBA4-06D1-4D40-A16A-BFD50179D6AC.
The recovery tools should be in a separate partition than the Windows partition to support automatic failover and to support booting partitions encrypted with WindowsВ BitLocker Drive Encryption.
We recommend that you place this partition immediately after the Windows partition. This allows Windows to modify and recreate the partition later if future updates require a larger recovery image.
Data partitions
The recommended partition layout for WindowsВ 10 does not include data partitions. However, if data partitions are required, they should be placed after the Windows RE partition. This allows future updates to Windows RE to grow the Windows RE partition by shrinking the Windows partition.
This layout makes it more difficult for end users to remove the data partition and merge the space with the Windows partition. To do so, the Windows RE partition must be moved to the end of the unused space reclaimed from the data partition, so that the Windows partition can be extended.
WindowsВ 10 does not include functionality or utility to facilitate this process. However, manufacturers can develop and provide such a utility if PCs are shipped with data partitions.
Partition layout
The default partition layout for UEFI-based PCs is: a system partition, an MSR, a Windows partition, and a recovery tools partition.

This layout lets you use WindowsВ BitLocker Drive Encryption through both Windows and through the Windows Recovery Environment.
Sample files: configure drive partitions by using WindowsВ PE and DiskPart scripts
For image-based deployment, boot the PC to Windows PE, and then use the DiskPart tool to create the partition structures on your destination PCs.
In these DiskPart examples, the partitions are assigned the letters: System=S, Windows=W, and Recovery=R. The MSR partition does not receive a drive letter.
Change the Windows drive letter to a letter that’s near the end of the alphabet, such as W, to avoid drive letter conflicts. Do not use X, because this drive letter is reserved for Windows PE. After the device reboots, the Windows partition is assigned the letter C, and the other partitions don’t receive drive letters.
If you reboot, WindowsВ PE reassigns disk letters alphabetically, starting with the letter C, without regard to the configuration in Windows Setup. This configuration can change based on the presence of different drives, such as USB flash drives.
The following steps describe how to partition your hard drives and prepare to apply images. You can use the code in the sections that follow to complete these steps.
To partition hard drives and prepare to apply images
Copy and save the CreatePartitions-UEFI.txt file to a USB flash drive.
Use WindowsВ PE to boot the destination PC.
Clean and partition the drive. In this example, F is the letter of the USB flash drive.
- If you use a custom partition layout on WindowsВ 10 for desktop editions, update the push-button recovery script so the recovery tools can recreate the custom partition layout when needed.
To avoid bare metal recovery boot issues due to partition size, manufacturers should allow the bare metal recovery feature’s auto generation script to create the partition used for the recovery WIM. If manufacturer’s want to use a custom DISKPART script to create partitions, the recommended minimum partition size is 990MB with a minimum of 250MB of free space.
Next steps
Use a deployment script to apply the Windows images on the newly created partitions. For more information, see Capture and Apply Windows, System, and Recovery Partitions.
Как создать загрузочный EFI-раздел Windows на GPT-диске вручную

Когда мы устанавливаем Windows на пустой (неразмеченный) жёсткий диск или отформатированный раздел обычным образом – с использованием установочного носителя, нам не нужно заморачиваться по поводу создания EFI -разметки операционной системы. Все необходимые разделы, в частности, загрузочный EFI , создаются автоматически, если компьютер работает в режиме BIOS UEFI . Но если Windows нужно установить не обычным образом.
А на другой жёсткий диск со своим независимым загрузчиком, если стоит вопрос в восстановлении работоспособности системы после удаления жёсткого диска с загрузочным разделом, в таких нестандартных ситуациях потребуется ручная работа.
Как вручную создать загрузочный EFI-раздел Windows?
Windows на подключённый к компьютеру второй GPT -диск не устанавливается со своей EFI -структурой. При обычной установке с установочного носителя загрузчик второй системы прописывается на уже существующий EFI -раздел – тот, что находится на первом диске.
Что делает вторую Windows уязвимой – она не сможет самостоятельно существовать, если загрузчик первой системы будет повреждён. Или если выйдет из строя или просто будет отсоединён первый жёсткий диск. Чтобы у второй Windows была своя независимая EFI -разметка, на время её установки нужно сделать невидимой первую систему – отключить её носитель в настройках BIOS , если такое возможно, или аппаратно. Это не всегда удобно, а иногда и невозможно в случае с ноутбуками.
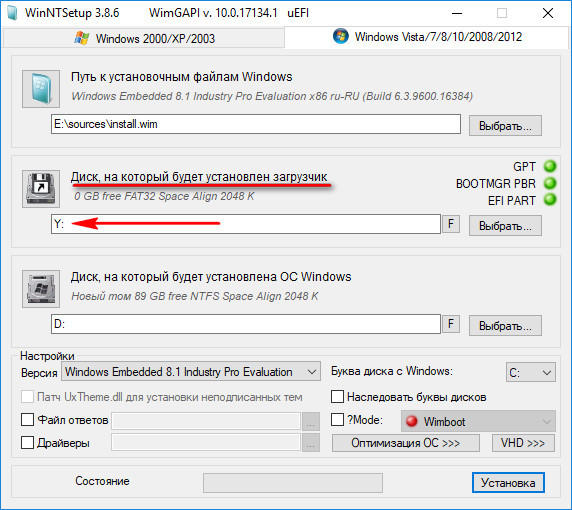
Вторую Windows со своим независимым загрузчиком могут установить запускаемые в среде текущей системы программы типа WinNTSetup или WinToHDD. Но они потребуют указать им загрузочный EFI -раздел.
Создать такой на пустом жёстком диске очень просто.
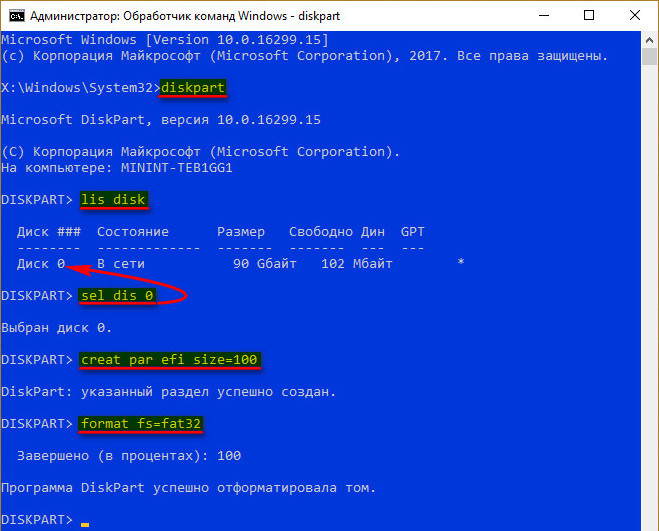
1. Создание EFI-раздела на пустом жёстком диске в командной строке
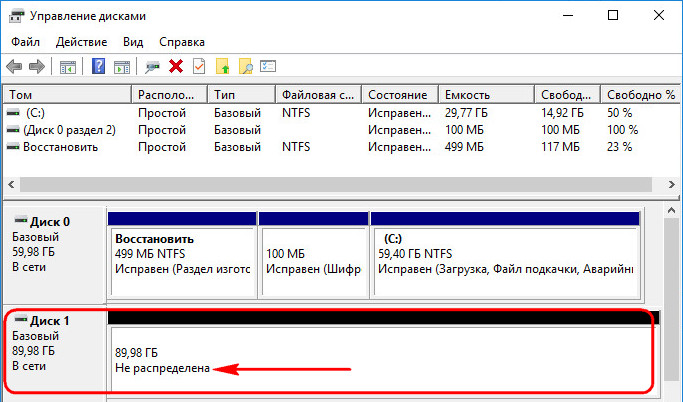
Итак, имеем проинициализированный как GPT носитель без разметки и данных.
Запускаем командную строку.
Обязательно делаем это от имени администратора.
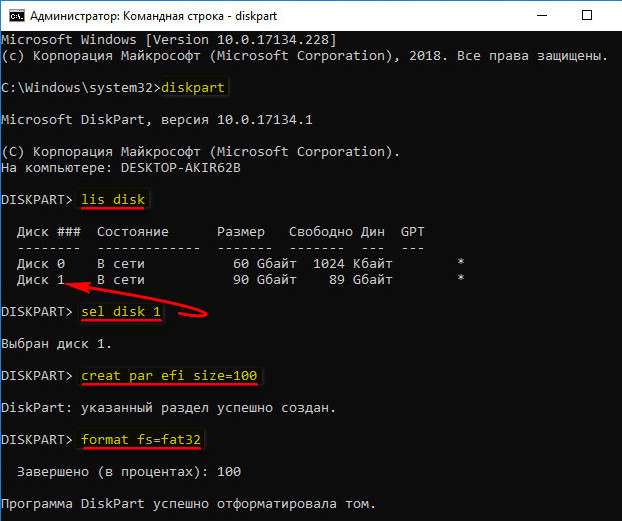
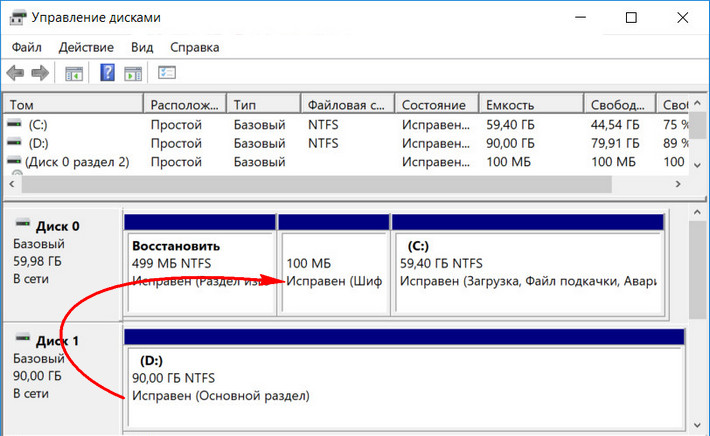
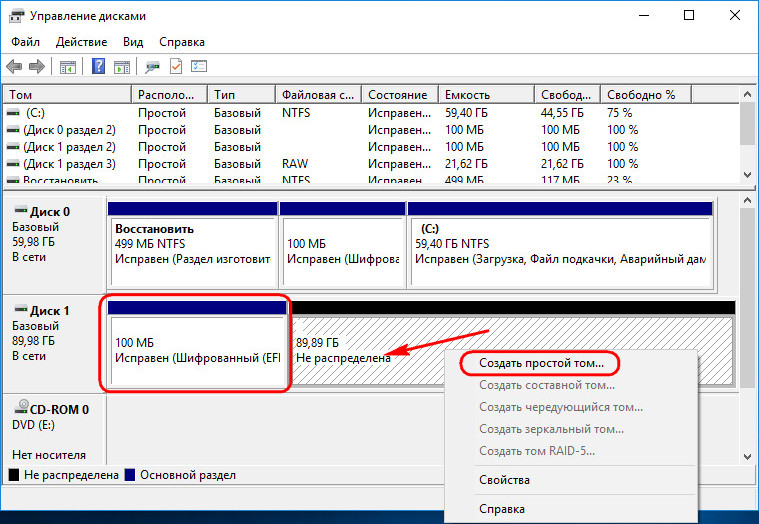
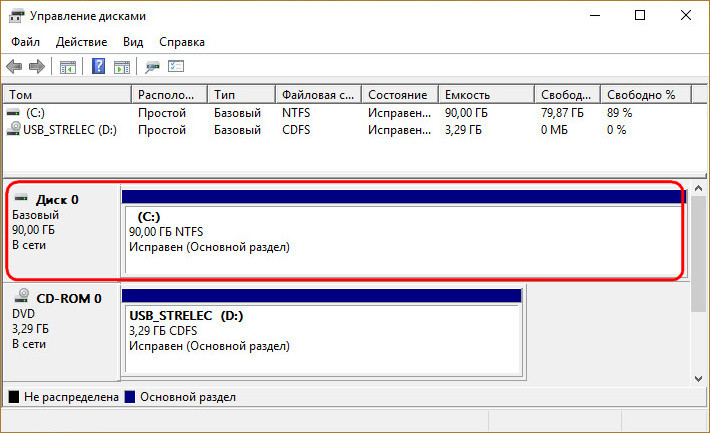
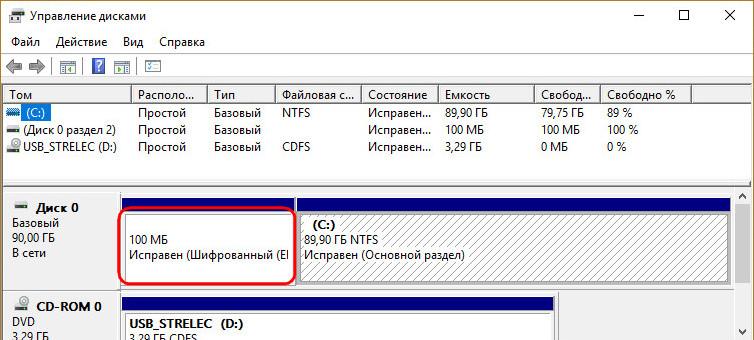
В утилите управления дисками видим, что на втором жёстком появился EFI -раздел на 100 Мб. Теперь можем формировать обычный раздел для указания его программам типа WinNTSetup или WinToHDD в качестве системного раздела С.
2. Создание EFI-раздела на пустом жёстком диске утилитой Bootice
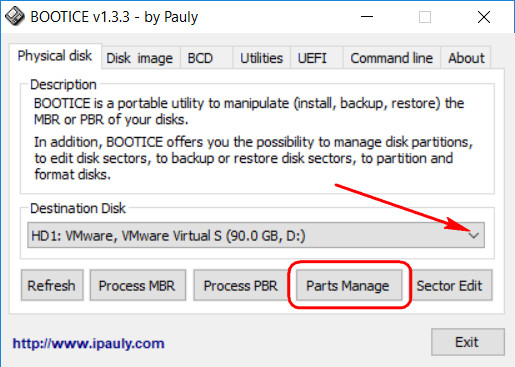
Кто не любит командную строку, для создания EFI -разметки пустого носителя может воспользоваться утилитой Bootice с графическим интерфейсом. Она бесплатная, её можно скачать на любом софт-портале Интернета. В главном окне выбираем второй жёсткий. Кликаем «Parts Manage».
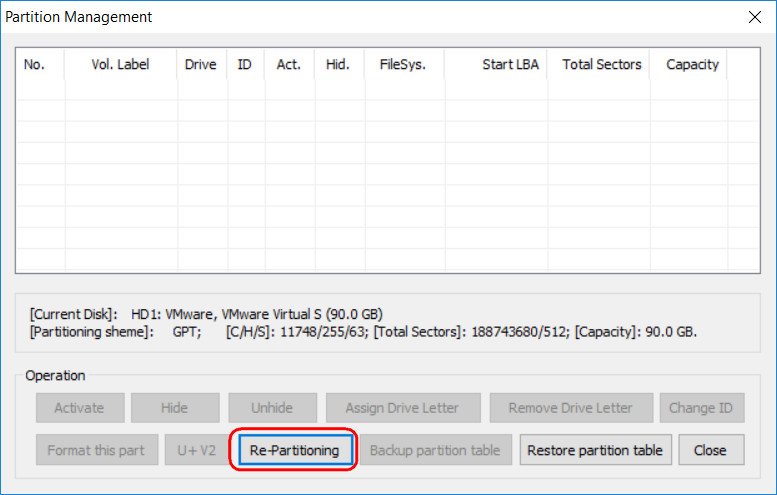
Затем – «Re-Partitioning».
Первым делом ставим галочку GPT в графе «Partition table type». Затем галочку ставим «Create ESP partition». И вверху в графе «Settings» убираем все значения «Size» кроме последнего. Жмём «Ок».
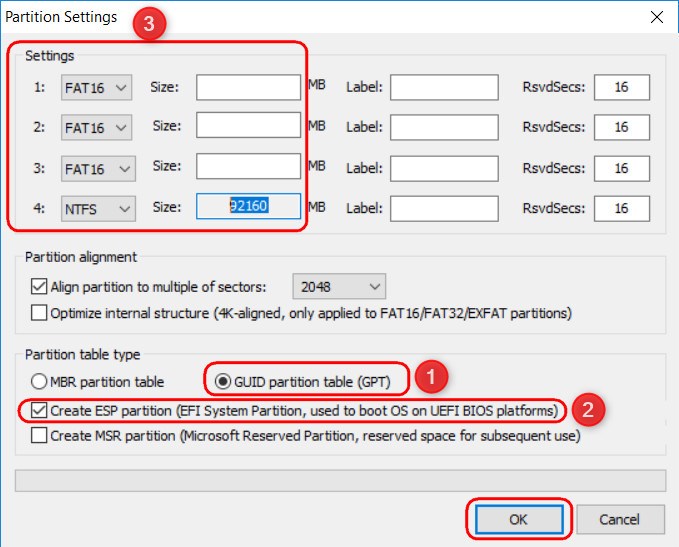
В итоге получим разметку диска с EFI -разделом на 128 Мб и разделом, вместившим в себя остальное дисковое пространство.
А как быть, если жёсткий диск не пустой? Если на нём есть структура и хранящиеся пользовательские данные. Или мы хотим восстановить Windows, лишившуюся загрузочного EFI -раздела после выхода из строя или отключения жёсткого диска, на котором ранее существовал её загрузчик. И на этот случай есть решения. Для восстановления системы без загрузчика нам, естественно, понадобится среда для выполнения определённых операций. В одном из случаев сгодится и обычный установочный носитель Windows. В другом случае будем работать с менеджером дискового пространства, потому нам понадобится функциональный и надёжный LiveDisk WinPE. Одним из таких является LiveDisk Стрельца. Сайт загрузки образа — Sergeistrelec.Ru.
3. Создание EFI-раздела в конце Windows
Итак, имеем, к примеру, вторую Windows, лишившуюся EFI -загрузчика после поломки диска с первой системой.
Как её запустить? Самый простой и быстрый способ – создать EFI -раздел в конце системного раздела и пересоздать загрузчик. Для этого не понадобится ничего более командной строки. Загружаемся с установочного носителя Windows, сразу же нажимаем Shift + F10 . Эта комбинация запустит командную строку. Если используем LiveDisk Стрельца, запускаемся, соответственно, с него.

И уже на его борту задействуем командную строку.
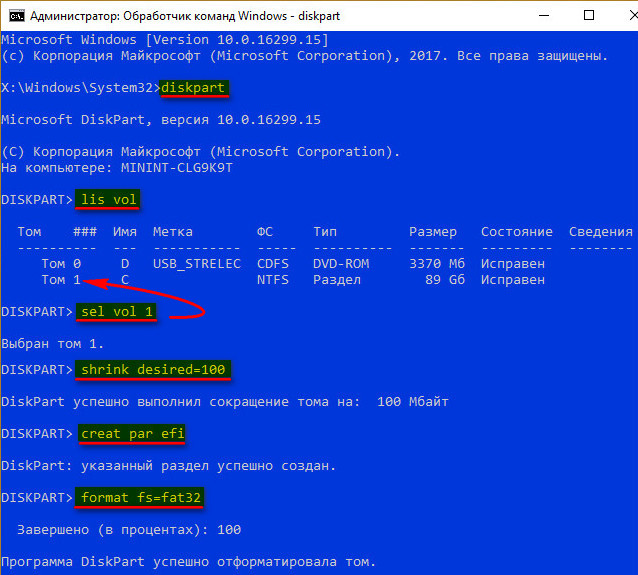
Вот указанный раздел сжался на 100 Мб и на освободившемся месте создался EFI -раздел.

Теперь можем пересоздавать загрузчик.
В командной строке выходим из diskpart:
Далее смотрим, под какой буквой значится системный раздел (смотрим карту разделов после ввода lis vol) . И подставляем её вместо нашей буквы С:
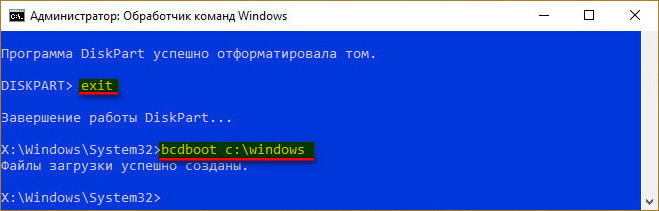
Всё – работоспособность Windows восстановлена.
4. Создание EFI-раздела перед Windows
Загрузочный раздел обычно существует в начале диска, перед системным разделом. Так не обязательно должно быть, но делается с целью ускорения запуска Windows. Чтобы UEFI быстрее нашла загрузчик. На SSD такая оптимизация вряд ли будет ощутимой, а вот в случае с HDD можно побороться пусть даже за толику производительности.
На борту LiveDisk Стрельца запускаем AOMEI Partition Assistant. Делаем клик на системном разделе, на боковой панели операций жмём «Изменение размера».
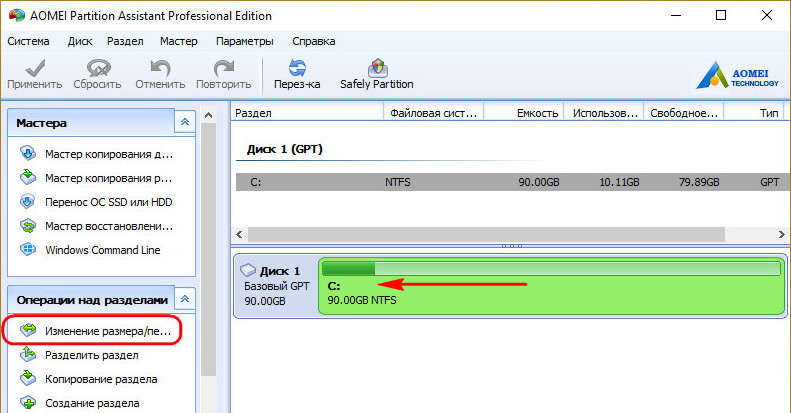
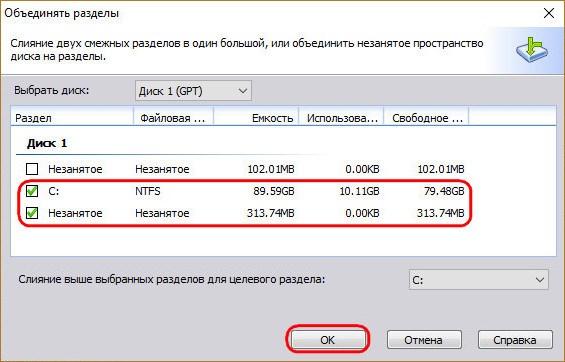
Немного оттягиваем ползунок на карте вправо, чтобы в графе ниже «Незанятое пространство перед» появилось несколько Мб. Далее вместо оттянутой цифры вписываем 105. Чтобы получилось 105 Мб. Жмём «Ок».
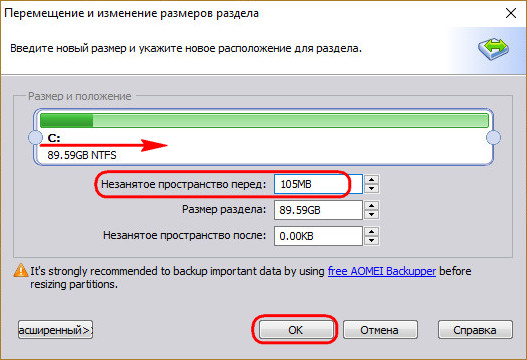
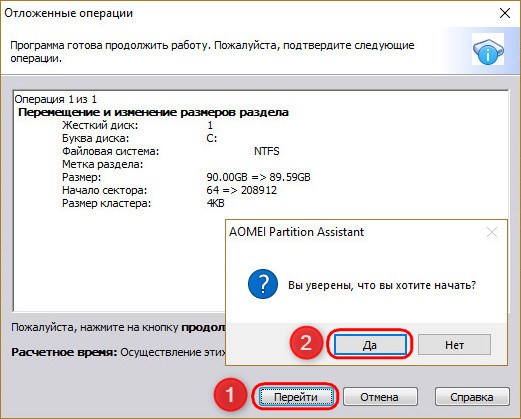
В итоге программа высвободит корректное значение дискового пространства, в нашем случае 102,01 Мб. И оставит небольшой хвост сзади раздела. Жмём «Применить».
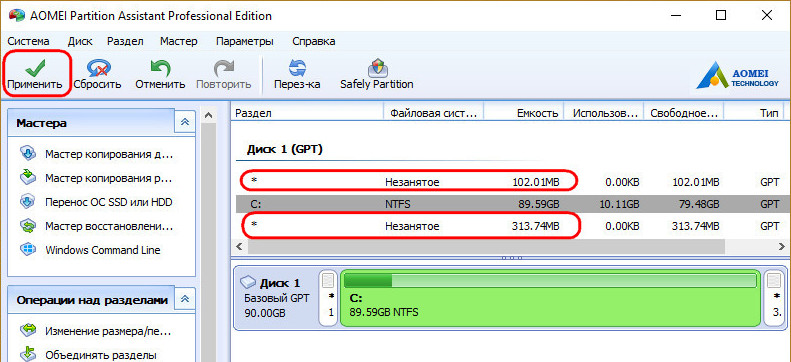
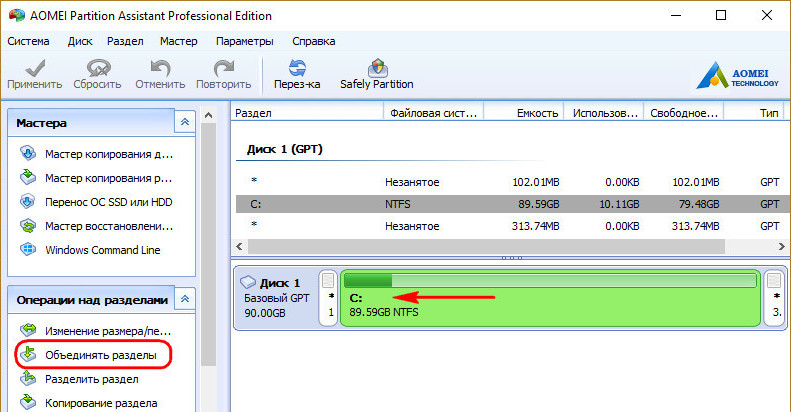
Далее можем присоединить хвост к разделу.
Теперь запускаем командную строку. И создаём EFI -раздел точно так же, как описано в п.1 статьи.
Вот EFI -раздел создан.
Осталось только пересоздать загрузчик, как описано в конце п.3 статьи.


