- Create Hard Disk Partitions Before Installing Windows 10/8/7
- Why create partition before installing Windows 10/8/7?
- Partition a hard drive during Windows setup
- Create partitions without OS pre-installed with free partition manager
- Windows Setup: Installing using the MBR or GPT partition style
- Why should I convert my drive?
- Reformatting the drive using a different partition style
- Make sure Windows Setup boots to the correct firmware mode
- Create and format a hard disk partition
- 8 Fixes: Can’t Install Windows on GPT or Windows Cannot Be Installed to This Disk Error
- Part 1. Fix «Can’t Install Windows on GPT Disk» Error
- Problem: Can’t Install Windows on GPT Disk
- Why You Fail to Install Windows on GPT Drive
- 4 Fixes to Resolve «Cannot Install Windows on GPT Disk» Error
- Part 2. Fix «Windows Cannot Be Installed the This Disk» Error
- Error: Windows Cannot Be Installed to This Disk
- Why Windows Cannot Be Installed to The Selected Disk
- Fixes to Remove «Windows Cannot Be Installed to This Disk» Error
- Conclusion
- Extended Reading: Cannot Install Windows FAQs
Create Hard Disk Partitions Before Installing Windows 10/8/7
Learn how to create hard disk partitions before installing Windows 10/8/7 operating system on your hard drive for your system, applications, games and other data better organized.

By AOMEI  / Last Updated January 16, 2020
Why create partition before installing Windows 10/8/7?
By default, Windows will generate a system reserved partition (on MBR disk) or recovery partition (on GPT disk) and C: drive if you select an unallocated space to install Windows operating system (OS). Since GPT disks can have multiple primary partitions as you like, it is no big deal to have one or more extra small partitions on a GPT disk, but things will be different for MBR disks, because you can have at most 4 primary partitions on a MBR disk.
If your computer supports UEFI boot mode, you can convert MBR to GPT disk without data loss. Otherwise, for those people who want to install multiple OS on one MBR drive, the 4 primary partitions are really precious. Besides, you can only have three primary partitions if you have logical partition(s) on the same disk. Therefore, to make full use of the primary partitions is to allow Windows to be installed into one partition without generating a system reserved partition or system recovery partition. The only way to prevent Windows from creating another partition is to partition hard drive before installing.
Partition a hard drive during Windows setup
Windows build-in tool, Disk Management or Diskpart.exe can be used for hard drive partitioning. Disk Management can only be used when OS has been successfully loaded, so you can use Disk Management to create a new partition for another OS if you already have windows installed. If you want to create partition without Windows pre-installed on the hard drive, you can use a Windows installation disc to run Diskpart. The specific steps listed below:
1. Insert the installation disc, and boot your computer from it.
2. At the Windows Setup screen, press Shift+F10 simultaneously to open a command line prompt. If you use the New button to create partitions, it will generate a system partition for an MBR disk.
3. Type “diskpart” and press Enter.
4. At Diskpart>, run a few lines of commands to create a new partition:
в—† List disk
в—† Select disk [disk number]
в—† Create partition primary [size=n]
For example, the following command is to create a 30000 MB primary partition on disk 0:
в—† List disk
в—† Select disk 0
в—† Create primary partition size=30000
5. Then you will have created a partition around 30GB. You can use this command to create more partitions or exit.
If your hard drive has enough space, then it is recommended to allocate more than 100GB to the system drive because Windows update, installed programs, and other system files will keep consuming space on system partition. If you don’t have a Windows installation disc, then you can use third-party free partition manager software to create partition without operating system.
Create partitions without OS pre-installed with free partition manager
AOMEI Partition Assistant Standard is a freeware for disk and partition management that provides the ability to create bootable media, so you can partition a hard drive with or without OS pre-installed. If you have Windows installed on your hard drive, you can just free download this software and start to partition your hard drive without losing data. Let’s see how it works:
1. Boot your computer from the AOMEI bootable media you created. It will lead you to the main interface of AOMEI Partition Assistant.
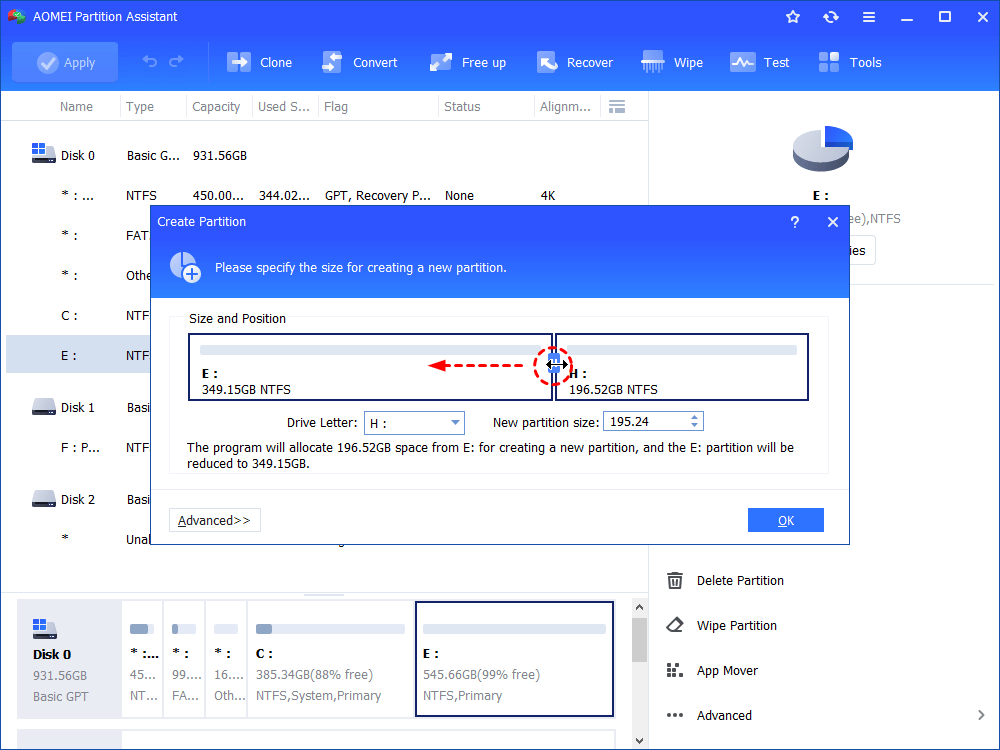
2. Right-click on unallocated space or a partition that is big enough to create a new partition, and then choose Create Partition button.
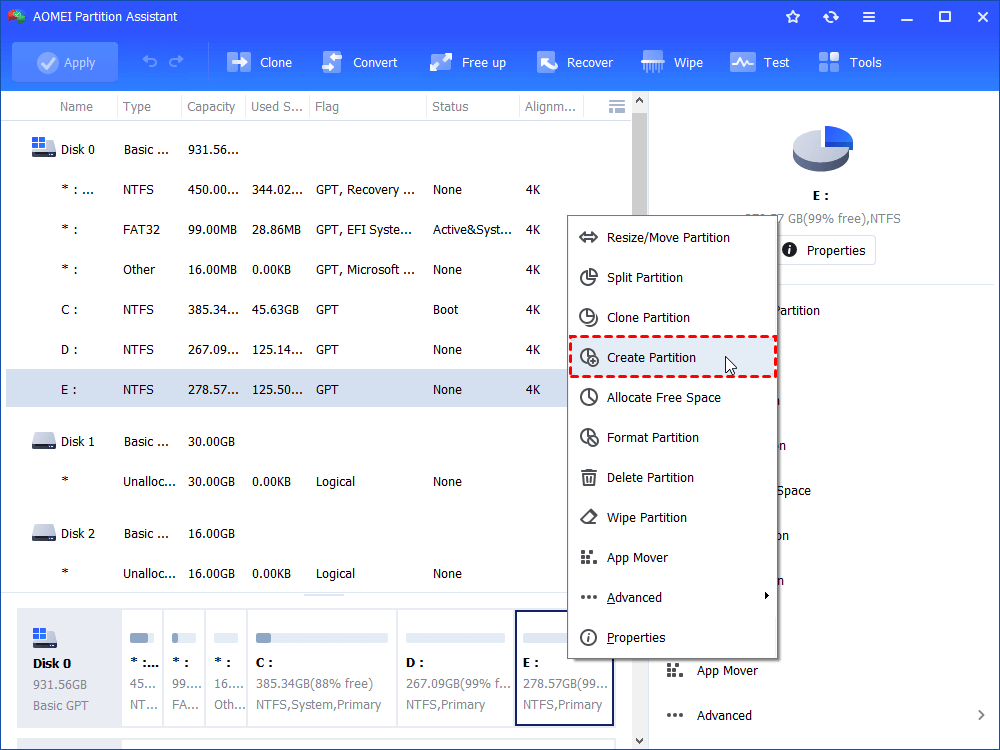
3. At the next screen, drag the slider or enter the amount of space to specify the partition size. You can also click Advanced option to see more options. Click OK when settings are done.
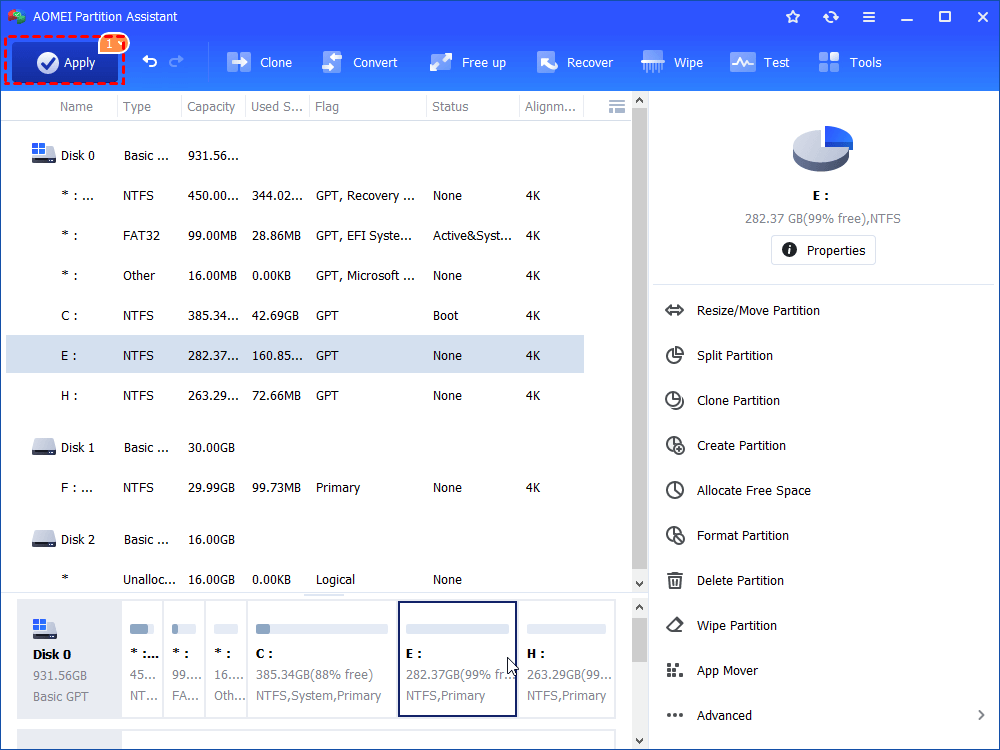
4. The program allows you to preview the partition layout without making any changes to your hard drive. If no problem, click Apply to run the operations.
It is really a good shot to create partition before installing another OS on your hard drive. Besides NTFS, AOMEI Partition Assistant also supports many other file systems including FAT32, FAT16, FAT12, exFAT, ReFS, and Ext2/Ext3/Ext4. The paid edition, like AOMEI Partition Assistant Professional or AOMEI Partition Assistant Server, provides even more advanced features like enabling you to migrating OS to GPT disk, converting dynamic disk into basic, etc.
Windows Setup: Installing using the MBR or GPT partition style
When installing Windows on UEFI-based PCs using Windows Setup, your hard drive partition style must be set up to support either UEFI mode or legacy BIOS-compatibility mode.
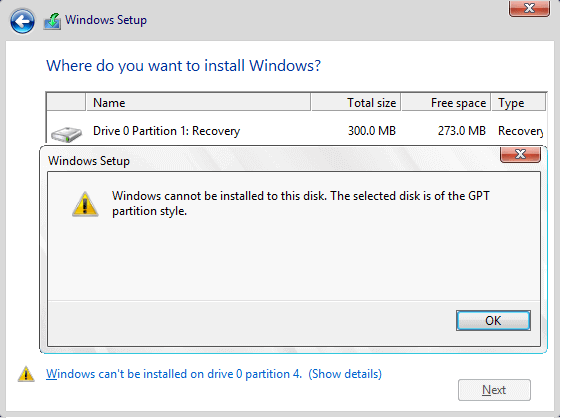
For example, if you receive the error message: “Windows cannot be installed to this disk. The selected disk is not of the GPT partition style”, it’s because your PC is booted in UEFI mode, but your hard drive is not configured for UEFI mode. You’ve got a few options:
Reboot the PC in legacy BIOS-compatibility mode. This option lets you keep the existing partition style. For more info, see Boot to UEFI Mode or Legacy BIOS mode.
Configure your drive for UEFI by using the GPT partition style. This option lets you use the PC’s UEFI firmware features.
You can preserve your data and convert the drive using the MBR2GPT tool. You can also choose to reformat the drive using the instructions below. Reformatting will erase all the data on the drive.
Why should I convert my drive?
Many PCs now include the ability to use the UEFI version of BIOS, which can speed up boot and shutdown times and can provide additional security advantages. To boot your PC in UEFI mode, you’ll need to use a drive formatted using the GPT drive format.
Many PCs are ready to use UEFI, but include a compatibility support module (CSM) that is set up to use the legacy version of BIOS. This version of BIOS was developed in the 1970s and provides compatibility to a variety of older equipment and network configurations, and requires a drive that uses the MBR drive format.
However, the basic MBR drive format does not support drives over 4TB. It’s also difficult to set up more than four partitions. The GPT drive format lets you set up drives that are larger than 4 terabytes (TB), and lets you easily set up as many partitions as you need.
Reformatting the drive using a different partition style
To wipe and convert the drive by using Windows Setup
Turn off the PC, and put in the Windows installation DVD or USB key.
Boot the PC to the DVD or USB key in UEFI mode. For more info, see Boot to UEFI Mode or Legacy BIOS mode.
When choosing an installation type, select Custom.
On the Where do you want to install Windows? screen, select each of the partitions on the drive, and select Delete. The drive will show a single area of unallocated space.
Select the unallocated space and click Next. Windows detects that the PC was booted into UEFI mode, and reformats the drive using the GPT drive format, and begins the installation.
To manually wipe a drive and convert it to GPT:
Turn off the PC, and put in the Windows installation DVD or USB key.
Boot the PC to the DVD or USB key in UEFI mode. For more info, see Boot to UEFI Mode or Legacy BIOS mode.
From inside Windows Setup, press Shift+F10 to open a command prompt window.
Open the diskpart tool:
Identify the drive to reformat:
Select the drive, and reformat it:
Close the command prompt window.
Continue the Windows Setup installation.
When choosing an installation type, select Custom. The drive will appear as a single area of unallocated space.
Select the unallocated space and click Next. Windows begins the installation.
Make sure Windows Setup boots to the correct firmware mode
To automate this process, you’ll need to run Windows Setup through Windows PE, and use a script to detect which mode you’re in before installing Windows. For more info, see WinPE: Boot in UEFI or legacy BIOS mode.
Create and format a hard disk partition
To create a partition or volume (the two terms are often used interchangeably) on a hard disk, you must be logged in as an administrator, and there must be either unallocated disk space or free space within an extended partition on the hard disk.
If there is no unallocated disk space, you can create some by shrinking an existing partition, deleting a partition, or by using a third-party partitioning program.
Open Computer Management by selecting the Start button. The select Control Panel > System and Security > Administrative Tools, and then double-click Computer Management.
In the left pane, under Storage, select Disk Management.
Right-click an unallocated region on your hard disk, and then select New Simple Volume.
In the New Simple Volume Wizard, select Next.
Enter the size of the volume you want to create in megabytes (MB) or accept the maximum default size, and then select Next.
Accept the default drive letter or choose a different drive letter to identify the partition, and then select Next.
In the Format Partition dialog box, do one of the following:
If you don’t want to format the volume right now, select Do not format this volume, and then select Next.
To format the volume with the default settings, select Next.
Review your choices, and then select Finish.
Note: When you create new partitions on a basic disk, the first three will be formatted as primary partitions. Beginning with the fourth, each one will be configured as a logical drive within an extended partition.
8 Fixes: Can’t Install Windows on GPT or Windows Cannot Be Installed to This Disk Error
Are you having problems installing Windows on your target GPT or MBR drive? On this page, we’ll thoroughly discuss this issue in two parts and you can follow to find respective solutions toward different errors.В
| Workable Solutions | Step-by-step Troubleshooting |
|---|---|
| Fix Can’t Install Windows on GPT Disk | Fix 1. Convert GPT Disk to MBR Disk using EaseUS Partition Master. Full steps Fix 2. Enable UEFI Boot Option in BIOS. Full steps Fix 3. Convert MBR to GPT via EaseUS Partition Master. Full steps Fix 4. Convert MBR to GPT using DiskPart. Full steps |
| Fix Windows Cannot Be Installed the This Disk | Fix 1. Convert Dynamic Disk to Basic Disk. Full steps Fix 2. Remove HDD Protection and Change SATA Controller Mode. Full steps Fix 3. Repair Your HDD. Full steps Fix 4. Format the Partition to NTFS. Full steps |
Check out and find the easiest solution to resolve your problem, installing Windows on your PC without any issue now.
Note that if you have saved important data on the target disk, back up your data first as some of the following fixes may remove data on your target drive.В
Part 1. Fix «Can’t Install Windows on GPT Disk» Error
Applies to:В FixВ «Windows Cannot Be Installed on GPT Partition Drive’ or «Can’t Install Windows on GPT» error.
Problem: Can’t Install Windows on GPT Disk
«I’m trying to install Windows 10 on a new SSD, but the computer keeps giving me this message ‘Windows cannot be installed on this disk. The selected disk is of the GPT partition style.’ What does this mean? Do I have to convert the GPT disk to MBR? Or to enable UEFI boot mode in BIOS?«
You won’t be able to install Windows on GPT disk if you are receiving this notice from your PC as listed below:
Error 1.В «Windows cannot be installed to this disk. The selected disk is of the GPT partition style.»
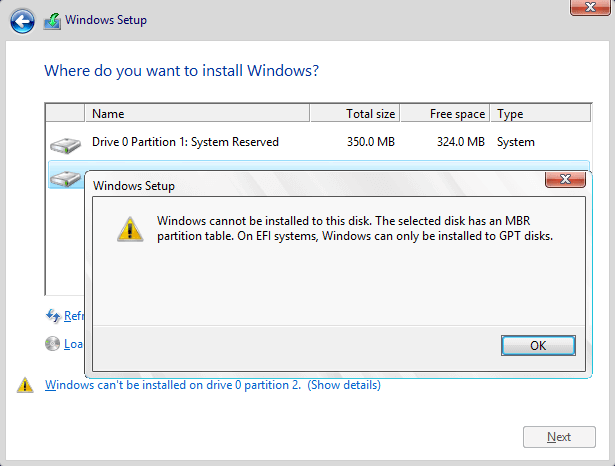
Error 2.В «Windows cannot be installed on this disk. The selected disk has an MBR partition table. On EFI systems, Windows can only installed on GPT disks».
Those two errors mean that the Windows cannot be installed on GPT drive. Don’t be panic. In the following, we’ll explain why you cannot install Windows to the selected disk and list practical solutions to help you out.
Why You Fail to Install Windows on GPT Drive
1. You forget to enable UEFI boot option. Or the motherboard supports Legacy BIOS only. (Error 1)
2. If you receiveВ Error 2, you must learn something aboutВ UEFI and BIOS. Know the differences and relations between them.
Usually, when you install Windows on UEFI-based PC using Windows Setup, the target disk must be set up to UIEFI mode or BIOS compatibility mode. If your computer is booted in UEFI mode,while your target disk is not configured UEFI mode, you’ll met Error 2.В
4 Fixes to Resolve «Cannot Install Windows on GPT Disk» Error
Here, we’ll provide you with 4 effective methods to fix this error issue and relative errors. Note that the former method is presented, the higher success rate it will be.
Fix 1. Convert GPT Disk to MBR Disk using EaseUS Partition Master [Error 1]
When the computer doesn’t support UEFI, you cannot install the Windows on GPT drive unless you convert the disk from GPT to MBR.
ProfessionalВ partition manager softwareВ — EaseUS Partition Master can organize your hard drive and change the partition style easily. You can easily convert GPT to MBR with the help of this software, making disk available to install Windows again:
Step 1.В InstallВ and openВ EaseUS Partition Master on your Windows computer.
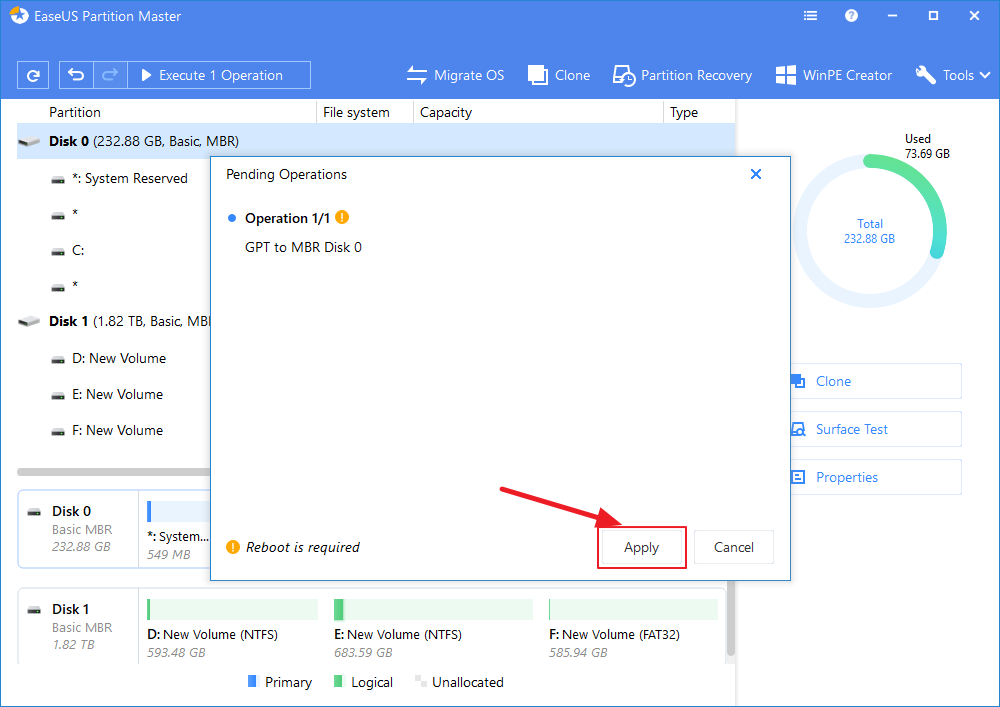
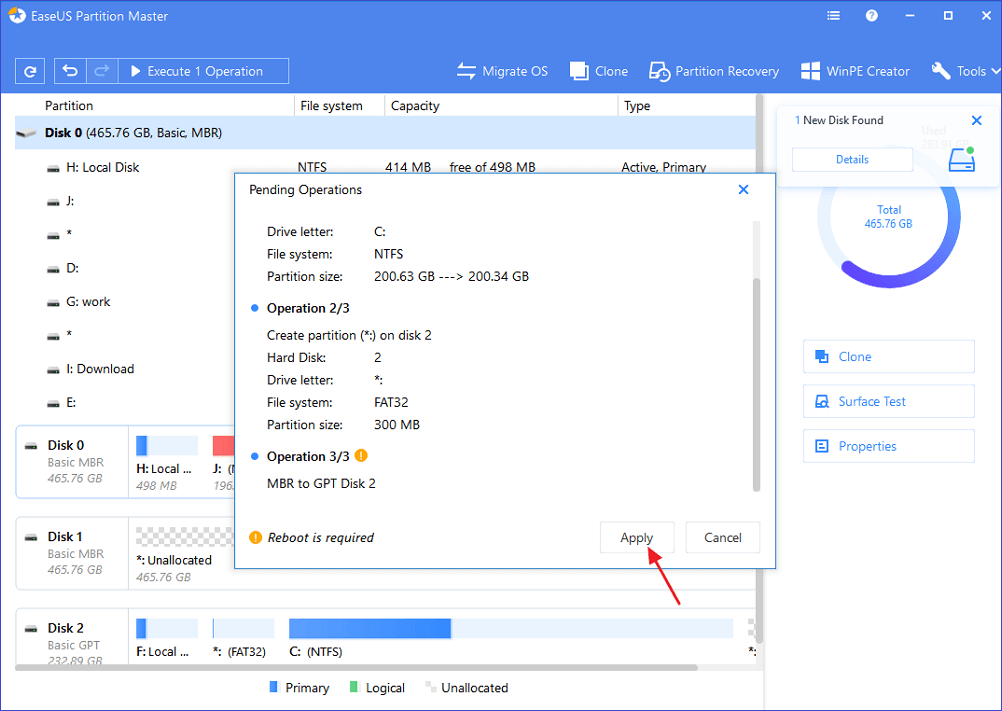
Step 2.В Right-click the GPT diskВ that you want to convertВ and select «Convert to MBR». Then, you will add a pending operation.
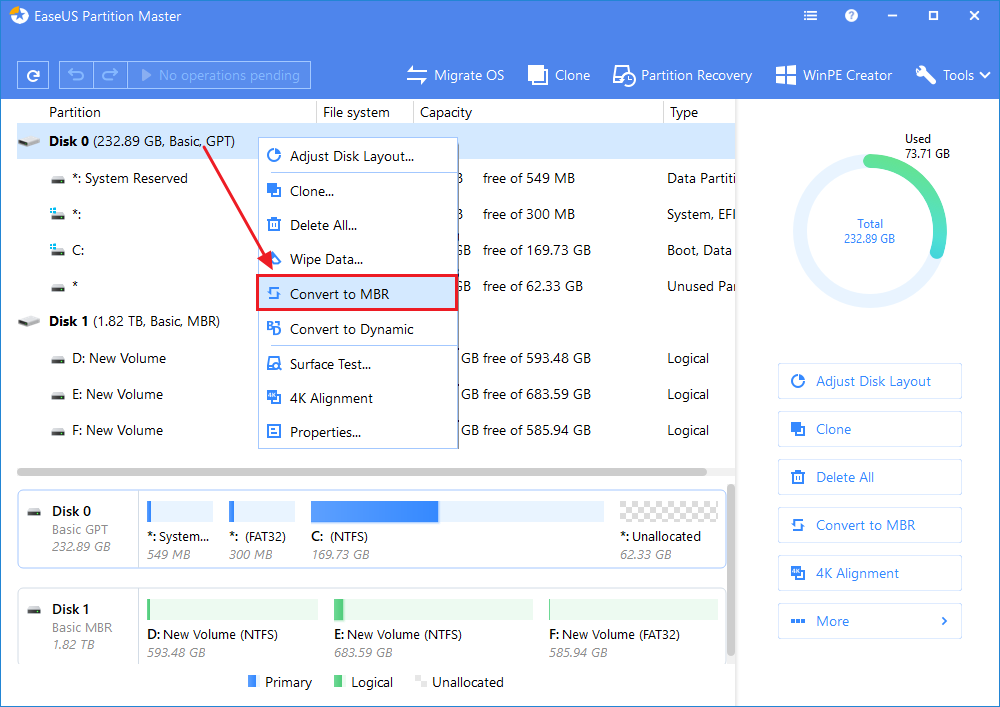
Step 3.В Click the «Execute Operation»В button at the top-left corner. Next, click «Apply» and begin to convert GPT disk to MBR. All data is safe with EaseUS partition manager software.
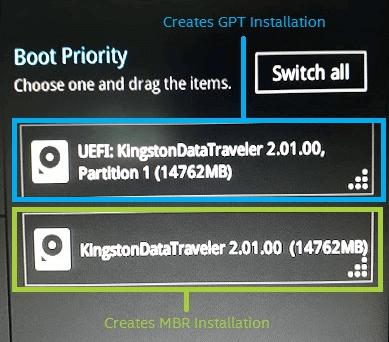
Fix 2. Enable UEFI Boot Option in BIOS to Fix Windows Cannot Install on GPT Drive Error
If you are faced withВ Error 1В -В «Windows cannot be installed to this disk. The selected disk is of the GPT partition style.», you can boot to UEFI mode if your motherboard supports UEFI.В
Step 1.В Reboot the PC and press the key that opens the boot device menu. You can press the Esc, F2, F9, F12, or another key to enter the boot menus.
Step 2.В Boot into UEFI mode and locate the boot options menu.
Step 3.В Confirm in the Boot Priority List that the USB UEFI OS Boot option is at the top of the list. Save your changes and continue to install Windows.
Fix 3. Convert MBR to GPT to using EaseUS Partition Master
If you encounterВ Error 2, you can fix the «The Selected Disk Has an MBR Partition Table»В error by converting MBR disk to GPT disk.
On the UEFI system, Windows can only be installed to GPT disks or something similar. That’s because MBR is compatible with BIOS while GPT is compatible with UEFI.
The steps are similar to those of converting GPT to MBR. The difference is that you need to convert to GPT with the help of EaseUS Partition Master:
Step 1. Download and launch EaseUS Partition Master on your Windows computer.
Step 2. Right-click the MBR disk that you want to convert and choose «Convert to GPT».
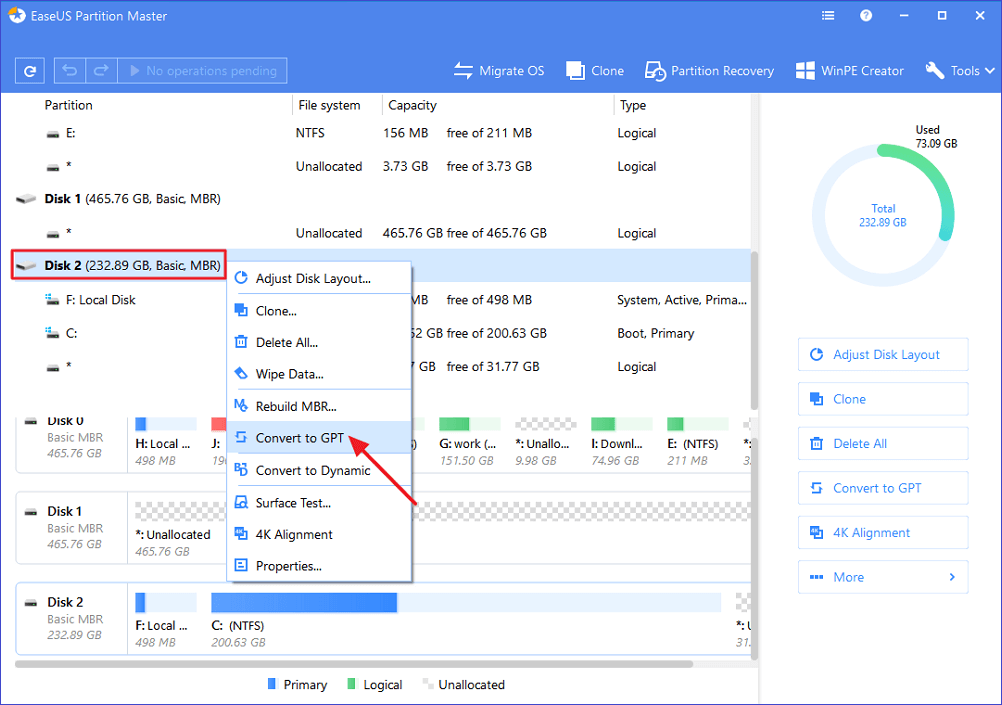
Step 3. After that, find and click the «Execute 1 Operation» button on the toolbar and choose «Apply» to start the conversion.
Fix 4. Convert MBR to GPT using DiskPartВ
Aims to resolve Error 2.В
Step 1. Turn off the PC and put in the Windows installation DVD or USB.
Step 2. Boot the PC from the DVD or USB.
Step 3. In Windows Setup, press «Shift + F10» to start Command Prompt.
Step 4. Enter the following command in order:
- diskpart
- list disk
- select disk
- clean
- convert gpt
- exit
Step 5. Close Command Prompt.
After removing «Can’t install Windows on GPT disk» error, you can now continue installing Windows on your PC. You can refer toВ Install Windows 10 on GPT diskВ for a detailed tutorial guide.В
Part 2. Fix «Windows Cannot Be Installed the This Disk» Error
Applies to:В FixВ «Windows Cannot Be Installed to This Disk» Error.
Error: Windows Cannot Be Installed to This Disk
When you are going to install Windows 10/8/7, you might receive different kinds of errors saying Windows cannot be installed to this disk. Here are some common errors that you might receive:
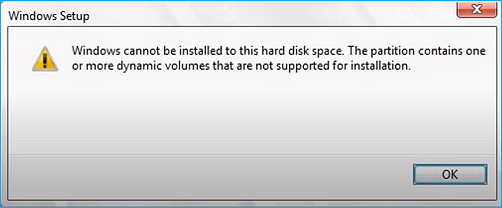
Error 1. В «Windows cannot be installed to this hard disk space. The partition contains one or more dynamic volumes that are not supported for installation».
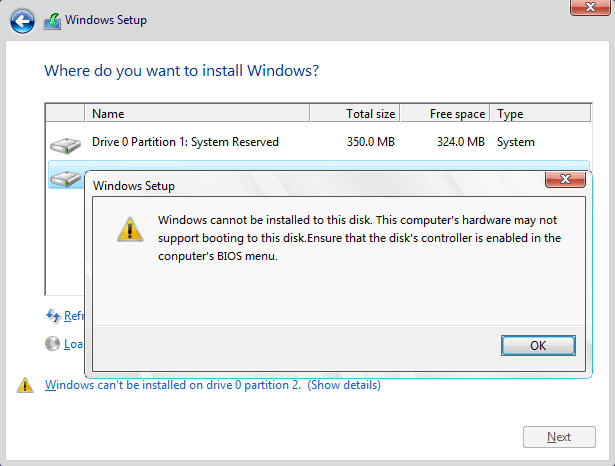
Error 2. «Windows cannot be installed to this disk. This computer’s hardware may not support booting to this disk. Ensure the disk’s controller is enabled in the computer’s BIOS menu.»
Error 3. «Windows cannot be installed to this disk. The disk may fail soon. If other hard disks are available, install Windows to another location.»
Error 4. «Windows cannot be installed to the hard disk space. Windows must be installed to a partition formatted in NTFS.»
Why Windows Cannot Be Installed to The Selected Disk
Why you could receive these errors? What are the main reasons? According to the error messages, the main reasons are as follows:
1. Users can only make a fresh install on a dynamic volume only when the volume was converted from a basic disk and was a boot partition or system partition. (Error 1)
2. Hardware protection and SATA Controller mode could bring up Error 2.
3. If you get Error 3, you can take your hard disk failure into account.
4. An incompatible file system of the partition to be installed with Windows. Microsoft rules that Windows must be installed to a partition formatted in NTFS since Windows Vista. (Error 4)
Fixes to Remove «Windows Cannot Be Installed to This Disk» Error
You can now selectively choose one of the solutions to fix Windows cannotВ be installed to the disk issue on your own PC.
Fix 1. Convert Dynamic Disk to Basic Disk
If you receive Error 1 — «Windows cannot be installed to this hard disk space. The partition contains one or more dynamic volumes that are not supported for installation», convert dynamic to basic disk.
EaseUS Partition Master also helps you convert dynamic disk to basic disk easily and quickly.
Here are the detailed steps:
Step 1. Install and open EaseUS Partition Master on your Windows computer.
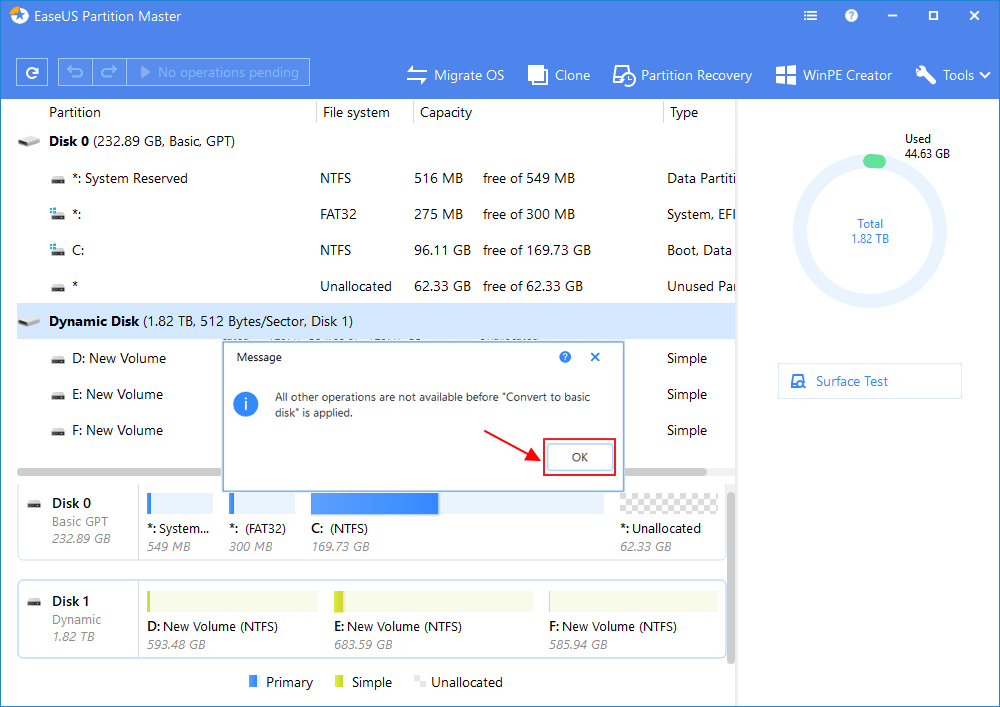
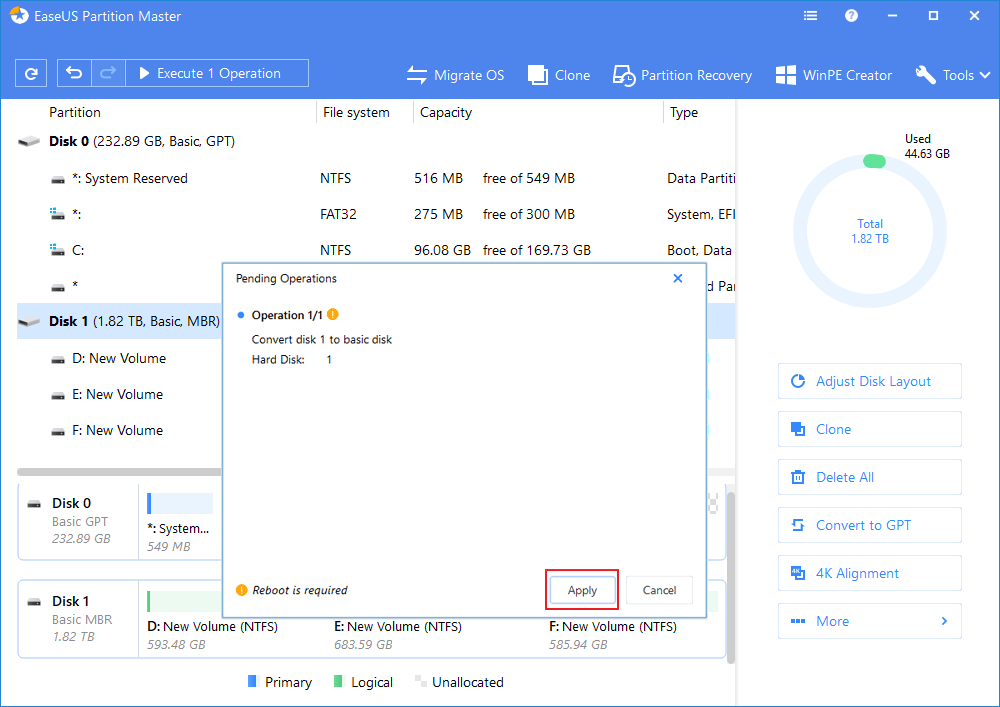
Step 2. Select the dynamic disk that you want to convert to basic. Right-click it and choose «Convert to Basic».

Step 3. Click «OK» on the pop-up notice window and you will add this conversion to the pending operations.
Step 4. Click the «Execute 1 Operation» button at the top-left corner and click «Apply» to begin to convert the dynamic disk to a basic disk. After that, you can also use this partition manager to resize/move, clone, merge, format, and delete the partitions.
Fix 2. Remove HDD Protection and Change SATA Controller Mode (for Error 2)
If you receive this message «Windows cannot be installed to this disk. This computer’s hardware may not support booting to this disk. Ensure the disk’s controller is enabled in the computer’s BIOS menu.» — Error 2, you should do two things:
Phrase 1. Remove Hard Disk Protection
Check if your hard disk protection is enabled. If it is, contact the salesperson and remove the protection according to his instructions.
Here is a quick guide that you can follow to remove write protection from hard drive using DiskPart:
Step 1. Start > RunВ -> type CMD and press enter.
Step 2. Type diskpartВ and press enter.
Step 3. Type the following command lines and hit enter each time:
- list volume
- select volume # (# is the number of your HDD.)
- attributes disk clear read-only
- clean
Step 4. TypeВ exitВ and hit Enter. Close DiskPart to finish the process.
After this, you’ve successfully removed write protection from your hard drive. If you need more practical solutions, refer to How to Remove Write Protection on SSD for help.
Phrase 2. Change SATA Controller Mode
This error may indicate that BIOS settings of your computer are not properly configured. Make sure you have changed the SATA Controller mode in BIOS. Then, you can try setting BIOS to the factory and go back to the default setting.
Fix 3. Repair Your HDD to Fix «Windows Cannot Be Installed to the Hard Disk Space»
Error 3 — «Windows cannot be installed to this disk. The disk may fail soon.» occurs when there’s something wrong with your HDD. What to do with a dying HDD? How to repair it? You should stop Windows installation, and then clone or back up important data immediately. Then, you can start repairing your HDD.
Fix 4. Format the Partition to NTFS
This method aims to solve Error 4. When partitions on the target disk are not with the NTFS file system, Windows cannot be installed to the disk.
Changing a volume’s file system is not an easy task for those who are not familiar with computer management and command line. Thus, an easy and safe solution is needed.
Comprehensive partition manager software — EaseUS Partition Master can fully meet this requirement. It enables you to format HDD to NTFS easily.
For this case, you need to create a bootable drive and then format hard drive from USB.
After fixing Windows cannot be installed to this disk or GPT/MBR drive error, you can then continue installing Windows on your target disk in your PC.В
Conclusion
This page covers 4 fixes to get rid of «Can’t install Windows on GPT disk» error and 4 practical methods to remove «Windows cannot be installed to the drive» errorВ for all levels of Windows users.В
If you are faced with any one of the errors, you can find answers here. If your target disk has unsupported partition styles disallow you installing Windows on it, EaseUS Partition Master helps convert GPT to MBR, Convert MBR to GPT, and even change Dynamic to Basic disk.
This software plays an important role during the fixing process. Why not get it now.
Extended Reading: Cannot Install Windows FAQs
Besides the above issues, if you have further concerns about installing Windows on GPTor MBR disk, check the questions and answer below.
You may get a clue:
1. How do I fix Windows cannot be installed to this disk MBR?
How do you fix ‘Windows cannot be installed to this disk’? The solution is easy to conclude: change MBR to GPT.
Here are two methods that you can try:
- Method 1. Change MBR to GPT using EaseUS Partition Master (as presented on this page in Fix 3 Part 1)
- Method 2. Run DiskPart to change MBR disk to GPT (as presented on this page in Fix 4 Part 1)
2. Can GPT boot into Windowsпјџ
Yes. GPT can be used to boot Windows OS as long as you have a Windows system installed on the disk or you have migrated your computer operating system on the disk.
If you need a guide to migrate OS to GPT, follow this link for help: Transfer Windows 10 to New Hard Drive (HDD/SSD).В
3. How do I change GPT partition to BIOS?
Mostly, GPT partition supports UEFI boot mode and BIOS compatibility mode. In order to change GPT partition to Legacy BIOS mode, you need to follow the following tips:
- #1. Check if your computer motherboard supports BIOS boot mode. (Check BIOS)
- #2. If the motherboard supports BIOS boot, then you need to check if your disk is with the MBR partition style.
- If not, convert GPT to MBR disk using provided method on this page in Part 1.В
- #3. Install Windows that support BIOS boot on the disk.
- #4. Finish Windows installation, enter BIOS and set the computer to boot on the MBR disk which was with GPT partition.
- #5. Save the changes, and restart PC.В
Was This Page Helpful?
Daisy is the Senior editor of the writing team for EaseUS. She has been working in EaseUS for over ten years, starting from a technical writer to a team leader of the content group. As a professional author for over 10 years, she writes a lot to help people overcome their tech troubles.
I love that the changes you make with EaseUS Partition Master Free aren’t immediately applied to the disks. It makes it way easier to play out what will happen after you’ve made all the changes. I also think the overall look and feel of EaseUS Partition Master Free makes whatever you’re doing with your computer’s partitions easy.
Partition Master Free can Resize, Move, Merge, Migrate, and Copy disks or partitions; convert to local, change label, defragment, check and explore partition; and much more. A premium upgrade adds free tech support and the ability to resize dynamic volumes.
It won’t hot image your drives or align them, but since it’s coupled with a partition manager, it allows you do perform many tasks at once, instead of just cloning drives. You can move partitions around, resize them, defragment, and more, along with the other tools you’d expect from a cloning tool.
Brithny/2021/02/26
Daisy/2020/12/11
Jean/2021/02/25
Jean/2020/12/11
About EaseUS Partition Master
All-round disk & partition management software for personal and commercial use. Let it manage your storage drive: resize, format, delete, clone, convert, etc.


