- Download and install Windows support software on your Mac
- Install the latest macOS updates
- Format a USB flash drive
- Download the Windows support software
- Install the Windows support software
- Learn more
- Install Windows 10 on your Mac with Boot Camp Assistant
- What you need to install Windows 10 on Mac
- How to install Windows 10 on Mac
- 1. Check your Secure Boot setting
- 2. Use Boot Camp Assistant to create a Windows partition
- 3. Format the Windows (BOOTCAMP) partition
- 4. Install Windows
- 5. Use the Boot Camp installer in Windows
- How to switch between Windows and macOS
- Learn more
- Установка Windows 7/8 на Mac без использования оптического привода
- Этап 1: Создание раздела Boot Camp
- Этап 2: Создание образа обобщенной установки Windows 7/8
- Этап 3: Заливаем образ WinClone на раздел Boot Camp
Download and install Windows support software on your Mac
After using Boot Camp Assistant to install or upgrade Microsoft Windows on your Mac, you might also need to install the latest Windows support software (drivers) from Apple.
When you install Microsoft Windows on your Mac, Boot Camp Assistant automatically opens the Boot Camp installer, which installs the latest Windows support software (drivers). If that doesn’t happen, or you experience any of the following issues while using Windows on your Mac, follow the steps in this article.
- Your Apple mouse, trackpad, or keyboard isn’t working in Windows.
Force Touch isn’t designed to work in Windows. - You don’t hear audio from the built-in speakers of your Mac in Windows.
- The built-in microphone or camera of your Mac isn’t recognized in Windows.
- One or more screen resolutions are unavailable for your display in Windows.
- You can’t adjust the brightness of your built-in display in Windows.
- You have issues with Bluetooth or Wi-Fi in Windows.
- You get an alert that Apple Software Update has stopped working.
- You get a message that your PC has a driver or service that isn’t ready for this version of Windows.
- Your Mac starts up to a black or blue screen after you install Windows.
If your Mac has an AMD video card and is having graphics issues in Windows, you might need to update your AMD graphics drivers instead.

Install the latest macOS updates
Before proceeding, install the latest macOS updates, which can include updates to Boot Camp.
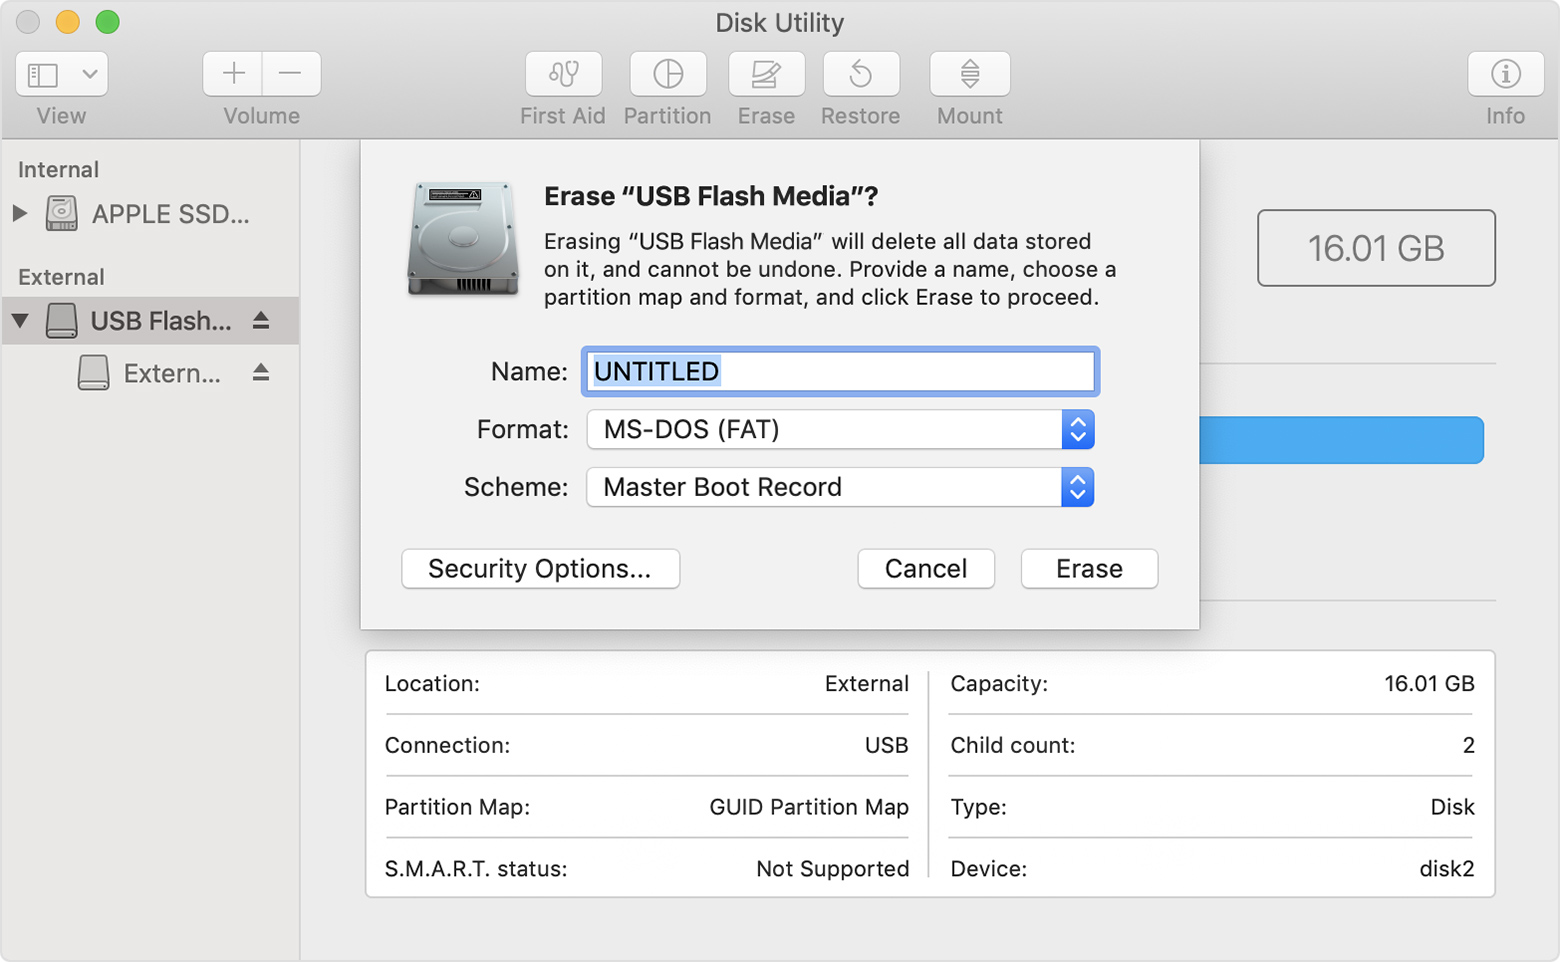
Format a USB flash drive
To install the latest Windows support software, you need a 16GB or larger USB flash drive formatted as MS-DOS (FAT).
- Start your Mac from macOS.
- Plug the USB flash drive into your Mac.
- Open Disk Utility, which is in the Utilities folder of your Applications folder.
- Choose View > Show All Devices from the menu bar.
- From the sidebar in Disk Utility, select your USB flash drive. (Select the drive name, not the volume name beneath it.)

- Click the Erase button or tab.
- Choose MS-DOS (FAT) as the format and Master Boot Record as the scheme.
- Click Erase to format the drive. When done, quit Disk Utility.
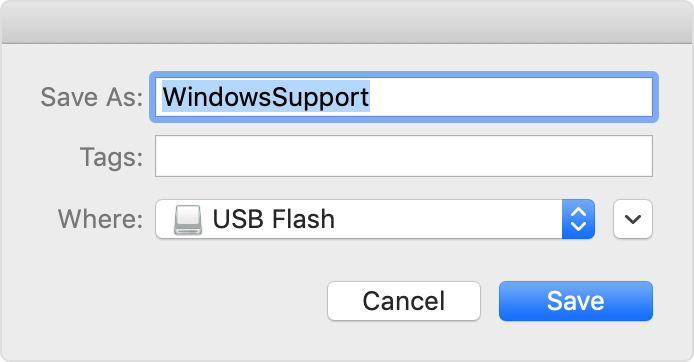
Download the Windows support software
- Make sure that your Mac is connected to the Internet.
- Open Boot Camp Assistant, which is in the Utilities folder of your Applications folder.
- From the menu bar at the top of your screen, choose Action > Download Windows Support Software, then choose your USB flash drive as the save destination. When the download completes, quit Boot Camp Assistant.
Install the Windows support software
After downloading the Windows support software to your flash drive, follow these steps to install the software. (If you’re attempting to resolve issues with a Bluetooth mouse or keyboard, it might be easier to use a USB mouse or keyboard until these steps are complete.)
- Make sure that the USB flash drive is plugged into your Mac.
- Start up your Mac in Windows.
- From File Explorer, open the USB flash drive, then open Setup or setup.exe, which is in the WindowsSupport folder or BootCamp folder. When you’re asked to allow Boot Camp to make changes to your device, click Yes.
- Click Repair to begin installation. If you get an alert that the software hasn’t passed Windows Logo testing, click Continue Anyway.
- After installation completes, click Finish, then click Yes when you’re asked to restart your Mac.
Learn more
If you can’t download or save the Windows support software:
- If the assistant says that the Windows support software could not be saved to the selected drive, or that the USB flash drive can’t be used, make sure that your USB flash drive has a storage capacity of at least 16GB and is formatted correctly.
- If the assistant doesn’t see your USB flash drive, click Go Back and make sure that the drive is connected directly to the USB port on your Mac—not to a display, hub, or keyboard. Disconnect and reconnect the drive, then click Continue.
- If the assistant says that it can’t download the software because of a network problem, make sure that your Mac is connected to the Internet.
- Make sure that your Mac meets the system requirements to install Windows using Boot Camp.
If a Mac feature still doesn’t work after updating the Windows support software, search for your symptom on the Apple support website or Microsoft support website. Some features of your Mac aren’t designed to work in Windows.
Information about products not manufactured by Apple, or independent websites not controlled or tested by Apple, is provided without recommendation or endorsement. Apple assumes no responsibility with regard to the selection, performance, or use of third-party websites or products. Apple makes no representations regarding third-party website accuracy or reliability. Contact the vendor for additional information.
Источник
Install Windows 10 on your Mac with Boot Camp Assistant
With Boot Camp, you can install Microsoft Windows 10 on your Mac, then switch between macOS and Windows when restarting your Mac.
What you need to install Windows 10 on Mac
- MacBook introduced in 2015 or later
- MacBook Air introduced in 2012 or later
- MacBook Pro introduced in 2012 or later
- Mac mini introduced in 2012 or later
- iMac introduced in 2012 or later 1
- iMac Pro (all models)
- Mac Pro introduced in 2013 or later
The latest macOS updates, which can include updates to Boot Camp Assistant. You will use Boot Camp Assistant to install Windows 10.
64GB or more free storage space on your Mac startup disk:
- Your Mac can have as little as 64GB of free storage space, but at least 128GB of free storage space provides the best experience. Automatic Windows updates require that much space or more.
- If you have an iMac Pro or Mac Pro with 128GB of memory (RAM) or more, your startup disk needs at least as much free storage space as your Mac has memory. 2
An external USB flash drive with a storage capacity of 16GB or more, unless you’re using a Mac that doesn’t need a flash drive to install Windows.
A 64-bit version of Windows 10 Home or Windows 10 Pro on a disk image (ISO) or other installation media. If installing Windows on your Mac for the first time, this must be a full version of Windows, not an upgrade.
- If your copy of Windows came on a USB flash drive, or you have a Windows product key and no installation disc, download a Windows 10 disk image from Microsoft.
- If your copy of Windows came on a DVD, you might need to create a disk image of that DVD.
![]()
How to install Windows 10 on Mac
To install Windows, use Boot Camp Assistant, which is included with your Mac.
1. Check your Secure Boot setting
Learn how to check your Secure Boot setting. The default Secure Boot setting is Full Security. If you changed it to No Security, change it back to Full Security before installing Windows. After installing Windows, you can use any Secure Boot setting without affecting your ability to start up from Windows.
2. Use Boot Camp Assistant to create a Windows partition
Open Boot Camp Assistant, which is in the Utilities folder of your Applications folder. Follow the onscreen instructions.
- If you’re asked to insert a USB drive, plug your USB flash drive into your Mac. Boot Camp Assistant will use it to create a bootable USB drive for Windows installation.
- When Boot Camp Assistant asks you to set the size of the Windows partition, remember the minimum storage-space requirements in the previous section. Set a partition size that meets your needs, because you can’t change its size later.
3. Format the Windows (BOOTCAMP) partition
When Boot Camp Assistant finishes, your Mac restarts to the Windows installer. If the installer asks where to install Windows, select the BOOTCAMP partition and click Format. In most cases, the installer selects and formats the BOOTCAMP partition automatically.
4. Install Windows
Unplug any external devices that aren’t necessary during installation. Then click Next and follow the onscreen instructions to begin installing Windows.
5. Use the Boot Camp installer in Windows
After Windows installation completes, your Mac starts up in Windows and opens a ”Welcome to the Boot Camp installer” window. Follow the onscreen instructions to install Boot Camp and Windows support software (drivers). You will be asked to restart when done.
- If the Boot Camp installer never opens, open the Boot Camp installer manually and use it to complete Boot Camp installation.
- If you have an external display connected to a Thunderbolt 3 port on your Mac, the display will be blank (black, gray, or blue) for up to 2 minutes during installation.
How to switch between Windows and macOS
Restart, then press and hold the Option (or Alt) ⌥ key during startup to switch between Windows and macOS.
Learn more
If you have one of these Intel-based Mac models using OS X El Capitan or later, you don’t need a USB flash drive to install Windows:
- MacBook introduced in 2015 or later
- MacBook Air introduced in 2017 or later 3
- MacBook Pro introduced in 2015 or later 3
- iMac introduced in 2015 or later
- iMac Pro (all models)
- Mac Pro introduced in late 2013 or later
For more information about using Windows on your Mac, open Boot Camp Assistant and click the Open Boot Camp Help button.
1. If you’re using an iMac (Retina 5K, 27-inch, Late 2014) or iMac (27-inch, Late 2013) or iMac (27-inch, Late 2012) with a 3TB hard drive and macOS Mojave or later, learn about an alert you might see during installation.
2. For example, if your Mac has 128GB of memory, its startup disk must have at least 128GB of storage space available for Windows. To see how much memory your Mac has, choose Apple menu > About This Mac. To see how much storage space is available, click the Storage tab in the same window.
3. These Mac models were offered with 128GB hard drives as an option. Apple recommends 256GB or larger hard drives so that you can create a Boot Camp partition of at least 128GB.
Information about products not manufactured by Apple, or independent websites not controlled or tested by Apple, is provided without recommendation or endorsement. Apple assumes no responsibility with regard to the selection, performance, or use of third-party websites or products. Apple makes no representations regarding third-party website accuracy or reliability. Contact the vendor for additional information.
Источник
Установка Windows 7/8 на Mac без использования оптического привода
На многих компьютера Mac сегодня отсутствует оптический привод: он просто не идет в комплекте на macbook air и mac mini, на некоторых MacBook/iMac заменен на дополнительный 2.5-дюймовый диск, а некоторых компьютерах привод может просто не работать.
Новые маки умеют загружаться с флешки, однако я обладатель не новых (2010), а также данное руководство будет полезно тем, кто хочет быстро ставить Windows из образа на любой мак.
Я перепробовал много способов — пытался установить с USB флешки/диска, все было тщетно (далеко не каждый mac загружается с флешки или внешнего диска). Refit также ничего не дал — был темный экран. Данный способ был просто спасением.
Итак, что необходимо:
- Virtual Box
- WinClone (последняя бесплатная версия)
- Windows 7/8 ISO образ, который вам нравится
Этап 1: Создание раздела Boot Camp
Создайте раздел Bootcamp используя Boot Camp Assistant. Операция достаточно простая. В 10.6 ассистент создает раздел без замечаний, в 10.7 — предупредит о том, что у вас отсутствует привод.
Этап 2: Создание образа обобщенной установки Windows 7/8
Слово «обобщенный» здесь означает, что образ не привязан к какому-то конкретному железу Mac. После его заливки на раздел Boot Camp (используя WinClone), при загрузке с него Windows 7/8 автоматически настроит всё железо, перезагрузится и вы можете работать. Однако могут понадобится дополнительные драйвера, которые вы можете поставить из комплекта Boot Camp. Данный образ вы можете использовать в будущем на любом мак для очень быстрой установки Windows. Однако, в первый раз его необходимо создать, эта процедура не самая простая:
Этап 2.1: Установка Windows 7/8 в VirtualBox
Создайте новую виртуальную машину в VirtualBox, назовите её win7. Важно использовать для виртуальной машины VDI образ диска обязательно динамический (dynamically allocated). Размера в 10 ГБ должно быть достаточно. Установите Windows, используя установочный ISO образ. Никакого софта больше не ставьте, включая вспомогающий софт от VirtualBox, т.к. это должна быть чистая система.
Этап 2.2: Удаление раздела System Reserved (Зарезервировано системой) в Windows 7/8
Проблема в том, что Windows создала еще один дополнительный раздел, в котором собственно находится загрузчик. Необходимо перенести загрузчик на основной раздел и удалить этот вспомогательный.
Update: Можно сделать проще: по старте установки Windows 7/8 при выбора раздела диска создаем новый и появляются диск System Reserved и С:\. Дальше диск С:\ удаляем, а System Reserved растягиваем до нужного размера и форматируем. После этого в него можно установить Windows и не будет раздела System Reserved. Спасибо IGHOR Либо используем этот метод (для уже установленной Windows):
- Загружаем Windows
- Заходим в Управление дисками (правый щелчок по Компьютер в Проводнике -> Управление)
- Назначаем любую букву для нашего скрытого раздела (правый щелчок мыши по разделу и выбираем пункт Изменить букву диска или путь к диску). Например назначили букву E:
- Запускаем командную строку под администратором. Поочередено, внимательно, вводим следущие команды:
- выгружает эту ветку реестра
- копируем файл bootmgr
- копируем папку Boot
- прописываем загрузчик в раздел C:
По выводу команд убеждаемся, что всё прошло успешно. Теперь командную строку можно закрыть.
- В Управление дисками делаем активным раздел C и удаляем уже ненужный раздел System Reserved. Останется нераспределенное место (100 МБ у меня), но это не важно.
- Перезагружаемся, система должна нормально загрузится теперь с раздела C:
Этап 2.3: Делаем Windows обобщенной используя утилиту sysprep
- Запускаем командную строку под администратором. Вводим:
точного ответа на вопрос «зачем» нет. Но этот сервис остановить необходимо - В папке C:\Windows\System32\sysprep создаем файл unattend.xml следущего содержания:
Внимательно проследите за тем, чтобы расширение файла было именно «XML», так как по умолчанию Windows может добавить «TXT»: unattend.xml.txt. Я для этого в св-вах папки выставил опцию всегда показывать расширения всех файлов. - Запускаем C:\Windows\System32\sysprep\sysprep.exe. Поставьте следущие опции:

Жмем «ОК», машина должна выключится сама.
Этап 2.4: Конвертирование образа VDI в WinClone образ
Этап 3: Заливаем образ WinClone на раздел Boot Camp
Используем второй таб Restore в программе WinClone и заливаем созданный в предыдещем этапе образ на уже физический раздел Boot Camp.
Для будущих инсталляций теперь вам нужно только этапы 1 и 3, второй необходимо проделать лишь один раз.
Я не являюсь автором данного know-how, это вольный перевод на русский (с незначительными дополнениями и улучшениями). Оригинал данной статьи доступен здесь. Метод опробован мной лично на 2 mac — iMAC MC508 2010 и Mac Mini 2011 младшая модель, работает замечтально, за что спасибо автору, который также говорил, что способ опробовали сотни людей, и он just works.
PS. Прошу строго не пинать, это мой первый пост здесь. Спасибо.
Источник


