- How to Clone Windows 10/8/7 to Another Computer
- WhyВ Need to Clone Windows 10 to a New Computer
- Part 1. How to Clone Windows 10 to Another Computer
- Part 2.В How to Transfer Files from One Computer to Another
- Bottom Line
- Installing Retail Windows 10 on another computer
- Replies (3)
- Should you transfer Windows 7 from one computer to another?
- How do I move Windows 7 from one computer to another?
- 1. Move Windows 7 to a different motherboard
- 2. Use Sysprep
- Issues with transferring Windows from one PC to another
- 1. If you have a retail license
- 2. If you have an OEM license
- Conclusion
- How to Move/Transfer Windows Installation to Another Computer
- Move Existing Windows 10 Installation to Another Computer
- Move or Transfer Windows 10 and Windows 7 Installation to Any Computer Using Third-party Software
- Windows Easy Transfer is No More Available for Windows 10 – Use PCmover Express Instead to Move Old Windows OS to New PC
- Uninstall Windows Product Key and Use the Key to the New PC
- Final Words:
How to Clone Windows 10/8/7 to Another Computer
WhyВ Need to Clone Windows 10 to a New Computer
«I have a new laptop to replace my old computer as it becomes slower and slower after running for a few years. The problem I’m facing now is that how can I keep the Windows 10, programs, and files the same as the old PC. I don’t want to reinstall Windows and applications. Is there a quick and easy way to do that?»
Many users have the same confusion as to the one above. Planning to switch to a new computer, but don’t know how to migrate the Windows and data on the old PC. Instead of wasting time re-installing system, applications,В and files, you can use the methods here to finishing cloning your PC efficiently.
Suppose you only need to clone Windows 10 and applications to the new computer, you can go to part 1В and use powerful backup softwareВ to transfer system. If you still want to copy files from the old computer to the new one, you can’t miss the one-click PC data transfer tool in part 2. It enables you to transfer large data between two computers wirelessly.В В
Part 1. How to Clone Windows 10 to Another Computer
Whenever we discuss cloning Windows 10 from one computer to another, compatibility and start-up issues are our top concerns. Since most hardware requires the appropriate drivers to run, you cannot simply move the system to a new computer with a different hardware configuration, and hope that the system can run normally.
To avoid these worries and clone the Windows system without removing and installing disk, we highly recommend you try the «System Transfer» function provided by EaseUS Todo Backup. ThisВ tool can help you to clone Windows 10 from the old computer to the new one with a bootable disk. And it ensures a successful system boot-up from cloned hard drive on the new computer. В Now, prepare a proper WinPE emergency disk/USB, and let’s begin to clone a PC by creating a Windows 10 system backup.
Support Windows 10/8.1/8/7/Vista/XP
Step 1. Create an Emergency Disk to USB
1. Connect an empty USB flash drive or external hard drive (with over than 100GB space) to your PC.
Note: Initialize the USB or external hard drive as MBR, and create two partitions: set the firstВ partition as FAT32 and the second partition as NTFS.В В
2. Run EaseUS Todo Backup and click «Tools» > «Create Emergency Disk».
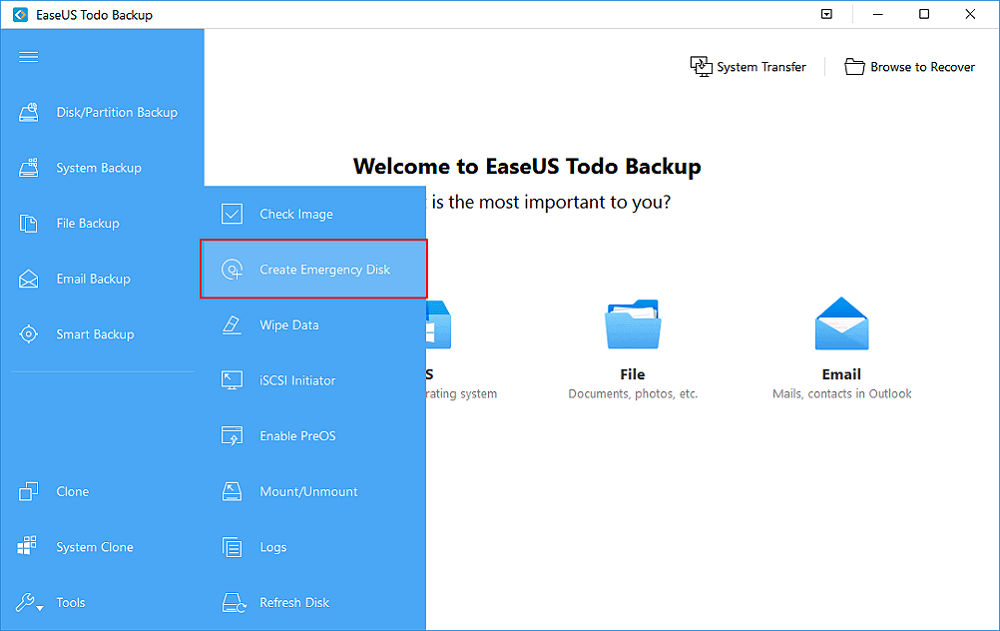
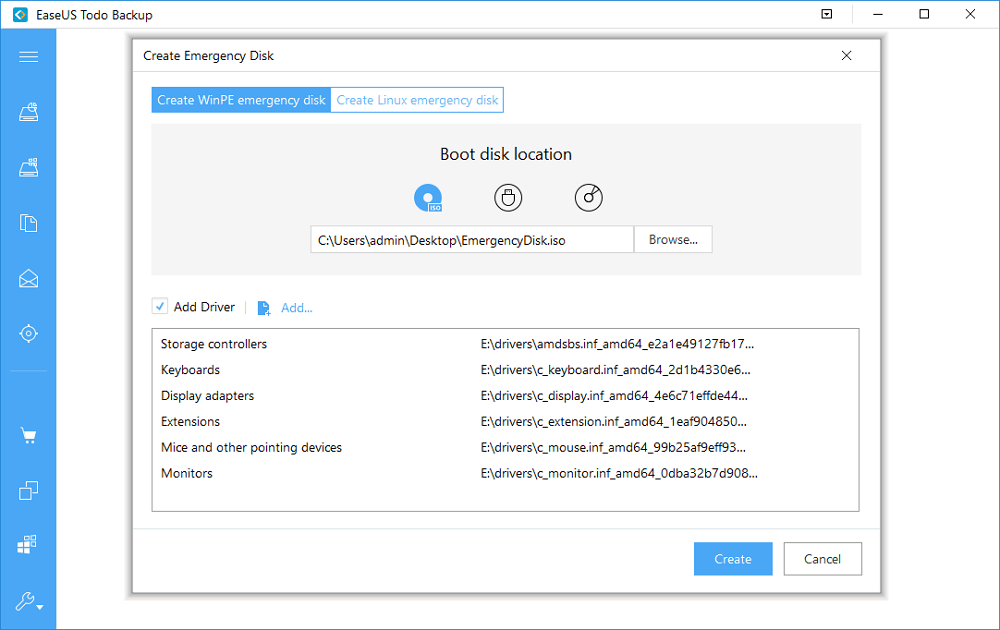
3. Choose USB as the disk location to create the emergency disk and click «Create».
The bootable disk will help you boot computer andВ transfer system image to the new PC.
Step 2. Create System Backup Image on Source Computer
1. Click «System Backup» on the left pane andВ Windows OS will be selected by default.
2. Click «Browse» andВ specify the second partition of theВ USB drive which contains the emergency disk to save system image.
You may also save system backup image to another empty external disk (which must be equal or bigger than the system C drive).
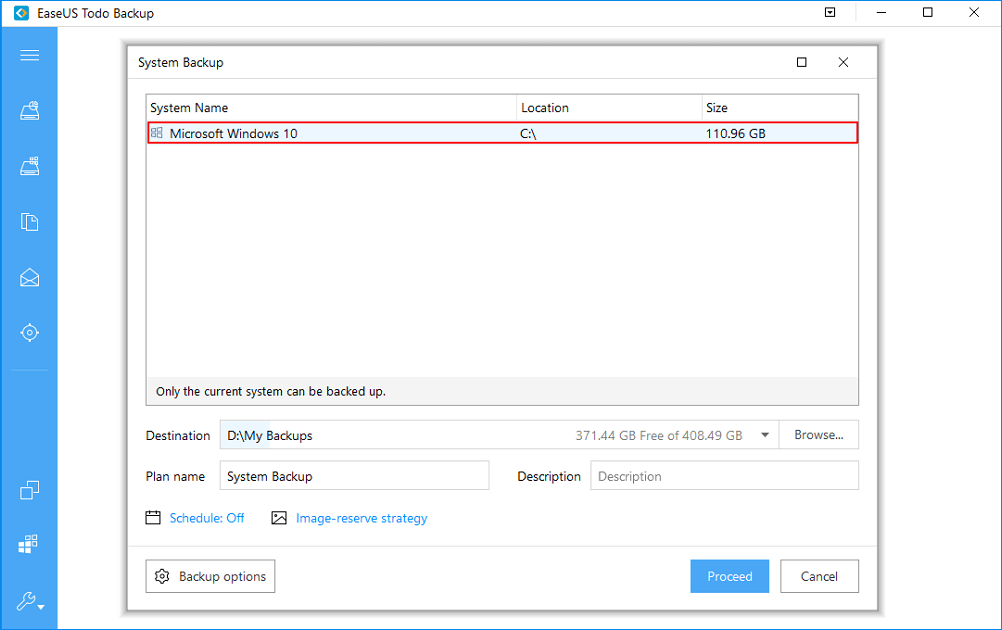
3. ClickВ «Proceed» to start creating a system backup image to the target device.
Step 3. Boot Target Computer from EaseUS Todo Backup Emergency Disk
1. Eject EaseUSВ emergency disk and system backup image USB and connect it to the new computer.
2. Restart PC and press «F2/F8″В to boot into BIOS.В
3. Go to the boot menu and set the computer to boot from the EaseUS Todo Backup emergency disk.
If you want to restore the system image to a GPT disk, you need to change the boot mode to EUFIВ in BIOS. Then your computer willВ enter EaseUS Todo Backup main interface.
Step 4. Transfer System to the New Computer
Note: RestoringВ system image to theВ new computerВ will erase the data on the target disk.В Remember to backВ up the files in advanceВ or use an emptyВ disk to restore the system imageВ to avoid data loss.
1. On EaseUS Todo Backup main interface, click «System Transfer».В

2. Select the system image on your USB external drive and clickВ «OK» to continue.
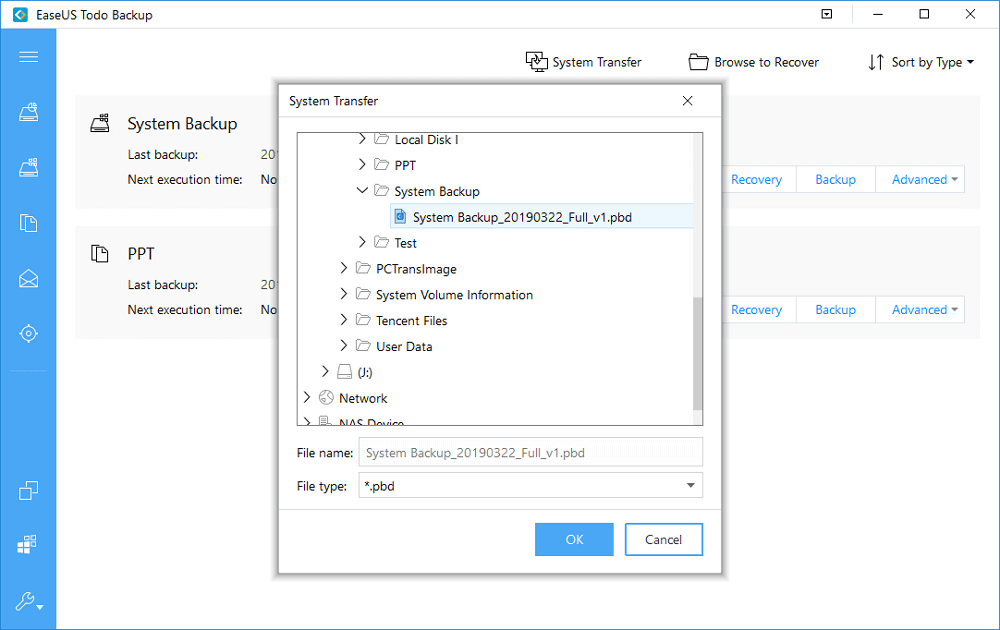
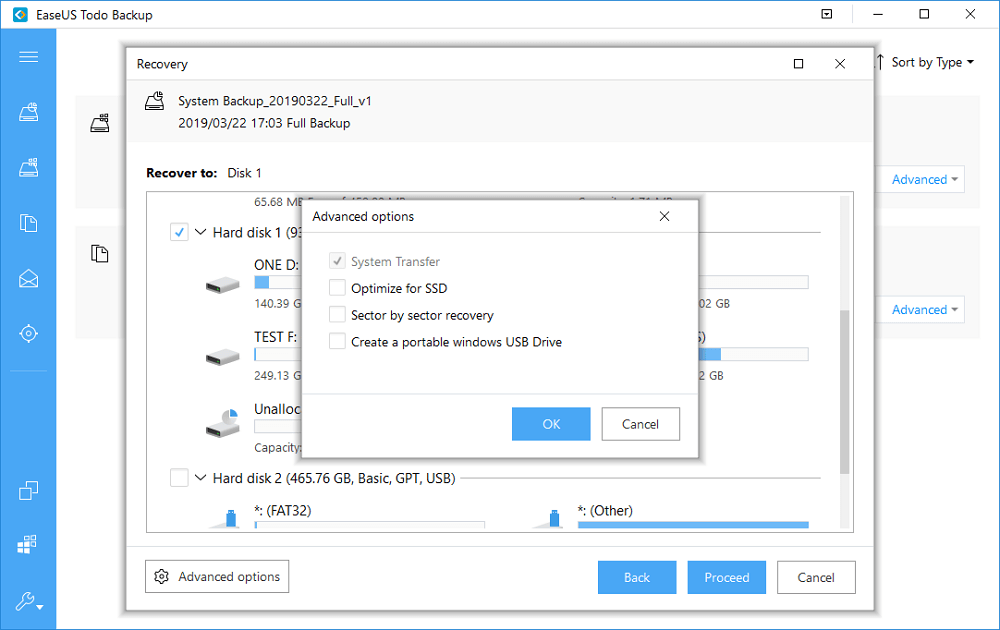
3. Specify the disk to restoreВ system image and tick «System Transfer» in Advanced options. ClickВ «OK» to save changes.
Then click «Proceed» to start transferring the system to a new computer.
Step 5. Restart PC with transferred system
1. Enter BIOS andВ set computer to boot up from the drive with the transferred system.
2. Save all changes and restart your computer.
3. Update all drive drivers and programs to ensure all things will work just fine on the new computer.
When the system transfer accomplishes, Windows 10/Windows 7 and most applications will work on your computer. In case you have some software installed on other partitions rather than the C drive, you can copy them to the new computer by yourself for regular use.
Except for system transfer, EaseUS Todo BackupВ also provides you the system clone feature to resolve many complex migration problems, especially when your need to upgrade hard disk from an old to a new one, from a smaller to a larger one, or from HDD to SSD. Take a look and get more practical tutorials.
Part 2.В How to Transfer Files from One Computer to Another
EaseUS offers you a complete computer migration solution. After you have transferred the operating system from the old computer to the new one with EaseUS Todo Backup, you can continue to copy files with the great PC data transfer software — EaseUS Todo PCTrans.
CopyingВ large numbers of files and programsВ manually is veryВ time-consuming,В or you simply do not have a large enough external drive to complete the data migration. Don’t be bothered by these problems. Use this easy PC transfer tool to quickly and safelyВ migrate all the files, folders, and programs.
Step 1. Launch EaseUS Todo PCTrans on your source and target computers, connect both PCs via the internet.
1. At the «PC to PC» section, click «PC to PC» to continue.В

2. Select your target computer via its device name, then enter its account password or verification code and select the transfer direction. Then click «Connect» to continue.
You can check the verification code on the right top of «PC to PC» mainscreen on the target computer.

Step 2. Select the categories Applications, Files, and Accounts to transfer via the internet.
If you want to transfer data selectively, click «Edit» under each category, and choose the specific items.

Step 3. Click «Transfer» to start transferring your apps/files/accounts from one computer to another computer via the Internet.

Bottom Line
EaseUS Todo Backup assists you to easily replace your old computer without worrying about the system transfer problem. This Windows schedule backup software also can back up your new computer regularly and automatically with the disk/partition backup function. Being efficient and convenient, it is your best bet.
Was This Page Helpful?
Tracy joined in EaseUS in 2013 and has been working with EaseUS content team for over 7 years. Being enthusiastic in computing and technology, she writes tech how-to articles and share technical solutions about Windows & Mac data recovery, file/system backup and recovery, partition management and iOS/Android data recovery.
Taking everything into consideration, we can say that EaseUS Todo Backup Home can offer you a little extra sense of security with a set of advanced tools. The interface provides quick adaptation, every process guiding you all the way through so you don’t get stuck or further damage your system rather than keeping it safe.
EaseUS Todo Backup Free lets you create backups of your important files or your entire computer through its streamlined interface. Just choose the backup type you’d like to get started, and let the program do the reset.
EaseUS includes all the features I expect from backup software like versioning, incremental backups, and scheduling. For more advanced users, EaseUS allows you to install a pre-boot environment onto your hard drive so you can use it to restore files without burning a CD or putting it on an external USB drive.
Tracy King/2021/03/03
Jean/2021/01/22
Brithny/2021/03/04
Jean/2021/01/22
EaseUS Todo Backup
Smart backup tool for your files and entire computer in Windows 10/8/7.
Installing Retail Windows 10 on another computer
Hello all. I recently bought, installed and registered my Retail copy of Windows 10 Home. When the time comes, I will be installing Windows 10 on a new machine (or reinstalling on my current machine after a hardware upgrade).
My question: what do I have to do to ensure my product key transfers/activates in the future? Do I have to deregister my current computer first, then activate on the new computer later?
Replies (3)
Normally just deleting the OS partitions is enough since running slmgr /upk to remove the Key does nothing to notify MS Activation servers but just removes it from any install you’re about to get rid of anyway. But you can do both if you want, especially if you’re not deleting the old OS partitions which is the proper way to uninstall an OS.
With retail WIndows 10 you can move it anywhere you want. At most it may require activation via phone robocall to confirm with the server that it’s only installed on that one PC, replacing the previous hardware signature in MS Activation servers
The modern way to reinstall to same hardware is to save externally a System Image Backup to reapply from Windows 10 Installation Media , Recovery drive, or System repair disc in 20 minutes. This also preserves activation.
There is more here in these steps for Clean Reinstall Windows 10
Over 100,000 helped in forums for 11 years. I don’t quit for those who are polite and cooperative.
Windows MVP 2010-21
1 person found this reply helpful
Was this reply helpful?
Sorry this didn’t help.
Great! Thanks for your feedback.
How satisfied are you with this reply?
Thanks for your feedback, it helps us improve the site.
Should you transfer Windows 7 from one computer to another?

![]()
If you plan on using Windows 7 for a longer period of time, but the hardware you currently have has malfunction or is simply dated, then you are probably wondering whether you can move your Windows installation from one PC to another.
The short answer would be yes, but the truth of the matter is that it is a bit complicated.
How do I move Windows 7 from one computer to another?
1. Move Windows 7 to a different motherboard
The simplest method one can think of when moving a WIndows install from one PC to another would be to simply put the motherboard of the old PC into the new one.
Additionally, you could just transfer the WIndows install from one motherboard to another. In theory, this should pretty much do it, but there are a number of complications linked to this method.
First of all, your Windows 7 install is calibrated to the drivers of your old PC. Because of this, when you move it into another PC (most likely one with a whole different set of specs), you may get error,s or even BSODs when trying to boot.
2. Use Sysprep
This tool is designed for large organizations and PC manufacturers, and it prepares an installation of Windows for duplication, auditing, and customer delivery.
Unfortunately, this isn’t available for the general public, and it can only be used with fresh installs anyway.
Issues with transferring Windows from one PC to another
Besides the hardware issues mentioned above, there is also the matter of activating your Windows install once moved to a new PC. First of all, it all depends on the type of license that you have.
1. If you have a retail license
You can move it to another computer as long as it’s only installed on one computer at a time.
This is because activating it on the second computer will automatically deactivate the license for the first computer. The key will work with both 32 and 64 bit, but only one can be installed at a time.
2. If you have an OEM license
OEM licenses are tied to the first computer they are installed on and can not be transferred to a different computer.
However, one workaround would be to move the motherboard into a computer that has the exact same hardware components. This way you can still use the OEM license without any of the driver issues mentioned above.
Conclusion
Given how many complications there are with transferring an entire Windows install to another computer, you might as well go for a clean install.
However, if personal data is your main concern, you can always simply make a backup of all of your files, and then transfer them to a new computer.
Did you find this article useful? Let us know in the comments section below.
RELATED ARTICLES YOU SHOULD CHECK OUT:
How to Move/Transfer Windows Installation to Another Computer
The process of moving or transferring entire Windows installation is necessary when you make some hardware up-gradation (like hard disk change, mother-board change etc.) or if you shift to a completely new PC. Your Windows OS probably won’t boot if any major changes is made to the PC. The problem would be solved if you format the Windows PC and make a fresh installation. But, the process is time taking and you loss all the installed applications. But, ‘System Preparation’ Windows utility lets you transfer entire Windows installation (including drivers, installed software) to a new configuration of Windows computer. But, the question is when can you transfer the installation to new PC?
- When you buy a new PC and try to install the same OS in it.
- When you buy a new desktop and want to transfer the old os to the new PC.
Installed OS can’t be transferred for the following reasons:
- If you have RAID system, it is not recommended for you to use this method.
- As, this method is based on sysprep, so, the method can’t be applied for an upgraded OS.
- The repaired version of Windows OS can’t be transferred using sysprep.
What does sysprep/generalize command do to Windows (7, 8, 8.1 and 10) OS before moving to another PC?
- All system specific informations are uninstalled or deleted.
- Every hardware set up has it’s own security id (SID), this sysprep command resets the security ID.
- All system restore points are deleted.
- All event logs and personalizations are removed.
- Built-in administrator account needs to be re-enabled.
Move Existing Windows 10 Installation to Another Computer
The methods are different depending upon whether you are changing the hard disk of your PC or you are changing all other components except hard-disk. All the Windows installations files are stored in the hard drive. So, here is the method one when you change the hardware components but keep the old hard disk.
Method 1: Use Built-in System Preparation tool to move existing Windows 10 (or Windows 7 and Windows 8.1) installation to any other PC.
You are advised to use this method only when you meet the below requirements:
- Keeping the old hard drive as it is, do a major modification to your PC just like change of mother board, etc.
- Move the hard drive to a new computer that has the same Windows installation. For example, both of the PCs have Windows 7 installation and you move hard drive from one computer to another.
The method is as follows:
Step 1. Before you install the new hardware, reboot your PC to normal mode and disconnect all the external hardware except main keyboard and mouse.
Step 2. If you have more than one hard disk connected to your PC, at first, you need to find the location of your system installation folder. If, it is on the c:\ drive, then keeping that hard disk attached, remove all other hard disk connected to the PC. In case, if the system folder or user profile folder is located to another location, at first move those ones to the c:\ drive and then disconnect the other hard drive.
Step 3. Run the Windows command prompt as Administrator (start >> All Programs >> Accessories >> Command Prompt, right click on it and select run as administrator). Windows 10 and Windows 8 users can access command prompt as admin just by right clicking on start button and select run command prompt as administrator.
Step 4. Type the following command to the command prompt: %windir%\System32\Sysprep\Sysprep.exe and press Enter.
Step 5. The system preparation tool opens up. Choose ‘Enter system out-of-box enterprise (OOBE)’ option from the drop down under ‘System clean up action’ option and tick the ‘Generalize’ box. Under shut-down options choose shut-down from the drop down menu. Click OK.
Step 6. Sysprep command now generalizes your Windows log files, system specific informations, and resets the hardware within few minutes.
Caution: Don’t run any other program during sysprep generalization process.
Step 7. Switch off the PC and disconnect the main power supply and install the new hardware to the computer.
Step 8. Start the PC now from the sysprep generalize hard disk and it looks like first time Windows start-up while booting.
Move or Transfer Windows 10 and Windows 7 Installation to Any Computer Using Third-party Software
Method 2: Transfer Windows installation if you change the hard disk and or if you move the entire computer set up to new computer using third-party system imaging software
Step 1. Follow the first six steps from Method 1.
Step 2. Boot PC using CD/DVD software like Macrium or Partedmagic
Step 3. Create the image of your Windows system that you want to transfer to another PC.
Step 4. Now, shut down the PC, change the hard disk.
Step 5. Boot the hard disk with the imaging software and restore the image.
Step 6. Follow step 7 and step 8 from Method 1.
This method works everywhere and try to make a back-up before proceeds. Therefore, if you face any driver related issue, try to reset the driver one by one to bypass the issue.
You can use the method if you decide to change the old hard drive. The cloning process can take several hours depending upon the size of the disk you are cloning. Remember that, you can’t clone a hard disk to smaller size hard disk. New hard disk should be larger in size, otherwise the process will fail.
Windows Easy Transfer is No More Available for Windows 10 – Use PCmover Express Instead to Move Old Windows OS to New PC
PCmover is the express solution when you want to migrate wide range of data like all the files, installed applications, settings, user accounts and all the data to the new pc. Thus it saves your time and money. You don’t have to take help any third-party cloud storage during migration of files to another pc. PCmover provides a secure migration and the software needs to be installed in both of the PCs.
The free version of the software can’t perform the transfer procedure, you need to be upgraded at least to the professional edition or enterprise edition to move older Windows OS files to the newer PC. It supports data migration from the range of Windows XP to Windows 10. A home user have to pay at least $44.95 for the transfer.
All the features of PCmover are mentioned here:
- It can migrate all the programs (or selective programs), users data, computer settings, all the entire user accounts and personalized data to the new PC.
- The entire migration can be done using networking (LAN), USB transfer, portable storage device etc.
- It can clone the old PC image and restores it to the new Windows OS.
- You can run the software direct from the command prompt.
- Multiple number of migrations can be done to the new pc’s from a central location.
Lets see how to transfer files, data and software to another PC using PCmover.
Process of creating the file to be exported to new PC:
PCmover needs to be installed to both computer (old and new).
Run PCmover to the old PC and select Old computer option button to prepare it. Click Next to continue.
Choose anyone from the options for the as a connection method for transfer: Wi-fi or wired network, Laplink USB cable, file storage device like DVD, USB pen drive or external hard drive. I love to prefer the third option.
Click ‘Next’ and the application takes time to determine applications list from the old PC. It takes few minutes.
Now, PCmover asks you for a location where you wish to save the file to be transferred. The software save the file in a .pcv format. Click ‘Next’ so that PCmover can get time to save the file to a selected location. It takes almost 1/2 hour to 1 hour time to create the file to be transferred, depending upon the installed applications and data, the time may vary.
The import process to the new PC by PCmover:
Copy the .pcv file to the external USB flash drive, the file size might be too large, so size selection of pen drive is a vital part. Alternatively you can use DVDs or portable external hard drive for the same.
Run the PCmover to the new PC. Select “New (prepare this computer)” option from the option window and click ‘Next’ to continue.
Now, follow the on-screen instructions and choose the file to be imported. It takes few hours to complete the task.
Restart the new PC and you will find all the settings, data and user profiles to the new PC, just similar to the older one.
Uninstall Windows Product Key and Use the Key to the New PC
I have already mentioned different ways of transferring Windows OS from old PC to new computer. When you change the mother board or hard drive of a PC, your PC installation might break. So, at first, it is better to uninstall the existing product key so that you can use the same one to the new installation.
Follow the quick rules to uninstall product key from the Windows computer.
Open command prompt with administrative privilege.
Enter the following command:
Take note of the Windows Activation ID from the pop-up that appears.
Now, run the following command:
You will get the message confirmation that “Uninstalled product key successfully”.
To install the same product key to the new PC, you need to apply the below command.
Final Words:
In this tutorial, I try to cover all the possible pros and cons of moving old Windows OS to a new PC. You might face difficulties while cloning your hard drive, so, I try to mention step by step guide in this how-to-guide. If you find any better option to transfer Windows installation to new PC, don’t forget to ping us at our contact section.
TechPeriod’s opinion: So far, you have messed all the things around. You have tried sysprep, PCmover etc. But best option for me is a fresh installation of Windows OS to the new PC. Before doing a fresh installation, remove the product key from the old computer and add the same product key to the new installation to activate the product. The method might not be useful to the Windows OEM users. However, if you have lost your Windows product key, then you can run your Windows OS for 1 year without using the serial key.


