- Установка Windows 7 на VHD
- Что такое VHD
- Для чего это нужно
- С чего начать
- Работа из установленной операционной системы
- Работа с DVD носителя
- Опции загрузки
- Выводы
- Boot to a virtual hard disk: Add a VHDX or VHD to the boot menu
- Prerequisites
- Step 1: Create a VHDX from diskpart
- Step 2: Apply a Windows image to the VHD
- Step 3: Detach the VHD, copy it to a new device, and attach it (optional)
- Step 4: Add a boot entry
- Deploy Windows with a VHDX (Native Boot)
- What Is VHDX with Native Boot?
- Common Scenarios
- Requirements
- Benefits
- Limitations
- Types of Virtual Hard Disks
Установка Windows 7 на VHD


 Посетителей: 57151 | Просмотров: 106767 (сегодня 0)


![]()
Что такое VHD
VHD — это формат файлов, используемых, например, виртуальной машиной Microsoft Virtual PC для эмуляции жесткого диска. Я неоднократно писал о поддержке операционной системой Windows 7 этого формата. Пришло время рассказать, как можно заставить Windows 7 запускаться прямо с виртуального жестокого диска и работать на физическом оборудовании, без использования виртуальной машины. Загрузчик Windows 7 умеет работать с VHD-файлами и запускать с них ОС, словно с обычного жесткого диска.
Для чего это нужно
- На физическом оборудовании система работает намного быстрей, чем в виртуальной машине, и использует все «прелести» этого оборудования. Таким образом, если ваша видеокарта поддерживает Aero, то вы его получите.
- Вы получите полный доступ к данным вашего ПК, так как физический жесткий диск будет «видно» из системы, загруженной с VHD.
- Система в VHD хранится в одном файле, значит, можно:
-легко её клонировать простым копированием VHD-файла
-можно тестить бета-версии софта, не беспокоясь за систему
-можно изучать систему, экспериментировать с реестром, не боясь её «свалить».
С чего начать
- Установленная операционная система Windows 7
- VHD-файл
- Загрузочный DVD с Windows 7
- Утилита DiskPart (она входит в состав системы)
Есть два пути создания VHD-файла:
- через интерфейс Windows 7;
- через командную строку прямо во время загрузки c DVD.
Работа из установленной операционной системы
Запускаем управление дисками: щелкнув по «Компьютер» в меню «Пуск» правой кнопкой мыши, выберите пункт «Управление», и слева щелкните «Управление дисками»:
Выполните пункт меню «Действие»—«Создать жесткий диск». На экране появится это окно:
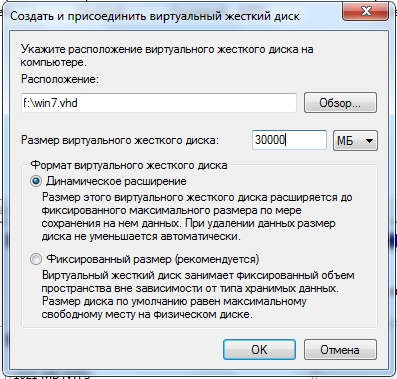
Задайте параметры расположения и размера жесткого диска. В данном примере я создаю новый файл Win7.vhd на диске F: размером 30 Гигабайт динамического типа.
Виртуальный жесткий диск готов к работе. Вставьте установочный диск Windows 7 в DVD-привод, перезагрузите текущую ОС, загрузитесь с DVD и дождитесь появления этого окна:
Нажмите Shift+F10. Это сочетание клавиш предоставит доступ к командной строке. Напечатайте в ней Diskpart и нажмите Enter.
Введите следующие команды:
Замените F: на верный путь в вашей системе.
Закройте окно командной строки и приступайте к установке операционной системы. При выборе раздела игнорируйте это предупреждение:
Работа с DVD носителя
Вставьте установочный диск Windows 7 в привод, загрузитесь с него и дождитесь появления этого окна:
Нажмите Shift+F10. Это сочетание клавиш предоставит доступ к командной строке. Напечатайте в ней Diskpart и нажмите Enter.
Напечатайте в DISKPART следующую команду:
Она означает — создать файл win7.vhd расширяемого типа, максимальный размер ограничить 30 Гигабайтами. Замените G: на имя диска, на котором вы хотите хранить создаваемый файл.
Смонтируйте VHD-файл, чтобы он был доступен программе установки:
После этого можно закрыть окно командной строки и выполнить установку на раздел VHD диска так, как будто это обычный логический раздел жесткого диска. При выборе раздела игнорируйте это предупреждение:
Опции загрузки
Программа установки сама пропишет новую запись в опции загрузки, однако, назовет она её «Windows 7». Вероятней всего, вы захотите изменить название. Это несложно сделать, используя стандартную утилиту bcdedit.exe. Запустите интерпретатор командной строки cmd.exe от имени администратора, для чего нажмите «Пуск», в поле поиска введите cmd.exe и нажмите CTRL+ENTER. Если у вас загружена «новая» система из VHD, введите:
В противном случае вы можете аналогичным образом переименовать текущую систему, либо найти идентификатор VHD-ОС в выводе bcdedit, запустив его без параметров:
В моем случае запись имеет идентификатор , и я выполню следующие команды:

- Системе
задать описание «Windows 7 From VHD» - Загружать по умолчанию текущую ОС. У меня была запущена Windows 7 с физического носителя, т.е. «родная».
Выводы
В данной статье были описаны основные приемы по организации загрузки Windows 7 с использованием виртуальных жестких дисков. Описанных шагов достаточно, чтобы установить Windows 7 в VHD-файл и загрузить её из него. Дополнительную информацию о VHD вы можете получить из статьи Работа с виртуальными жесткими дисками (VHD) в Windows 7.
Boot to a virtual hard disk: Add a VHDX or VHD to the boot menu
Native Boot allows you to create a virtual hard disk (VHDX), install Windows to it, and then boot it up, either on your PC side-by-side with your existing installation, or on a new device.
A native-boot VHDX can be used as the running operating system on designated hardware without any other parent operating system. This differs from a scenario where a VHDX is connected to a virtual machine on a computer that has a parent operating system.
Native boot for WindowsВ 10 requires the .vhdx format, not the .vhd format.
VHDXs can be applied to PCs or devices that have no other installations of Windows, without a virtual machine or hypervisor. (A hypervisor is a layer of software under the operating system that runs virtual computers.) This enables greater flexibility in workload distribution because a single set of tools can be used to manage images for virtual machines and designated hardware.
You can also deploy the VHDX to a PC that already has Windows installed on it, and use a boot menu to select between the existing version of Windows, or the version on the VHD.
To learn more about using VHDXs in an enterprise environment, see Understanding Virtual Hard Disks with Native Boot.
Prerequisites
A technician PC with the Windows Assessment and Deployment Kit (WindowsВ ADK) tools installed on it.
A generalized WindowsВ image (.WIM file). To learn more, see Sysprep (Generalize) a Windows installation.
A bootable WindowsВ PE drive. To learn more, see WinPE: Create USB Bootable drive.
A destination PC or device on which to install the VHDX. This device requires 30В gigabytes (GB) or more of free disk space. You can install the VHDX to a device already running other operating system installations, or as the only operating system on a device.
Step 1: Create a VHDX from diskpart
On the technician PC:
From the Command Prompt, open Diskpart.
Create and prepare a new VHDX. In this example, we create a 25 GB fixed-type VHDX.
Attach the VHDX. This adds the VHDX as a disk to the storage controller on the host.
Create a partition for the Windows files, format it, and assign it a drive letter. This drive letter will appear in File Explorer.
Step 2: Apply a Windows image to the VHD
On your technician PC, apply a generalized Windows image to the primary partition of the VHDX that you created and attached in Step 1.
Step 3: Detach the VHD, copy it to a new device, and attach it (optional)
You can deploy the VHDX to a device that already has a copy of Windows installed on it, or you can clean and prepare the destination PC’s hard drive to use the VHD.
Detach the VHDX and save it to a network share or storage drive
Use diskpart to detach the virtual disk from your technician PC.
Copy the VHDX to a network share or removable storage drive. The following maps a drive letter to a network share, creates a directory for the VHD, and then copies the VHD.
Clean and prepare a new device for native boot
On your destination PC:
Use your bootable WinPE key to boot the destination PC to WinPE.
Clean and prepare the destination PC’s hard drive. Create a system partition (S), and a main partition (M) where the VHDX will be stored.
Connect to the network drive or storage location where you copied the VHDX in step 3.2.
Copy the VHDX from the network drive or storage location to the destination PC’s main partition.
Attach the VHDX
While still booted into WinPE, attach your VHDX to the destination PC.
Identify the attached VHDX’s volume letter. (Optional: Change it to another letter that makes more sense, for example V, and leave the diskpart command line open for the next step).
Step 4: Add a boot entry
From your destination PC, open Diskpart (if necessary) and identify the drive letters of the VHDX and the system partition, for example, V and S.
Add a boot entry to the device. You can add multiple VHDX files using this method.
Remove the Windows PE USB key.
Restart the destination PC.
If there’s only one boot entry, the device immediately boots to Windows. If there’s more than one boot entry, you’ll see a boot menu where you can choose between the available versions of Windows on the device.
Deploy Windows with a VHDX (Native Boot)
Native boot enables Windows 10 virtual hard disks (VHDXs) to run on a computer without a virtual machine or hypervisor. A hypervisor is a layer of software under the operating system that runs virtual machines. Native boot for Windows 10 requires the .vhdx format, not the .vhd format.
What Is VHDX with Native Boot?
A virtual hard disk can be used as the running operating system on designated hardware without any other parent operating system, virtual machine, or hypervisor. Windows disk-management tools, the DiskPart tool and the Disk Management Microsoft Management Console (Diskmgmt.msc), can be used to create a VHDX file. A supported Windows image (.wim) file can be applied to a VHD, and the VHDX can be copied to multiple systems. The Windows boot manager can be configured to boot directly into the VHD.
The VHDX can also be connected to a virtual machine for use with the Hyper-V Role in WindowsВ Server.
Native-boot VHDXs are not designed or intended to replace full image deployment on all client or server systems. Enterprise environments already managing and using .vhdx files for virtual machine deployment will get the most benefit from the native-boot VHDX capabilities. Using the .vhdx file as a common image container format for virtual machines and designated hardware simplifies image management and deployment in an enterprise environment.
For more information about virtualization in Windows, see this Microsoft Web site. For more information about how to use VHDs with native boot, see this Microsoft Web site.
Common Scenarios
Using disk-management tools to create and attach a VHDX for offline image management. You can attach a VHDX by using the Attach vdisk command which activates the VHDX so that it appears on the host as a disk drive instead of as a .vhd file.
Mounting reference VHDX images on remote shares for image servicing.
Maintaining and deploying a common reference VHDX image to execute in either virtual or physical computers.
Configuring VHDX files for native boot without requiring a full parent installation.
Configuring a computer to boot multiple local VHDX files that contain different application workloads, without requiring separate disk partitions.
Using Windows Deployment Services (WDS) for network deployment of VHDX images to target computers for native boot.
Managing desktop image deployment.
Requirements
The local disk must have at least two partitions: a system partition that contains the WindowsВ boot-environment files and Boot Configuration Data (BCD) store, and a partition to store the VHDX file. The .vhd file format is supported for native boot on a computer with a WindowsВ 7 boot environment, but you will have to update the system partition to a WindowsВ 8 or Windows 10 environment to use the .vhdx file format. For more information about how to add a WindowsВ 8 or Windows 10 boot environment for native VHDX boot, see Boot to VHDX (Native Boot): Add a Virtual Hard Disk to the Boot Menu.
The local disk partition that contains the VHDX file must have enough free disk space for expanding a dynamic VHDX to its maximum size and for the page file created when booting the VHD. The page file is created outside the VHDX file, unlike with a virtual machine where the page file is contained inside the VHD.
Benefits
Using the same image-management tools for creating, deploying, and maintaining system images to be installed on designated hardware or on a virtual machine.
Deploying an image on a virtual machine or a designated computer, depending on capacity planning and availability.
Deploying Windows for multiple boot scenarios without requiring separate disk partitions.
Deploying supported Windows images in a VHDX container file for faster deployment of reusable development and testing environments.
Replacing VHDX images for server redeployment or recovery.
Limitations
Native VHXD disk management support can attach approximately 512В VHDX files concurrently.
Native VHDX boot does not support hibernation of the system, although sleep mode is supported.
VHDX files cannot be nested in other VHDX files.
Native VHDX boot is not supported over Server Message Block (SMB) shares.
WindowsВ BitLocker Drive Encryption cannot be used to encrypt the host volume that contains VHDX files that are used for native VHDX boot, and BitLocker cannot be used on volumes that are contained inside a VHD.
The parent partition of a VHDX file cannot be part of a volume snapshot.
An attached VHDX can’t be a dynamic disk. A dynamic disk provides features that basic disks do not, such as the ability to create volumes that span multiple disks (spanned and striped volumes), and the ability to create fault-tolerant volumes (mirrored and RAID-5 volumes). All volumes on dynamic disks are known as dynamic volumes.
The parent volume of the VHDX cannot be configured as a dynamic disk. Store the VHDX on a basic disk.
Types of Virtual Hard Disks
Three types of VHDX files can be created by using the disk-management tools:
Fixed size. A fixed size VHDX is a file that is allocated to the size of the virtual disk. For example, if you create a virtual hard disk that is 2В gigabytes (GB) in size, the system will create a host file approximately 2В GB in size. Fixed hard-disk images are recommended for production servers and working with customer data. Recommended for production servers, to increase performance and help protect user data
Dynamically expanding. A dynamically expanding VHDX is a file that is as large as the actual data written to it at any given time. As more data is written, the file dynamically increases in size. For example, the size of a file backing a virtual 2В GB hard disk is initially around 2В megabytes (MB) on the host file system. As data is written to this image, it grows with a maximum size of 2В GB.
Dynamically expanding VHDXs are recommended only for development and testing environments becaise they can be more easily corrupted by a catastrophic system shutdown, such as a power outage.
Differencing. A differencing hard disk image describes a modification of a parent image. This type of hard-disk image is not independent; it depends on another hard-disk image to be fully functional. The parent hard disk image can be any of the mentioned hard-disk image types, including another differencing hard-disk image.
Differencing hard disk images are recommended only for development and testing environments.


