- How to download older ISO versions of Windows 10
- Download older versions of Windows 10 using Rufus
- How to restore a Windows 7-based computer to a previous Windows installation by using the Windows.old folder
- INTRODUCTION
- More Information
- Step 1: Determine whether there is a Windows.old folder and whether there is sufficient free space on the Windows hard disk
- Step 2: Start the Windows Recovery Environment
- Step 3: Move the Windows 7 folders to a new Win7 folder
- Step 4: Copy the contents or move the contents of the Windows.old folder
- Step 5: Restore the boot sector for the previous Windows installation
- Step 6: Restore the Boot.ini file for the previous Windows installation of Windows XP or of Windows 2000
- Step 7: Close the Command Prompt window, and then click Restart
- Cannot install an older version of Windows 10
- How to download ISO of an older version of Windows 10
- How to download an older version of Windows 10
How to download older ISO versions of Windows 10
Do you need to rollback to a previous version of Windows 10? Here are the steps to download the ISO file for any version of the OS.

Although you can download the ISO file to install Windows 10 from the Microsoft support website, you can only download the latest version, as the website does not include an option to select older versions.
However, if you upgraded your computer by mistake, you are experiencing compatibility problems with a new version, or you do not like the new release, you can download older versions of Windows 10 using the Rufus tool to rollback to a previous version.
Rufus is a free third-party tool designed to create a bootable USB flash drive to install Windows 10. However, unlike the Media Creation Tool, Rufus can also download the ISO file and prepare the bootable media using an older version of Windows 10.
In this guide, you will learn the steps to use Rufus to download the ISO file and create a media to install older versions of Windows 10, even if they are no longer supported.
Download older versions of Windows 10 using Rufus
To create a USB media with an older version of Windows 10, use these steps:
Under the “Download” section, click the link to download the latest version.
Double-click the executable to launch the tool.
Click the Settings button (third button from the left) a the bottom of the page.
Rufus settings button
Under the “Settings” section, use the “Check for updates” drop-down menu and select the Daily option.
 Rufus enable updates
Click the Close button.
Click the Close button again to close the app.
Open Rufus again.
Under the “Device” section, use the drop-down menu, and select the USB drive to create the installation media.
Under the “Boot selection” section, use the drop-down menu and select the Disk or ISO image option.
Click the down arrow button on the right side, and select the Download option.
 Rufus ISO download option
Click the Download button.
Select the Windows 10 option. (You can also select the Windows 8.1 option.)
 Windows 10 or Windows 8.1 ISO selection
Click the Continue button.
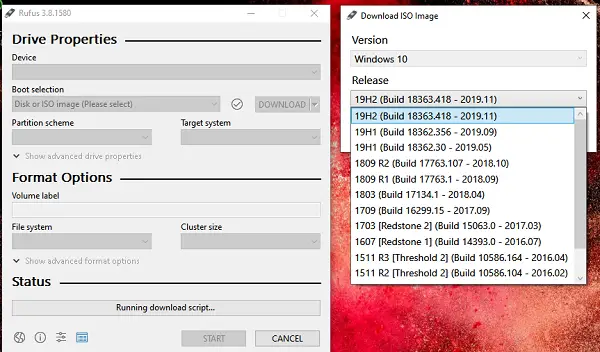
Under the “Release” section, select the older version of Windows 10 to download:
- Version 20H2, October 2020 Update (Build number 19042).
- Version 2004, May 2020 Update (Build number 19041).
- Version 1909, November 2019 Update (Build number 18363).
- Version 1903, May 2019 Update (Build number 18362).
- Version 1809, October 2018 Update (Build number 17763).
- Version 1803, April 2018 Update (Build number 17134).
- Version 1709, Fall Creators Update (Build number 16299).
- Version 1703, Creators Update (Build number 15063).
- Version 1607, Anniversary Update (Build number 14393).
- Version 1511, November Update (Build number 10586).
- Version 1507, Initial Release (Build number 10240).
 Select older Windows 10 ISO (1909, 1903, 1809, etc.)
Click the Continue button.
Select the edition, including Windows 10 Home and Windows 10 Pro, or Windows 10 Education.
Click the Continue button.
Select the language of Windows 10.
Click the Continue button.
Select the operating system architecture (x64 or x86). (If it’s a newer device, you’ll need to select the x64 option.)
Click the Download button.
 Rufus download an old Windows 10 ISO file
Select the location to save the Windows 10 ISO automatically.
Continue with the default settings after the download.
Click the Start button.
 Create bootable USB of Windows 10 using Rufus
Click the OK button to confirm the deletion of the USB drive data.
Once you complete the steps, you can use the bootable USB flash drive to install an older version of Windows 10 using a clean or in-place upgrade installation.
Update March 10, 2020: This guide was originally published in October 2019 and revised in March 2021 with new changes.
We may earn commission for purchases using our links to help keep offering the free content. Privacy policy info.
All content on this site is provided with no warranties, express or implied. Use any information at your own risk. Always backup of your device and files before making any changes. Privacy policy info.
How to restore a Windows 7-based computer to a previous Windows installation by using the Windows.old folder
INTRODUCTION
In certain scenarios you may need to restore your Windows 7 Computer back to the previous installation of Windows. This article walks you through the steps to manually restore your computer back to the previous version of Windows.
Note: To do this, you must use the command prompt, and you must type specific commands at the command prompt to rename and to move folders between the different versions of Windows.
Note: If you currently have Service Pack 1 for Windows 7 installed, the uninstall steps are the same as with Windows 7 without any service packs installed. If you are restoring back to a previous Windows 7 installation, you may need to Install Windows 7 Service Pack 1 to that installation.
This article is intended for a beginning to intermediate computer user.
More Information
To resolve this issue, follow the steps listed below to restore your computer back to a previous version of Windows using the Windows.OLD folder.
TIP: You may find it easier to follow the steps if you print this article first.
Step 1: Determine whether there is a Windows.old folder and whether there is sufficient free space on the Windows hard disk
Click Start  , and then click Computer.
On the View menu, click Details.
In the Free Space column, note how much space is available for Local Disk (C:) under the Hard Disk Drives area.
In the Hard Disk Drives area, double-click Local Disk (C:), and then determine whether the Windows.old folder exists.
Important If the Windows.old folder does not exist, you cannot follow the steps in this article to restore the previous Windows installation to this computer. You must backup and restore or transfer your files to the previous operating system.
Right-click the Windows.old folder.
Windows 7 will determine the size of the folder after several seconds.
Determine whether the Windows.old folder is smaller than the free space that is available for Local Disk (C:) in step 1.2.
Note If the Windows.old folder is two times as large as the free space that is available for the Local Disk (C:) entry, you may be unable to restore the previous Windows installation.
Step 2: Start the Windows Recovery Environment
Put the Windows 7 installation disc in the DVD drive, and then restart the computer.
Press a key when you are prompted to restart from the disc.
In the Install Windows window, select a language, a time, a currency, a keyboard input method or other input method, and then click Next.
In the Install Windows window, click Repair your computer.
In the System Recovery Options window, click the version of the Windows 7 operating system that you want to repair, and then click Next.
In the System Recovery Options window, click Command Prompt.
The Command Prompt window opens, and it displays the command prompt. The command prompt is where you will type the commands that are described in the following steps.
Step 3: Move the Windows 7 folders to a new Win7 folder
Note When you type one or more of the commands at the command prompt in the following steps and press ENTER, you may receive the following message:
The system cannot find the file specified.
If you receive this message, go to the next step in this section, and then type the command in that next step.
Type the following commands and press ENTER after each command:
Move Windows Win7\Windows
Move «Program Files» «Win7\Program Files»
Move Users Win7\Users
Attrib –h –s –r ProgramData
Move ProgramData Win7\ProgramData
Rd «Documents and Settings»
Step 4: Copy the contents or move the contents of the Windows.old folder
Note When you type one or more of the commands at the command prompt in the following steps and press ENTER, you may receive the following message:
The system cannot find the file specified.
If you receive this message, go to the next step in this section, and then type the command in the next step.
Type the following commands and press ENTER after each command:
move /y c:\Windows.old\Windows c:\
move /y «c:\Windows.old\Program Files» c:\
move /y c:\Windows.old\ProgramData c:\
move /y c:\Windows.old\Users c:\
move /y «c:\Windows.old\Documents and Settings» c:\
Step 5: Restore the boot sector for the previous Windows installation
Type one of the following commands at the command prompt, as appropriate for your situation.
Note In the following commands, D: represents the DVD drive. If the DVD drive on the computer is represented by a different letter, such as E:, use that letter in the command.
When the previous Windows installation was Windows Server 2003, Windows XP, or Microsoft Windows 2000
Type the following command, and then press ENTER:
D:\boot\bootsect /nt52 c:
When the previous Windows installation was Windows Vista
Type the following command, and then press ENTER:
D:\boot\bootsect /nt60 c:
Step 6: Restore the Boot.ini file for the previous Windows installation of Windows XP or of Windows 2000
Note Follow these steps only when the previous installation is Windows XP or Windows 2000.
Type the following commands and press ENTER after each command:
Attrib –h –s –r boot.ini.saved
Copy boot.ini.saved boot.ini
Step 7: Close the Command Prompt window, and then click Restart
Type the following command at the command prompt, and then press ENTER:
Click Restart to restart your computer.
Note After you have verified that Windows XP is functional, you can remove the C:\Win7 folder if it is not needed for data recovery.
Cannot install an older version of Windows 10
I’ve had a very difficult time over the past two days simply trying to get an older, more compatible version of Windows 10 for my laptop.
I need to install Windows 10, so naturally I went to download the Media Creation Tool. I ran it, and upon booting up the laptop, the install went perfectly, no issues whatsoever. Unfortunately, my GTX 1060 would get detected, but no matter what driver I install, it ALWAYS gives me an Error 43. I searched this up online, and as it turns out, lots of people with NVIDIA graphics cards are actually having a problem with with Windows 10 2004 (2020 May Update), so I decided to use an older version of Windows. Apparently 1909 has the issue of NVIDIA graphics cards not working properly as well, so I’ve decided to go with Windows 10 1903.
Since there is no official place to download the ISO, I used RUFUS to both download and «burn» the ISO to the USB. This happened successfully. Upon booting my laptop with the USB, the install started off fine, but soon gave me an error code: 0x80070570, meaning there are missing or corrupt files. This is the part at which I have been stuck on for the past two days. The «burning» ISO to USB part always works, but when I install on my laptop, it fails with that EXACT error code. I’ve tried 1909 and 1903, and it still doesn’t work. I’ve tried formatting the USB fully as FAT32, and decreasing the install.wim file (in win10iso/sources/) and it still produces the same error. I read online somewhere that it could be a memory problem, but then upon creating the USB again with the Media Creation Tool, it installs perfectly on my laptop (just the graphics card driver don’t work).
The problem here, is that the Media Creation Tool is doing something that RUFUS is not. I just need to do whatever Media Creation Tool does, but with the ISO of an older version of Windows 10. I don’t understand what is going on. I’ve done my research and am still as confused as I was before.
Sorry for my rant, but it is quite frustrating as to what is going on. I just want to install an older, more compatible (with my graphics card) version of Windows 10.
How to download ISO of an older version of Windows 10
When you download the ISO of Windows 10, it always offers the latest version of Windows 10. What if you need a different or older version of Windows 10, which is supported? In this post, we will show you how to download and install an older version of Windows 10 ISO.
How to download an older version of Windows 10
Every time one of the older versions of Windows 10 reaches its end of life, Windows 10 users should update to the latest version. There is no way they can download a particular version even though they are supported. For example, Windows 10, version 1803, end of support was on November 12, 2019. The next release after v1803 was v1903, but users need to update to Windows 10 v1909. However, there is a way to download ISO of an older version by following these steps:
- Download Rufus. It is a software that can build a bootable USB drive for Windows.
- Double click to launch the software. It’s a portable application and does not require any installation.
- In Boot Selection dropdown, select Disk or ISO image
- Then click on the arrow next to the dropdown which has Select
- Choose Download, and click on it
- It will download, and run a script, and then display a popup.
- Select Windows 10, and click on Download
- It will then display another window where you can select the version of Windows 10
- As of now, I can see version 1507 to 19H2 available for download.
- Next, you need to select the edition of Windows 10, i.e. Home, Pro, or Education.
- Lastly, select the language, architecture, and click on the download button to start to download the ISO file.
The prompt which lets you select a version of the OS you plan to download opens behind Rufus’ window, so look there is you miss it. At this point, I will suggest minimizing all open windows, and move the Rufus window left or right to locate the version selector
Rufus acts as a download manager for the ISO. If you are using any third-party download manager, I would suggest checking the box which says — Download using a browser. In case of any interruption, Rufus will be able to manage the ISO file better.
While Rufus allows you to download even the unsupported version of Windows 10, I suggest you download the supported version only. Else, Windows will automatically be forced to upgrade to the latest version.
I hope the tutorial was easy to understand, and you were able to download the ISO of an older version of Windows 10 ISO.


