- Windows 10 OEM fresh install on SSD (new drive)
- Replies (6)
- Easy Way to Install Windows 10 on SSD
- What’s the Best Procedure to Install Windows 10 on SSD?
- #1. How to Install Windows 10 on SSD by OS Migration
- #2. How to Reinstall Windows 10 on SSD by Windows 10 Installation Media
- What If You Cannot Install Windows 10 on SSD?
- 3 Ways to Fix Windows Won’t Install on SSD or HDD
- Windows unable to install on SSD
- Situation 1. SSD not recognized by BIOS
- Situation 2. SSD not recognized by Windows 10/8/7 Setup
- Situation 3. Windows cannot be installed to this disk
Windows 10 OEM fresh install on SSD (new drive)
hi, i need help on windows 10 OEM installation. So i bought SSD and want to install it on my laptop. i have the Windows 10 Home single language OEM key installed. the question is how can i install windows on the SSD with oem key? do i need the Windwos 10 Home Single language or just Windows 10 home ? thanks
ah last question (i know its stupid) how i can reply on my own post? Thank you.
Replies (6)
When you upgraded from a previous version of Windows or receive a new computer preinstalled with Windows 10, what happened is the hardware (your PC) will get a digital entitlement, where a unique signature of the computer will be stored on Microsoft Activation Servers. The Windows 7 or Windows 8 genuine license you were previously running will be exchanged for a diagnostics key.
Anytime you need to reinstall Windows 10 on that machine, just proceed to reinstall Windows 10. It will automatically reactivate. You will prompted to enter a product key a couple times through the installation, click I don’t have a key and Do this later.
There is no need to know or get a new key, but if you have issues with Digital Licensing or the Activation Troubleshooter, you can utilize an existing Windows 7 or Windows 8/8.1 product key you already own to reactivate if necessary. or use the reset function in Windows 10.
Go to a working computer, download, create a bootable copy, then perform a clean install.
Step 1: How to download official Windows 10 ISO files
http://answers.microsoft.com/en-us/windows/wiki.
Review the following guide for instructions and details about configuring your BIOS or UEFI boot settings for DVD, CD, USB or SD Card.
a
BIOS/UEFI Setup Guide: Boot from a CD, DVD, USB Drive or SD Card
https://www.groovypost.com/howto/bios-uefi-setu.
Once your computer is set to boot from the DVD, you should see this option. If you are installing from a retail Windows 10 USB thumb drive, you will be asked to select either 32 or 64 bit Windows 10. Learn more here https://www.groovypost.com/howto/choose-windows.
The Windows logo will appear on screen, this might be here for a while, as long as you see the animating dots, everything should be ok.
Select your Language, Time and Keyboard method then click Next.
Click Install now
Windows 10 setup will prompt you for a product key during installation a couple times. If you originally upgraded from Windows 7 or Windows 8/8.1 click the option ‘I don’t have a key’ and ‘Do this later’ . If you have a Windows 10 product key, you can proceed to enter it.
Setup will also prompt you to select the edition you have a license for — Home or Pro. Please make sure you choose the right edition. If you choose the wrong edition, your only option will be to perform a clean install again.
The copy of Windows 10 you download and upgrade from will correspond with the edition of Windows you have installed, if it does not, this is why you might be experiencing problems activating:
Windows 7 Starter, Home Basic, Home Premium, Windows 8.0 Core, Windows 8.1 Core should install Windows 10 Home
Windows 7 Professional, Windows 7 Ultimate, Windows 8.0 Pro, Windows 8.1 Pro should install Windows 10 Pro
IF YOU ARE NOT SURE WHICH EDITION YOUR SYSTEM CAME WITH, CHOOSE WINDOWS 10 HOME.
Wait while setup prepares to copy files
Accept the license terms then click Next
Click Custom: Install Windows only (advanced)
NOTE: Sometimes Windows 10 setup can become confused if it see’s a thumb drive. You might get a driver missing error or something to that effect. If you do, restart setup, but this time, when you arrive at the following screen, disconnect your thumb drive then go through Custom options. When setup is ready copy files, it will prompt you to reconnect the installation source (your USB).
Select the drive then click New
NOTE: If you have multiple partitions listed, select each one (starting at the bottom), then click delete until there is only a single (one) unallocated drive displayed in the window.
Select the unallocated drive listed, click New, click Apply then OK
This will split the drive into multiple partitions, select the Primary partition then click Next.
NOTE: The System Reserved partition is where recovery files are kept for diagnostics and repairing damaged Windows 10 files; or even reinstall Windows 10.
Wait while Windows installs
When this phase of setup is complete, Windows will automatically restart then reboot into setup again.
Windows is detecting and installing your hardware. After this is complete, Windows will restart one last time.
Out of Box Experience
The Out of Box Experience page is where you get to configure detailed settings in Windows, which includes creating a user account, configure privacy, sync PC settings and install modern applications.
Note: This is a non-Microsoft website. The page appears to be providing accurate, safe information. Watch out for ads on the site that may advertise products frequently classified as a PUP (Potentially Unwanted Products). Thoroughly research any product advertised on the site before you decide to download and install it.
Easy Way to Install Windows 10 on SSD
What’s the Best Procedure to Install Windows 10 on SSD?
«I want to install Windows 10 OS on a new SSD from HDD. I plan to use the new SSD as the boot drive while the old WD 1TB hard drive as a storage drive. What is the best or easiest procedure for extracting the old Windows OS from the old hard drive? I am not sure how to identify the OS files.»

Usually, there are two ways for you to install Windows 10 on SSD. One is to clone Windows 10 from the source drive to the target drive, and the other one is to reinstall Windows 10 on SSD from scratch, namely a clean install or fresh install. Both are approachable and efficient methods to boot Windows 10 from SSD eventually. However, the former one is recommended as the prior choice after comparison. By cloning Windows 10 from HDD to SSD is the most straightforward and less time-consuming.
Nonetheless, if you want to reinstall Windows 10 on SSD, you might spend a little more effort. You know, Windows 10 is only free if you are upgrading from the previous Windows version. If you want a fresh install, you should have a legit product key for the Windows 10. Otherwise, your best option would be cloning system partition to SSD by using several clicks toВ transfer Windows 10 OS to SSD.
#1. How to Install Windows 10 on SSD by OS Migration
No matter you choose to get the old Windows system installed on the SSD and then upgrade your computer to Windows 10 or migrate the new Windows 10 partition to the new SSD after a successful Windows 10 upgrade, you need a partition managerВ for help. EaseUS Partition Master is the top recommendation of a magic partition tool that lets you install Windows 10 on SSD from HDD/SSD within several clicks.
Note: The operation of migrating OS to SSD or HDD will delete and remove existing partitions and data on your target disk when there is not enough unallocated space on the target disk. If you saved important data there, back up them to an external hard drive in advance.
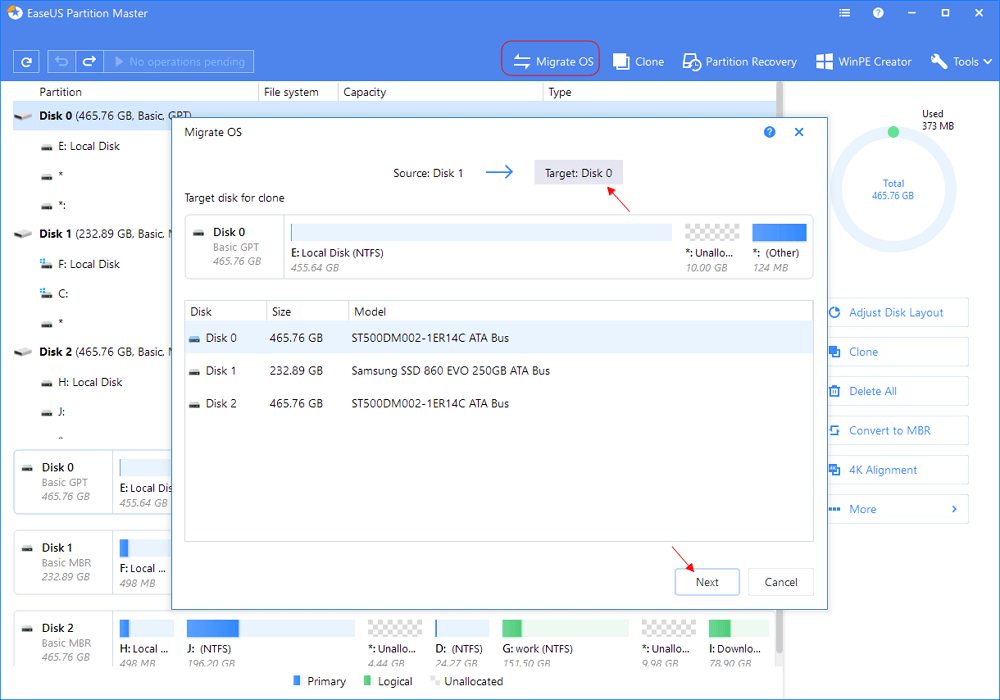
Step 1.В Select «Migrate OS» from the top menu. Select the SSD or HDD as the destination disk and click «Next».
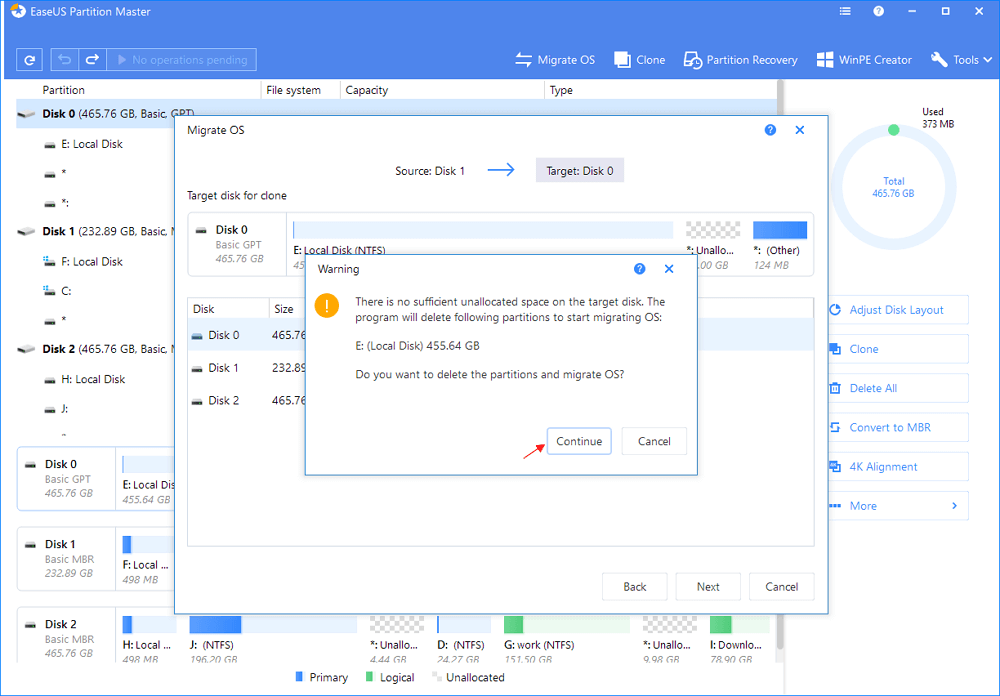
Step 2. Click «Continue» after check warning message.В The data and partitions on the target disk will be deleted. Make sure that you’ve backed up important data in advance. If not, do it now.
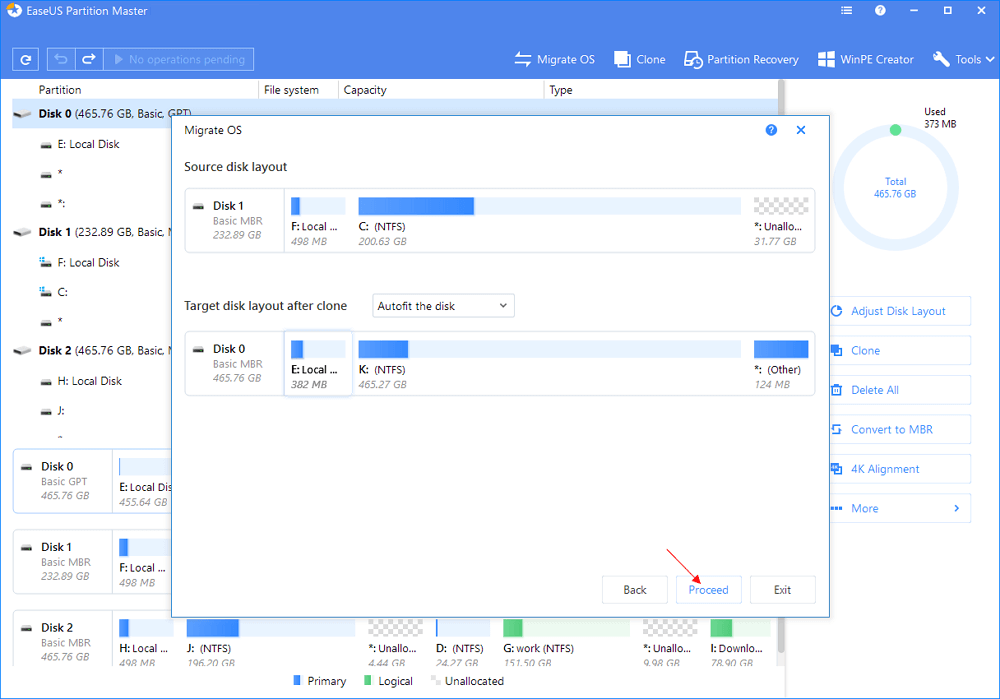
Step 3. Preview the layout of your target disk. You can also click the disk layout options to customize the layout of your target disk as you want. Then click «Proceed» to start migrating your OS to a new disk
#2. How to Reinstall Windows 10 on SSD by Windows 10 Installation Media
Sometimes you have to start a fresh install of Windows 10, mainly when your current OS has been crashing or freezing a lot. As long as you can carefully follow the below guide and prepare all the necessary tools beforehand, you can make it on your own, and finally run a fresh OS on the new SSD.
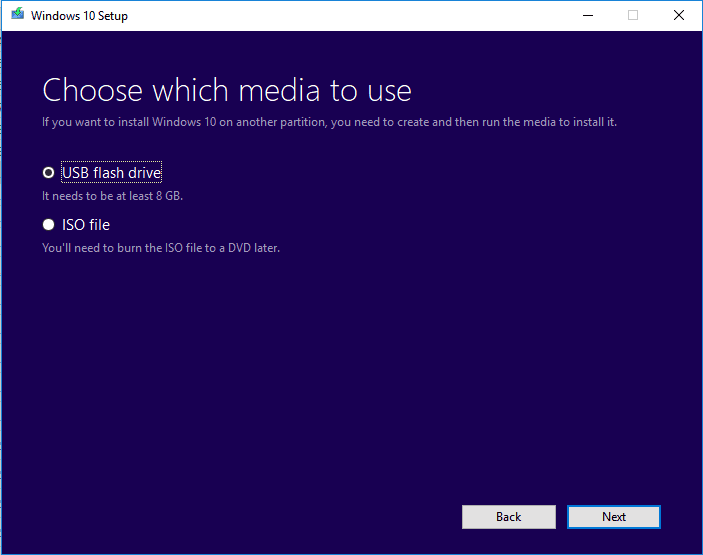
First of all, to reinstall Windows 10 on SSD manually, you need to create a bootable installation media. If you don’t have the bootable media created, click here toВ download the Media Creation Tool, and next use the tool to create a bootable USB flash drive (min4GB) or create the ISO file and burn to a CD/DVD disc.
With the bootable installation media at hand, now head to the detailed steps to reinstall Windows 10 on SSD.
Step 1. Remove the old HDD and connect the new SSD to your computer.
Step 2. Insert the bootable USB flash drive, and change your computer boot order to the USB drive in BIOS settings. Make sure that you boot PC from the installation media. The installation should start.
Step 3.В During the installation process, skip the steps which ask for a product key and select the option I am Reinstalling Windows 10 on this PC, and activation will not be an issue, your PC will have a digital entitlement stored on the Microsoft Servers.
Step 4.В While installing, your system will reboot. At that point, you may need to go into your BIOS settings again and change the boot order so your system boots from your new SSD. Otherwise, the installation may start all over again. Do not remove the installation media at this point.
Step 5. When Windows 10 has finished installing and the desktop appears, you can shut down your system and remove the installation media. The next time you start the computer, you will boot Windows 10 from the new SSD.
What If You Cannot Install Windows 10 on SSD?
Chances are that when you choose to use the Windows installation media way to reinstall Windows 10 on SSD, some strange error messages will prevent you from successfully installing the operating system on the selected hard drive.
1. Can’t install Windows 10 on a new SSD
For a new SSD that is not initialized at the beginning, you need to connect it to the computer and initialize the SSD to an MBR or GPT style and then start to install OS on it.В
2. Windows cannot be installed to this disk. The selected disk is of the GPT partition style.
Usually, the error message that appears on the screen is Windows cannot be installed onto this disk. This computer’s hardware may not support booting to this disk. Ensure the disk’s controller is enabled in the computer BIOS menu. We fixed this problem in the article onВ how to fix Windows cannot be installed to this disk.
No matter it’s the problem of SSD not initialized or the selected disk is of GPT partition style, you can easily fix the trouble with the help of EaseUS Partition Master, and continue installing Windows 10 on SSD without any hassle.
3 Ways to Fix Windows Won’t Install on SSD or HDD
There are 3 situations where Windows 10/8/7 won’t install on SSD. Learn the step by step guide to make it right.

By AOMEI  / Last Updated February 13, 2020
Windows unable to install on SSD
Installing Windows 10/8/7 on a solid state drive (SSD) will surely make your computer faster. However, it would be frustrating if Windows won’t install on SSD. This article covers 3 situations and provides a corresponding solution so you can fix this effectively.
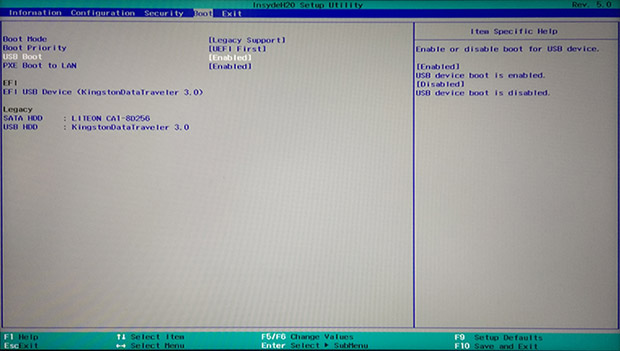
Situation 1. SSD not recognized by BIOS
Usually, an SSD will be automatically detected in BIOS when you attach it. However, if your SSD is not showing in BIOS, you should check the things belowпј›
1. Check the SSD cable connection. You can simply switch another SATA cable. You can also connect it to an external USB adapter to see if it is a problem of damaged BIOS connection.
2. Check if SATA port is enabled. In some cases, the port is turned OFF in System Setup (BIOS). When you connect a new SSD drive to the system, you may need to manually turn it on before you can see the drive in BIOS.
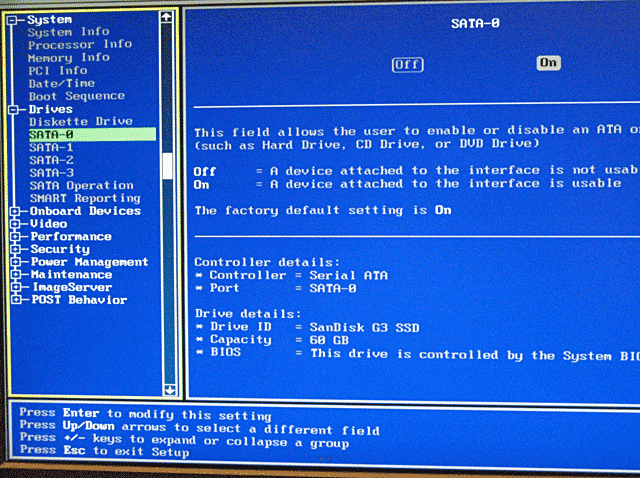
3. Connect the drive to another working computer to see if the SSD is damaged.
Situation 2. SSD not recognized by Windows 10/8/7 Setup
If it is detected in BIOS, then you can refer to the following steps to make it right:
If it is detected in BIOS, then you can refer to the following steps to make it right:
1. Boot into BIOS, and set SATA to AHCI Mode. For installing Windows8/10 cannot install on SSD, enable Secure Boot if it is available.
2. If your SSD still is not showing at Windows Setup, press SHIFT+F10 to open a Command Prompt window.
3. Type “diskpart”
4. Type “list disk” to display all the disks connected to your computer.
5. Type “select disk [disk number]” For example, type “select disk 0” if you have insert one drive in your system
6. Make sure the selected disk has no valuable data. Type “clean all” and press Enter to wipe out all data from the SSD.
7. When the process is complete, type “exit” to close this windows and go back to Windows Setup screen.
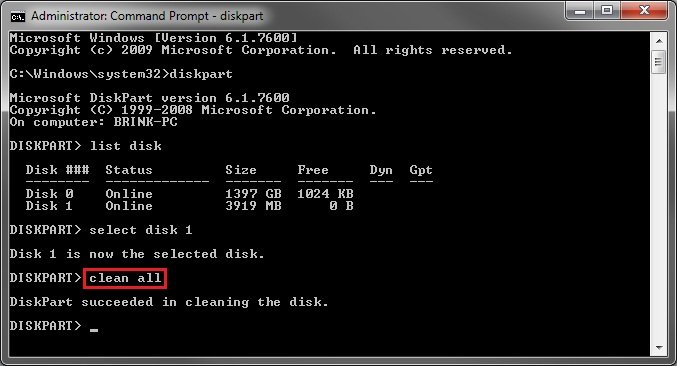
After that, you should see the SSD drive appear at Windows Setup. If you think this disk clean process may reduce its lifespan, you can perform a Secure Erase for SSD.
Situation 3. Windows cannot be installed to this disk
If Windows sees the SSD drive, but you can’t install Windows on SSD GPT with an error “Windows cannot be installed to this disk. The selected disk is of the GPT partition style”, you can fix this through changing BIOS settings or converting disk to MBR partition style.
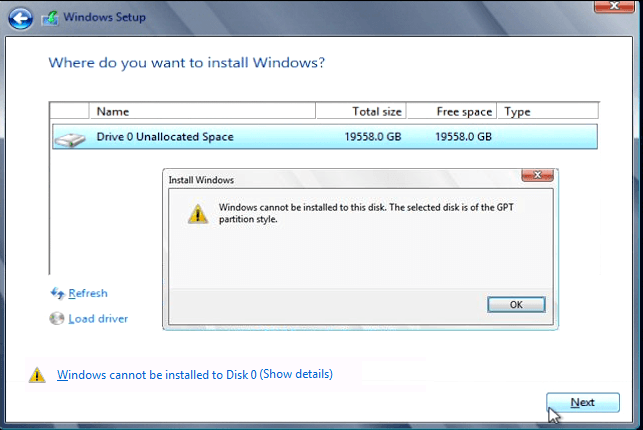
If your computer supports UEFI boot, you can go to BIOS settings and enable UEFI mode. If you only see Legacy boot mode, you can convert the SSD to MBR disk referring to the following.
1. Press Shift+F10 to bring out a command prompt.
2. Type the following:
diskpart
list disk
select disk [disk number]
clean
convert mbr
3. Wait for the process to complete. Till then, go back to Windows installation screen, and then you should be able to install Windows.
If the error message you received is “Windows cannot be installed to this disk. The selected disk has an MBR partition table. On EFI systems, Windows can only be installed to GPT disks”, you can disable UEFI mode and enable Legacy mode, or you can convert SSD to GPT disk.
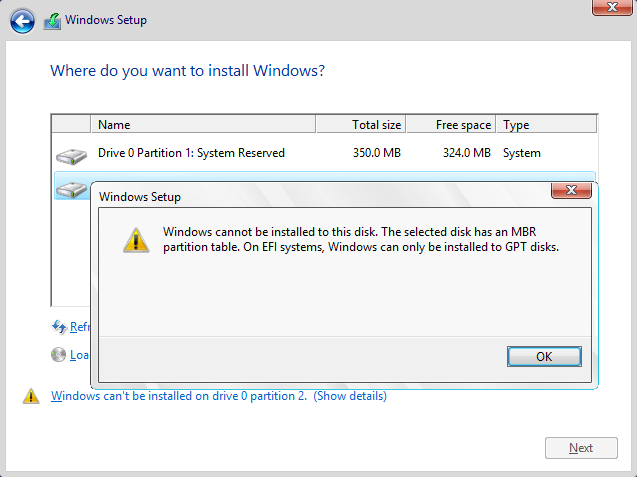
As mentioned, using diskpart.exe to convert disk to MBR/GPT will completely wipe out everything on the disk. If you do not want the SSD to be erased, there is third party software AOMEI Partition Assistant Standard that allows you to convert disk to MBR/GPT without data loss/removing partitions.
You can download the free version on a working computer and connect your SSD to it as a second drive. To convert drive to GPT/MBR with AOMEI Partition Assistant:
1. Open this software.
2. Right click on the SSD and select Convert to GPT. If your SSD is MBR, select Convert to MBR.
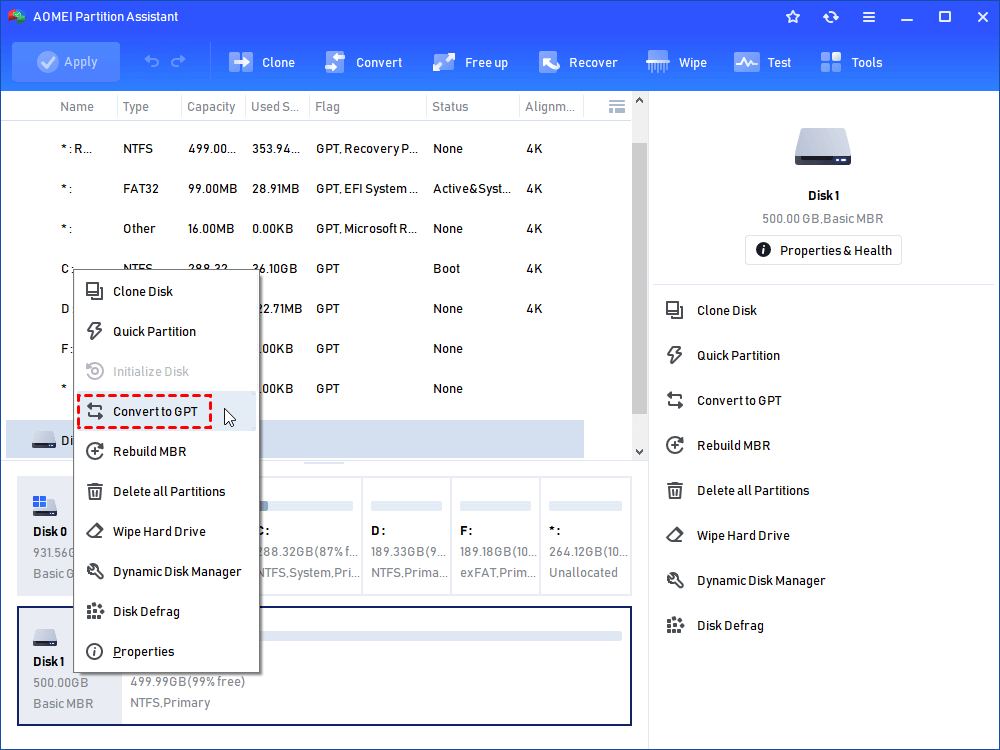
3. Confirm the task and click “Apply” to apply this change.

PS.: You need to uprade AOMEI Partition Assistant to Professional version if you need to convert system disk between MBR and GPT.
This software also allows you to create a bootable media so you can use it on a computer that has no Windows system installed yet. If you want to clone hard drive to SSD instead of fresh install, this software can be of use too. In conclusion, you don’t need to panic when Windows will not install on SSD. You can just follow these steps to fix it based on your own situation.


