- How to install Windows in UEFI mode
- Preparing bootable USB drive
- Installing Windows on Phoenix BIOS systems
- Installing Windows on AMI BIOS systems
- How to install Windows 10 from USB with UEFI support
- How to create Windows 10 UEFI boot media with Media Creation Tool
- 1. ExpressVPN: The best VPN available right now
- How to create Windows 10 UEFI boot media with Rufus
- Create install flash drive with Windows 10 ISO
- Create boot flash drive downloading Windows 10 ISO
- More Windows 10 resources
- The Dell XPS 15 is our choice for best 15-inch laptop
- Halo: MCC’s live service elements make it better, not worse
- Microsoft’s Surface Duo is not ‘failing up’
- These are the best PC sticks when you’re on the move
How to install Windows in UEFI mode
The following procedure refers to installation of Windows 8.1/10, in UEFI mode only!
For installing Windows in Legacy mode please refer to How to install Windows in Legacy mode.
Preparing bootable USB drive
- Download Rufus application from: Rufus
- Connect USB drive to any computer. Make sure to disconnect all other USB mass storage devices.
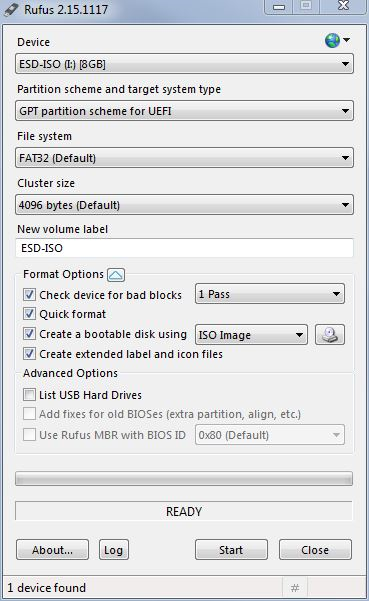
- Run Rufus application and configure it as described in the screenshot:
 Warning! Everything on the destination disk will be overwritten.
 - Choose the Windows installation media image:
- Press Start button to proceed.
- Wait until completion.
- Disconnect the USB drive.
 Warning! Everything on the destination disk will be overwritten.
Installing Windows on Phoenix BIOS systems
- On the target PC set USB to be the first boot device in the boot order (BIOS defaults).
- Connect the prepared bootable USB drive to the target PC and boot from it.
- Press F5 during boot until the One-Time-Boot menu appears.
- Browse to the Main -> Boot Features menu and set the CSM Support setting to No.
- Press F10 and Yes to save the changes, and Exit.
- Press F5 during boot until the One Time Boot menu appears.
- Choose the USB HDD option from the list of bootable devices.
- Windows installation process will start.
Installing Windows on AMI BIOS systems
Please, perform the following steps for Windows 10 Pro installation on the fitlet2:
1. Prepare a bootable USB drive and boot from it.
2. Connect the created media to the fitlet2.
3. Power up the fitlet2.
4. Press the F7 key during the BIOS boot until the One Time boot menu appears.
5. Choose the installation media device.
6. The system will boot from the Windows installation media and Windos 10 Installation wizard will start.
7. Follow the on-screen instructions to install the Windows 10 on the fitlet2.
How to install Windows 10 from USB with UEFI support
 Source: Windows Centtral
When installing a clean copy of Windows 10, usually you connect a USB media to the device to launch the «Windows Setup» wizard to continue with the installation process. However, if you have a computer with a Unified Extensible Firmware Interface (UEFI), instead of the legacy Basic Input/Output System (BIOS), it is crucial to use the appropriate media for the system firmware type.
On Windows 10, there are at least two methods to create a USB bootable media. You can use the Microsoft Media Creation Tool to download the files onto a removable storage with support for both firmware types (UEFI and legacy BIOS). Or you can use a third-party tool called «Rufus,» which makes it easy to create a USB to install Windows with support for UEFI.
In this Windows 10 guide, we will walk you through the steps to create a USB flash drive that includes support for UEFI using the Microsoft Media Creation Tool and Rufus.
How to create Windows 10 UEFI boot media with Media Creation Tool
The best way to create a bootable USB media for an in-place upgrade or clean install of Windows 10 is to use the official Media Creation Tool available through the Microsoft support website.
To create a USB install media, connect a flash drive of at least 8GB of space, and then use these steps:
Under the «Create Windows 10 installation media» section, click the Download tool now button to save the file on the device.
 Source: Windows Central
Select the Create installation media (USB flash drive, DVD, or ISO file) for another PC option.
 Source: Windows Central
(Optional) Clear the Use the recommended options for this PC option.
Source: Windows Central
Select the correct language, architecture, and edition of Windows 10 (if applicable).
Quick tip: If you plan to install Windows 10 on multiple computers running 32-bit and 64-bit architectures, use the «Architecture» drop-down menu and select the Both option.
Select the USB flash drive option.
Source: Windows Central
Select the flash drive from the list. (If the storage device is not available, click the Refresh drive list option.)
Source: Windows Central
Once you complete the steps, the Media Creation Tool will download the files and will create a bootable USB flash drive that you can use to install Windows 10 on devices with support for UEFI and BIOS.
![]()
1. ExpressVPN: The best VPN available right now
This is our top pick for anyone looking to get started with a VPN. It offers a great mix of speed, reliability, outstanding customer service, and affordability. There is a 30-day money-back guarantee, so give it a shot today.
How to create Windows 10 UEFI boot media with Rufus
Alternatively, you can use Rufus, a free third-party tool that allows you to create an installation media with support for UEFI devices. You can use the tool to create a bootable media using an existing ISO file, or you can use the option to download the files from the Microsoft servers and then create the installation media.
Create install flash drive with Windows 10 ISO
To create a bootable media using an existing Windows 10 ISO file, connect a flash drive of at least 8GB of space, and use these steps:
Under the «Download» section, click the latest release (first link) and save the file on the device.
 Source: Windows Central
Use the «Target system» drop-down menu and select the UEFI (non CSM) option.
 Source: Windows Central
Under the «Show Advanced drive properties» section do not change the default settings.
Source: Windows Central
Under the «Volume label» field, confirm a name for the drive — for example, «win10_20h2_usb.»
Source: Windows Central
After you complete the steps, Rufus will create a USB flash drive to install Windows 10 on a device using UEFI with a locally available image.
Create boot flash drive downloading Windows 10 ISO
Rufus also includes an option to download the Windows 10 ISO file directly from the Microsoft servers, which you can then use with the tool to create a bootable USB flash drive.
To create an install media of Windows 10 with Rufus, connect a USB flash drive of at least 8GB of space, and then use these steps:
Under the «Download» section, click the latest release (first link) of the tool to save the file onto your computer.
Source: Windows Central
Click the Settings button at the bottom of the page.
Source: Windows Central
Under the «Settings» section, use the «Check for updates» drop-down menu and select the Daily option.
Source: Windows Central
Under the «Boot selection» section, click the arrow button next to the «Select» option and choose the Download option.
Source: Windows Central
Use the «Language» drop-down menu and select your installation language.
Quick note: If you are in the United States, select the «English» option. Otherwise, select the «English International» option.
Use the «Architecture» drop-down menu and select the 32-bit or 64-bit option (recommended).
Quick tip: You can check the architecture of your device on Settings > System > About, under the Device specifications section.
Click the Download button.
![]() Source: Windows Central
Source: Windows Central
Use the «Target system» drop-down menu and select the UEFI (non CSM) option.
Source: Windows Central
Once you complete the steps, the tool will run the script and download the Windows 10 ISO file. After the download, you can use that ISO file to create a bootable media to install Windows 10 on a UEFI device.
When you have the USB bootable media with support for UEFI systems, you can use it to start the «Windows Setup» wizard to perform a clean installation of Windows 10 or an in-place upgrade.
However, since the «UEFI:NTFS bootloader» does not include a digital signature for secure boot, you must temporarily disable secure boot on the motherboard firmware before you can boot into the setup wizard. Usually, you would complete this task from within the Unified Extensible Firmware Interface that you can access by hitting one of the function keys (F1, F2, F3, F10, or F12), the ESC, or Delete key as soon as you start the computer.
The only caveat is that these settings will be different per manufacturer and even by computer model. So make sure to check your device manufacturer’s support website for more specific instructions. After the installation of Windows 10, you can enable the feature again.
More Windows 10 resources
For more helpful articles, coverage, and answers to common questions about Windows 10, visit the following resources:
We may earn a commission for purchases using our links. Learn more.
![]()
The Dell XPS 15 is our choice for best 15-inch laptop
For a lot of people, a 15-inch laptop is a perfect size that offers enough screen for multitasking, and in a lot of cases, some extra performance from powerful hardware. We’ve rounded up the best of the best at this size.
![]()
Halo: MCC’s live service elements make it better, not worse
Halo: The Master Chief Collection is more popular than ever, but some fans don’t agree with the live service approach 343 Industries has taken with it. Here’s why those elements are, at the end of the day, great for the game and for Halo overall.
![]()
Microsoft’s Surface Duo is not ‘failing up’
Microsoft announced this week that it was expanding Surface Duo availability to nine new commercial markets. While Surface Duo is undoubtedly a work in progress, this is not a sign of a disaster. It’s also doesn’t mean that Surface Duo is selling a ton either. Instead, the reason for the expansion is a lot more straightforward.
![]()
These are the best PC sticks when you’re on the move
Instant computer — just add a screen. That’s the general idea behind the ultra-portable PC, but it can be hard to know which one you want. Relax, we have you covered!


