- Install Windows from a USB Flash Drive
- What you need
- Step 1 — Format the drive and set the primary partition as active
- Step 2 — Copy Windows Setup to the USB flash drive
- Step 3 — Install Windows to the new PC
- If your Windows image is larger than 4GB
- How to Install Windows 10, 8, 7 to USB as Portable OS Device?
- Can Windows be installed on a USB drive?
- How to install Windows 10/8/7 onto USB?
- в—Џ Install Windows to USB with ISO file
- в—Џ Install Windows to USB with the current system
- How to Boot a PC from the portable Windows USB
- Further reading: how to install Windows with USB drive?
- Conclusion
- How to Run Windows 10 From a USB Drive
- Running Windows 10 From a USB Drive
- Running WinToUSB
- Running Rufus
- Launch Windows 10 With USB
Install Windows from a USB Flash Drive
Here’s how to create a bootable Windows installation USB drive starting with a Windows .iso file or a Windows Setup DVD.
If you’re looking for an easy way to create a bootable USB Windows installation drive, use the media creation tool.
What you need
- Windows 10 install .iso or DVD
- USB flash drive with at least 5GB free space. This drive will be formatted, so make sure it doesn’t have any important files on it.
- Technician PC — Windows PC that you’ll use to format the USB flash drive
- Destination PC — A PC that you’ll install Windows on
Step 1 — Format the drive and set the primary partition as active
Connect the USB flash drive to your technician PC.
Open Disk Management: Right-click on Start and choose Disk Management.
Format the partition: Right-click the USB drive partition and choose Format. Select the FAT32 file system to be able to boot either BIOS-based or UEFI-based PCs.
Set the partition as active: Right-click the USB drive partition and click Mark Partition as Active.
If Mark Partition as Active isn’t available, you can instead use diskpart to select the partition and mark it active.
Step 2 — Copy Windows Setup to the USB flash drive
Use File Explorer to copy and paste the entire contents of the Windows product DVD or ISO to the USB flash drive.
Optional: add an unattend file to automate the installation process. For more information, see Automate Windows Setup.
Step 3 — Install Windows to the new PC
Connect the USB flash drive to a new PC.
Turn on the PC and press the key that opens the boot-device selection menu for the computer, such as the Esc/F10/F12 keys. Select the option that boots the PC from the USB flash drive.
Windows Setup starts. Follow the instructions to install Windows.
Remove the USB flash drive.
If your Windows image is larger than 4GB
Windows USB install drives are formatted as FAT32, which has a 4GB filesize limit. If your image is larger than the filesize limit:
Copy everything except the Windows image file (sources\install.wim) to the USB drive (either drag and drop, or use this command, where D: is the mounted ISO and E: is the USB flash drive.)
Split the Windows image file into smaller files, and put the smaller files onto the USB drive:
How to Install Windows 10, 8, 7 to USB as Portable OS Device?
Installing Windows to USB drive allows you to directly run OS on other computers with this portable bootable USB flash drive.

By Dylan  / Last Updated June 16, 2020
Can Windows be installed on a USB drive?
«I can use a USB flash to install Windows on my computer from ISO. But I’m often on a business trip, so I’m wondering if I can install Windows 10 to a USB, and wherever I go, I can directly run my customized operating system from the USB drive.»
— Question from Microsoft.com
When you work from home or on a business trip, you may want to run a different Windows system like Windows 10, 8, 7 from a bootable Windows USB. Actually, it is not a difficult operation. And in this post, we are going to give you a tutorial of making a portable system by installing Windows to USB drive.
Content table:
How to install Windows 10/8/7 onto USB?
To install Windows to a USB, you can use a feature called “Windows To Go Creator”, which is provided by AOMEI Partition Assistant Professional . It allows you to deploy a Windows environment on a USB drive so that you can use your own system wherever you go on any other PC.
Besides, This tool can create Windows USB with either ISO files or the current system. And it also supports creating a Windows OS bootable USB on Mac. And you can download the demo version to see how it works.
Before the operation, you need to know (and you need to do):
An ISO file/disc: You can insert an installation Disc, or download ISO file from Microsoft website. Also, you can install the current system to USB,
A 2.0/3.0 USB flash drive: Taking running speed into consideration, we recommend 3.0 USB drive, which can take much less time than 2.0 USB and port.
Backup the files on USB : The USB drive will be formatted before it is created to be a “Windows To Go” device.
в—Џ Install Windows to USB with ISO file
Step 1. Install and open AOMEI Partition Assistant. In the main interface, click “All Tools” and select “Windows To Go Creator”.

Step 2. In this window, choose “Create Window To Go for personal computer” and click “Next”.
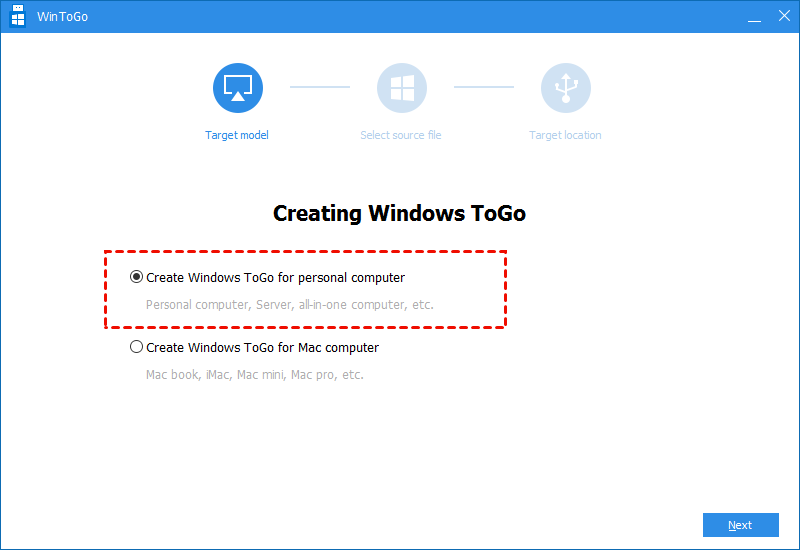
вњЌNote : If you are using a Mac computer, you can choose the second option to run windows from USB on Mac.
Step 3. Then select “Create Windows ToGo with system disc/ISO” and choose the ISO file, and click “Next”.

Step 4. Then the USB drive will be detected automatically by the program, if it doesn’t, you can click fresh, and click “Browse” to choose the ISO file. And click “Proceed”.
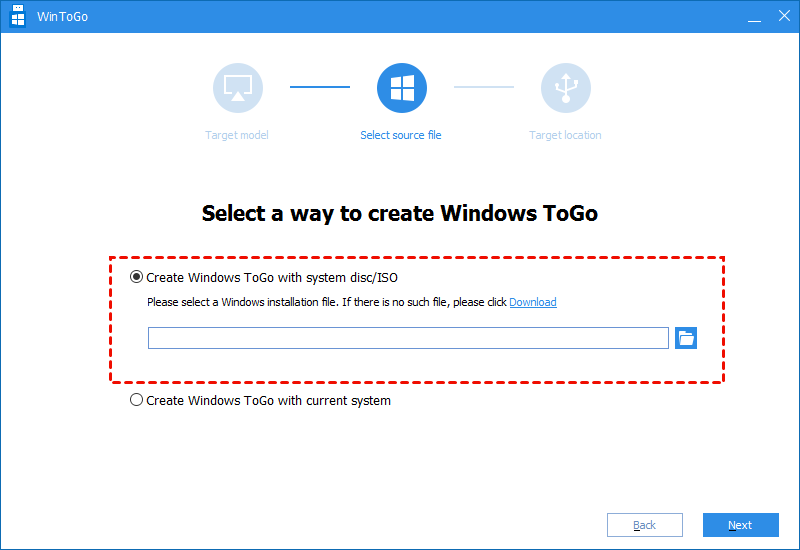
Step 5. It will pop up a small window to tell you the files on the USB drive will be erased. Please back up the USB beforehand.

в—Џ Install Windows to USB with the current system
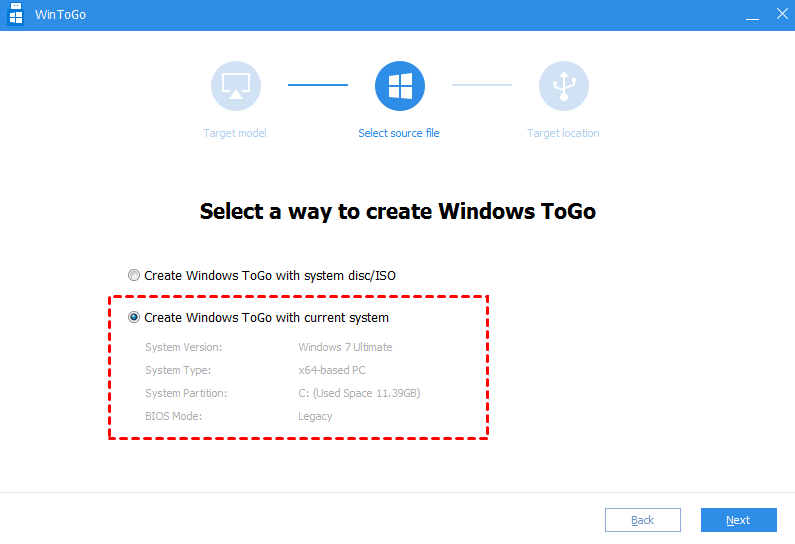
Step 1 and step 2 are the same, just open “Windows To Go Creator” in the main interface, and select Creating Windows To Go with PC.
Step 3. Choose “Create Windows To Go with the current system, and you will see the elaborate information of current OS on the computer, and click “Next”.
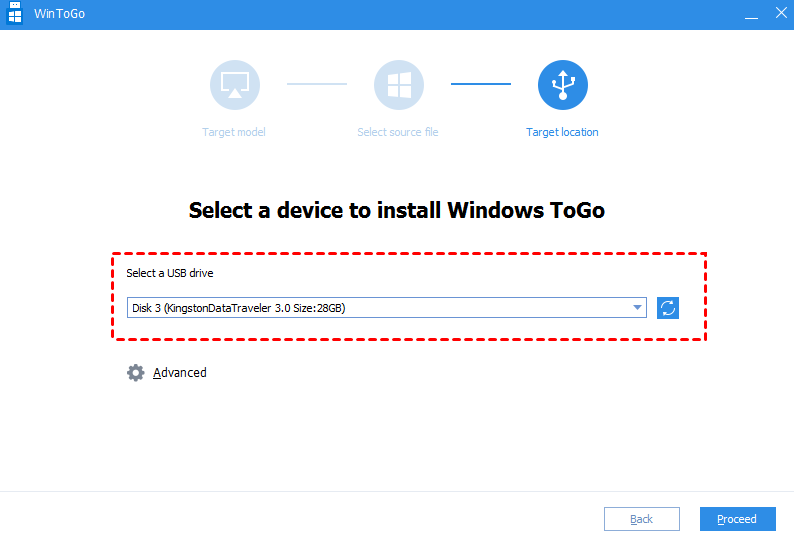
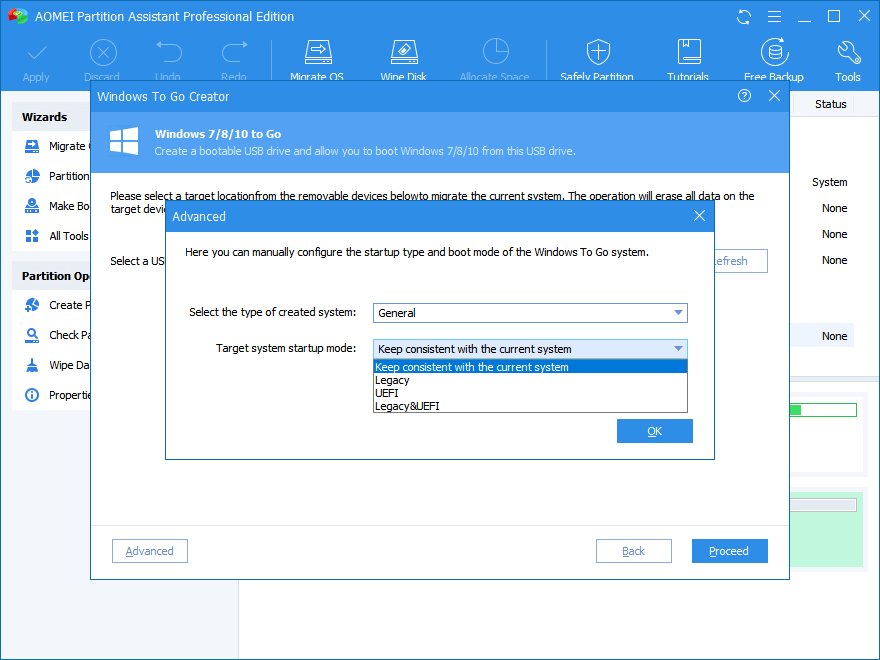
Step 4. Then the program will detect your USB drive. Reinsert it if it can’t be detected. Besides, you can click “Advanced” to decide the type of the created system and startup mode. Then click “Proceed”.
When the operation gets finished, Windows will be stalled on the USB. And you can insert it boot other computers.
How to Boot a PC from the portable Windows USB
Now, you can connect the USB to any other PC, and enter BIOS setup to set it as the boot drive. Then follow the steps below.
Step 1. With the USB inserted, turn on the computer.
Step 2. When the initial startup screen appears, tap the BIOS key (F2, F3, F4, F7, F8, it depends on the manufacturer that created the BIOS).
Step 3. And the BIOS setup will be launched. And use the arrow keys to choose «Boot» tab.
Step 4. And choose «Change boot order», and move the USB to the first one on the boot sequence.
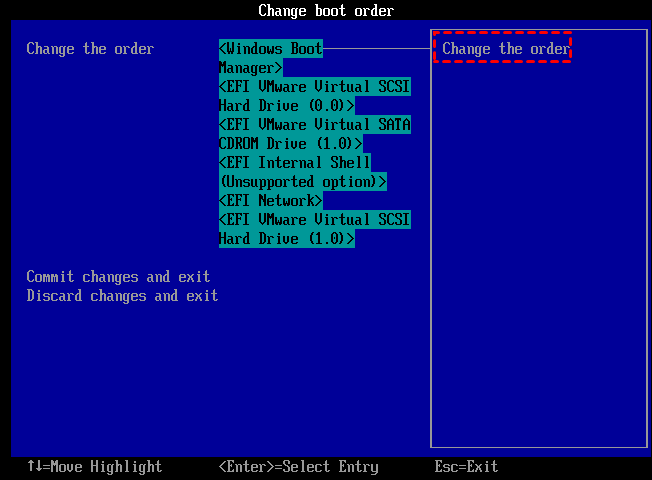
Step 5. Save the change and exit, and the PC will be started from the USB.
Further reading: how to install Windows with USB drive?
If you want to create a Windows creation tool (create a bootable USB for installation) you can refer to the following content and learn how to install Windows to your computer through USB drive.
Step 1. Insert a USB drive to your computer and download Windows ISO file.
Step 2. Click “Search” icon on the left bottom, type “cmd” in the search box and hit Enter to open the Command Prompt.
Step 3. Type “diskpart” and press Enter on Command Prompt to open Disk part tool.
в—Џ list disk
в—Џ select disk n (n is the drive letter of your USB)
в—Џ clean
в—Џ create partition primary
в—Џ select partition 1
в—Џ format fs=ntfs quick.
в—Џ active
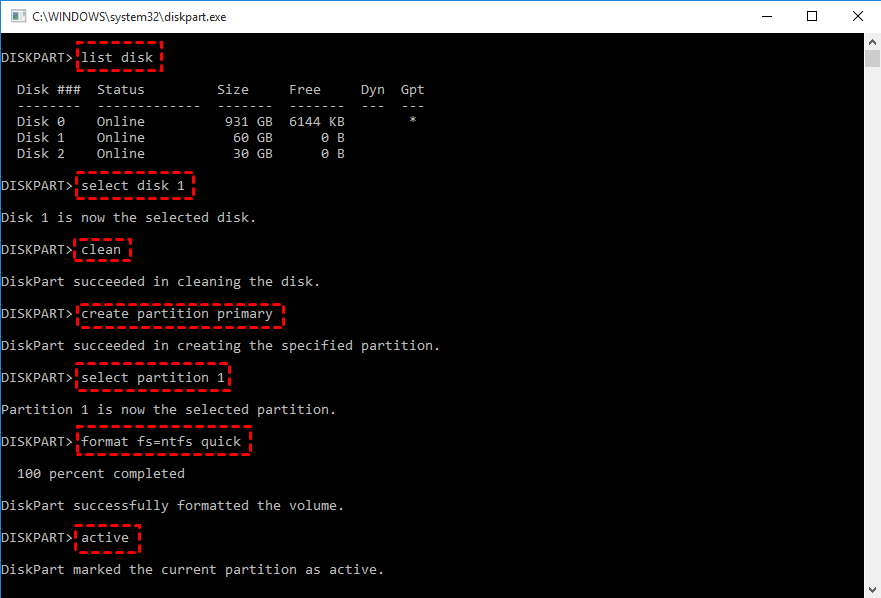
After executing these commands, your USB is bootable for installation, and you need to burn the ISO file to USB drive.
Step 4. And leave the Disk part tool, and open Command Prompt, then execute the commands as follow:
● xcopy A:\*.* B: /s/e/f”(A is the ISO image drive, and E: is the USB drive letter).
● A:\Boot\Bootsect /NT60 B: /force /mbr”.
The two commands will copy ISO files to USB drive and write a bootloader to your USB. After that, you can use this USB to boot up your PC and install Windows.
✍Attention : This way cannot directly run your own system on a computer. If you need, please use the “Windows To Go Creator” of AOMEI Partition Assistant Professional.
Conclusion
This is all about how to install Windows to USB. This tutorial can be applied to different Windows systems including Windows 10/8/7, Windows XP, and Vista. Besides, the versatile software-AOMEI Partition Assistant provides other functions, like migrating OS to HDD or SSD , extending system disk. And if you meet some boot issues, you can use it to create a bootable USB to repair your computer.
In addition, if your computer is running with Windows Server system, you can turn to AOMEI Partition Assistant Server Edition .
How to Run Windows 10 From a USB Drive
Loading and running Windows 10 from a USB drive is a handy option when you’re using a computer saddled with an older version of Windows.


You run Windows 10 on your own computer, but now you’re using another PC outfitted with an older operating system. If you prefer to use the newest version of Windows, though, there’s a way to run Windows 10 directly through a USB drive.
You’ll need a USB flash drive with at least 16GB of free space, but preferably 32GB. You’ll also need a license to activate Windows 10 on the USB drive. That means you have to either purchase one or use an existing one that is associated with your digital ID.
You can then use a Windows USB utility to set up the USB drive with Windows 10. Once you’re done, you’ll be able to boot up off the drive to launch Windows 10.
The major downside of booting from a USB drive is that Windows 10 will run slower than it does off your hard drive. But if you’re in a pinch you can at least work with the OS and access different apps this way.
Microsoft once offered its own tool called Windows to Go, which could generate a bootable Windows USB drive with the Enterprise and Education versions of Windows 10. However, the company has stopped development on that program and no longer updates it.
Instead, you can turn to two utility programs, WinToUSB and Rufus. These tools can create a bootable drive from any version of the operating system and on any type of USB drive.
Running Windows 10 From a USB Drive
If you want to run Windows from a USB, the first step is to sign into your current Windows 10 computer and create a Windows 10 ISO file that will be used to install the operating system onto the drive.
To do this, browse to the Download Windows 10 website. This site offers the latest edition of Windows 10, which at this point is the Windows 10 November 2019 Update, or Windows 10 version 1909.
Click the Download tool now button, then double-click the downloaded MediaCreationTool.exe file to install the program. At the first screen for Applicable notices and license terms, click the Access button. Then click the Create installation media (USB flash drive, DVD, or ISO file) for another PC button and hit Next.
At the Select language, architecture, and edition screen, confirm that all of the options are correct and then click Next.
You’ll then need to choose what media you want to use. Given the option between a USB flash drive and an ISO file, click ISO file. Then click Next.
Choose a location on your hard drive to store the Windows.iso file and click Save. Windows 10 will then generate the necessary ISO file. When the process is done, click Finish.
Running WinToUSB
Next, it’s time to enlist the aid of a third-party Windows USB program. Let’s kick things off with WinToUSB. This program comes in three flavors: Free, Professional, and Enterprise.
Start with the free version to see if you like it, but be aware that the freebie poses certain limitations. Most notably, you can create an installation of Windows 10 Home but not Professional or Enterprise.
If you need either of these editions, the Professional version of WinToUSB costs $29.95, while the Enterprise option will run you $199.95. Download and install the WinToUSB software from the dedicated website.
Next, connect a blank USB flash drive to your computer. Launch WinToUSB from its Start menu shortcut. At the introductory screen, click the button to the right of the Image File field and choose the ISO file you created for Windows 10.
Select the version of Windows 10 you wish to clone onto the USB stick. If you’re using the free version, your only choice is one of the Windows 10 Home versions, so select that one and hit Next.
At the next screen, you’ll need to determine your destination disk. Open the drop-down menu and choose your USB drive. A message pops up asking you to select a partition scheme. Click the MBR for BIOS option and hit Yes.
At the next screen, click the option for Legacy to choose the Installation mode. Click Next and your Windows 10 USB drive will now be created.
When the installation process reaches 100 percent, indicating that it’s finished, close the WinToUSB program and remove the USB drive.
Running Rufus
Now let’s check out Rufus. Download and install the Rufus program from its website, then launch the software. At the Drive Properties window, select your USB drive in the Device field, if it’s not already selected. Click the Select button next to the Boot selection field and select your Windows 10 ISO file.
Click the Image option field and change it to Windows to Go. You can leave the other options at their default values. If you wish, change the Volume label to something like Windows 10. Then click the Start button.
At the next screen, choose the version of Windows that you want to run on the USB drive, then click OK. A warning message flashes that all data on your USB drive will be destroyed. Click OK to continue.
Rufus will now copy the necessary files to the USB drive. After the USB drive has been set up, close the Rufus window.
Launch Windows 10 With USB
When you want to launch Windows 10 on a different computer, insert your USB drive into that PC. Press the appropriate key to launch your Boot menu and choose the option to boot up off the USB drive. The easiest way is to hold the Shift key and restart the computer.
The first time you run Windows 10 off the USB drive, you’ll need to go through the familiar Windows setup process. You’ll also need to activate Windows 10.
You can then install apps onto the USB drive and access any files or documents stored online, so the experience comes close to working on one of your own Windows 10 PCs.


