- How to: Install and uninstall Windows services
- Install using InstallUtil.exe utility
- Uninstall using InstallUtil.exe utility
- Install using PowerShell
- Uninstall using PowerShell
- Практическое руководство. Установка и удаление служб Windows How to: Install and uninstall Windows services
- Установка с помощью программы InstallUtil.exe Install using InstallUtil.exe utility
- Удаление с помощью служебной программы InstallUtil.exe Uninstall using InstallUtil.exe utility
- Установка с помощью PowerShell Install using PowerShell
- Удаление с помощью PowerShell Uninstall using PowerShell
- «The Windows Installer service could not be accessed» when you try to install Office
- Symptoms
- Cause
- Resolution
- Method 1: Use the Msconfig tool to confirm that the installer service is running
- Method 2: Re-register Windows Installer
- Method 3: Try the methods that are listed in Microsoft Knowledge Base Article 319624
- Method 4: Reinstall Windows Installer
- More Information
How to: Install and uninstall Windows services
If you’re developing a Windows service with the .NET Framework, you can quickly install your service app by using the InstallUtil.exe command-line utility or PowerShell. Developers who want to release a Windows service that users can install and uninstall can use the free WiX Toolset or commercial tools like Advanced Installer, InstallShield, or others. For more information, see Create an installer package (Windows desktop).
If you want to uninstall a service from your computer, don’t follow the steps in this article. Instead, find out which program or software package installed the service, and then choose Apps in Settings to uninstall that program. Note that many services are integral parts of Windows; if you remove them, you might cause system instability.
To use the steps in this article, you first need to add a service installer to your Windows service. For more information, see Walkthrough: Creating a Windows service app.
You can’t run Windows service projects directly from the Visual Studio development environment by pressing F5. Before you can run the project, you must install the service in the project.
You can use Server Explorer to verify that you’ve installed or uninstalled your service.
Install using InstallUtil.exe utility
From the Start menu, select the Visual Studio directory, then select Developer Command Prompt for VS .
The Developer Command Prompt for Visual Studio appears.
Access the directory where your project’s compiled executable file is located.
Run InstallUtil.exe from the command prompt with your project’s executable as a parameter:
If you’re using the Developer Command Prompt for Visual Studio, InstallUtil.exe should be on the system path. Otherwise, you can add it to the path, or use the fully qualified path to invoke it. This tool is installed with the .NET Framework in %WINDIR%\Microsoft.NET\Framework[64]\ .
- For the 32-bit version of the .NET Framework 4 or 4.5 and later, if your Windows installation directory is C:\Windows, the default path is C:\Windows\Microsoft.NET\Framework\v4.0.30319\InstallUtil.exe.
- For the 64-bit version of the .NET Framework 4 or 4.5 and later, the default path is C:\Windows\Microsoft.NET\Framework64\v4.0.30319\InstallUtil.exe.
Uninstall using InstallUtil.exe utility
From the Start menu, select the Visual Studio directory, then select Developer Command Prompt for VS .
The Developer Command Prompt for Visual Studio appears.
Run InstallUtil.exe from the command prompt with your project’s output as a parameter:
After the executable for a service is deleted, the service might still be present in the registry. If that’s the case, use the command sc delete to remove the entry for the service from the registry.
Install using PowerShell
From the Start menu, select the Windows PowerShell directory, then select Windows PowerShell.
Access the directory where your project’s compiled executable file is located.
Run the New-Service cmdlet with the with your project’s output and a service name as parameters:
Uninstall using PowerShell
From the Start menu, select the Windows PowerShell directory, then select Windows PowerShell.
Run the Remove-Service cmdlet with the name of your service as parameter:
After the executable for a service is deleted, the service might still be present in the registry. If that’s the case, use the command sc delete to remove the entry for the service from the registry.
Практическое руководство. Установка и удаление служб Windows How to: Install and uninstall Windows services
Если вы разрабатываете службу Windows с помощью .NET Framework, вы можете быстро установить приложение службы с помощью служебной программы командной строки InstallUtil.exe или PowerShell. If you’re developing a Windows service with the .NET Framework, you can quickly install your service app by using the InstallUtil.exe command-line utility or PowerShell. Если вы являетесь разработчиком и хотите создать службу Windows, которую пользователи могут устанавливать и удалять, можно использовать набор инструментов WiX или коммерческие средства, такие как Advanced Installer, InstallShield или другие. Developers who want to release a Windows service that users can install and uninstall can use the free WiX Toolset or commercial tools like Advanced Installer, InstallShield, or others. См. сведения о создании пакета установщика (классическое приложение Windows). For more information, see Create an installer package (Windows desktop).
Если вы хотите удалить службу на своем компьютере, не выполняйте процедуру, описанную в этой статье. If you want to uninstall a service from your computer, don’t follow the steps in this article. Вместо этого определите, какая программа (или программный пакет) установила эту службу, а затем выберите Приложения в параметрах, чтобы удалить эту программу. Instead, find out which program or software package installed the service, and then choose Apps in Settings to uninstall that program. Следует отметить, что многие службы являются составной частью ОС Windows. Если их удалить, это может привести к нестабильной работе системы. Note that many services are integral parts of Windows; if you remove them, you might cause system instability.
Чтобы использовать процедуру, описанную в этой статье, сначала необходимо добавить установщик службы в свою службу Windows. To use the steps in this article, you first need to add a service installer to your Windows service. Дополнительные сведения см. в разделе Пошаговое руководство: создание диспетчера служб Windows. For more information, see Walkthrough: Creating a Windows service app.
Проекты служб Windows нельзя запускать непосредственно из среды разработки Visual Studio путем нажатия клавиши F5. You can’t run Windows service projects directly from the Visual Studio development environment by pressing F5. Перед запуском проекта необходимо установить службу в проекте. Before you can run the project, you must install the service in the project.
Запустите обозреватель сервера и убедитесь, что служба установлена или удалена. You can use Server Explorer to verify that you’ve installed or uninstalled your service.
Установка с помощью программы InstallUtil.exe Install using InstallUtil.exe utility
В меню Пуск выберите каталог Visual Studio и затем Командная строка разработчика для VS . From the Start menu, select the Visual Studio directory, then select Developer Command Prompt for VS .
Появится командная строка разработчика для Visual Studio. The Developer Command Prompt for Visual Studio appears.
Откройте каталог, где находится скомпилированный исполняемый файл вашего проекта. Access the directory where your project’s compiled executable file is located.
Запустите InstallUtil.exe из командной строки, указав исполняемый файл проекта в качестве параметра: Run InstallUtil.exe from the command prompt with your project’s executable as a parameter:
Если вы используете командную строку разработчика для Visual Studio, системный путь должен указывать на файл InstallUtil.exe. If you’re using the Developer Command Prompt for Visual Studio, InstallUtil.exe should be on the system path. Если это не так, можно добавить его в путь или использовать полный путь для его вызова. Otherwise, you can add it to the path, or use the fully qualified path to invoke it. Этот инструмент устанавливается вместе с платформой .NET Framework в папку %WINDIR%\Microsoft.NET\Framework[64]\ . This tool is installed with the .NET Framework in %WINDIR%\Microsoft.NET\Framework[64]\ .
Пример: For example:
- Для 32-разрядной версии .NET Framework 4 или 4.5 и более поздних версий: если каталог установки Windows — C:\Windows, по умолчанию используется путь C:\Windows\Microsoft.NET\Framework\v4.0.30319\InstallUtil.exe. For the 32-bit version of the .NET Framework 4 or 4.5 and later, if your Windows installation directory is C:\Windows, the default path is C:\Windows\Microsoft.NET\Framework\v4.0.30319\InstallUtil.exe.
- Для 64-разрядной версии .NET Framework 4 или 4.5 и более поздних версий: по умолчанию используется путь C:\Windows\Microsoft.NET\Framework64\v4.0.30319\InstallUtil.exe. For the 64-bit version of the .NET Framework 4 or 4.5 and later, the default path is C:\Windows\Microsoft.NET\Framework64\v4.0.30319\InstallUtil.exe.
Удаление с помощью служебной программы InstallUtil.exe Uninstall using InstallUtil.exe utility
В меню Пуск выберите каталог Visual Studio и затем Командная строка разработчика для VS . From the Start menu, select the Visual Studio directory, then select Developer Command Prompt for VS .
Появится командная строка разработчика для Visual Studio. The Developer Command Prompt for Visual Studio appears.
Запустите InstallUtil.exe из командной строки, указав выходные данные проекта в качестве параметра: Run InstallUtil.exe from the command prompt with your project’s output as a parameter:
После удаления исполняемого файла для службы сама служба может по-прежнему присутствовать в реестре. After the executable for a service is deleted, the service might still be present in the registry. В этом случае удалить запись службы из реестра можно с помощью команды sc delete. If that’s the case, use the command sc delete to remove the entry for the service from the registry.
Установка с помощью PowerShell Install using PowerShell
В меню Пуск выберите Каталог Windows PowerShell и Windows PowerShell. From the Start menu, select the Windows PowerShell directory, then select Windows PowerShell.
Откройте каталог, где находится скомпилированный исполняемый файл вашего проекта. Access the directory where your project’s compiled executable file is located.
Выполните командлет New-Service, указав в качестве параметров выходные данные проекта и имя службы. Run the New-Service cmdlet with the with your project’s output and a service name as parameters:
Удаление с помощью PowerShell Uninstall using PowerShell
В меню Пуск выберите Каталог Windows PowerShell и Windows PowerShell. From the Start menu, select the Windows PowerShell directory, then select Windows PowerShell.
Выполните командлет Remove-Service, указав в качестве параметра имя службы. Run the Remove-Service cmdlet with the name of your service as parameter:
После удаления исполняемого файла для службы сама служба может по-прежнему присутствовать в реестре. After the executable for a service is deleted, the service might still be present in the registry. В этом случае удалить запись службы из реестра можно с помощью команды sc delete. If that’s the case, use the command sc delete to remove the entry for the service from the registry.
«The Windows Installer service could not be accessed» when you try to install Office
Office 365 ProPlus is being renamed to Microsoft 365 Apps for enterprise. For more information about this change, read this blog post.
Symptoms
When you try to install Microsoft Office, you may receive an error message that is similar to the following:
«The Windows Installer Service could not be accessed.»
Cause
This problem may occur if the Windows Installer files are damaged or missing.
Resolution
To resolve this problem, use one of the following methods.
Method 1: Use the Msconfig tool to confirm that the installer service is running
Click Start, and then click Run. (The screen shot for this step is listed below).

In the Open box, type msconfig, and then click OK. (The screen shot for this step is listed below). 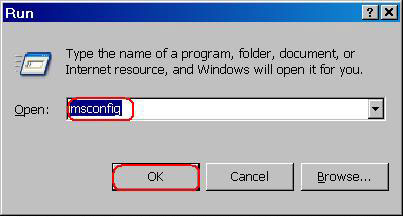
On the Services tab, click to select the check box that is next to Windows Installer. (The screen shot for this step is listed below). 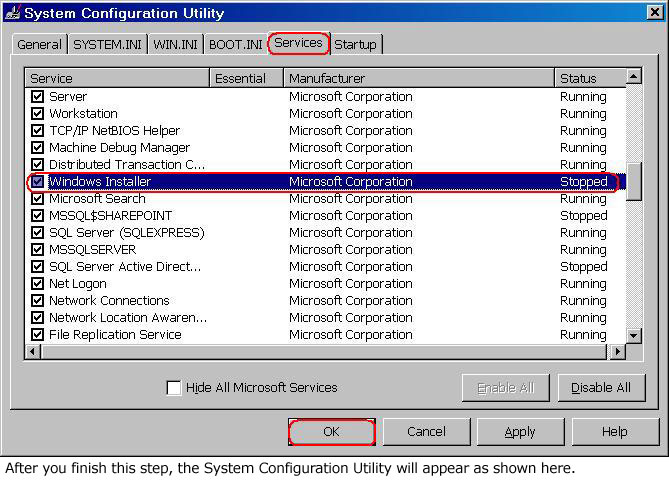
Click OK, and then click RestartВ to restart the computer. (The screen shot for this step is listed below). 
Install Office again. When you are prompted to enter the product key, type the product key, and then click Next.
Office will be installed, and you will not be prompted for the product key when the programs start.
Method 2: Re-register Windows Installer
This section, method, or task contains steps that tell you how to modify the registry. However, serious problems might occur if you modify the registry incorrectly. Therefore, make sure that you follow these steps carefully. For added protection, back up the registry before you modify it. Then, you can restore the registry if a problem occurs. For more information about how to back up and restore the registry, see How to back up and restore the registry in Windows.
Note Because there are several versions of Microsoft Windows, the following steps may be different on your computer. If they are, see your product documentation to complete these steps.
To re-register Windows Installer, follow these steps.
Note If you cannot complete the following steps, go to method 3.
Click Start, and then click Search. (The screen shot for this step is listed below).

Click All files and folders. (The screen shot for this step is listed below).

In the File name box, type Msiexec.exe, and then click Search. (The screen shot for this step is listed below).

After the search is complete, make a note of the location of the Msiexec.exe file. The location of the file should be similar to the following example: C:\Windows\System32 (The screen shot for this step is listed below).

On the File menu, click Close to close the SearchВ dialog box. (The screen shot for this step is listed below).

Click Start, and then click Run. (The screen shot for this step is listed below).

In the Open box, type regedit, and then click OK. (The screen shot for this step is listed below).

Locate and then click the following registry key: HKEY_LOCAL_MACHINE\SYSTEM\CurrentControlSet\Services\MSIServer(The screen shot for this step is listed below).

In the right pane of the Registry Editor window, double-click ImagePath. (The screen shot for this step is listed below).

In the Edit String dialog box that appears, make sure that the string in the Value data box contains the correct path for the Msiexec.exe file that you determined in step 4.
Note The following is an example of the correct path, where drive is the drive where Windows is installed:
drive:\Windows\System32\msiexec.exe /V
If the Value data box does not contain the correct path, make changes to correct the path, and then click OK to close the Edit String dialog box. (The screen shot for this step is listed below).

On the File menu, click ExitВ to quit Registry Editor. (The screen shot for this step is listed below).

Start your computer in Safe mode, and then register the Msiexec.exe file. To do this, follow these steps:
Shut down your computer, and then restart your computer.
Restart your computer and press the F8 key on your keyboard. On a computer that is configured for booting to multiple operating systems, press the F8 key when you see the Boot menu.
Use the ARROW keys to select Safe Mode, and then press ENTER.
If the Boot menu appears again, and the words «Safe Mode» appear in blue at the bottom, select the installation that you want to start, and then press ENTER.
Log on to the computer.
Click Start, click Run, type msiexec /regserver in the Open box, and then click OK. (The screen shot for this step is listed below).

Shut down your computer, and then restart your computer normally.
If you still cannot install Microsoft Office successfully and you receive an error message that is similar to the message listed in the «Symptoms» section, go to Method 3.
Method 3: Try the methods that are listed in Microsoft Knowledge Base Article 319624
Try the methods that are listed in the following Microsoft Knowledge Base article:
319624 «Windows Installer Service could not be accessed» error message when installing application
Method 4: Reinstall Windows Installer
Note This method applies to Microsoft Windows 95, Microsoft Windows 98, Microsoft Windows Millennium Edition (Me), and Microsoft Windows NT 4.0. For Microsoft Windows 2000, Microsoft Windows XP, and Microsoft Windows Server 2003, either reapply the latest service pack or repair the operating system.
To reinstall the Windows Installer, follow these steps.
Click Start, and then click Run. (The screen shot for this step is listed below).
In the Open box, type cmd, and then click OK. (The screen shot for this step is listed below). 
At the command prompt, type the following lines. Press ENTER after you type each line.
(The screen shot for this step is listed below).

ren msi.dll msi.old
(The screen shot for this step is listed below).

ren msiexec.exe msiexec.old
(The screen shot for this step is listed below).

ren msihnd.dll msihnd.old
(The screen shot for this step is listed below).

At the command prompt, type exit, and then press ENTER. (The screen shot for this step is listed below).

Restart your computer.
Update the Windows Installer files to the latest version. To do so, visit one of the following Microsoft Web sites, and then download and install Windows Installer 2.0.
Note Windows Installer 2.0 is included with Microsoft Windows XP. You do not have to perform this step if you are using Windows XP.
After the installation of the Windows Installer is complete, shut down and restart your computer normally before you install Microsoft Office.
More Information
For more information about how to restart Windows in Safe mode, see Advanced startup options (including safe mode).


