- Install Windows from a USB Flash Drive
- What you need
- Step 1 — Format the drive and set the primary partition as active
- Step 2 — Copy Windows Setup to the USB flash drive
- Step 3 — Install Windows to the new PC
- If your Windows image is larger than 4GB
- Создание установочного носителя для Windows
- Как установить Windows с флешки (программы и инструкция)
- Выбор версии Windows для установки
- Какую разрядность выбрать, Windows 10 32-бит или 64-бит?
- Пошаговая инструкция по установке Windows:
- Программы для создания загрузочной флешки Windows
- WinSetupFromUSB
- Install Windows from USB with WinSetupFromUSB, multiboot and a lot more
- Downloads
- Установка Windows XP с флешки с помощью WinSetupFromUSB
- Установка Windows XP с флешки
Install Windows from a USB Flash Drive
Here’s how to create a bootable Windows installation USB drive starting with a Windows .iso file or a Windows Setup DVD.
If you’re looking for an easy way to create a bootable USB Windows installation drive, use the media creation tool.
What you need
- Windows 10 install .iso or DVD
- USB flash drive with at least 5GB free space. This drive will be formatted, so make sure it doesn’t have any important files on it.
- Technician PC — Windows PC that you’ll use to format the USB flash drive
- Destination PC — A PC that you’ll install Windows on
Step 1 — Format the drive and set the primary partition as active
Connect the USB flash drive to your technician PC.
Open Disk Management: Right-click on Start and choose Disk Management.
Format the partition: Right-click the USB drive partition and choose Format. Select the FAT32 file system to be able to boot either BIOS-based or UEFI-based PCs.
Set the partition as active: Right-click the USB drive partition and click Mark Partition as Active.
If Mark Partition as Active isn’t available, you can instead use diskpart to select the partition and mark it active.
Step 2 — Copy Windows Setup to the USB flash drive
Use File Explorer to copy and paste the entire contents of the Windows product DVD or ISO to the USB flash drive.
Optional: add an unattend file to automate the installation process. For more information, see Automate Windows Setup.
Step 3 — Install Windows to the new PC
Connect the USB flash drive to a new PC.
Turn on the PC and press the key that opens the boot-device selection menu for the computer, such as the Esc/F10/F12 keys. Select the option that boots the PC from the USB flash drive.
Windows Setup starts. Follow the instructions to install Windows.
Remove the USB flash drive.
If your Windows image is larger than 4GB
Windows USB install drives are formatted as FAT32, which has a 4GB filesize limit. If your image is larger than the filesize limit:
Copy everything except the Windows image file (sources\install.wim) to the USB drive (either drag and drop, or use this command, where D: is the mounted ISO and E: is the USB flash drive.)
Split the Windows image file into smaller files, and put the smaller files onto the USB drive:
Создание установочного носителя для Windows
Вы можете использовать установочный носитель (USB-устройство флэш-памяти или DVD-диск) для установки новой копии Windows, выполнения чистой установки или переустановки Windows 10.
Чтобы создать установочный носитель, перейдите на веб-сайт скачивания ПО, где вы найдете пошаговые инструкции. На этом веб-сайте вы можете выбрать версию Windows и создать собственный установочный носитель с помощью USB-устройства флэш-памяти или DVD-диска. Чтобы перейти непосредственно к одной из версий, выберите одну из следующих ссылок:
Windows 10 (Затем выберите Скачать средство сейчас.)
Важно: Создайте резервную копию файлов перед установкой и переустановкой Windows на компьютере. Узнайте, как это сделать для Windows 10 или для Windows 7 и Windows 8.1.
Чтобы создать установочный носитель, необходимо следующее:
Компьютер с надежным подключением к Интернету. Время скачивания зависит от скорости подключения к Интернету.
USB-устройство флэш-памяти или DVD-диск. Необходимо пустое USB-устройство флэш-памяти с 8 ГБ свободного места или пустой DVD-диск (и устройство записи DVD). Рекомендуем использовать чистый носитель, поскольку все его содержимое будет удалено. Если при записи DVD-диска из ISO-файла отображается сообщение о том, что файл образа диска слишком большой, необходимо использовать DVD-носитель с двумя слоями (DL).
Ключ продукта. 25-значный ключ продукта (не требуется для цифровых лицензий). Если вам требуется помощь, см. раздел Как найти ключ продукта Windows.
После создания установочного носителя вы можете сбросить или переустановить Windows. Дополнительные сведения см. в разделе Параметры восстановления в Windows 10.
Как установить Windows с флешки (программы и инструкция)
Для установки Windows на компьютер нужна загрузочная флешка или DVD-диск. Программы для создания установочного USB вы можете скачать по ссылкам в конце статьи. На нашем сайте вы найдёте подробные инструкции по записи образа на флешку. Наши советы помогут вам установить Windows самостоятельно и совершенно бесплатно.
Выбор версии Windows для установки
Убедитесь, что компьютер соответствует системным требованиям для установки Windows. После этого, определитесь со сборкой. Какую версию операционной системы лучше установить? Какая сборка Windows самая лучшая и быстрая? Выбор зависит от возможностей вашего ноутбука или компьютера. Самой свежей версией на данный момент является Windows 10.
Какую разрядность выбрать, Windows 10 32-бит или 64-бит?
64-битная версия Windows 10:
- поддерживает более 4 Гигабайт оперативной памяти
- позволяет запускать 32-битные версии программ и игр
- улучшенная работа приложений, оптимизированных под 64-bit архитектуру
32-битная версия Windows 10:
- Использует на 20% меньше оперативной памяти
- Некоторые устаревшие приложения и игры работают только в 32-bit версии
- Занимает меньше места на жёстком диске
Пошаговая инструкция по установке Windows:
- Отформатировать флешку (8+ Гб) для записи образа.
- Скачать и установить программу для создания установочного носителя.
- Загрузить образ Windows с официального сайта Microsoft.
- Создать загрузочную флешку в одной из программ.
- Установить Windows.
Чтобы запустить установку, необходимо войти в БИОС и выставить загрузку с USB. Варианты входа в BIOS — при загрузке системы нажать F12, Shift+F8, F8.
Программы для создания загрузочной флешки Windows
Один из самых удобных и практичных инструментов для создания установочного диска — Microsoft Media Creation Tool. Но вы можете использовать и другие программы по вашему вкусу.
Официальные программы для создания загрузочной USB флешки и диска от Microsoft:
- Media Creation Tool (версия 1.4 от 12.10.2017 г.) — скачать
- Windows USB/DVD Download Tool (версия 1.0 от от 9.12.2009 г.) — скачать
Программы для записи установочных носителей из образов от сторонних разработчиков:
- UltraISO 9.7.0.3476 (Русская версия) — скачать
- Rufus (версия 2.16 от 31.07.2017 г.) — скачать
- Win Setup From USB (версия 1.8 от 16.05.2017 г.) — скачать
WinSetupFromUSB
Install Windows from USB with WinSetupFromUSB, multiboot and a lot more
Downloads
Here you can download WinSetupFromUSB and updates of the tools included.
Please do not hotlink files, use this page if you want to post a link to the program. If you need to link to a specific version, you could use version number like this:
Note: A few antivirus programs keep detecting a couple of the included files as viruses. This is false positive . These vendors were informed numerous times and the serious companies such as DrWeb and Kaspersky, update their signatures to remove the false detection within a few hours after being informed. Others, such as McAfee, despite all the efforts and contacts, don’t do anything to update their signatures. For a few unknown ones, which use third party signatures, there is no way to contact them or they simply don’t respond. This program will never knowingly distribute any kind of malware.
- added support for multi-version/dual Windows ISOs (32 and 64 bits in one ISO for example). Stock Microsoft dual ISOs are supported and tested, other such sources too, as long as they use unmodified bootmgr and default location for BCD store is in /boot/bcd. Tested in BIOS/UEFI with both Secure Boot on and off, stock Windows 10 dual and single ISO builds 1803, 1809, Server 2016 and 2019.
- added detection of Windows 10 build number which is added to the boot menu names
- updated ImDisk and WimLib
- minor bug fixes
- fixed issue with Windows 10 and recovery option not shown
- fixed issue with persistence file size not set correctly and tooltip for using persistence
- updated some the tools to their latest version- BootIce, ImDisk, WimLib
1) Windows 10 – single ISOs created by Microsoft Media Creation Tool or downloaded from Microsoft should work. Dual ISOs made by the same tool (x32 and x64 in a single ISO) are NOT supported yet due to the changed structure. Such source can still be added using the previous versions which dump entire contents as they are, 1.0 beta8 for example. Limitations- such source needs to be added first, and any other sources of the same type,but not the same x32+x64, has to be added using 1.6 beta 2 or later.
- disabled superfloppy check due to issues with latest Windows 10 builds
- increased input timeouts to 45 seconds
- fixed issue with Swedish locale and bcdedit
- added check if imdisk is an old version
1) Windows 10 – single ISOs created by Microsoft Media Creation Tool or downloaded from Microsoft should work. Dual ISOs made by the same tool (x32 and x64 in a single ISO) are NOT supported yet due to the changed structure. Such source can still be added using the previous versions which dump entire contents as they are, 1.0 beta8 for example. Limitations- such source needs to be added first, and any other sources of the same type,but not the same x32+x64, has to be added using 1.6 beta 2 or later.
- updated imdisk package for compatibility with latest Windows 10 versions
- Added Windows 10 in all GUI elements
1) Windows 10 – single ISOs created by Microsoft Media Creation Tool or downloaded from Microsoft should work. Dual ISOs made by the same tool (x32 and x64 in a single ISO) are NOT supported yet due to the changed structure. Such source can still be added using the previous versions which dump entire contents as they are, 1.0 beta8 for example. Limitations- such source needs to be added first, and any other sources of the same type,but not the same x32+x64, has to be added using 1.6 beta 2 or later.
2) If program is run on latest Windows 10 builds, seconds source can no longer be added due to incorrectly detected superfloppy format of the USB disk. This is due to changed by Microsoft WMI call results or structure. Fix is being worked on and will be released as soon as it’s ready.
- Fixed missing EFI boot menu for Windows 10 sources
Note: Windows 10 – single ISOs created by Microsoft Media Creation Tool or downloaded from Microsoft should work. Dual ISOs made by the same tool (x32 and x64 in a single ISO) are NOT supported yet due to the changed structure. Such source can still be added using the previous versions which dump entire contents as they are, 1.0 beta8 for example. Limitations- such source needs to be added first, and any other sources of the same type,but not the same x32+x64, has to be added using 1.6 beta 2 or later.
Установка Windows XP с флешки с помощью WinSetupFromUSB
Итак, перед нами поставлена задача, создать загрузочную флешку для последующей установки в нее Windows xp. Более поздние версии этой ОС ставятся с Flash на ура, а вот с xp возникает немало проблем при установке, особенно на старых компьютерах. Поэтому в этой статье будет показан способ, который работает в частности на новых и старых пк.
Хоть данная ОС и считается устаревшей, она по прежнему имеет спрос благодаря старым рабочим конфигурациям, для которых кроме линукса и Xp альтернатив практически нет. Так что пока работает старое железо, будет спрос.
WinSetupFromUSB — бесплатная программа позволяющая создавать загрузочный USB Flash накопитель (флешку) для установки всех версий windows. Скачать последнюю версию программы можно на Оф Сайте . После скачивания извлекаем архив, и запускаем WinSetupFromUSB.exe или х64 в зависимости от разрядности вашей ОС.
Установка Windows XP с флешки
После запуска программы необходимо выбрать нужную нам флешку. После этого нужно нажать на «RMPrepUSB«.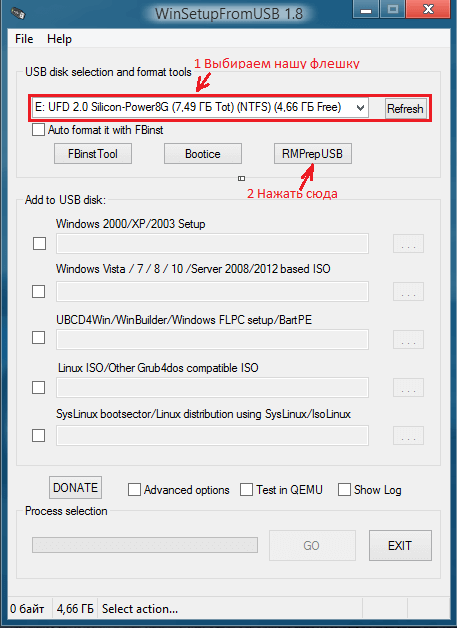
В открывшемся окне выбираем такие параметры:
Загрузочный сектор — XP/BartPE bootable [NTLDR].
Файловая система и опции — Fat32, Boot as HDD (C: 2PNTS).

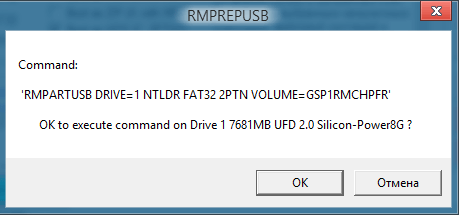
Жмем «Подготовить Диск» в результате чего, произойдет форматирование флеш накопителя. Высветиться два окна подтверждения, жмем «ОК».

В черном окне (командная строка) можно наблюдать в % процесс подготовки. По окончанию оно само закроется, вам нужно закрыть оставшееся окно, нажав кнопку «Выход».
Далее в главном меню программы отмечаем галочкой пункт «Windows 2000/XP/2003 Setup» и указать папку с установочными файлами. Для этого вам нужно будет предварительно распаковать установочный образ в удобное для вас место. Распаковать можно архиваторами 7zip или Winrar, либо же программами для работы с образами, например DAEMON Tools или UltraISO.
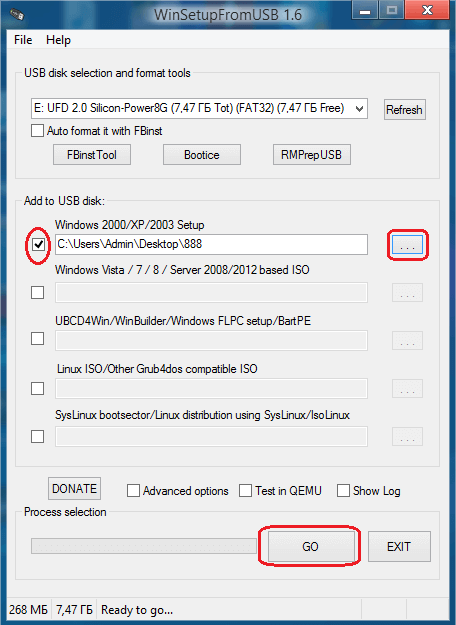
После того как выбрали файлы, нажимаем на «GO» . Пойдет процесс копирования файлов на флешку. Занимает это по времени 5-10 мин в зависимости от объема данных.
Для начала установки windows, необходимо установить наш флеш накопитель в качестве загрузочной в настройках биос. Для этого во время включения пк, на первых секундах загрузки жмем клавишу «Delete» или «F2» на ноутбуках, и ищем раздел boot или что-то подобное этому.
Если все сделали правильно, то при последующей перезагрузке вы увидите такое окно, просто жмем «Enter».
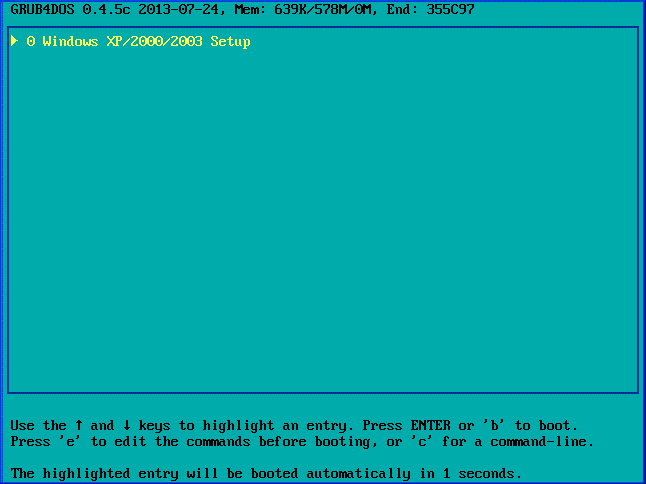
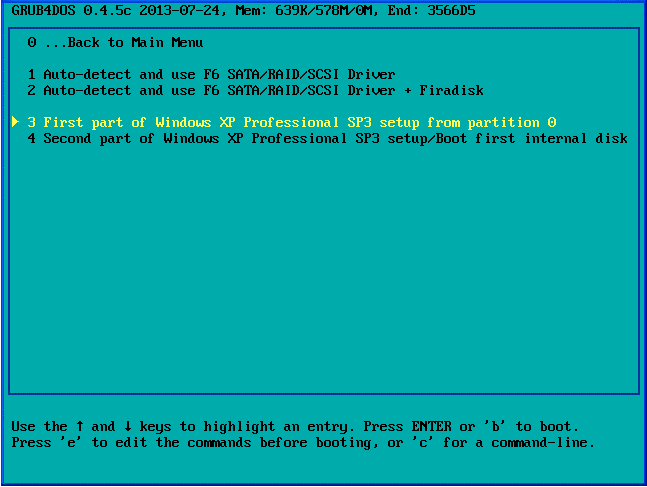
Выбрали 3 пункт. Начнется установка операционной системы. Далее, после первой перезагрузки появится снова окно, в котором нужно уже будет выбрать пункт под номером 4 для продолжения установки. На этом всё, статья завершена.)


