- Install Windows from a USB Flash Drive
- What you need
- Step 1 — Format the drive and set the primary partition as active
- Step 2 — Copy Windows Setup to the USB flash drive
- Step 3 — Install Windows to the new PC
- If your Windows image is larger than 4GB
- Создание установочного носителя для Windows
- How To Install Windows 10 ISO From USB?
- Contents
- Steps to follow to prepare the USB stick for the download
- How to install Windows 10 from USB
- Windows USB/DVD Download Tool
- Overview
- Installation
- Using the Windows USB/DVD Download Tool
- Frequently Asked Questions
- Troubleshooting
Install Windows from a USB Flash Drive
Here’s how to create a bootable Windows installation USB drive starting with a Windows .iso file or a Windows Setup DVD.
If you’re looking for an easy way to create a bootable USB Windows installation drive, use the media creation tool.
What you need
- Windows 10 install .iso or DVD
- USB flash drive with at least 5GB free space. This drive will be formatted, so make sure it doesn’t have any important files on it.
- Technician PC — Windows PC that you’ll use to format the USB flash drive
- Destination PC — A PC that you’ll install Windows on
Step 1 — Format the drive and set the primary partition as active
Connect the USB flash drive to your technician PC.
Open Disk Management: Right-click on Start and choose Disk Management.
Format the partition: Right-click the USB drive partition and choose Format. Select the FAT32 file system to be able to boot either BIOS-based or UEFI-based PCs.
Set the partition as active: Right-click the USB drive partition and click Mark Partition as Active.
If Mark Partition as Active isn’t available, you can instead use diskpart to select the partition and mark it active.
Step 2 — Copy Windows Setup to the USB flash drive
Use File Explorer to copy and paste the entire contents of the Windows product DVD or ISO to the USB flash drive.
Optional: add an unattend file to automate the installation process. For more information, see Automate Windows Setup.
Step 3 — Install Windows to the new PC
Connect the USB flash drive to a new PC.
Turn on the PC and press the key that opens the boot-device selection menu for the computer, such as the Esc/F10/F12 keys. Select the option that boots the PC from the USB flash drive.
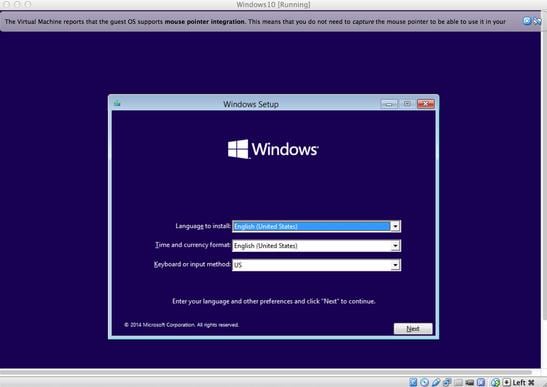
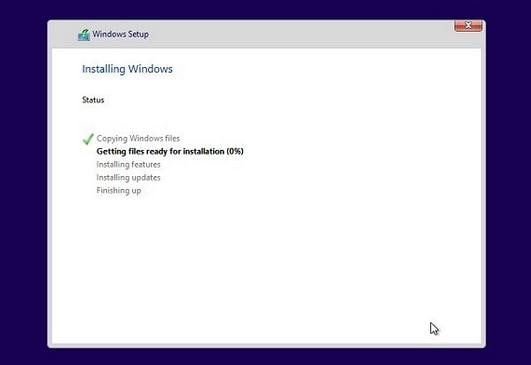
Windows Setup starts. Follow the instructions to install Windows.
Remove the USB flash drive.
If your Windows image is larger than 4GB
Windows USB install drives are formatted as FAT32, which has a 4GB filesize limit. If your image is larger than the filesize limit:
Copy everything except the Windows image file (sources\install.wim) to the USB drive (either drag and drop, or use this command, where D: is the mounted ISO and E: is the USB flash drive.)
Split the Windows image file into smaller files, and put the smaller files onto the USB drive:
Создание установочного носителя для Windows
Вы можете использовать установочный носитель (USB-устройство флэш-памяти или DVD-диск) для установки новой копии Windows, выполнения чистой установки или переустановки Windows 10.
Чтобы создать установочный носитель, перейдите на веб-сайт скачивания ПО, где вы найдете пошаговые инструкции. На этом веб-сайте вы можете выбрать версию Windows и создать собственный установочный носитель с помощью USB-устройства флэш-памяти или DVD-диска. Чтобы перейти непосредственно к одной из версий, выберите одну из следующих ссылок:
Windows 10 (Затем выберите Скачать средство сейчас.)
Важно: Создайте резервную копию файлов перед установкой и переустановкой Windows на компьютере. Узнайте, как это сделать для Windows 10 или для Windows 7 и Windows 8.1.
Чтобы создать установочный носитель, необходимо следующее:
Компьютер с надежным подключением к Интернету. Время скачивания зависит от скорости подключения к Интернету.
USB-устройство флэш-памяти или DVD-диск. Необходимо пустое USB-устройство флэш-памяти с 8 ГБ свободного места или пустой DVD-диск (и устройство записи DVD). Рекомендуем использовать чистый носитель, поскольку все его содержимое будет удалено. Если при записи DVD-диска из ISO-файла отображается сообщение о том, что файл образа диска слишком большой, необходимо использовать DVD-носитель с двумя слоями (DL).
Ключ продукта. 25-значный ключ продукта (не требуется для цифровых лицензий). Если вам требуется помощь, см. раздел Как найти ключ продукта Windows.
После создания установочного носителя вы можете сбросить или переустановить Windows. Дополнительные сведения см. в разделе Параметры восстановления в Windows 10.
How To Install Windows 10 ISO From USB?
Contents
- 1. Complete Windows 10 Tips
- 1.2 Windows 10 Release
2. Windows 10 Download & Install
- 2.1 Windows 10 Download
- 2.2.Windows 10 Free
- 2.3 Windows 10 Review
- 2.4 Windows 10 Upgrade
- 2.5 Windows 10 ISO
- 2.6 Windows 10 Features and Price
Are you a Windows fan? Then you must be eager to try the new Windows 10! However, it will be released officially on 29th July and its still time you could put your hands on it. If you can’t wait to experience the new OS by Microsoft, you can try the preview.
The preview lets you download, install and use the latest OS beta. This new Windows 10 features the Spartan Web browser, and Cortona – the virtual assistant newly introduced by Microsoft. This new operating system will make the desktop your primary interface.
You must opt for a full installation if you want to have a real-world experience of using Windows 10 in your desktop. However, you must remember that you wont be able to revert back to the previous version of the operating system you are using in case you don’t like the new operating system by Windows in case you do not have a recovery media. Wondering what are the things that you’ll need for downloading the Windows 10 Technical Preview? Here’s a list:
- Of course your desktop or laptop in which to install the OS. The system requirements include 1GHz processor, 1GB RAM (for 32bit version). If you are using the 64 bit version you need 2GB RAM. Remember, for the 64bit version you will need 16GB storage in your desktop. If you have a system with all these specifications you can easily download the Windows 10 ISO from a USB.
- The USB flash drive that you are using should be of 8GB for the 64-bit version and 4Gb for the 32-bit version.
- In addition to that, you will need a USB stick of at least 8GB , the free utility that is needed for creating USB drives that are bootable.
Steps to follow to prepare the USB stick for the download
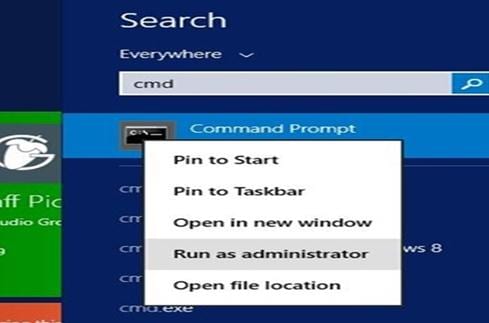
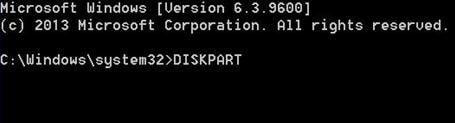
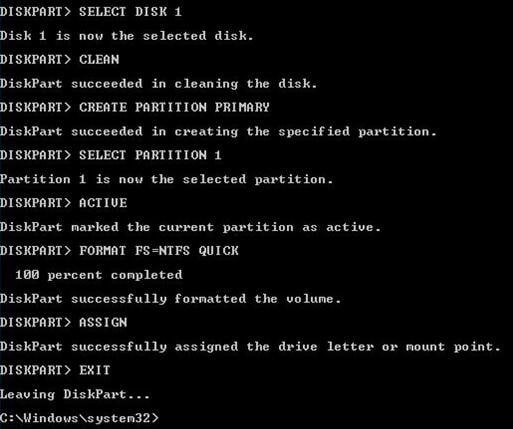
The first step is to open the «Run» box. Now type «CMD». This will launch the command prompt. Now you need to run the program called «DISKPART». This will partition and then format the USB stick you are using. Now, you can see that the program starts to run. Hen it does, type «list disk». This will bring you to the list of drives in your system. Once this happens, you need to type «select disk n». Here, «n» is the number of the disk that you are using.
The next you need to do is to clean the drive. So, make sure that you have kept a backup of the things that you need from the drive. Now, you need to create the partition. Type «create partition primary». To select the created partition you need to type «select partition 1» and then «active». Now format the drive. After the formatting is done, the final step is to type «assign» and give it a drive letter.
The USB stick is ready to be used for mounting the ISO file. If you are using the Windows 8.1 version, right click on the ISO file and choose the «mount» option. If it does not happen, you may have to use a third party utility like Rufus. Once it is done, you can transfer all the contents of the ISO file on the USB stick that you are using.
How to install Windows 10 from USB
If you are currently using Windows 7, you need to use the Virtual CloneDrive. It is a mounting software that you need to use and then, mount the Windows 10 ISO and note the drive letter. If you have the DVD of Windows 10 Technical Preview, all you need to do is to insert it into the drive and note its drive letter. This letter will be used wherever needed.
Now, you need to open the Command Prompt and you need to follow a set of commands one after the other. These commands are given below in chronological order below:
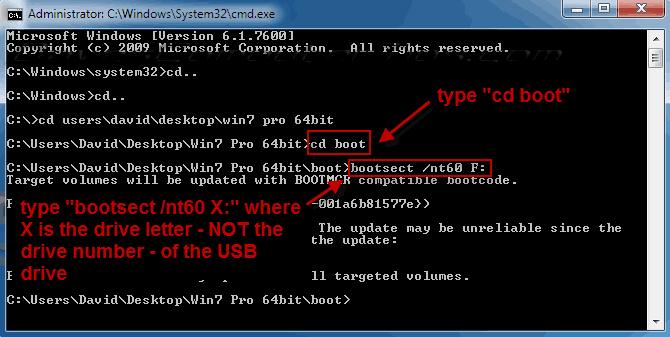
Drive Letter: CD BOOT and then hit the “Enter Key”
The Drive Letter here is the one for the virtual drive containing Windows 10 ISO. For this you can also consider the DVD drive that contains the installation files.
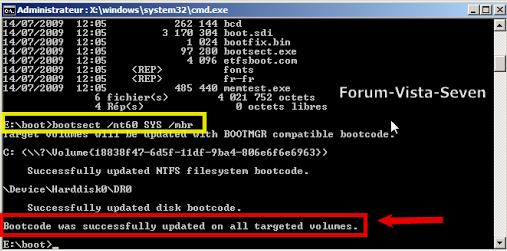
The next step is to type the command «BOOTSECT.EXE/NT60 Drive Letter. The Drive Letter you use here is the drive letter of the bootable USB drive that you had created to use for the purpose of installing the Windows 10 ISO to your computer. After you do that, you can see a message «Bootcode was successfully updated on all targeted volumes». When you see this, you can close the Command Prompt.
Now you need to copy all the contents of the Windows 10 ISO to the USB drive root. To do that you can either copy files directly from the mounted USB drive or extract the ISO file contents. You can do the same with the DVD of Windows 10 ISO. Remember, copy the Windows 10 ISO files to the root of the drive you are using.
When it is ready, just turn on the system where you want to load the Windows 10 ISO. The PC should be able to boot from the USB stick. Check whether you need to set the booting priority to «Boot from USB». Now, you need to restart the PC in order to install Windows 10 ISO. The Windows 10 Technical Preview will present simple, easy-to-understand instructions on the screen, which you should follow to be able to complete the installation.
Once you have installed the Technical Preview, you can share your experience and your thoughts on the new OS in the Windows 10 forums. However, do make sure that you have used the right prompts to prepare the bootable USB.
The development of Windows is still going on, and it’s in the final stages. As this is the final OS version by Microsoft, they are probably keeping no stone unturned to make it flawless. The future of Microsoft is “Windows as a service”. So, enjoy the newest version of Windows!
Windows USB/DVD Download Tool
Overview
When you download Windows from Microsoft Store, you have two options: You can download a collection of compressed files, or you can download an ISO file. An ISO file combines all the Windows installation files into a single uncompressed file.
If you choose to download an ISO file so you can create a bootable file from a DVD or USB drive, copy the Windows ISO file onto your drive and then run the Windows USB/DVD Download Tool. Then simply install Windows onto your computer directly from your USB or DVD drive.
When you download the ISO file, you must copy it onto a USB or DVD. When you’re ready to install Windows, insert the USB drive or DVD with the ISO file on it and then run Setup.exe from the root folder on the drive.
This allows you to install Windows onto your machine without having to first run an existing operating system. If you change the boot order of drives in your computer’s BIOS, you can run the Windows installation directly from your USB drive or DVD when you first turn on your computer. Please see the documentation for your computer for information about how to change the BIOS boot order of drives.
Making copies
To install the software, you can make one copy of the ISO file on a disc, USB flash drive, or other media.
After you’ve installed the software and accepted the license terms that accompany the software, those license terms apply to your use of the software. The license terms for Windows permit you to make one copy of the software as a back-up copy for re-installation on the licensed computer. If you do not delete your copy of the ISO file after installing the Windows software, the copy of the ISO file counts as your one back-up copy.
If you need to download the software again, you can go to your Download Purchase History in your Microsoft Store account and access the download there.
Installation
To install the Windows USB/DVD Download Tool:
2. Click Download then Run.
3. Follow the steps in the setup dialogs. You’ll have the option to specify where to install the Windows USB/DVD Download Tool.
You must be an administrator on the computer on which you are installing the Windows USB/DVD Download tool. It requires the Microsoft .NET Framework version 2.0 or higher.
System requirements
Windows XP SP2, Windows Vista, or Windows 7 (32-bit or 64-bit)
Pentium 233-megahertz (MHz) processor or faster (300MHz is recommended)
50MB of free space on your hard drive
DVD-R drive or 4GB removable USB drive
For Windows XP users
The following applications must be installed prior to installing the tool:
Microsoft .NET Framework 2.0 must be installed. It can be downloaded here.
Microsoft Image Mastering API v2 must be installed. It can be downloaded here.
Using the Windows USB/DVD Download Tool
Before you run the Download Tool, make sure you have purchased the Windows ISO download from Microsoft Store and downloaded the Windows ISO file to your drive. If you have purchased Windows but have not yet downloaded the ISO file, you can download the ISO file from your Microsoft Store Account.
To make a copy of your Windows ISO file:
1. Click the Windows START button, and click WINDOWS USB/DVD DOWNLOAD TOOL in the ALL PROGRAMS list to open the Windows USB/DVD Download Tool.
2. In the SOURCE FILE box, type the name and path of your Windows ISO file, or click BROWSE and select the file from the OPEN dialog box. Click NEXT.
3. Select USB DEVICE to create a copy on a USB flash drive or select DVD disk to create a copy on a DVD disk.
4. If you are copying the file to a USB flash drive, select your USB device in the drop-down list and click BEGIN COPYING. If you are copying the file up to a DVD, click BEGIN BURNING.
When your Windows ISO file is copied to your drive, install Windows by moving to the root folder of your DVD or USB drive, and then double-click Setup.exe.
Frequently Asked Questions
Where can I download .NET framework 2.0?
The .NET framework can be downloaded here.
Where can I download Image Mastering API 2.0?
The Image Mastering API can be downloaded here.
What size USB drive is required?
You need a USB drive with a minimum of 4GB of free space.
Can I use my newly created USB drive to install Windows on someone else’s computer?
No. The Windows ISO file on the USB drive is only intended to be used to install Windows on the licensed user’s own computer.
Can I back up to a CD-ROM?
No. The Windows ISO file is too large to fit on a CD.
Can I back up to a Blu-ray Disc?
Yes, as long as your DVD drive can write to a Blu-ray Disc.
IfI have other files on the USB drive will the Windows USB/DVD download tool delete them?
This tool requires the USB drive to be completely blank before the Windows files are copied. This helps ensure that the device is bootable after the copying has completed.
Can I backup to an external hard drive or other device with enough free disk space?
Yes, but this is not recommended. The device must be formatted in order for the device to be bootable. A dedicated USB flash drive would be a better option.
Can I use the Windows USB/DVD Download Tool to back up other files?
No. This tool is only for use with the Windows ISO file purchased from Microsoft Store.
Does the tool support dual-layer DVD discs for burning?
No. Currently, the tool does not support dual-layer DVD discs.
Troubleshooting
The tool is asking me to install the .NET framework and Image Mastering API before I install the tool
If you’re running Windows XP, you must install the .NET Framework 2.0 and the Image Mastering API 2.0 before installing the tool. You can download .NET framework here and you can download the Image Mastering API here.
A restart may be required after installing the .NET framework and the Image Mastering API.
When creating a bootable USB device, I am getting an error about bootsect
To make the USB drive bootable, you need to run a tool named bootsect.exe. In some cases, this tool needs to be downloaded from your Microsoft Store account. This may happen if you’re trying to create a 64-bit bootable USB device from a 32-bit version of Windows. To download bootsect:
1. Login to your Microsoft Store account to view your purchase history.
2. Look for your Windows purchase.
3. Next to Windows, there is an Additional download options drop-down menu.
4. In the drop-down menu, select 32-bit ISO.
5. Right-click the link, and then save the bootsect.exe file to the location where you installed the Windows USB/DVD Download Tool (e.g. C:\Users\username\AppData\Local\Apps\Windows USB DVD Download Tool).
6. Once the file has been saved, go back to the Windows USB/DVD Download Tool to create your bootable USB device.
My USB drive is not in the list of available devices
If you don’t see your USB drive in the list of available devices, please make sure the drive is inserted in the USB port, and then click the Refresh button beside the list of available drives.
I inserted a blank DVD in my DVD-ROM drive, but the Windows USB/DVD Download Tool doesn’t recognize it
If there are multiple drives on the system, the tool will select the first one that is capable of burning DVDs. If you have multiple DVD-R drives, try inserting the blank DVD into another DVD-R drive. If that doesn’t help, please make sure that your disc isn’t damaged and that your DVD-R drive is operational. Contact Product Support if issues continue to arise.
I inserted a blank DVD in my DVD-ROM drive, but the tool won’t let me burn it
Make sure the disc isn’t a dual-layer DVD disc. Currently, dual-layer discs are not supported within the tool.


