- Install windows with parallels
- Установите Parallels Desktop для Mac
- Скачайте Windows
- Создайте новую виртуальную машину
- Выберите установочный носитель
- Введите ключ продукта Windows
- Выберите режим использования Windows
- Укажите имя и расположение
- Начните установку
- Устранение неполадок
- Другие способы создания виртуальной машины Windows с помощью Parallels Desktop
- Была ли эта статья полезной?
- How to Activate Parallels Desktop and Install Windows on Mac
- How do you install Windows on Mac?
- How to install Parallels Desktop
- How to activate Parallels Desktop Business Edition
- Experience how easy it is to install Windows on Mac
- How to Install Windows 10 in Parallels Desktop for Mac
- Scenario 1: You have just installed Parallels Desktop on your Mac.
- Scenario 2: You have Parallels Desktop on your Mac, and you want to add a Windows 10 VM.
- Scenario 3: You want to move Windows 10 from a physical PC into a Parallels Desktop VM.
Install windows with parallels
В этой статье приведены инструкции по первой установке Windows на компьютер Mac c процессором Intel для ее последующего использования с Parallels Desktop. Если же вы хотите установить Parallels Desktop на компьютер Мас с чипом М1, воспользуйтесь статьей KB 125375.
Вы также можете:
Импортировать данные с компьютера Windows на Mac. Инструкции см. в статье KB 123929. Если вы используете Parallels Desktop 13 или более позднюю версию, см. статью KB 123929
Установите Parallels Desktop для Mac
Если вы еще не работали с Parallels Desktop для Mac, скачайте последнюю версию здесь.
Если вы используете Parallels Desktop, переходите к шагам ниже.
Скачайте Windows
Скачать Windows 10 Вы можете прямо через Parallels Desktop. Щелкните значок Parallels в строке меню Mac > Создать… > Получить Windows 10 от Microsoft > Скачать Windows 10.
Также вы можете посетить вэб-сайт Microsoft, чтобы скачать Windows 10 напрямую.
С вопросами о приобретении предыдущих версий Windows обратитесь в магазины розничной торговли или в уполномоченные интернет-магазины, включая Amazon.com.
Обратите внимание, что лицензия на Microsoft Windows не входит в пакет поставки Parallels Desktop. Если у вас нет копии Windows, то приобрести Windows 10 можно в Microsoft Online Store:
Примечание. Посетите страницу, если необходима помощь в выборе выпуска Windows 10: Home или Pro.
Создайте новую виртуальную машину
Откройте файл Parallels Desktop.app в папке Программы и выберите Файл > Создать.
Щелкните Установить Windows или другую ОС с DVD или файла образа и нажмите кнопку Продолжить.
Выберите установочный носитель
Вы можете установить Windows с помощью DVD-диска, ISO-образа диска или загрузочного USB-носителя.
Важная информация. Установочные файлы Windows с расширением .exe могут использоваться только для обновления уже существующей виртуальной машины (ВМ) Windows. Файлы с расширением .exe не применяются при выполнении новой установки для создания новой ВМ Windows. Чтобы получить физический диск или ISO-образ, обратитесь к торговому партнеру.
Мастер Parallels автоматически определит установочный носитель для установки Windows.
Вы также можете переключиться в ручной режим и выбрать расположение установочных файлов Windows.
Введите ключ продукта Windows
Нажмите кнопку Продолжить. В окне «Ключ продукта Windows» не снимайте флажок Экспресс-установка.
Примечание. Если убрать флажок «Экспресс-установка», необходимо вручную установить Parallels Tools после установки Windows.
После этого нажмите кнопку Продолжить.
Выберите режим использования Windows
Выберите режим использования Windows в Parallels Desktop для Mac Home Edition:
- Производительность
- Только игры
В выпусках Parallels Desktop для Mac Pro Edition и Business Edition:
- Разработка ПО
- Тестирование ПО
- Разработка
Более подробную информацию о профилях виртуальных машин см. в статье KB 123878.
Укажите имя и расположение
Имя. Укажите имя своей виртуальной машины.
Расположение. По умолчанию виртуальные машины Parallels Desktop расположены в папке /Пользователи/имяпользователя/Parallels/_.
Чтобы изменить стандартные настройки виртуальной машины, установите флажок Настроить параметры до начала установки. Эти настройки можно будет легко изменить и после установки.
Начните установку
Чтобы начать установку Windows, нажмите кнопку Продолжить. По окончании установки Windows запустите ее. Для этого откройте приложение Windows или нажмите кнопку включения в списке «Виртуальные машины Parallels».
Важная информация. При первом запуске Windows будет установлен продукт Windows Parallels Tools, который обеспечит прозрачное взаимодействие между Windows и OS X. Не отменяйте и не останавливайте процесс установки. После завершения установки Parallels Tools поступит запрос на перезапуск Windows.
Устранение неполадок
Если у вас возникли проблемы с установкой Windows с DVD-диска или у вас нет дисковода DVD, вы можете создать ISO-образ своего установочного диска на другом компьютере и выполнить установку с помощью него. Информацию о функциях Вы можете найти в статье KB 4917: Создание ISO-образа установочного DVD-диска Windows.
Другие способы создания виртуальной машины Windows с помощью Parallels Desktop
Чтобы создать виртуальную машину Windows, выполните следующие действия:
Была ли эта статья полезной?
Как, по вашему мнению, можно улучшить эту статью?
How to Activate Parallels Desktop and Install Windows on Mac
Almost all users who purchase a subscription for Parallels Desktop do so with one goal in mind: to install Windows on Mac. Parallels Desktop Mac Business Edition will help you and your employees easily work with Windows programs on Mac, running even the most demanding applications effortlessly.
Before proceeding, you should have already signed up for Parallels My Account. In this article, you’ll learn how to how to install and activate Parallels Desktop. Only then can you install Windows on Mac.
How do you install Windows on Mac?
Installing Windows on Mac is a crucial step to being able to run Windows applications on a macOS® device. To be able to do this, you first need to install a Windows virtualization tool on your Mac computer, such as Parallels Desktop. Parallels Desktop is not only perfectly compatible with any Windows program—it’s also fast, secure, and designed for rapid mass deployments.
How to install Parallels Desktop
- Download the Parallels Desktop installer to your Mac.
- Double-click the .dmg installation file to mount it in Finder, then double-click Install.
- Read through the Software License Agreement and click Accept.
- Once prompted, enter your local Mac user password to finalize the installation.
Next, you’ll activate Parallels Desktop Business Edition.
How to activate Parallels Desktop Business Edition
- Start Parallels Desktop by double-clicking the icon.
- If the first screen that opens is the Installation Assistant, Skip it for now. The Installation Assistant helps you install Windows—you can run this at a later time.
- Go to the Parallels Desktop dropdown menu, and then click Account & License.
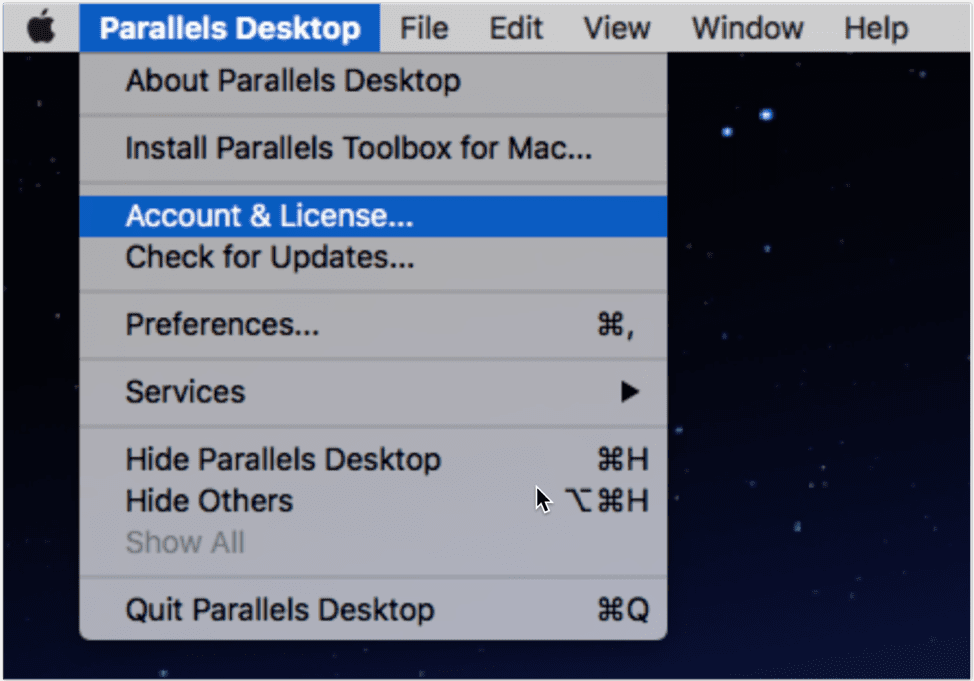
4. This opens the Sign-in dialog box.
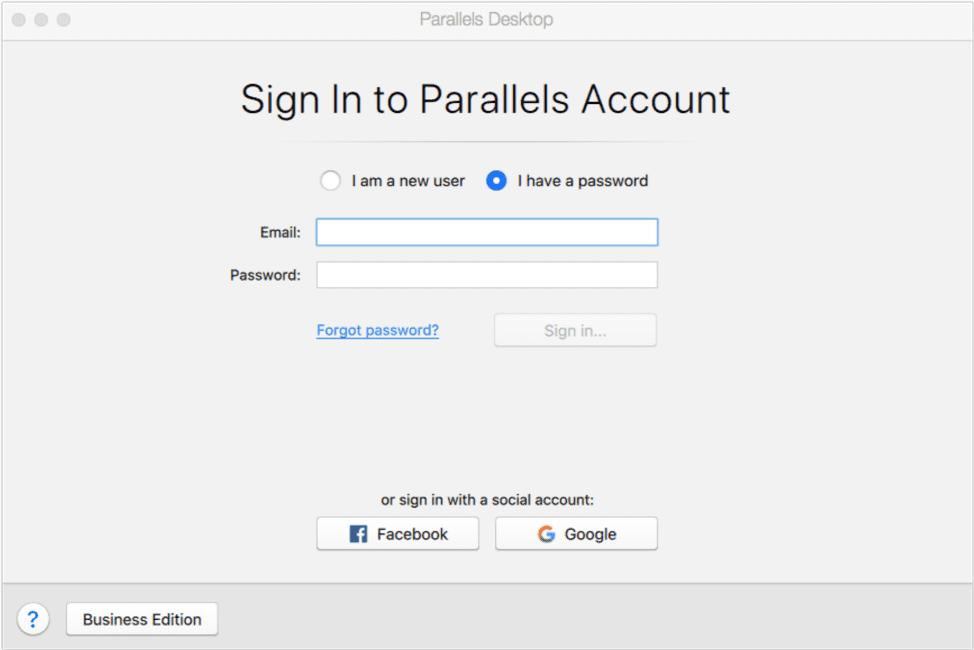
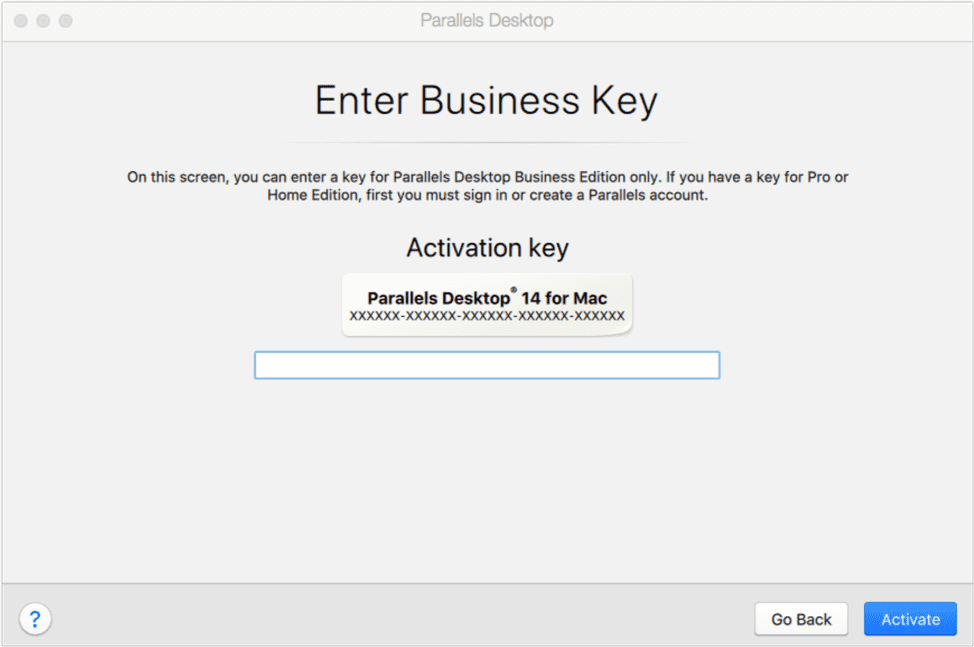
5. Click on the Business Edition button at the lower-left corner, which opens the Enter Business Key dialog. This then prompts you to enter your Parallels Desktop Business Edition license key. After entering it, click Activate.
6. If your activation was successful, you’ll see a confirmation message.
And just like that, your Parallels Desktop Business Edition is installed, activated and ready for Windows installation!
Read “How to Install Windows 10 in Parallels Desktop for Mac” for the complete instructions on how to install Windows on Mac.
Experience how easy it is to install Windows on Mac
With Parallels Desktop Business Edition, you can install Windows on Mac across your organization without breaking a sweat. Try it out yourself. Download the free trial now.
How to Install Windows 10 in Parallels Desktop for Mac
Windows 10 is the most popular version of Windows. Installing it on Parallels Desktop® for Mac is easy to do—and does not require you to purchase Windows 10 beforehand.
There are four different scenarios you might find yourself in, with slightly different steps:
Scenario 1: You have just installed Parallels Desktop on your Mac.
Scenario 2: You have Parallels Desktop on your Mac, and you want to add a Windows 10 virtual machine (VM).
Scenario 3: You want to move Windows 10 from a physical PC into a Parallels Desktop VM.
Here are the individual steps for each:
Scenario 1: You have just installed Parallels Desktop on your Mac.
When you first launch Parallels Desktop on a Mac, it will detect that you have no virtual machines and will automatically offer to download and install Windows 10 for you. (See Figure 1.)
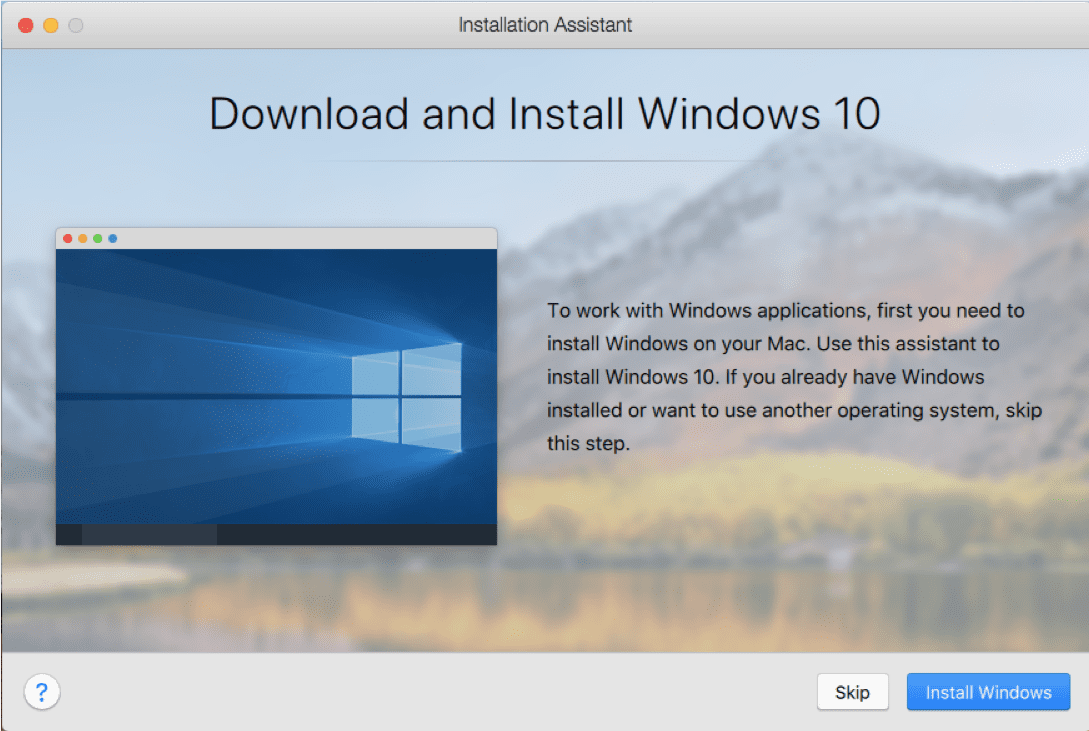
Figure 1_Download and install Windows 10
Once you click “Install Windows,” there is basically nothing else for you to do. The Windows 10 installation files will begin downloading (Figure 2).
Note: If you click on “Skip” instead, you will be directed to the Installation Assitant where you can purchase Windows 10 (see Figure 8).

Figure 2_Downloading Windows 10
Once the download finishes, the installation of Windows 10 into a new VM in Parallels Desktop will begin (Figure 3).
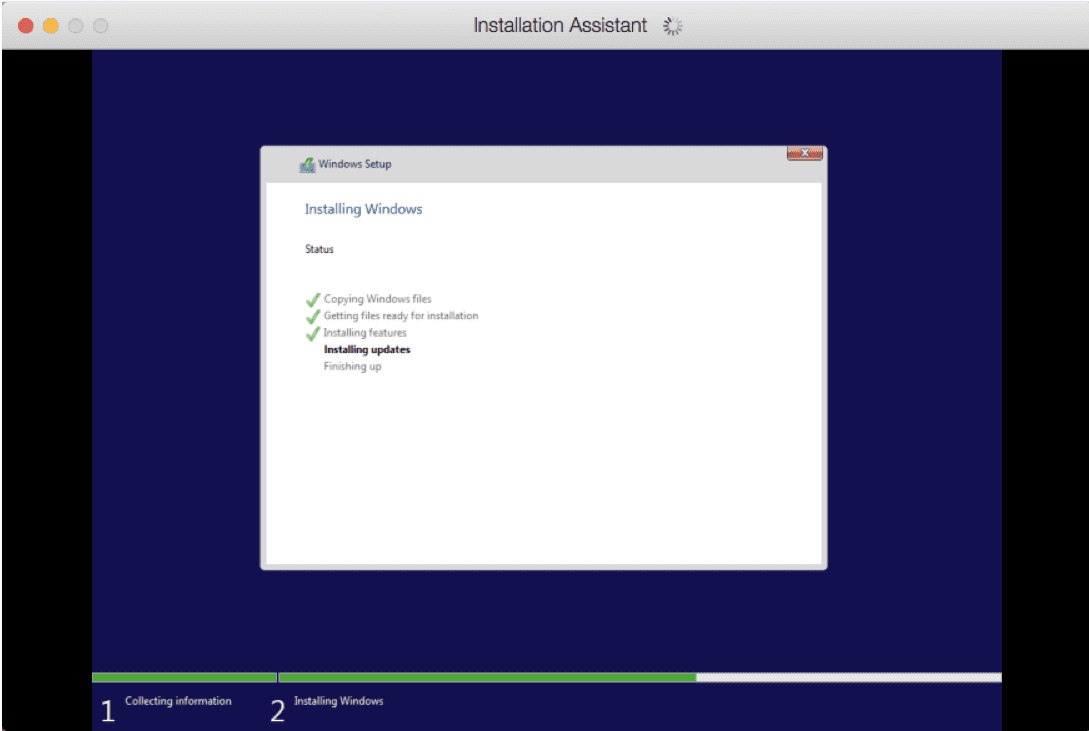
Figure 3_Installing Windows
You will be notified when it completes (Figure 4).
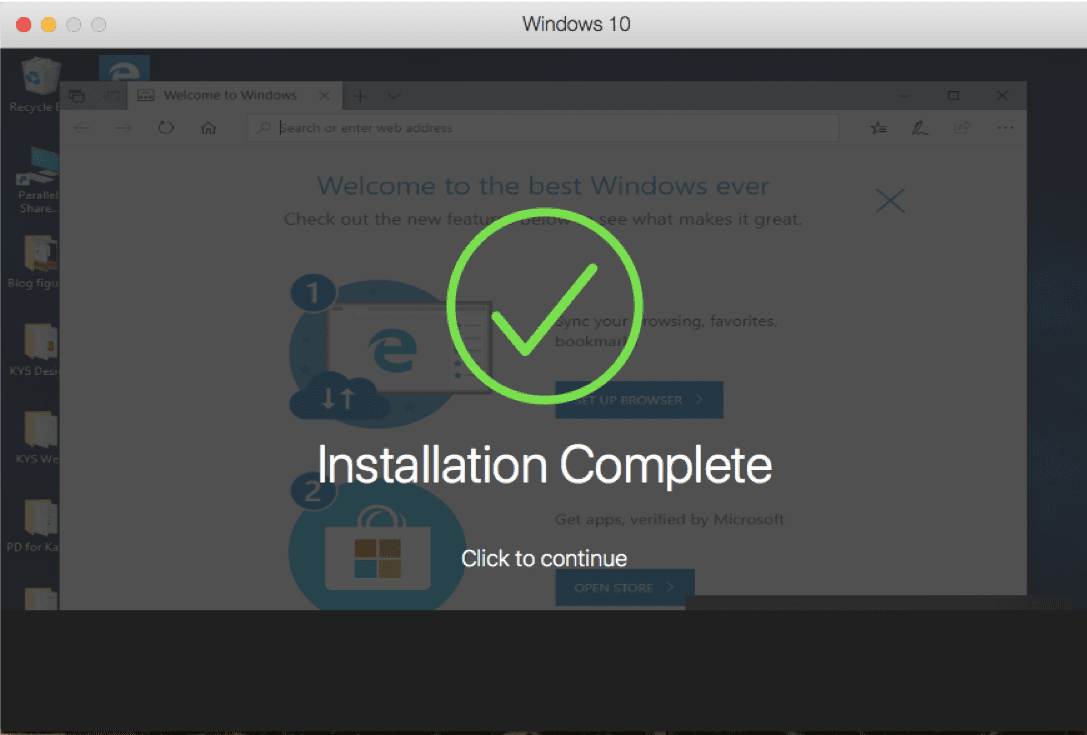
Figure 4_Windows 10 installation complete
How long this process takes depends on the speed of your Internet connection and Mac. For me, at home and on a new MacBook Air, this took about one hour and 40 minutes.
While Windows 10 is installing, you’ll see dialogs about the installation of Parallels® Toolbox, a separate Parallels product that’s bundled with Parallels Desktop (Figure 5).
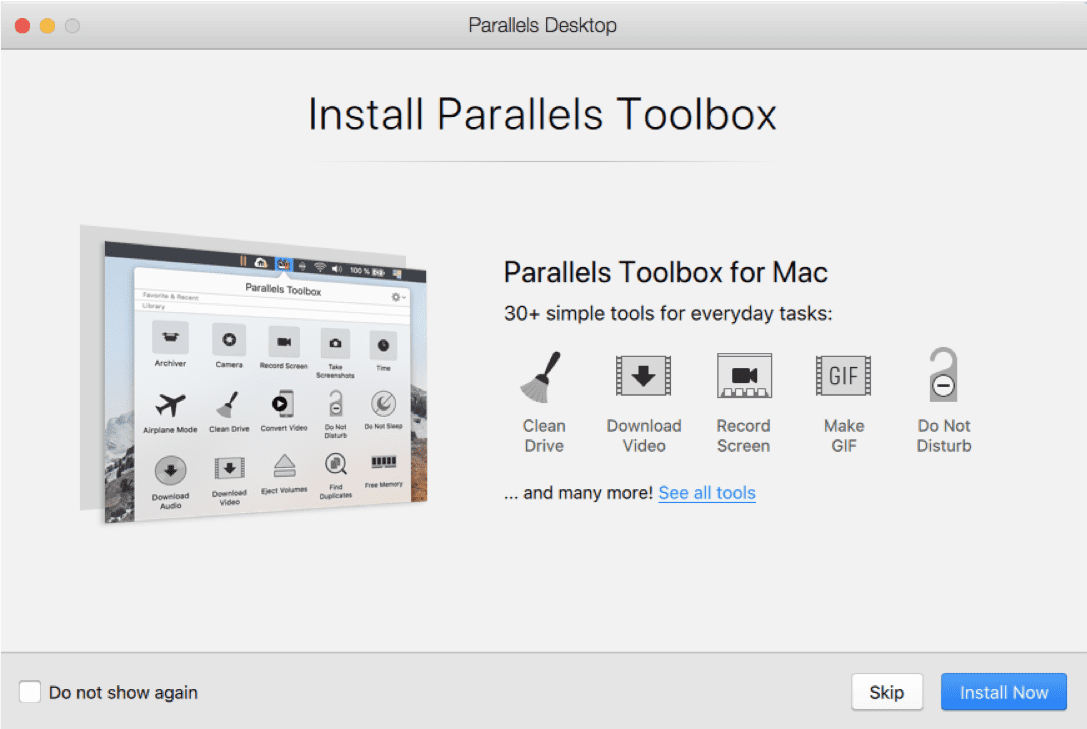
Figure 5_Parallels Toolbox, a product that is bundled with Parallels Desktop
Parallels Toolbox gives you 30+ single-purpose tools for common tasks. I encourage you to install Parallels Toolbox—I think you’ll find the tools very useful.
After Windows 10 is installed, you should get all of the available updates, and probably there will be several of them (Figure 6).
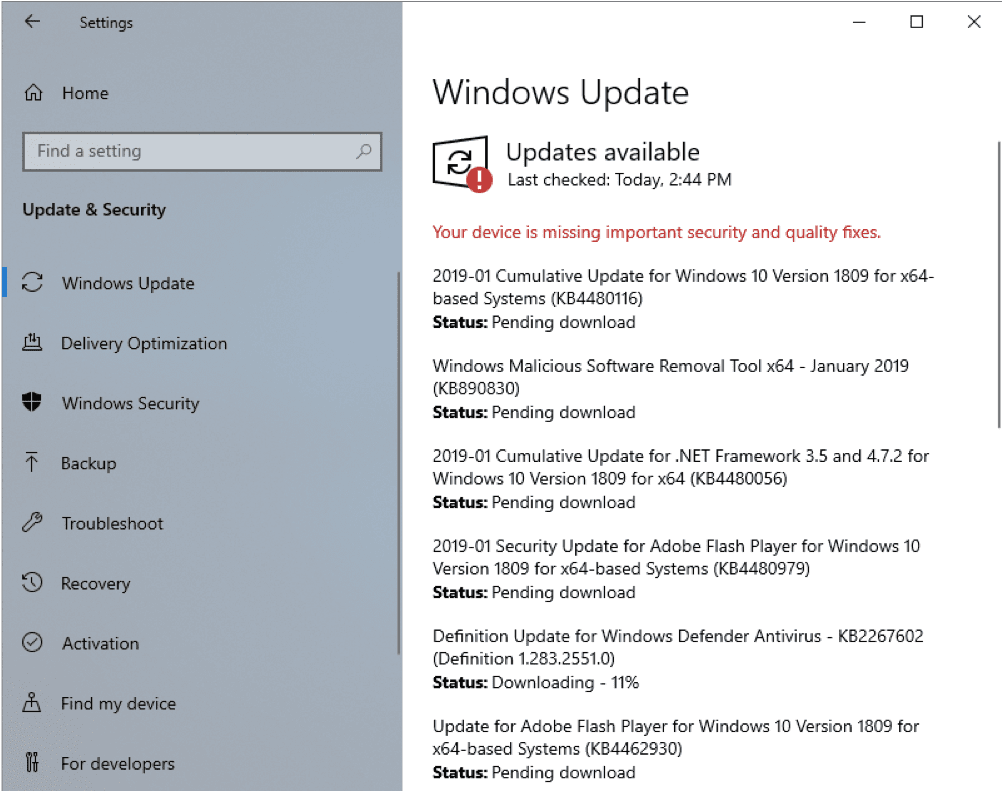
Figure 6_Get all of the available Windows updates
This may take a while but is very important.
At this point, you have a working installation of Windows 10 in a Parallels Desktop VM. You have not yet purchased Windows from Microsoft. A few features will be disabled until you do so. You can purchase and activate Windows from within your Windows VM, and the entire process takes only a few minutes (Figure 7).
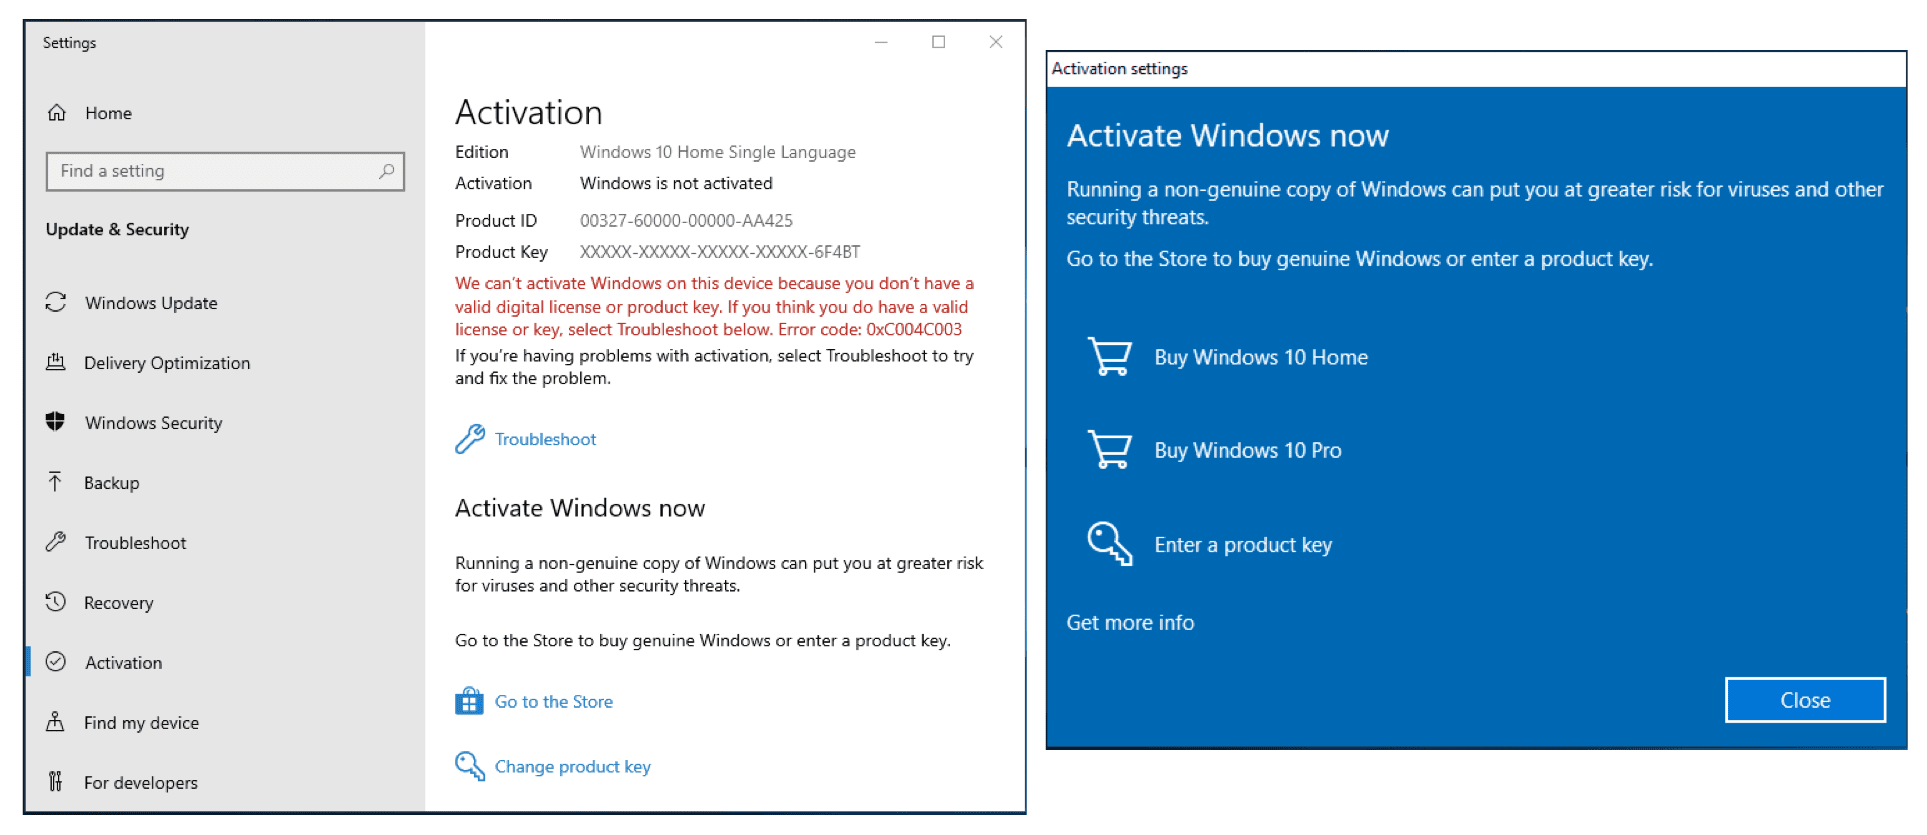
Figure 7_Purchasing and activating Windows 10
Scenario 2: You have Parallels Desktop on your Mac, and you want to add a Windows 10 VM.
Adding Windows 10 as an additional VM in Parallels Desktop is also easy.
To start the process, either choose “New…” in the File menu of Parallels Desktop, or click on the “+” sign in the top right corner of the Control Center window.
Assuming that you don’t have a Windows 10 installation DVD laying around, click on the “Get Windows 10 from Microsoft” button (Figure 8).
Figure 8_Get Windows 10 button in the Installation Assistant
Then choose to purchase Windows 10 Home or Windows 10 Pro in the next screen. If you want to install Windows 10 without making a purchase yet, choose to download it (Figure 9).
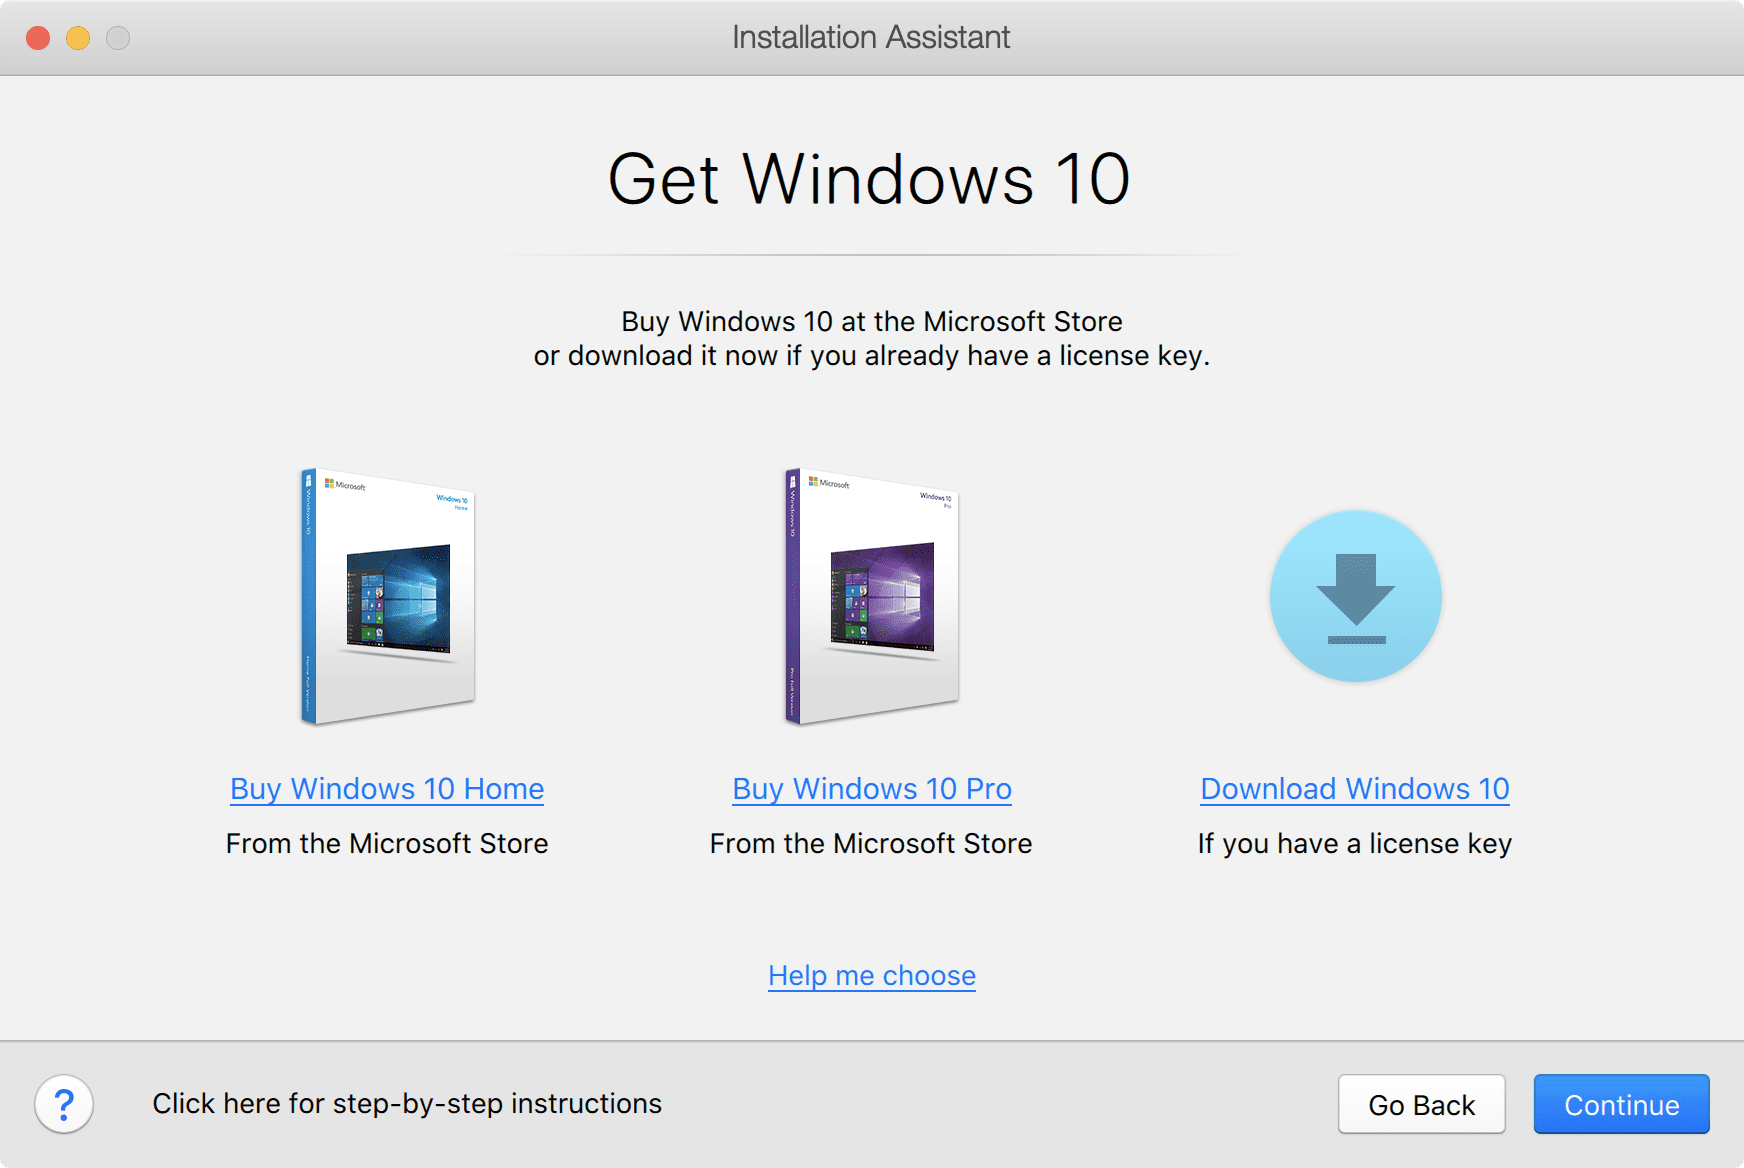
Figure 9_Choose which way to get Windows 10
Whichever path you choose, you will end up with a Windows 10 installation ISO file and a Windows 10 product key. After that, everything proceeds in the same manner as scenario 1. (See the previous Figure 2 as an example.) Don’t forget to install Parallels Toolbox and all the available Windows 10 updates!
Scenario 3: You want to move Windows 10 from a physical PC into a Parallels Desktop VM.
In this last scenario, you start out with the Installation Assistant dialog (see previous Figure 8) but choose “Transfer Windows from a PC.” You will then see the Transfer Windows dialog shown in Figure 14.
![]()
Figure 14_Transfer Your PC
This process will copy everything from a physical PC to a Parallels Desktop VM: apps, data files, and Windows itself. The physical PC will not be modified.
The most common way to transfer is via the network. The amount of time this will take depends on how much information is on the PC and how fast your network is.
There may be several Windows PCs on your network, so you need to indicate which PC you want to migrate into a VM. Do this by installing the Parallels Transfer Agent on the PC to be migrated.
There are two computers involved in this transfer: the Windows PC you are transferring from, and the Mac running Parallels Desktop which you are transferring to. Some of the actions you’ll take to set up this transfer occur on the PC and others on the Mac, so you will need to go back and forth between the two computers to set everything up. These tasks are not complicated, as shown in this video:
I hope you’ve seen how easy it is to install Windows 10 on Parallels Desktop. Feel free to download a free full-featured trial of Parallels Desktop and install Windows 10 like explained in scenario 1 right away at no extra cost.
Feel free to also check out our detailed video about How to install Windows on your Mac with Parallels Desktop – at no cost to you:
Let us know in the comments below, on Twitter or Facebook which way of installing Windows 10 on your Mac worked best for you.


