- Powershell — установка ролей и компонентов Windows
- Install-WindowsFeature
- Enable-WindowsOptionalFeature
- Feature Update through Windows 10, version 20H2 Enablement Package
- Summary
- How to get this update
- Prerequisites
- Restart information
- Update replacement information
- File information
- Включение и отключение компонентов Windows 10
- Работаем с Windows Features
- Управление Features on Demand (FOD)
- Установка и переустановка пакетов языков (Language Interface Packs, LIP)
- Install-Windows Feature
- Syntax
- Description
- Examples
- EXAMPLE 1
- EXAMPLE 2
- EXAMPLE 3
- EXAMPLE 4
- EXAMPLE 5
- EXAMPLE 6
- Parameters
Powershell — установка ролей и компонентов Windows

Навигация по посту
Для установки ролей и компонентов в Powershell у нас есть 2 командлета и каждый со своими особенностями. Первый WindowsFeature и второй WindowsOptionalFeature (этот пойдет на замену dism).
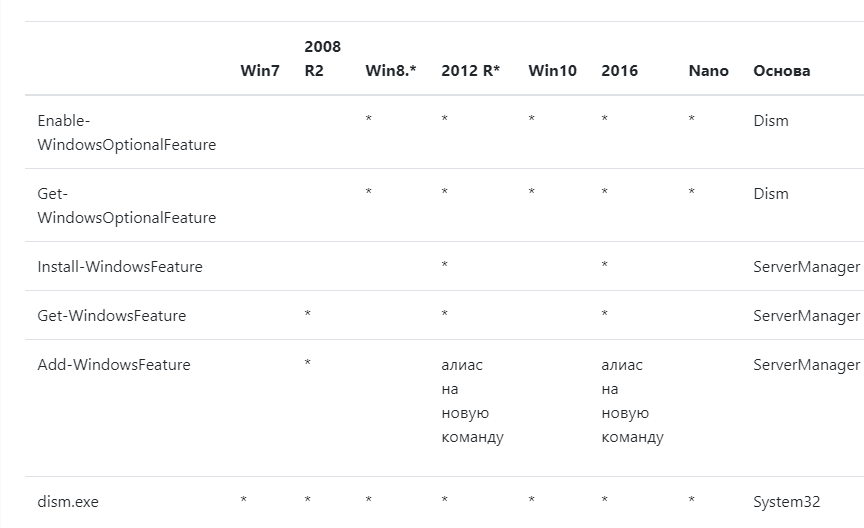
Т.е. в 2008 R2 эти командлеты работать будут. В Win 7 скорее всего тоже, но зависит от версии powershell.
Install-WindowsFeature
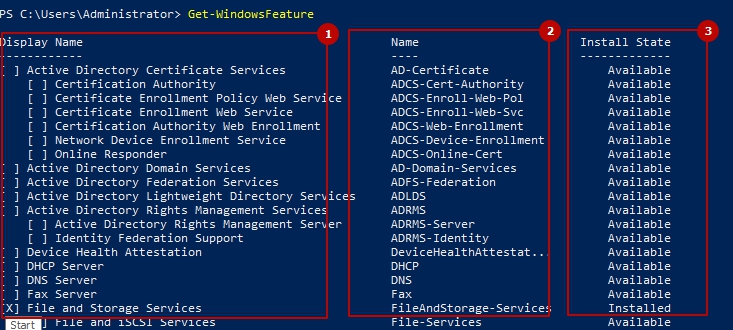
Этот командлет идет как альтернатива Server Manager и может установить все эти же роли и компоненты. Работает ли он не на серверной версии, а например с установленным RSAT — не проверял, но скорее всего да. Один из плюсов этой команды, что мы можем установить роль сразу на множество машин. Для получения всех ролей и компонентов запустим:
Если мы хотим получить не такой большой вывод, а более конкретную роль или компонент, то сделаем так:
Способ выше будет фильтровать по колонке Name (на рис.2) — это имя нужно для установки. Если мы хотим фильтровать по полному названию или состоянию роли (установлена или нет), то нужно выполнить другие команды.
Если мы хотим получить роли по полному имени — выполним команду:
Где Light — это имя сервиса. Звездочки по обе стороны говорят, что до и после могут находиться еще символы.
Если хотим получить статус роли (колонка 3) сделаем такой запрос:
Отобразятся все установленные роли.
Далее выполним установку:
Можно и так, но плохая практика т.к. может быть несколько ролей с вхождением *DNS*:
Где:
-Name — имя роли с колонки 2 на рисунке.
-IncludeAllSubFeature — говорит о том, что по умолчанию будут включены все необходимые роли и компоненты. Если вдруг забыли включить, то можно и после, по крайне мере у меня все работало на тестовых стендах, но такой вариант не очень хорошая практика.
-IncludeManagementTools — установка компонентов интерфейса.
Причем если установка уже была произведена, то переустановки или похожих действий не будет.
Для установки на удаленном компьютере можно выполнить:
-ComputerName — имя компьютера или IP
Если установка на другом компьютере будет под другим пользователем:
-Credential — логин пользователя
Для удаления роли или компонента используется:
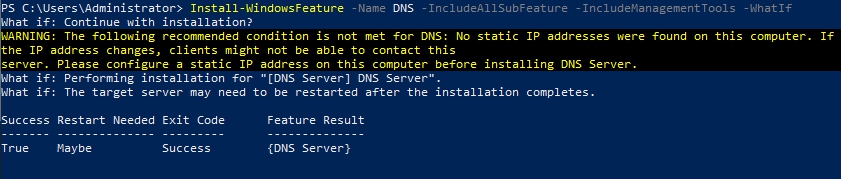
Если у нас есть какие-то сомнения в работе команд выше, то мы можем использовать ключ -WhatIF, который дословно «что если я исполню эту команду». Т.е. мы ничего не поломаем, узнаем нужна ли будет перезагрузка, какие компоненты будут доустановлены и будет ли ошибка. Пример:
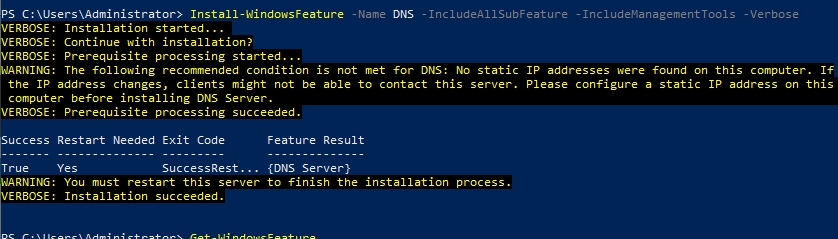
Ключ -Verbose установит компонент с детальным отображением процесса:
Далее нужно будет настраивать роль. Для каждой роли и компонента он свой. Например для создания леса делаем Install-ADDSForest.
Через эту команду можно установить сервисы и на VHD диск или множество ролей с XML файла.
Enable-WindowsOptionalFeature
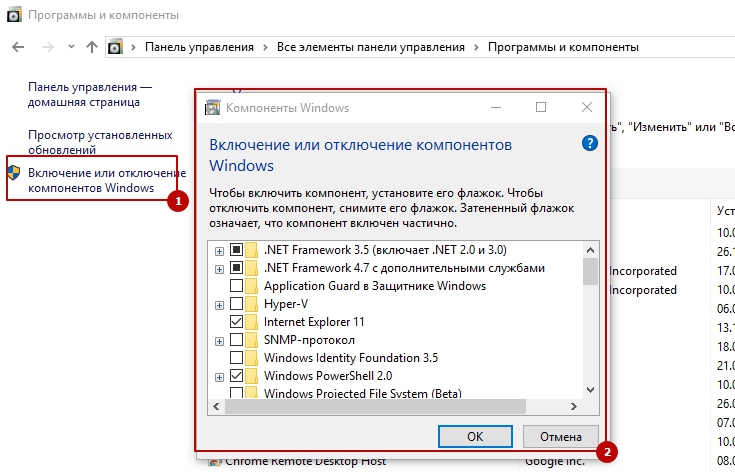
Этот командлет включен в клиентские редакции Windows и серверные, он устанавливает компоненты через powershell. Если сравнивать с работой через интерфейс команда аналогина этому окну:
Для получения всех компонентов выполняем:
-Online говорит, что пакеты будут искаться на этом же компьютере. Можно поставить -Path и указать путь до образа Windows что бы увидеть другие пакеты.
Что бы отфильтровать вывод по имени:
Фильтруем по статусу:
Для того, что бы включить компонент нужно выполнить:
Если хотим отключить — меняем глагол:
Обычно я использую WindowsOptionalFeature для подготовки Nano сервера т.к. там нет WindowsFeature и пакеты с ролями сначала импортируются, а затем доустанавливаются.
Feature Update through Windows 10, version 20H2 Enablement Package
Summary
Windows 10, versions 2004 and 20H2 share a common core operating system with an identical set of system files. Therefore, the new features in Windows 10, version 20H2 are included in the latest monthly quality update for Windows 10, version 2004 (released October 13, 2020), but are in an inactive and dormant state. These new features will remain dormant until they are turned on through the “enablement package,” a small, quick-to-install “master switch” that activates the Windows 10, version 20H2 features.
The enablement package is a great option for installing a scoped feature update like Windows 10, version 20H2 as it enables an update from version 2004 to version 20H2 with a single restart, reducing update downtime. This enables devices to take advantage of new features now. For version 2004 devices that receive updates directly from Windows Update, devices automatically get the enablement package by installing the feature update to Windows 10, version 20H2.
If a device is updating from Windows 10, version 1909 or an earlier version, this feature update enablement package cannot be manually installed. Instead, it is bundled and automatically included with the feature update to Windows 10, version 20H2. Note the installation time is not reduced in this scenario.
How to get this update
Windows Update and Microsoft Update
None. This update will be downloaded and installed automatically from Windows Update. The update is named Feature Update to Windows 10, version 20H2.
Microsoft Update Catalog
This update is only available through the other release channels.
Windows Server Update Services (WSUS)
This update will automatically synchronize with WSUS if you configure Products and Classifications as follows:
Product: Windows 10
Prerequisites
You must have the following prerequisites installed before applying this update:
Restart information
You must restart your device after you apply this update.
Update replacement information
This update does not replace any previously released update.
File information
The English (United States) version of this software update installs files that have the attributes that are listed in the following tables.
Включение и отключение компонентов Windows 10
Как известно, Windows 10 отличается набором компонентов от предыдущих версий операционных систем Windows. Зачастую требуется их включить или выключить, чтобы они не потребляли системные ресурсы, да и просто не мешали. В этой статье мы рассмотрим как это сделать быстрее и эффективнее.
Начнем с того, что существует два основных способа работы с компонентами (они еще называются features) — утилита DISM и командлеты Powershell. И то и другое встроено в Windows 10, в отличие от Windows 7, где dism можно было добавить или установив пакет Windows ADK, или руками скопировав dism.exe с другого компьютера.
Сразу отмечу, что утилиту dism и среду powershell для работы с системой необходимо запускать от имени администратора, даже если ваш аккаунт уже находится в группе локальных админов. Итак, вы или находите cmd или windows powershell в меню и, кликнув правой кнопкой мышки, выбираете «Запуск от имени администратора».
В Windows 10 есть понятие Features и Capabilities. Первое — это привычные нам компоненты, которые можно найти в Панели управления -> Программы и компоненты -> Включение и отключение компонентов Windows. То есть это встраиваемые модули, которые выполняют определенный сервисный функционал.
Capabilities — это дополнительные возможности, которые расширяют возможности интерфейса и увеличивают удобство пользователя. Среди них — Language packs, наборы шрифтов. Да, Microsoft удалил часть нестандартных шрифтов, которые теперь вынесены в опциональные компоненты. Скачать эти компоненты можно в виде ISO файла с сайта Volume Licensing Service Center или напрямую через Internet и графический интерфейс Windows. Такую концепцию Microsoft назвала Features on Demand (FOD). Их в более ранних версия Windows не было.
Работаем с Windows Features
Итак, список установленных компонентов можно посмотреть командой
Dism /online /Get-Features
Вот как в Powershell можно получить список всех компонентов командлетами Get-WindowsFeature (для Windows Server) или Get-WindowsOptionalFeature (Windows 10):
Чтобы получить список отключенных компонентов, введите:
Get-WindowsOptionalFeature -Online | ? state -eq ‘disabled’ | select featurename
Этот список также можно вывести в файл (для windows Server):
Get-WindowsFeature | Where-Object <$_.Installed -match “True”>| Select-Object -Property Name | Out-File C:\Temp\WindowsFeatures.txt
Посмотрев список названий и их состояние, можно использовать эти названия для того, чтобы компоненты включить или выключить:
Dism /online /Enable-Feature /FeatureName:TFTP /All
ключ /All позволяет включить также все дочерние компоненты;
Установка компонентов через Powershell выполняется командой Enable-WindowsOptionalFeature.
Enable-WindowsOptionalFeature -Online -FeatureName RSATClient-Roles-AD-Powershell
Параметр -All включает все дочерние компоненты.
Dism /online /Disable-Feature /FeatureName:TFTP
Аналогично, через Powershell это можно сделать командой Disable-Windowsoptionalfeature -online -featureName [feature name].
Обратите внимание, некоторые фичи имеют разные названия в Windows 7 и Windows 10. Например, RSAT в Windows 7 — это RemoteServerAdministrationTools, а в Windows 10 — RSATclient.
Управление Features on Demand (FOD)
Если вы устанавливаете их через графический интерфейс, то вам необходимо пройти “System –> App & features –> Manage optional features” и нажать знак + напротив необходимых компонентов.
Чтобы сделать это автоматизированно через командную строку, наберите чтобы получить список доступных компонентов:
DISM.EXE /Online /Get-Capabilities
или на Powershell:
Как и прежде, запомните название необходимых вам компонентов, чтобы включить их командой (на примере .Net Framework 3):
DISM.EXE /Online /Add-Capability /CapabilityName:NetFx3
или на Powershell:
Add-WindowsCapability –Online -Name NetFx3
Если же у вас нет доступа в Интернет, то есть выход. Итак, вы скачиваете ISO образ диска с FOD компонентами с сайта Volume Licensing Service Center. Файлы будут разные для разных релизов Windows 10 — 1511, 1607, 1703, 1709. Важно помнить, что компоненты одного релиза не подходят к другому. Если вы сделаете in-place upgrade (установка одного релиза поверх другого через обновление), то несовместимые установленные компоненты будут удалены без вашего желания! Да, Microsoft удаляет то, что считает несовместимым при обновлении.
Так вот, ISO файл содержит набор неизвестных и сложных для понимания файлов с расширением cab. Вот чудесный файлик на сайта Microsoft, который обясняет назначение каждого файла. Итак, существуют следующие типы FOD:
- Microsoft-Windows-LanguageFeatures-Basic — проверка правописания для различных языков и раскладок клавиатуры;
- Microsoft-Windows-LanguageFeatures-Fonts — национальные шрифты, например, азиатские
- Microsoft-Windows-LanguageFeatures-OCR — средства для распознавания шрифтов
- Microsoft-Windows-LanguageFeatures-Handwriting — средства для распознавания рукописного ввода
- Microsoft-Windows-LanguageFeatures-TextToSpeech — средства преобразования текста в голос, используемые подсказчиком Cortana
- Microsoft-Windows-LanguageFeatures-Speech — распознавание голоса
- Microsoft-Windows-InternationalFeatures — пакеты национальных настроек, например, для Тайваня
Итак, для добавления таких FOD компонентов, используйте команды вида (замените имя компонента):
Dism /Online /Add-Capability /CapabilityName:Language.Basic
Для удаления FOD:
Dism /Online /Remove-Capability /CapabilityName:Language.Basic
Установка и переустановка пакетов языков (Language Interface Packs, LIP)
Язык интерфейса Windows можно поменять, установив так называемые LIP. ранее они назывались MUI (Multi user interface). Файлы LIP выглядят так: Microsoft-Windows-Client-Language-Pack_x64_es-es.cab для испанского языка. Выглядеть установка будет примерно так:
Dism /Add-Package /online /PackagePath:»C:\Languages\Microsoft-Windows-Client-Language-Pack_x64_fr-fr.cab»
Dism /Remove-Package /online /PackageName:Microsoft-Windows-Client-LanguagePack-Package
В следующей статье мы поговорим как с помощью DISM и Powershell управлять так называемыми Modern-приложениями AppX.
Install-Windows Feature
Installs one or more roles, role services, or features on either the local or a specified remote server that is running Windows Server 2012 R2. This cmdlet is equivalent to and replaces Add-WindowsFeature, the cmdlet that was used to install roles, role services, and features in Windows Server 2008 R2.
Syntax
Description
The Install-WindowsFeature cmdlet installs the specified features on a computer that is running Windows Server 2012 R2, or on an offline virtual hard disk (VHD) on which Windows Server 2012 R2 is installed. This cmdlet works similarly to the installation of roles and features in Server Manager, with an important exception: the cmdlet does not install management tools for the features by default. To install management tools such as snap-ins on a target server, you must add the IncludeManagementTools parameter to your command.
This cmdlet requires elevation; you must be running a Windows PowerShell session as an administrator to use this cmdlet.
Examples
EXAMPLE 1
This example shows what is installed with Web Server (IIS), including all role services, on a computer named Server1. By adding the WhatIf parameter, you can view the results of the installation command without running it.
EXAMPLE 2
This example installs Web Server (IIS), including all role services and applicable management tools, on a computer named Server1, by using the credentials of a user account named contoso.com\johnj99.
EXAMPLE 3
This example installs all roles, role services and features that are specified in a configuration file named ADCSConfigFile.xml. The configuration file was created by clicking Export configuration settings on the Confirm installation selections page of the arfw in Server Manager.
EXAMPLE 4
This example installs Active Directory Certificate Services (AD CS) as specified in a configuration file named ADCSConfigFile.xml. AD CS is installed on a list of computers that is contained in the variable $servers. The configuration file was created by clicking Export configuration settings on the Confirm installation selections page of the arfw in Server Manager. On the first line, the value of the $servers variable is set; on the second line, the installation instructions in the ADCSConfigFile.xml configuration file are applied to each of the servers that has been named in $servers.
EXAMPLE 5
This example retrieves a list of all Windows features beginning with the characters Web, and then pipes the resulting list to Install-WindowsFeature . The result of this cmdlet is all features that start with Web are installed on the local computer.
EXAMPLE 6
This example installs Web Server (IIS) on the local computer, specifying that the source of feature files for the installation is a folder, winsxs, on a computer named Server2. The computer account of the local computer must have Read permissions on the specified share.
Parameters
Installs one or more available features on a specified remote computer. This parameter accepts only one computer name. If this parameter is not added, or no computer name is specified, the default target is the local computer.
Valid values for the parameter include a NetBIOS name, an IP address, or a fully qualified domain name of a remote computer that is running Windows Server
To use an IP address of a remote computer as the value of this parameter, your command must include the Credential parameter. The computer must either be configured for HTTPS transport, or the IP address of the remote computer must be included in the WinRM TrustedHosts list on the local computer. For information about adding a computer name to the WinRM TrustedHosts list, see «How to Add a Computer to the Trusted Host List» in about_Remote_Troubleshootinghttp://go.microsoft.com/fwlink/p/?LinkID=135188.
| Type: | String |
| Aliases: | Cn |
| Position: | Named |
| Default value: | None |
| Accept pipeline input: | False |
| Accept wildcard characters: | False |
Provides a single path to a configuration file which specifies roles and features to be installed, and any configuration parameters needed. The path can be specified by using a local relative path (such as D:\myfolder) or by using built-in environment variables prefixed with the $env tag (such as $env:systemdrive\filename). A configuration file can be generated by running the arfw in Server Manager.
If this parameter is specified, then the Name parameter cannot be used.
| Type: | String |
| Position: | Named |
| Default value: | None |
| Accept pipeline input: | False |
| Accept wildcard characters: | False |
Prompts you for confirmation before running the cmdlet.
| Type: | SwitchParameter |
| Aliases: | cf |
| Position: | Named |
| Default value: | False |
| Accept pipeline input: | False |
| Accept wildcard characters: | False |
Specifies a user account that has access rights to perform this action. If the parameter is not added, or no value is specified, the default value of this parameter is the current user. Enter a user name in one of the following formats. Quotation marks are optional.
A Credential object returned by the Get-Credentialhttp://go.microsoft.com/fwlink/p/?LinkID=113311 cmdlet.
If a user name is entered, then a prompt for a password is displayed.
| Type: | PSCredential |
| Position: | Named |
| Default value: | None |
| Accept pipeline input: | False |
| Accept wildcard characters: | False |
Specifies that all subordinate role services, and all subfeatures of parent roles, role services, or features specified by the Name parameter should be installed.
| Type: | SwitchParameter |
| Position: | Named |
| Default value: | None |
| Accept pipeline input: | False |
| Accept wildcard characters: | False |
Specifies that all applicable management tools of the roles, role services, or features specified by the Name parameter should be installed. Note: Although management tools are installed by default when you are installing features by using the arfw, management tools are not installed by default when you install features by using the Install-WindowsFeature cmdlet; this parameter must be added to install management tools.
| Type: | SwitchParameter |
| Position: | Named |
| Default value: | None |
| Accept pipeline input: | False |
| Accept wildcard characters: | False |
Specifies a name and path to a log file. Add this parameter if the results of your command must be stored in a log.
| Type: | String |
| Position: | Named |
| Default value: | None |
| Accept pipeline input: | False |
| Accept wildcard characters: | False |
Specifies a list of features to install. This parameter does not support wildcard characters. If this parameter is specified, then the ConfigurationFilePath parameter cannot be used.
| Type: | Feature [ ] |
| Position: | 0 |
| Default value: | None |
| Accept pipeline input: | True |
| Accept wildcard characters: | False |
Specifies that the target computer is restarted automatically, if a restart is required by the installation process for the specified roles or features. This parameter cannot be used with the Vhd parameter.
| Type: | SwitchParameter |
| Position: | Named |
| Default value: | None |
| Accept pipeline input: | False |
| Accept wildcard characters: | False |
Specifies the path to feature files, if the files are not available in the local feature store of the target computer or VHD. Valid values for this parameter are either a network path or the path to a Windows image file (WIM). If you are installing roles or features on an offline VHD, you must use a mounted WIM. It is not necessary to mount the WIM file for installing on a running physical computer, because a WIM is mounted internally for deployments to a physical computer. Specify the path by using a local relative path, or by using built-in environment variables that are prefixed with the $env tag as shown in the following examples.
If this parameter is used in combination with the -ComputerName parameter, the source path must be accessible by the target computer (e.g. local devices/drives/paths on the client system will cause the installation to fail).
The path specified in this parameter is only used if the command cannot find feature files in the local side-by-side store of the specified target computer or VHD. The command searches for feature files in the following order:
On the target computer or offline VHD.
Path specified as the value of this parameter. If you add a UNC path, verify that the computer account of the target server has Read permissions on the share. The computer account should be in one of the following formats: DOMAIN\SERVERNAME$ or SERVER$
Repository path specified by the Group Policy Object (GPO), Specify settings for optional component installation and component repair, located in Computer Configuration/Administrative Templates/System in Local Group Policy Editor. This Group Policy setting controls the following Windows Registry setting: HKEY_LOCAL_MACHINE\Software\Microsoft\Windows\CurrentVersion\Policies\Servicing\LocalSourcePath.
This parameter is optional.
| Type: | String [ ] |
| Position: | Named |
| Default value: | None |
| Accept pipeline input: | False |
| Accept wildcard characters: | False |
Specifies the path to an offline VHD. The path can either point to a VHD file, or to a location on which the VHD is already mounted by using Deployment Image Servicing and Management (DISM) tools.
The VHD can be on a local disk on the target computer, or on a network shared folder. If the VHD is in a network shared folder, then the value of this parameter is a UNC path to the VHD. In this case, the computer account of the computer that you are using to mount the VHD must have read and write permissions (Read/Write permissions in the File Sharing dialog box, or Full Control on the Security tab of the folder Properties dialog box) on the shared folder, or the VHD will not be accessible. Local loopback UNC paths are not supported. Use either of the following formats for the computer account: DOMAIN\SERVERNAME$ or SERVERNAME$.
Add the ComputerName parameter to specify the target computer you want to use to mount the VHD. If the ComputerName parameter is not specified, then the local computer is used. The computer that you are using to mount the VHD must be running Windows Server 2012 R2. Any local path, such as D:\myFolder, that is specified by using this parameter is always relative to the target computer.
| Type: | String |
| Position: | Named |
| Default value: | None |
| Accept pipeline input: | False |
| Accept wildcard characters: | False |
Shows what would happen if the cmdlet runs. The cmdlet is not run.


