Install winetricks mac os
Copy raw contents
How to install/about wine on mac
As this question keeps appearing more recently I’m making this basic guide.
- Install XQuartz 2.7.7 or above
- Gatekeeper must allow block unsigned packages
- Running OS X 10.8 to macOS 10.14* (macOS Catalina & later)
Recommended way to install Winehq packages;
Installing wine using homebrew Once homebrew is installed you the following command to install your selected wine package
The above command will install XQuartz and the most recent wine-staging pkg available on winehq but it will also add wine for use in Terminal meaning you no longer need to launch the installed Wine Staging app each time you want to access wine.
Please Note;
Only a single wine package can be installed using brew
The —no-quarantine command is required as homebrew by default adds the quarantine flag to downloaded casks, this causes Gatekeeper to treat the bundle as damaged.
Winehq is currently not providing recent packages for macOS so I decided to upload my own builds.
This command will add my brew tap and the second command will install my custom cask of Wine Staging
The tap contains the following
- gcenx-wine-stable
- gcenx-wine-devel
- gcenx-wine-staging
- wine-crossover
How to manually install wine on mac using Winehq releases;
Grab a wine package usually using the latest wine-devel is recommended, but most agree it’s best to use the latest wine-staging due to additional patches.
If your intention is to have a more stable environment use wine-stable
The above is the Winehq way to install wine on mac but that makes it cumbersome to use considering you must launch the Wine Stable , Wine Devel or Wine Staging app each time to get access to wine within Terminal
The default WINEPREFIX will be
/.wine so anything you install will be placed into the hidden
/.wine folder. You can override this by using the WINEPREFIX command
The default architecture of a WINEPREFIX will be 64Bit meaning 32Bit and 64Bit applications & games are supported but that’s not always ideal for several reasons. A new WINEPREFIX can be created and also setting WINEARCH
Here is an example of using both commands to create a 32Bit only WINEPREFIX
The above command will create a new WINEPREFIX thats also 32Bit only and launch winecfg
Basic wine tools
- wine (32Bit loader)
- wine64 (64Bit loader)
- msiexec (execute msi files
- notepad
- regedit (Wines Registry editor)
- regsvr32 (Provides DLL registration services)
- wineboot
- winecfg (wine configuration utility)
- wineconsole (windows like shell aka cmd)
- winedbg (wine debug utility)
- winefile (wine file manager)
- winemine (wines version of the game mine)
- winepath
What’s this winetricks everyone keeps saying to use?
Winetricks is an easy way to work around problems in Wine.
While winetricks can be installed directly from GitHub you will be missing packages winetricks requires, instead install again using homebrew
Now you will also have access to winetricks command within Terminal
Why doesn’t Virtual Desktop work?
By default wine on mac uses what’s known as macDriver using winetricks run the following command
This will swap from macDriver to x11 now wine will make use of XQuartz
Why doesn’t my game work on mac but Winehq says it does?
This usually happens when the game uses DirectX10 or above, the version of OpenGL included on macOS hasn’t been updated in years so it’s missing some needed extensions.
Can I use DXVK on mac?
No not currently.
MoltenVK is Vulkan 1.1 compliant, but still missing additional extensions needed by DXVK.
MoltenVK uses Metal meaning only wine64 has Vulkan support (currently wine32on64 doesn’t support MoltenVK).
Please Note;
CrossOver-20 does include DXVK support, this provides DirectX10 and DirectX11 support. CodeWeavers patched MoltenVK to fake unsupported extensions and a custom version of DXVK that’s modified specifically for macOS.
macOS Catalina and later
Currently only CrossOver-19 and later will run
Here are some free alternatives;
- Unofficial Wineskin Use a WS11 Engine
- PortingKit Should automatically select a working Engine
- My brew tap
Gatekeeper will give a warning for each Windows binary that is ran as these won’t be code-signed in a way Apple expects, to avoid this you could disabled Gatekeeper using the following command
Please Note;
macOS Catalina 10.15.0 to 10.15.3, SIP needs to be disabled this will allow wine32on64 to change the state of i386_set_ldt
My current wine-crossover package can be downloaded directly WineCX19.02
Phoenicis has a build of WineCX19.0.0
Also;
wine32on64 currently does not support 16Bit executable so some things just won’t work
Apple Silicon support?
Only CrossOver-20.0.2 includes support for Apple Silicon at this time, this requires macOS Big Sur 11.1 and install Rosetta2.
I will be adding support for Apple Silicon into Wineskin once I’m able to obtain an M1 Mac mini, currently checking where would be the best place to purchase from.
Using wine in a macOS Virtual Machine
From Wine-4.15 to Wine-5.16 macDriver (the default display driver) won’t function within a Virtual Machine, however the X11 display driver works.
You can edit the wine registry manually or use winetricks
Please Note; The macDriver regression was resolved from Wine-5.17
Wine-5.9 to Wine-5.18 file limit regression;
The upstream patch was applied to my recently uploaded Wine-5.17 packages
The most commonly noticed issues was wine-gecko was always crashing.
Источник
Install winetricks mac os
How to install/about wine on mac
As this question keeps appearing more recently I’m making this basic guide.
- Install XQuartz 2.7.7 or above
- Gatekeeper must allow block unsigned packages
- Running OS X 10.8 to macOS 10.14* (macOS Catalina & later)
Recommended way to install Winehq packages;
Installing wine using homebrew Once homebrew is installed you the following command to install your selected wine package
The above command will install XQuartz and the most recent wine-staging pkg available on winehq but it will also add wine for use in Terminal meaning you no longer need to launch the installed Wine Staging app each time you want to access wine.
Please Note;
Only a single wine package can be installed using brew
The —no-quarantine command is required as homebrew by default adds the quarantine flag to downloaded casks, this causes Gatekeeper to treat the bundle as damaged.
Winehq is currently not providing recent packages for macOS so I decided to upload my own builds.
This command will add my brew tap and the second command will install my custom cask of Wine Staging
The tap contains the following
- gcenx-wine-stable
- gcenx-wine-devel
- gcenx-wine-staging
- wine-crossover
How to manually install wine on mac using Winehq releases;
Grab a wine package usually using the latest wine-devel is recommended, but most agree it’s best to use the latest wine-staging due to additional patches.
If your intention is to have a more stable environment use wine-stable
The above is the Winehq way to install wine on mac but that makes it cumbersome to use considering you must launch the Wine Stable , Wine Devel or Wine Staging app each time to get access to wine within Terminal
The default WINEPREFIX will be
/.wine so anything you install will be placed into the hidden
/.wine folder. You can override this by using the WINEPREFIX command
The default architecture of a WINEPREFIX will be 64Bit meaning 32Bit and 64Bit applications & games are supported but that’s not always ideal for several reasons. A new WINEPREFIX can be created and also setting WINEARCH
Here is an example of using both commands to create a 32Bit only WINEPREFIX
The above command will create a new WINEPREFIX thats also 32Bit only and launch winecfg
Basic wine tools
- wine (32Bit loader)
- wine64 (64Bit loader)
- msiexec (execute msi files
- notepad
- regedit (Wines Registry editor)
- regsvr32 (Provides DLL registration services)
- wineboot
- winecfg (wine configuration utility)
- wineconsole (windows like shell aka cmd)
- winedbg (wine debug utility)
- winefile (wine file manager)
- winemine (wines version of the game mine)
- winepath
What’s this winetricks everyone keeps saying to use?
Winetricks is an easy way to work around problems in Wine.
While winetricks can be installed directly from GitHub you will be missing packages winetricks requires, instead install again using homebrew
Now you will also have access to winetricks command within Terminal
Why doesn’t Virtual Desktop work?
By default wine on mac uses what’s known as macDriver using winetricks run the following command
This will swap from macDriver to x11 now wine will make use of XQuartz
Why doesn’t my game work on mac but Winehq says it does?
This usually happens when the game uses DirectX10 or above, the version of OpenGL included on macOS hasn’t been updated in years so it’s missing some needed extensions.
Can I use DXVK on mac?
No not currently.
MoltenVK is Vulkan 1.1 compliant, but still missing additional extensions needed by DXVK.
MoltenVK uses Metal meaning only wine64 has Vulkan support (currently wine32on64 doesn’t support MoltenVK).
Please Note;
CrossOver-20 does include DXVK support, this provides DirectX10 and DirectX11 support. CodeWeavers patched MoltenVK to fake unsupported extensions and a custom version of DXVK that’s modified specifically for macOS.
macOS Catalina and later
Currently only CrossOver-19 and later will run
Here are some free alternatives;
- Unofficial Wineskin Use a WS11 Engine
- PortingKit Should automatically select a working Engine
- My brew tap
Gatekeeper will give a warning for each Windows binary that is ran as these won’t be code-signed in a way Apple expects, to avoid this you could disabled Gatekeeper using the following command
Please Note;
macOS Catalina 10.15.0 to 10.15.3, SIP needs to be disabled this will allow wine32on64 to change the state of i386_set_ldt
My current wine-crossover package can be downloaded directly WineCX19.02
Phoenicis has a build of WineCX19.0.0
Also;
wine32on64 currently does not support 16Bit executable so some things just won’t work
Apple Silicon support?
Only CrossOver-20.0.2 includes support for Apple Silicon at this time, this requires macOS Big Sur 11.1 and install Rosetta2.
I will be adding support for Apple Silicon into Wineskin once I’m able to obtain an M1 Mac mini, currently checking where would be the best place to purchase from.
Using wine in a macOS Virtual Machine
From Wine-4.15 to Wine-5.16 macDriver (the default display driver) won’t function within a Virtual Machine, however the X11 display driver works.
You can edit the wine registry manually or use winetricks
Please Note; The macDriver regression was resolved from Wine-5.17
Wine-5.9 to Wine-5.18 file limit regression;
The upstream patch was applied to my recently uploaded Wine-5.17 packages
The most commonly noticed issues was wine-gecko was always crashing.
Источник
Как установить приложения из Windows на OS X

Иногда вам нужна всего одна программа, которой нет на операционке Apple. Это может быть игра или узкоспециализированный софт. В таких случаях нет смысла разворачивать Bootcamp. Есть решение гораздо эффективнее: WINE.
Кто такие свитчеры
«Свитчеры», — люди переключающиеся с MS Windows на Mac. Термин был введен Apple во время проведения рекламной компании в июне 2002 года. В её рамках опрашивали известных людей уже сменивших платформу. К сожалению, особого успеха она не приобрела и была прекращена в 2013. Но термин остался, а годы гегемонии Windows на постсоветском пространстве позволяют уверенно называть свитчерами 100% наших пользователей OS X.
Новая операционная система встречает иной логикой работы, привычные действия выполняются иначе, пропадает любимое ПО. Процесс привыкания проходит по-разному. Кто-то уже через пару дней принимает новые правила игры и забывает свои старые привычки. Другие испытывают дискомфорт, ищут способы сделать что-то по-старому и в итоге либо остаются, либо ставят Windows на Mac.
Как правило, отторжение возникает из-за невозможности решить свою проблему знакомым способом. Постепенно эти вопросы разрешатся, и чтобы упросить процесс, рекомендую использовать приложение WINE.
WINE – Wine Is Not an Emulator
WINE в отличие от Parallels Desktop, Virtual Box и других, в реальности не является эмулятором, а реализует собственную версию WinAPI. Что имеет как свои плюсы в виде высокой скорости работы, зачастую выше, чем в Windows, за счет отсутствия самой ОС, так и минусы ввиду отсутствия реализации определенных API.
Сам WINE достаточно недружелюбен для новичка, поэтому его настройку будем производить через Wineskin.
Рассмотрим две наиболее частых задачи:
- запуск прикладного ПО;
- запуск игр;
Установка WineSkin
- Переходим на сайт Wineskin.
- Следуем в раздел Downloads.
- Находим ссылку для скачивания и ждем появление архива на вашем маке.
- Распаковываем архив и переносим Wineskin Winery в папку с приложениями.
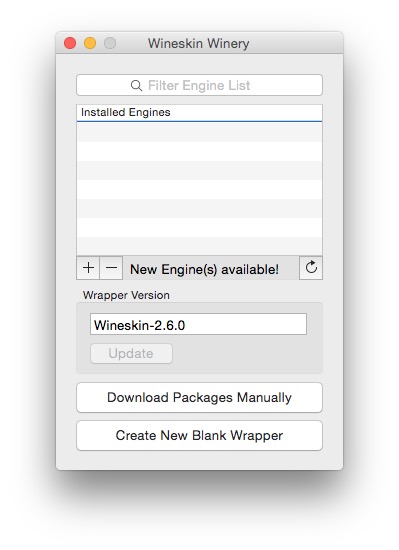
- Запускаем Wineskin Winery, соглашаемся с системным предупреждением о том, что разработчик неизвестен и попадаем в окно настройки Wine.
Установка прошла успешно, для продолжения немного синхронизируем терминологию:
- Wrapper (обертка), — контейнер, который содержит все файлы для корректной работы запускаемого Windows приложения. В OS X контейнеры имеют расширение APP и могут свободно копироваться между устройствами как обычные приложения;
- Engine, — версия Wine, предоставляющая WinAPI. Определенные приложения работают только с конкретной версией Wine. Для проверки рекомендую использовать каталог совместимости AppDB;
- WineTricks, — утилита позволяющая устанавливать различные библиотеки для расширения уровня совместимости с приложениями и играми;
Пришло время создать свой первый контейнер. Для этого нажимаем плюс и видим окно выбора версии Wine.
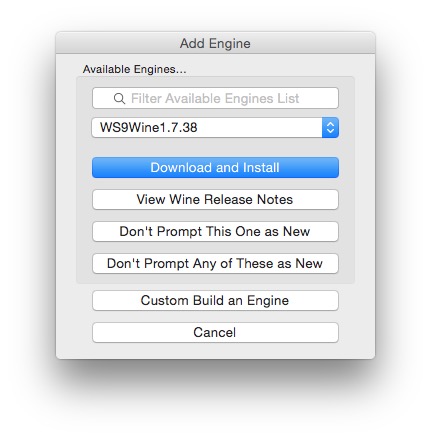
Выбираем последнюю версию и нажимаем Download and Install, после чего произойдет возврат в прошлое окно. Потребуется нажать Create New Blank Wrapper, которая инициализирует создание контейнера для нашего будущего приложения. В процессе появится запрос на имя контейнера, именно оно будет отображаться в Launchpad.
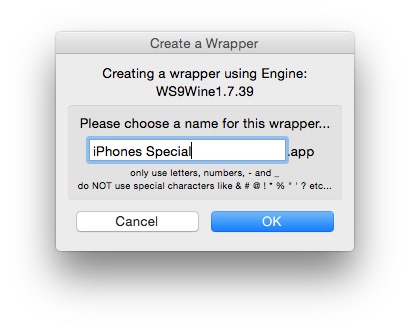
Процедура создания обертки может занять некоторое время, так как в процессе происходит загрузка из Интернета необходимых библиотек. Затем появится диалоговое окно с информацией о том, что создание прошло успешно и предложением просмотреть результат View wrapper in Finder – что мы и сделаем для перехода к следующему шагу.
Если кто-то поспешил и нажал кнопку ОК, созданный контейнер можно найти по адресу: /Users/ /Applications/Wineskin
Установка приложения
В качестве примера предлагаю рассмотреть одно из лучших Windows приложений, аналоги которого на других платформах, и рядом не валялись, — Total Commander.
У нас есть заготовка для установки Total Commander (или любого другого приложения) и подразумевается, что инсталляционный пакет Total Commander вы уже скачали.
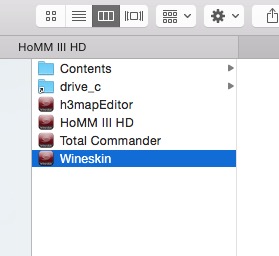
- Вызываем контекстное меню для нашего контейнера iPhones Special, кликая по нему правой кнопкой, выбираем пункт: Показать содержимое пакета.
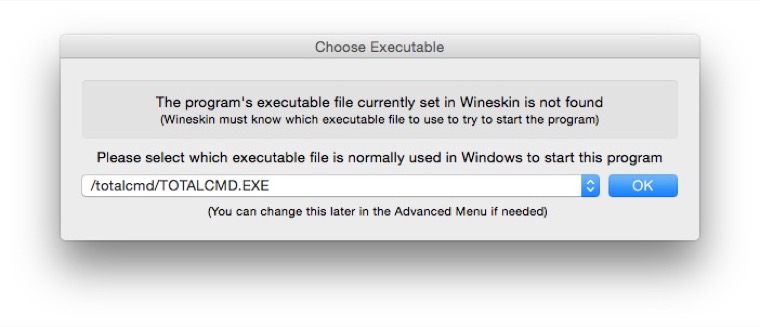
- Появляется структура пакета, где присутствует файл Wineskin, запускаем его двойным кликом и видим следующий диалог:
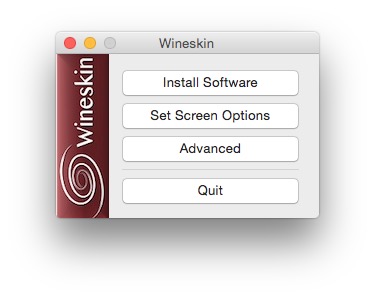
- Choose Setup Executable, — установка программного обеспечения посредством стандартных установщиков, типа setup.exe, подходит для большинства приложений.
- Copy a Folder Inside, — позволяет скопировать предустановленное приложение в ваш контейнер. Отлично подходит для приложений, которые были ранее установлены в среде Windows и требуется их перенос на мак.
- Move a Folder Inside, – аналогично предыдущему пункту, за тем исключением, что данные будут перенесены, а не скопированы.
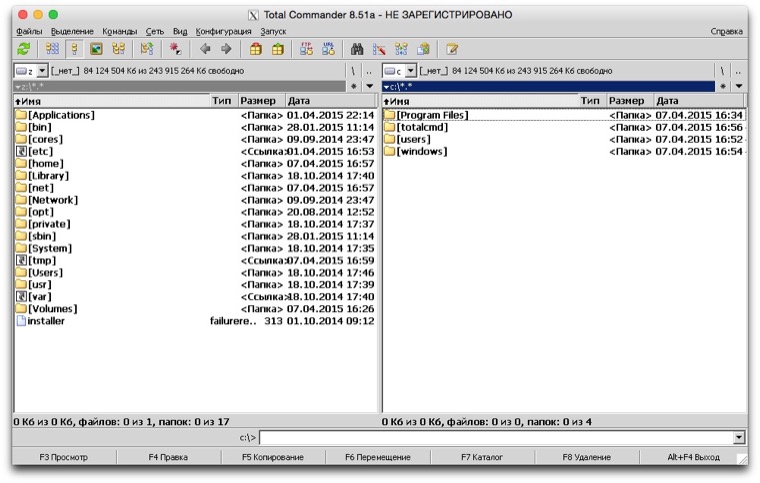
Да, шрифты ужасны и только сейчас понимаешь, что так было всегда. Рекомендую изменить на Tahoma и смириться, так как адекватного сглаживания, как в OSX, добиться мне не удалось. Если кто-то придумает решение, ждем в комментариях.
Мы создали тестовый контейнер, поместили в него приложение, успешно его запустили, но не сделали каких-либо дополнительных настроек. Главное, что поняли общий принцип, и теперь приступим к более сложным операциям.
Множественное использование контейнеров и установка игр
Wineskin – мощный инструмент, одним из достоинств которого является возможность создавать контейнеры с разными движками для разных приложений. Но использование одного контейнера для нескольких приложений не афишируется. Сейчас мы установим игру в тот же контейнер, где у нас живет Total Commander, а затем сделаем их раздельный запуск и разные иконки в Launchpad.
Что требуется помнить при установке большинства игр, особенно с повышенными требованиями к графике:
- необходимо устанавливать библиотеки расширения vcrun*, как правило, версию можно подсмотреть в папке с инсталлятором игры;
- не забываем ставить DirectX, для Wine рекомендуется использовать версию d3dx9_36.dll, как наиболее стабильную;
- устанавливать все расширения лучше перед установкой игры;
- в процессе установки игры никогда не соглашаться на обновление DirectX и других библиотек.
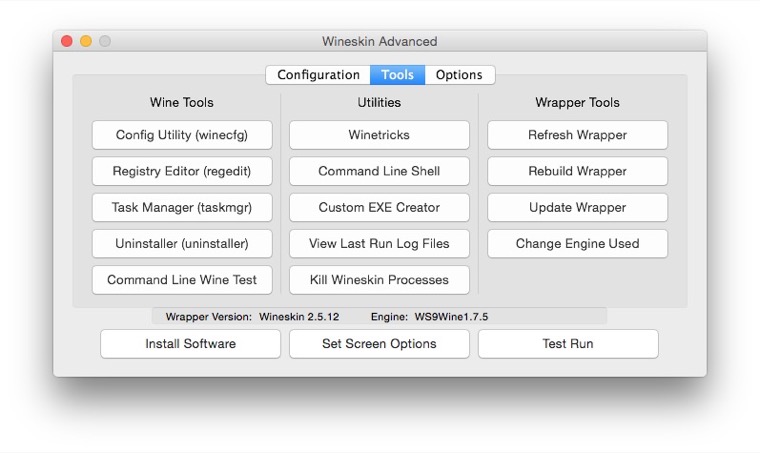
Для установки дополнительных библиотек используем WineTricks. Вызывается он из расширенных настроек основного окна Wineskin, находится на второй закладке в средней колонке: Wineskin → Advanced → Tools → Utilities | Winetricks
После запуска Winetricks, появляется окно, визуально разделенное на две зоны: список доступных библиотек и окно статуса загрузки.
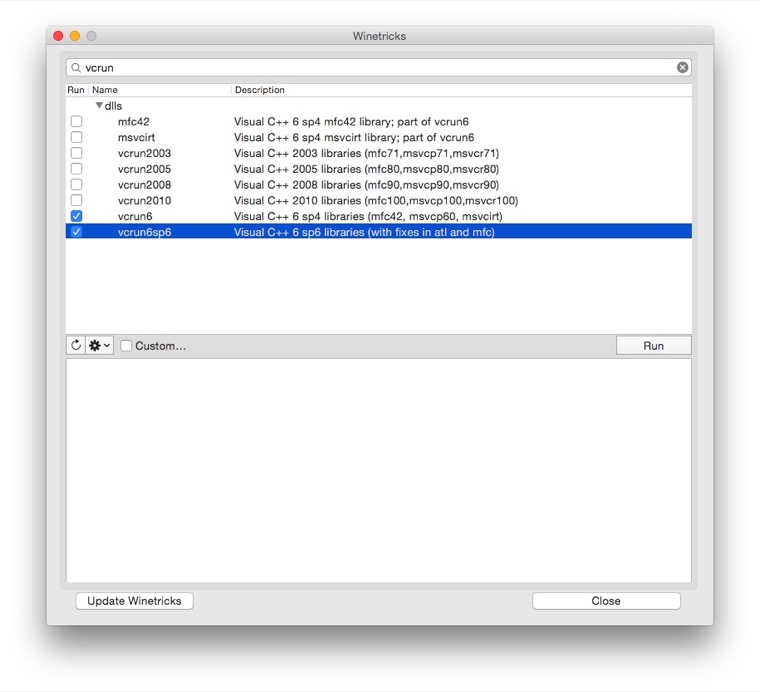
Для установки, проставляем галочки в чек-боксы и нажимаем Run.
Важно: если в процессе установки возникло ощущение что все зависло, вызовите Exposed (Ctrl + ↓), вполне возможно, что диалоговое окно не смогло вызвать на себя фокус, и ждет нажатия ОК или Продолжить.
После установки всех необходимых библиотек, переходим к установке игры, аналогично тому, как ставится обычное приложение.
Я знатный «олдфаг» и современными играми не интересуюсь, поэтому, взял для примера, классику пошаговых стратегий: Heroes of Might and Magic III. Версия от GOG не страдает зависимостью от CD-диска в приводе, поэтому ставится без каких-либо проблем.
После установки у нас в контейнере присутствуют несколько приложений с разными исполняемыми файлами. Для начала создадим для них ярлыки. Для этого в расширенных настройках, там где находится Winetricks, находим пункт Custom EXE Creator.
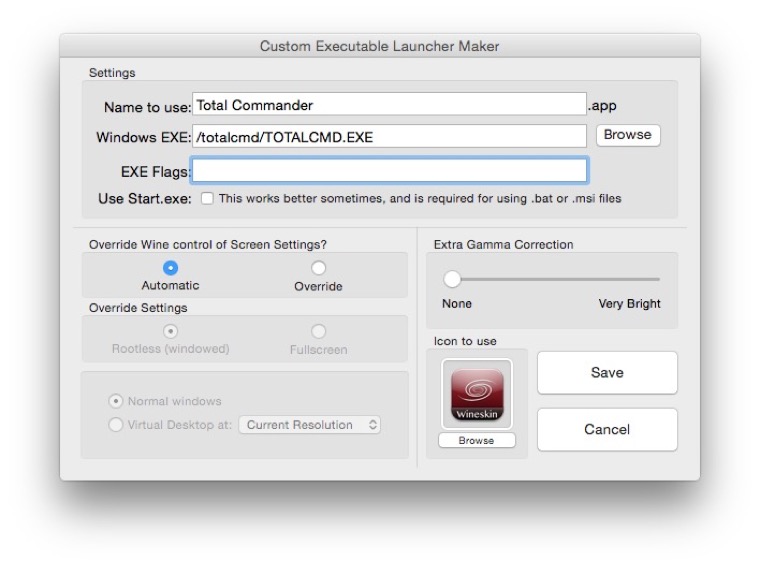
Задаем название для ярлыка, выбираем исполняемый файл и нажимаем ОК. В итоге в нашем контейнере появится исполняемый файл. Создадим отдельные ярлыки для Total Commander, игры HoMM III HD и редактора карт к ней.
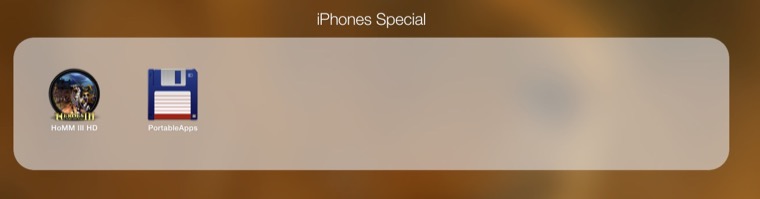
Осталось вынести эти ярлыки в список приложений, для чего используем обычное перетаскивание с удержанием клавиш Option+Command, в итоге будут созданы ярлыки.
Сейчас у нас все ярлыки имеют одинаковый значок, исправляем и этот недостаток.
Для начала находим иконку, можно поискать на сайте Icon Archive. Выбираем максимального качества, в идеале PNG 256х256px, владельцам ретины еще больше. Копируем её в буфер обмена. После этого открываем Finder, переходим в раздел Приложения (Application), находим наш ярлык, вызываем контекстное меню и выбираем пункт Свойства.
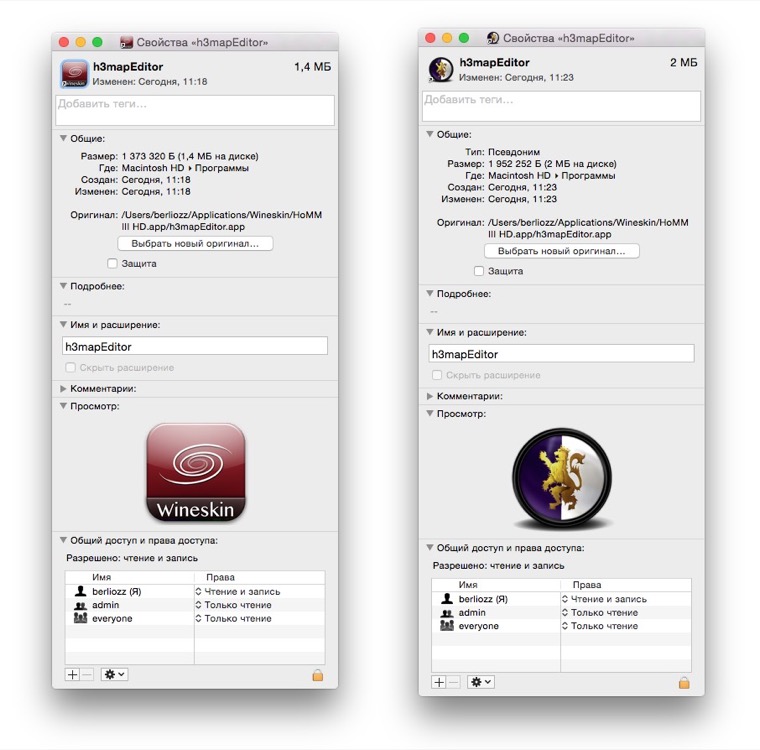
В отображаемом окне, выделяем иконку в левом верхнем углу, просто кликнув, мышью и нажимаем CMD+V, изображение вставляется из буфера обмена и вуаля, новая иконка. В итоге получаем следующий набор.
Заключение
Мы научились базовым вещам, но не рассмотрели даже половину функций Wine. Цель как всегда одна: разбудить ваш интерес, показать дорогу. А уж как далеко вы сможете по ней пройти, зависит только от вас.
Источник


