- Установка Windows 10 на компьютере Mac с помощью приложения «Ассистент Boot Camp»
- Необходимые условия для установки Windows 10 на компьютере Mac
- Инструкции по установке Windows 10 на компьютере Mac
- 1. Проверьте настройки функции «Безопасная загрузка»
- 2. Использование приложения «Ассистент Boot Camp» для создания раздела Windows
- 3. Форматирование раздела Windows (BOOTCAMP)
- 4. Установка Windows
- 5. Использование установщика Boot Camp в Windows
- Процедура переключения между Windows и macOS
- Дополнительная информация
- How to Make a Windows 10 USB Using Your Mac — Build a Bootable ISO From Your Mac’s Terminal
- Quincy Larson
- Step 1: Download the Windows 10 ISO file
- Step 2: Insert your USB storage drive into your Mac
- Step 3: Use the diskutil command to identify which drive your USB is mounted on
- Step 4: Format your USB Drive to work with Windows
- Step 5: Use hdiutil to mount the Windows 10 folder and prepare it for transfer.
- Step 6: Copy the Windows 10 ISO over to your USB Drive
- Step 7: Put your USB into your new PC and start loading Windows
- Quincy Larson
- Install Windows on your newer Mac using Boot Camp
- What you need
- Before you begin
- Perform the installation
- Step 1: Check for software updates
- Step 2: Prepare your Mac for Windows
- Step 3: Install Windows
- Step 4: Install Boot Camp on Windows
Установка Windows 10 на компьютере Mac с помощью приложения «Ассистент Boot Camp»
С помощью Boot Camp можно установить Microsoft Windows 10 на компьютере Mac и переключаться между macOS и Windows при его перезагрузке.
Необходимые условия для установки Windows 10 на компьютере Mac
- MacBook, выпущенный в 2015 г. или позже
- MacBook Air, выпущенный в 2012 г. или позже
- MacBook Pro, выпущенный в 2012 г. или позже
- Mac mini, выпущенный в 2012 г. или позже
- iMac, выпущенный в 2012 г. или позже 1
- iMac Pro (все модели)
- Mac Pro, выпущенный в 2013 году или позже
Последние обновления macOS, которые могут включать обновления приложения «Ассистент Boot Camp». Приложение «Ассистент Boot Camp» необходимо для установки Windows 10.
Не менее 64 ГБ свободного места на загрузочном диске Mac:
- Достаточно 64 ГБ дискового пространства, но для оптимальной работы требуется не менее 128 ГБ. Это минимальный объем, необходимый для автоматических обновлений Windows.
- Если объем оперативной памяти (ОЗУ) компьютера iMac Pro или Mac Pro составляет 128 ГБ или больше, на загрузочном диске должно быть как минимум столько же свободного места 2 .
Внешний флеш-накопитель USB объемом памяти не менее 16 ГБ, если только не используется компьютер Mac, для которого не требуется флеш-накопитель для установки Windows.
64-разрядная версия Windows 10 Home или Windows 10 Pro в виде образа диска (ISO) или на другом установочном носителе. При первой установке Windows на компьютере Mac используйте полную версию Windows, а не обновление.
- Если ваша копия Windows записана на флеш-накопитель USB или у вас есть ключ продукта Windows и нет установочного диска, загрузите образ диска Windows 10 на сайте Microsoft.
- Если ваша копия Windows записана на диск DVD, может потребоваться создать его образ.

Инструкции по установке Windows 10 на компьютере Mac
Для установки Windows используйте приложение «Ассистент Boot Camp», входящее в комплект поставки компьютера Mac.
1. Проверьте настройки функции «Безопасная загрузка»
Узнайте, как проверить настройки функции «Безопасная загрузка». В настройках функции «Безопасная загрузка» по умолчанию выбран параметр «Высший уровень безопасности». Если вы выбрали параметр «Функции безопасности отключены», перед установкой Windows снова включите параметр «Высший уровень безопасности». После установки Windows вы можете использовать любые настройки функции «Безопасная загрузка». Это не повлияет на запуск ОС Windows.
2. Использование приложения «Ассистент Boot Camp» для создания раздела Windows
Откройте приложение «Ассистент Boot Camp» во вложенной папке «Утилиты» папки «Программы». Следуйте инструкциям на экране.
- Если появится сообщение о необходимости использовать накопитель USB, вставьте флеш-накопитель USB в компьютер Mac. Приложение «Ассистент Boot Camp» использует его, чтобы создать загружаемый накопитель USB для установки Windows.
- Когда приложение «Ассистент Boot Camp» попросит указать размер раздела Windows, руководствуйтесь минимальными требованиями к объему памяти, указанными в предыдущем разделе. Укажите размер раздела в соответствии со своими потребностями. В дальнейшем изменить его будет нельзя.
3. Форматирование раздела Windows (BOOTCAMP)
По завершении работы приложения «Ассистент Boot Camp» компьютер Mac перезагрузится в среде установки Windows. Если установщик спросит, куда установить Windows, выберите раздел BOOTCAMP и нажмите «Форматировать». В большинстве случаев установщик автоматически выберет и отформатирует раздел BOOTCAMP.
4. Установка Windows
Отсоедините все внешние устройства, которые не требуются во время установки. Затем нажмите «Далее» и следуйте инструкциям на экране, чтобы начать установку Windows.
5. Использование установщика Boot Camp в Windows
По завершении установки Windows компьютер Mac запускается в Windows и отображает приветствие установщика Boot Camp. Следуйте инструкциям на экране, чтобы установить Boot Camp и вспомогательное программное обеспечение Windows (драйверы). По завершении будет предложено выполнить перезапуск.
- Если установщик Boot Camp не открывается, откройте его вручную и используйте для выполнения установки Boot Camp.
- При наличии внешнего дисплея, подключенного к порту Thunderbolt 3 на компьютере Mac, его экран во время установки (до 2 минут) будет пустым (черным, серым или синим).
Процедура переключения между Windows и macOS
Перезапустите компьютер, во время запуска нажмите и удерживайте клавишу Option (или Alt) ⌥ для переключения между операционными системами Windows и macOS.
Дополнительная информация
Если используется одна из перечисленных ниже моделей Mac на базе процессора Intel с OS X El Capitan или более поздней версии, для установки Windows не требуется флеш-накопитель USB.
- MacBook, выпущенный в 2015 г. или позже
- MacBook Air, выпущенный в 2017 г. или позже 3
- MacBook Pro, выпущенный в 2015 г. или позже 3
- iMac, выпущенный в 2015 г. или позже
- iMac Pro (все модели)
- Mac Pro, выпущенный в конце 2013 г. или позже
Для получения дополнительных сведений об использовании Windows на компьютере Mac откройте приложение «Ассистент Boot Camp» и нажмите кнопку «Открыть Справку Boot Camp».
1. Если используется компьютер iMac (с дисплеем Retina 5K, 27 дюймов, конец 2014 г.), iMac (27 дюймов, конец 2013 г.) или iMac (27 дюймов, конец 2012 г.) с жестким диском объемом 3 ТБ и операционной системой macOS Mojave или более поздней версии, узнайте об оповещении, которое может отображаться во время установки.
2. Например, если объем ОЗУ на компьютере Mac составляет 128 ГБ, то на загрузочном диске должно быть доступно не менее 128 ГБ для Windows. Чтобы узнать объем ОЗУ компьютера Mac, перейдите в меню Apple > «Об этом Mac». Чтобы узнать объем доступного дискового пространства, перейдите на вкладку «Хранилище» в этом же окне.
3. Эти модели Mac также были доступны с жесткими дисками емкостью 128 ГБ. Компания Apple рекомендует жесткие диски емкостью не менее 256 ГБ, чтобы можно было создать раздел Boot Camp размером не менее 128 ГБ.
Информация о продуктах, произведенных не компанией Apple, или о независимых веб-сайтах, неподконтрольных и не тестируемых компанией Apple, не носит рекомендательного или одобрительного характера. Компания Apple не несет никакой ответственности за выбор, функциональность и использование веб-сайтов или продукции сторонних производителей. Компания Apple также не несет ответственности за точность или достоверность данных, размещенных на веб-сайтах сторонних производителей. Обратитесь к поставщику за дополнительной информацией.
How to Make a Windows 10 USB Using Your Mac — Build a Bootable ISO From Your Mac’s Terminal

Quincy Larson

Most new PCs don’t come with DVD drives anymore. So it can be a pain to install Windows on a new computer.
Luckily, Microsoft makes a tool that you can use to install Windows from a USB storage drive (or «thumbdrive» as they are often called).
But what if you don’t have a second PC for setting up that USB storage drive in the first place?
In this tutorial we’ll show you how you can set this up from a Mac.
Step 1: Download the Windows 10 ISO file
You can download the ISO file straight from Windows. That’s right — everything we’re going to do here is 100% legal and sanctioned by Microsoft.
If you want an English-language version of the latest update of Windows 10, you can download the ISO here.
If you have a relatively new computer, you probably want the 64-bit version. If you’re not sure, go with the 32-bit version to be safe.
If you want a non-English-language version of Windows, or want to get an older update version, download the ISO here instead.
Step 2: Insert your USB storage drive into your Mac
The ISO file is only about 5 gigabytes, but I recommend you use a USB drive with at least 16 gigabytes of space just in case Windows needs more space during the installation process.
I bought a 32 gigabyte USB drive at Walmart for only $3, so this shouldn’t be very expensive.
Stick your USB drive into your Mac. Then open your terminal. You can do this using MacOS Spotlight by pressing both the ⌘ and Space bar at the same time, then typing «terminal» and hitting enter.
Don’t be intimidated by the command line interface. I’m going to tell you exactly which commands to enter.
Step 3: Use the diskutil command to identify which drive your USB is mounted on
Open Mac Spotlight using the ⌘ + space keyboard shortcut. Then type the word «terminal» and select Terminal from the dropdown list.
Paste the following command into your terminal and hit enter:
You will see output like this (note — your Mac’s terminal may be black text on a white background if you haven’t customized it).
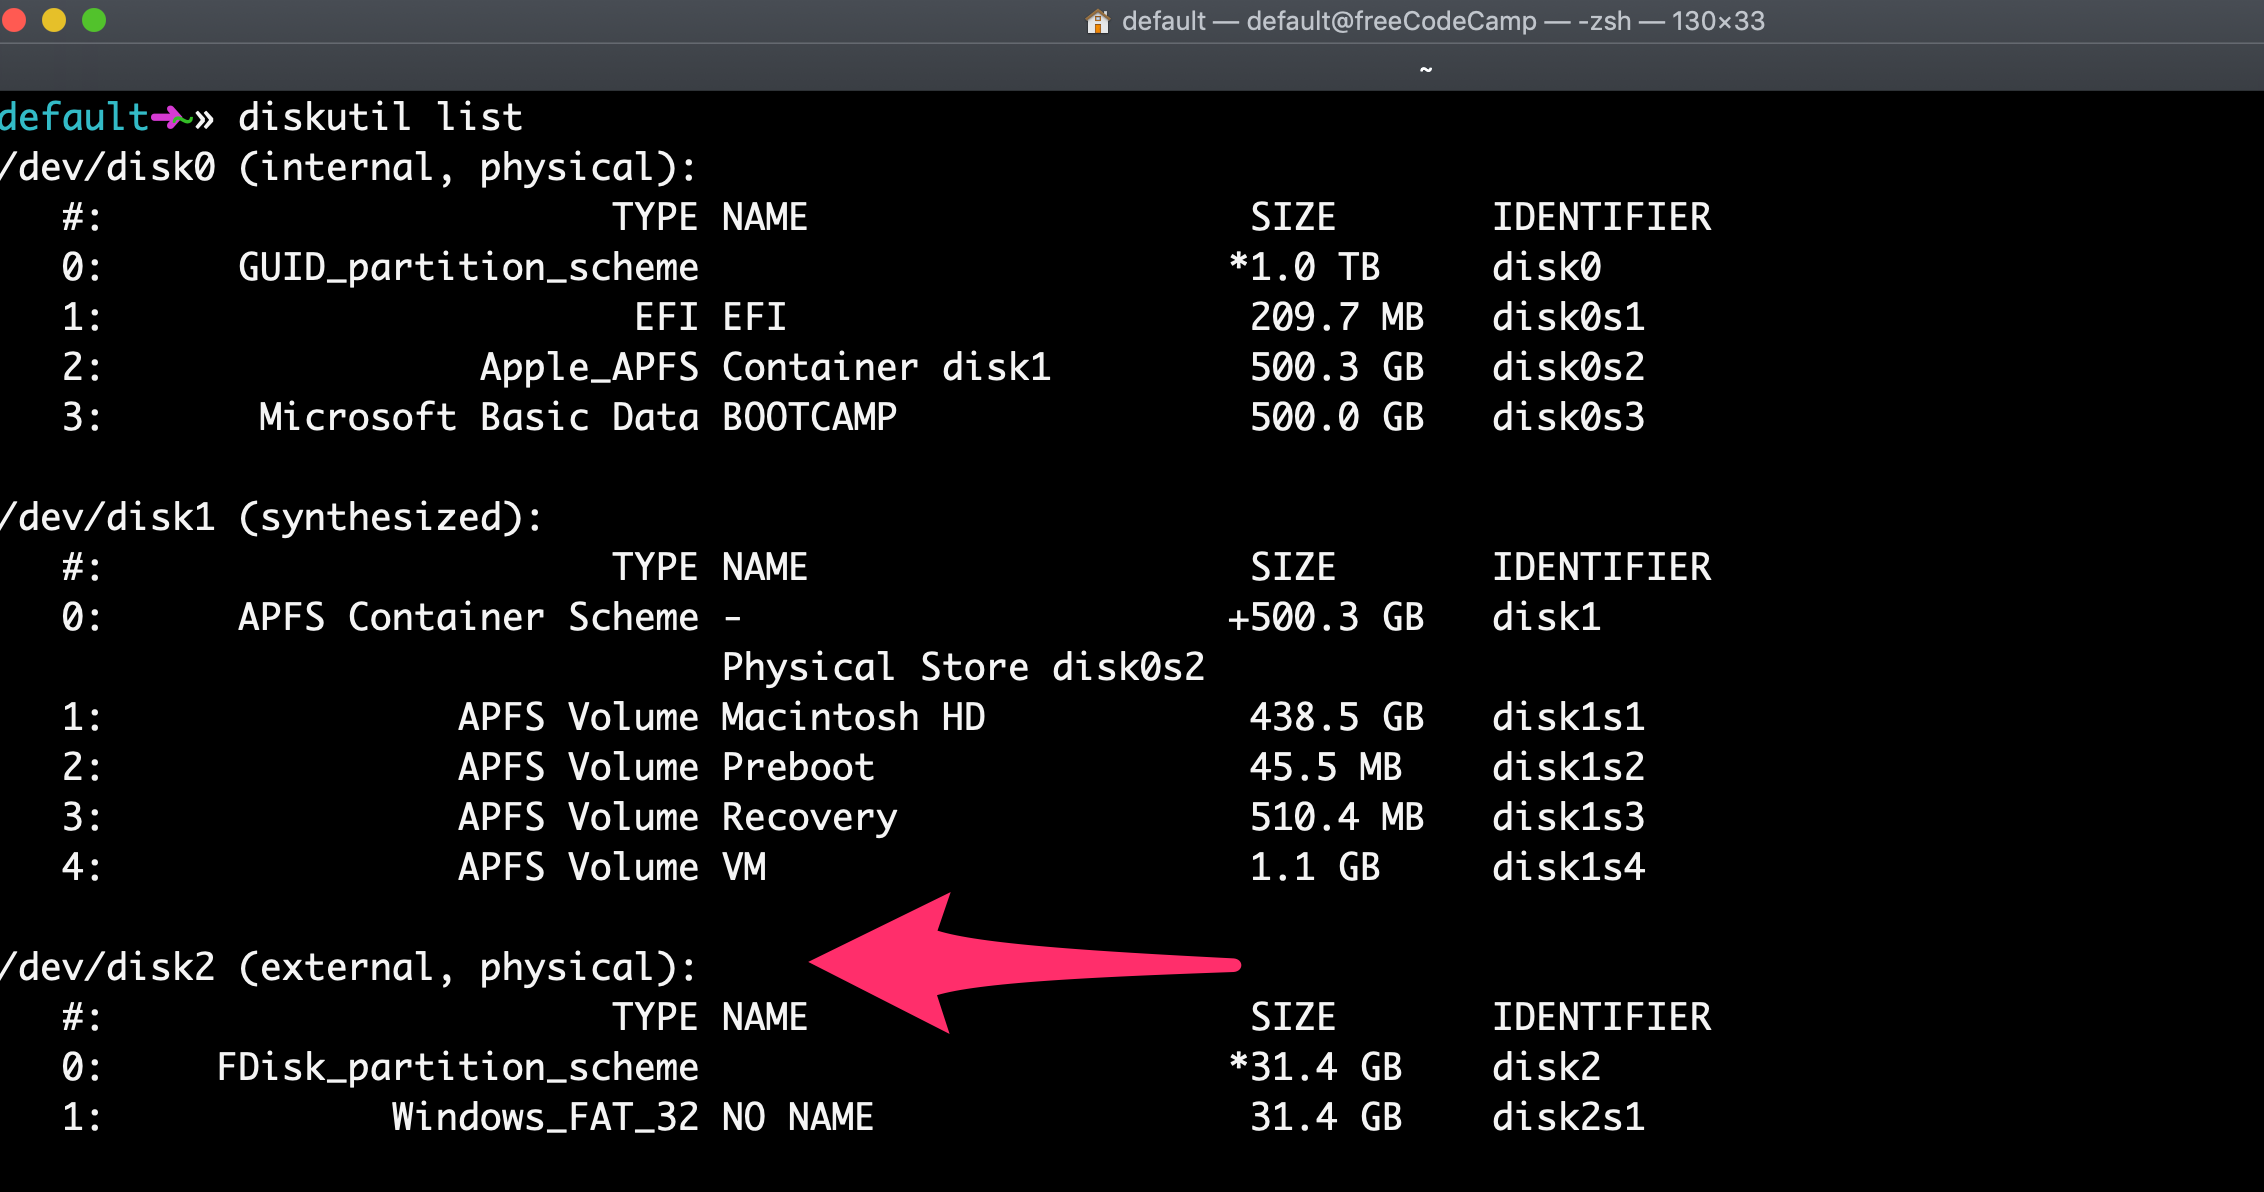
Copy the text I point to here. It will probably be something like
Step 4: Format your USB Drive to work with Windows
Next format your USB drive to Windows FAT32 format. This is a format that Windows 10 will recognize.
Note that you should replace the disk2 with the name of the your drive from step 3 if it wasn’t disk2 . (It may be disk3 or disk4 ).
Run this command using the correct disk number for your USB:
diskutil eraseDisk MS-DOS «WIN10» GPT /dev/disk2
Then you’ll see terminal output like this.
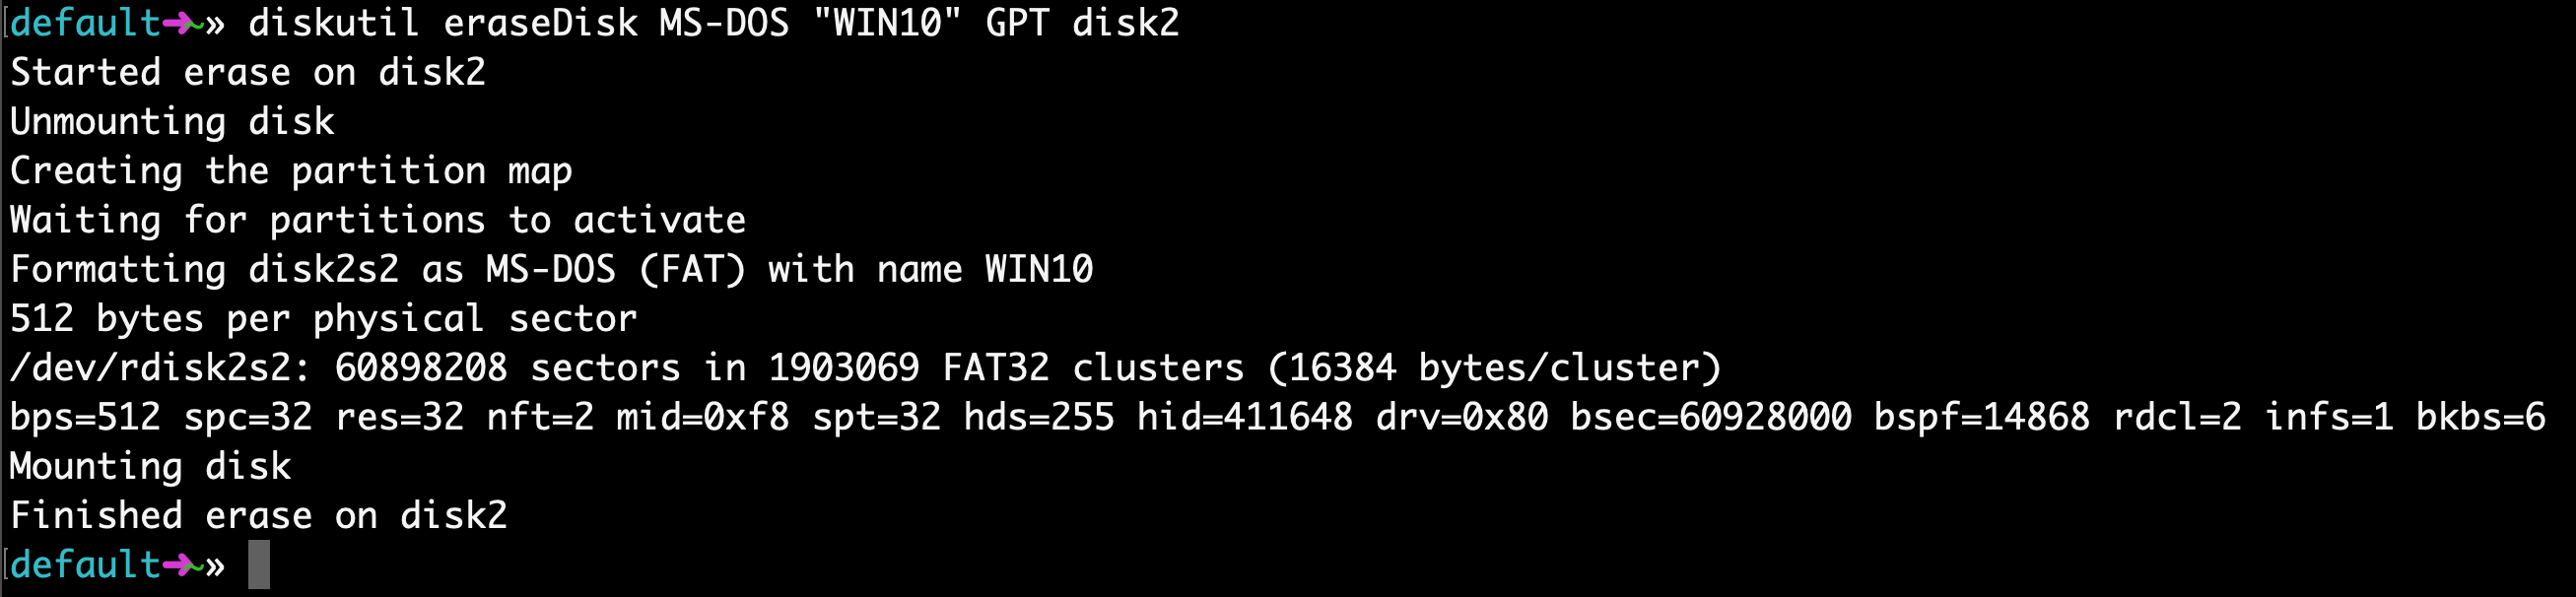
This will probably only take about 20 seconds on a newer computer, but may take longer on an older computer.
Note that for some hardware, you may instead need to run this command, which uses the MBR format for partitioning instead of GPT. Come back and try this command if step 7 fails, then redo steps 5, 6, and 7:
Step 5: Use hdiutil to mount the Windows 10 folder and prepare it for transfer.
Now we’re going to prep our downloaded ISO file so we can copy it over to our USB drive.
You will need to check where your downloaded Windows 10 ISO file is and use that. But your file is probably located in your
/Downloads folder with a name of Win10_1903_V1_English_x64.iso .
Step 6: Copy the Windows 10 ISO over to your USB Drive
Update April 2020: One of the files in the Windows 10 ISO – install.wim – is now too large to copy over to a FAT-32 formatted USB drive. So I’ll show you how to copy it over separately.
Thank you to @alexlubbock for coming up with this workaround.
First run this command to copy over everything but that file:
rsync -vha —exclude=sources/install.wim /Volumes/CCCOMA_X64FRE_EN-US_DV9/* /Volumes/WIN10
Then run this command to install Homebrew (if you don’t have it installed on your Mac yet):
/usr/bin/ruby -e «$(curl -fsSL https://raw.githubusercontent.com/Homebrew/install/master/install)»
Then use Homebrew to install a tool called wimlib with this terminal command:
brew install wimlib
Then go ahead and create the directory that you’re going to write the files into:
Then run this command. Note that this process may take several hours, you may see 0% progress until it finishes. Don’t abort it. It will use wimlib to split the install.wim file into 2 files less than 4 GB each (I use 3.8 GB in the following command), then copy them over to your USB:
wimlib-imagex split /Volumes/CCCOMA_X64FRE_EN-US_DV9/sources/install.wim /Volumes/WIN10/sources/install.swm 3800
Once that’s done, you can eject your USB from your Mac inside Finder. Note that Windows will automatically rejoin these files later when you’re installing.
Step 7: Put your USB into your new PC and start loading Windows
Congratulations — your computer now should boot directly from your USB drive. If it doesn’t, you may need to check your new PC’s BIOS and change the boot order to boot from your USB drive.
Windows will pop up a screen and start the installation process.
Enjoy your new PC, and your newly-installed copy of Windows.
Quincy Larson
The teacher who founded freeCodeCamp.org.
If you read this far, tweet to the author to show them you care. Tweet a thanks
Learn to code for free. freeCodeCamp’s open source curriculum has helped more than 40,000 people get jobs as developers. Get started
freeCodeCamp is a donor-supported tax-exempt 501(c)(3) nonprofit organization (United States Federal Tax Identification Number: 82-0779546)
Our mission: to help people learn to code for free. We accomplish this by creating thousands of videos, articles, and interactive coding lessons — all freely available to the public. We also have thousands of freeCodeCamp study groups around the world.
Donations to freeCodeCamp go toward our education initiatives, and help pay for servers, services, and staff.
Install Windows on your newer Mac using Boot Camp
You can use Boot Camp Assistant to install Windows 10 on your Intel-based Mac.
Newer Mac computers use a streamlined method to install Windows on your Mac. To find out whether your Mac uses this method, see the “Learn more” section in the Apple Support article Install Windows 10 on your Mac with Boot Camp Assistant. If your Mac is an older model that requires an external USB drive, follow the instructions in Install Windows on your older Mac using Boot Camp instead.
What you need
The keyboard and mouse or trackpad that came with your Mac. If they aren’t available, use a USB keyboard and mouse.
A full-installation, 64-bit version of Windows 10 on a disk image (ISO file) or other installation media.
Sufficient free storage space on your startup drive. For information about the amount of free space needed, see the Apple Support Article Install Windows 10 on your Mac with Boot Camp Assistant.
Before you begin
Before you install Windows, make sure you back up important files.
You can use Time Machine or any other method to back up your files. For information about backing up files, see Back up your files with Time Machine and Ways to back up or protect your files.
Perform the installation
On your Mac, do the following steps in order.
Step 1: Check for software updates
Before you install Windows, install all macOS updates.
On your Mac, log in as an administrator, quit all open apps, then log out any other users.
Choose Apple menu  > System Preferences, click Software Update, then install all available macOS updates.
If your Mac restarts after installing an update, open Software Update again to install any additional updates.
Step 2: Prepare your Mac for Windows
Boot Camp Assistant prepares your Mac by creating a new partition for Windows named BOOTCAMP and downloading the Boot Camp support software.
Important: If you’re using a Mac notebook computer, connect it to a power source before continuing.
On your Mac, open Boot Camp Assistant  , located in /Applications/Utilities.
At the Introduction screen, click Continue.
The system is checked for total available disk space. Older Time Machine snapshots and cached iCloud files are removed to make space for Boot Camp. This process may take a long time to complete (you can click the Stop button to skip this process).
If you have only one internal disk, choose the Windows ISO image, specify the partition size by dragging the divider between the macOS and Windows partitions, then click Install.
Important: You can’t resize the partition later.
If you have multiple internal disks, follow the onscreen instructions to select and format the disk you want to install Windows on and to choose the Windows ISO image.
If you select your startup disk: You can create an additional partition for Windows. Specify the partition size by dragging the divider between the macOS and Windows partitions.
If you select an APFS-formatted disk: You can either create an additional partition on the disk for Windows, or erase the entire disk and create a partition for Windows. If you choose to create an additional partition, specify the partition size by dragging the divider between the macOS and Windows partitions.
If you select a non-APFS-formatted disk: You can erase the entire disk and create a partition for Windows.
If Boot Camp is already present on the disk you select, you also have the option to uninstall it.
Important: You can’t resize the partition later.
When this step is complete, the Windows installer starts.
Step 3: Install Windows
In the Windows installer, follow the onscreen instructions.
When the installation is finished, your Mac automatically restarts using Windows.
Follow the onscreen instructions to set up Windows.
Step 4: Install Boot Camp on Windows
After installing Windows, Boot Camp drivers that support your Mac hardware start installing.
Note: If the support software doesn’t install automatically, you need to install it manually. For instructions, see the Apple Support article If the Boot Camp installer doesn’t open after using Boot Camp Assistant.
In the Boot Camp installer in Windows, follow the onscreen instructions.
Important: Do not click the Cancel button in any of the installer dialogs.
If a message appears that says the software you’re installing has not passed Windows Logo testing, click Continue Anyway.
You don’t need to respond to installer dialogs that appear only briefly during installation, but if a dialog asks you to install device software, click Install.
If nothing appears to be happening, there may be a hidden window that you must respond to. Look behind open windows.
When the installation is complete, click Finish.
After your Mac restarts, follow the instructions for any other installers that appear.


