- Download and install Windows support software on your Mac
- Install the latest macOS updates
- Format a USB flash drive
- Download the Windows support software
- Install the Windows support software
- Learn more
- How to install the driver manually on MAC OS?
- Как вручную установить драйвер на MAC OS?
- Как исправить ошибку Kernel driver not installed (rc=-1908) в VirtualBox на macOS
- Installing the Driver on Mac OS X
- System Requirements
- Step 1: Download the Drill ODBC Driver
- Step 2: Install the Drill ODBC Driver
- Step 3: Check the Drill ODBC Driver Version
Download and install Windows support software on your Mac
After using Boot Camp Assistant to install or upgrade Microsoft Windows on your Mac, you might also need to install the latest Windows support software (drivers) from Apple.
When you install Microsoft Windows on your Mac, Boot Camp Assistant automatically opens the Boot Camp installer, which installs the latest Windows support software (drivers). If that doesn’t happen, or you experience any of the following issues while using Windows on your Mac, follow the steps in this article.
- Your Apple mouse, trackpad, or keyboard isn’t working in Windows.
Force Touch isn’t designed to work in Windows. - You don’t hear audio from the built-in speakers of your Mac in Windows.
- The built-in microphone or camera of your Mac isn’t recognized in Windows.
- One or more screen resolutions are unavailable for your display in Windows.
- You can’t adjust the brightness of your built-in display in Windows.
- You have issues with Bluetooth or Wi-Fi in Windows.
- You get an alert that Apple Software Update has stopped working.
- You get a message that your PC has a driver or service that isn’t ready for this version of Windows.
- Your Mac starts up to a black or blue screen after you install Windows.
If your Mac has an AMD video card and is having graphics issues in Windows, you might need to update your AMD graphics drivers instead.

Install the latest macOS updates
Before proceeding, install the latest macOS updates, which can include updates to Boot Camp.
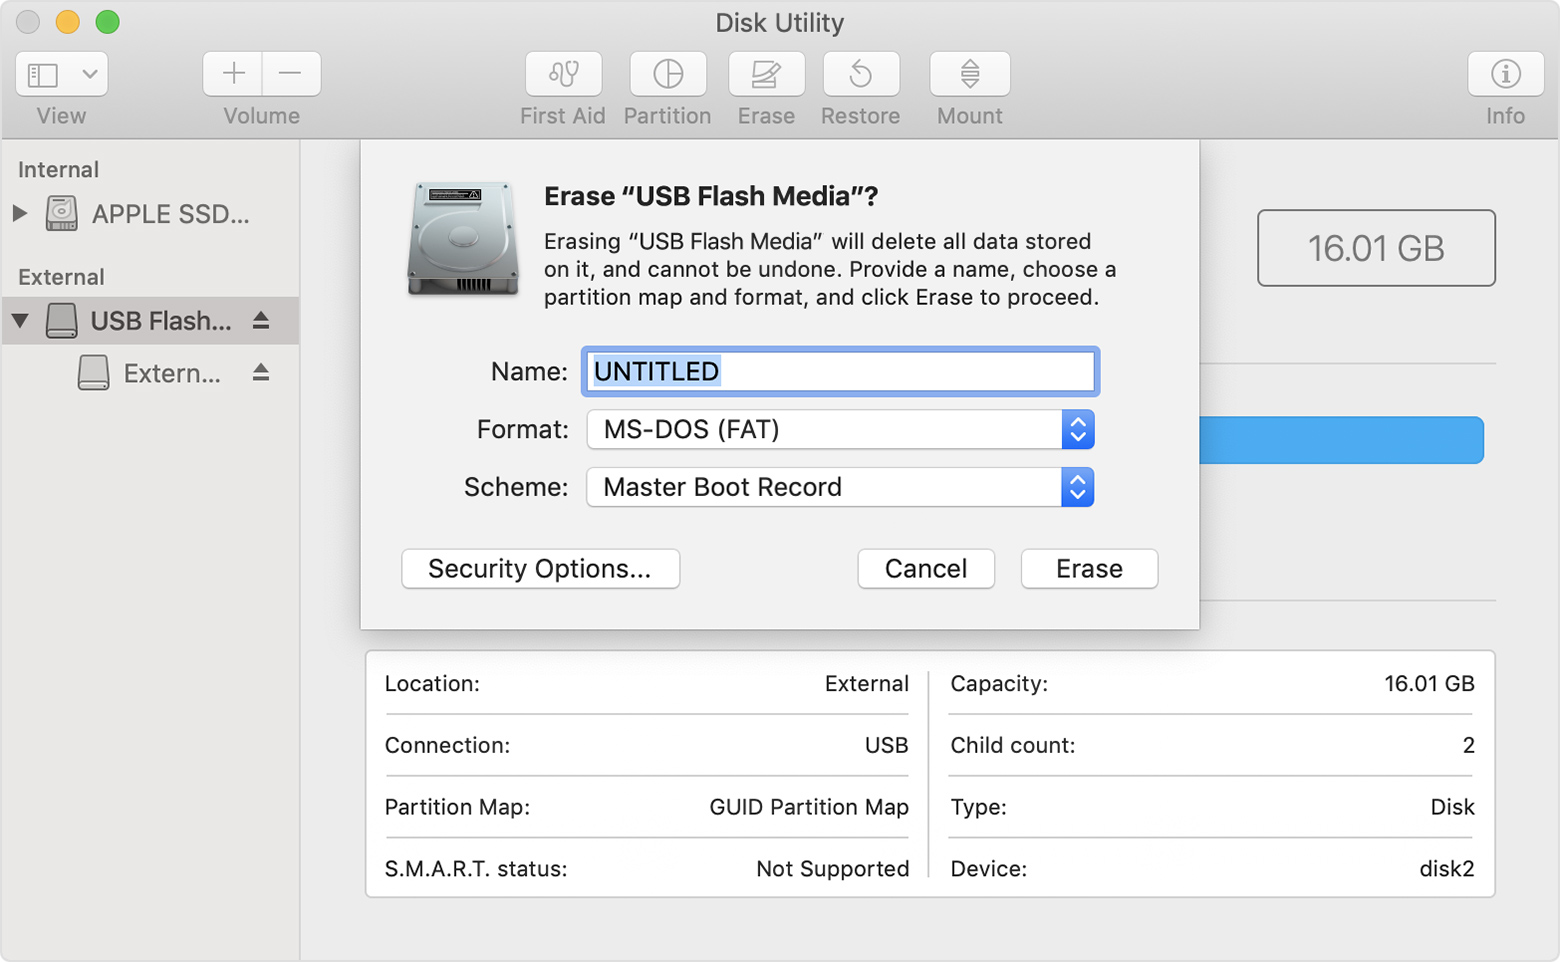
Format a USB flash drive
To install the latest Windows support software, you need a 16GB or larger USB flash drive formatted as MS-DOS (FAT).
- Start your Mac from macOS.
- Plug the USB flash drive into your Mac.
- Open Disk Utility, which is in the Utilities folder of your Applications folder.
- Choose View > Show All Devices from the menu bar.
- From the sidebar in Disk Utility, select your USB flash drive. (Select the drive name, not the volume name beneath it.)

- Click the Erase button or tab.
- Choose MS-DOS (FAT) as the format and Master Boot Record as the scheme.
- Click Erase to format the drive. When done, quit Disk Utility.
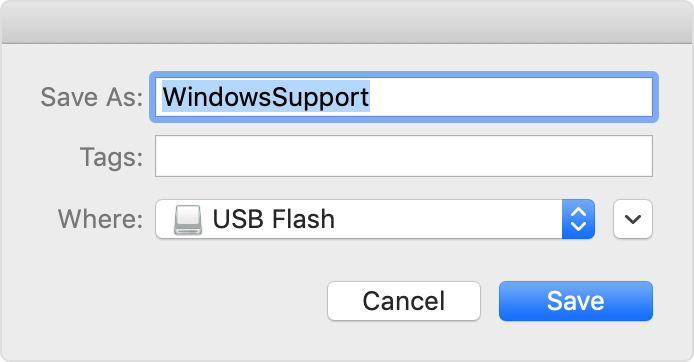
Download the Windows support software
- Make sure that your Mac is connected to the Internet.
- Open Boot Camp Assistant, which is in the Utilities folder of your Applications folder.
- From the menu bar at the top of your screen, choose Action > Download Windows Support Software, then choose your USB flash drive as the save destination. When the download completes, quit Boot Camp Assistant.
Install the Windows support software
After downloading the Windows support software to your flash drive, follow these steps to install the software. (If you’re attempting to resolve issues with a Bluetooth mouse or keyboard, it might be easier to use a USB mouse or keyboard until these steps are complete.)
- Make sure that the USB flash drive is plugged into your Mac.
- Start up your Mac in Windows.
- From File Explorer, open the USB flash drive, then open Setup or setup.exe, which is in the WindowsSupport folder or BootCamp folder. When you’re asked to allow Boot Camp to make changes to your device, click Yes.
- Click Repair to begin installation. If you get an alert that the software hasn’t passed Windows Logo testing, click Continue Anyway.
- After installation completes, click Finish, then click Yes when you’re asked to restart your Mac.
Learn more
If you can’t download or save the Windows support software:
- If the assistant says that the Windows support software could not be saved to the selected drive, or that the USB flash drive can’t be used, make sure that your USB flash drive has a storage capacity of at least 16GB and is formatted correctly.
- If the assistant doesn’t see your USB flash drive, click Go Back and make sure that the drive is connected directly to the USB port on your Mac—not to a display, hub, or keyboard. Disconnect and reconnect the drive, then click Continue.
- If the assistant says that it can’t download the software because of a network problem, make sure that your Mac is connected to the Internet.
- Make sure that your Mac meets the system requirements to install Windows using Boot Camp.
If a Mac feature still doesn’t work after updating the Windows support software, search for your symptom on the Apple support website or Microsoft support website. Some features of your Mac aren’t designed to work in Windows.
Information about products not manufactured by Apple, or independent websites not controlled or tested by Apple, is provided without recommendation or endorsement. Apple assumes no responsibility with regard to the selection, performance, or use of third-party websites or products. Apple makes no representations regarding third-party website accuracy or reliability. Contact the vendor for additional information.
Источник
How to install the driver manually on MAC OS?
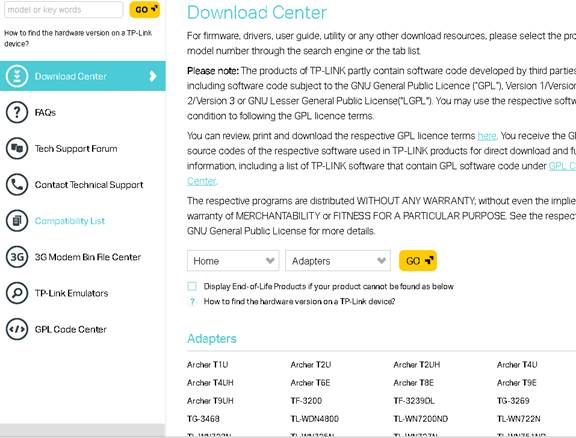
Before the installation, please go to Download Center to download the driver on the MAC, and plug the adapter into the computer.
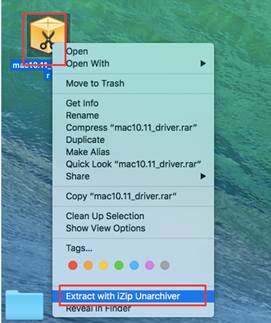
Note: If there already is a driver but it’s not working, you need to uninstall it first before installing the new driver. (Finder》 download》open the old driver we download before》click the un-install apk and run it to uninstall the driver)
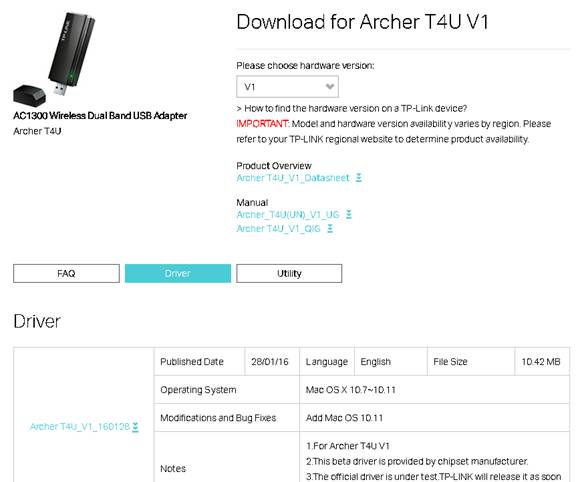
Let’s take Archer T4U for example.
Then please follow the steps below:
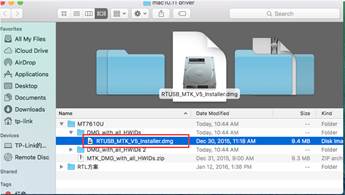
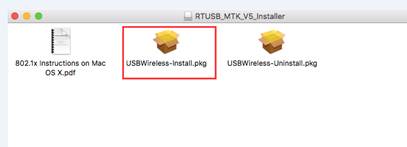
1.Please double click on the driver and extract it, then open the folder and run the pkg install file;
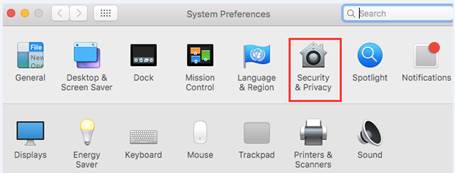
2.A warning message will pop up as the below. To solve this problem, please go to “System Preferences”, and “Security & Privacy”, then click “Open Anyway” to identify the driver.
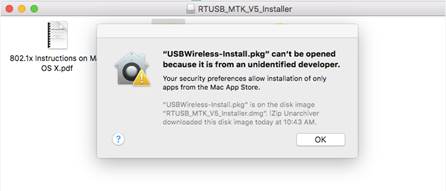
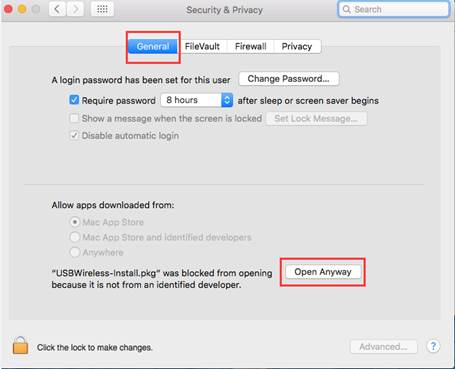
Note: if “Allow apps downloaded from” is “Anywhere”, the warning message won’t pop up.
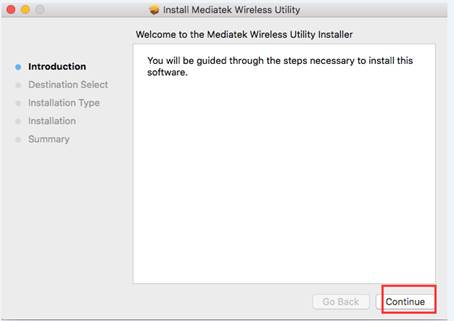
3.After the driver is being identified, it will be installed automatically. During the process, an authentication windows will pop up to ask for username and password, which is the administration account of your MAC (if you have no idea what it is or how to find it, please contact the Apple support for help.). Then please click “Install Software” to continue the process.
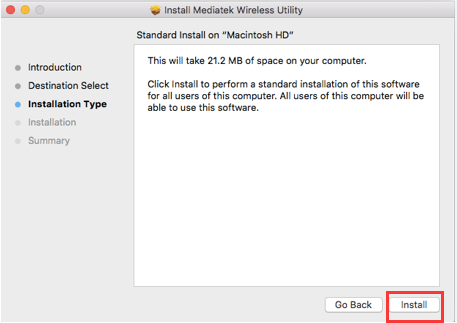

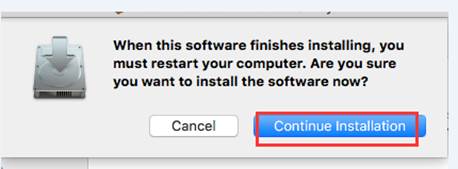
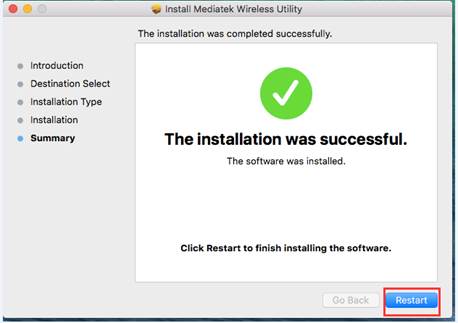
4.Now please click “Continue Installation” and “Restart” to finish the installation process.
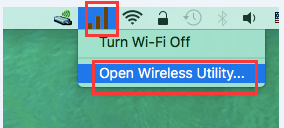
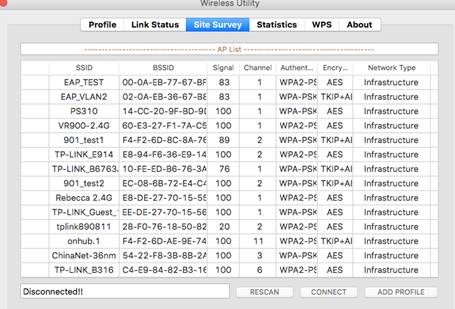
5.After MAC is rebooted, please click the Wi-Fi icon to “Open Wireless Utility”, then you can choose your Wi-Fi and connect it. (Note: it may take time for utility to search W i-Fi , please wait patiently for about 1 min.)
Источник
Как вручную установить драйвер на MAC OS?
Перед установкой загрузите драйвер на ваш MAC и подключите адаптер к компьютеру.
Следуйте указанным ниже инструкциям:
1.Разархивируйте архив с драйвером и запустите установочный файл.
2.Появится предупреждающее сообщение (как на изображении ниже). Для решения проблемы перейдите в раздел «Системные настройки», выберите «Безопасность и конфиденциальность», затем нажмите кнопку «Открыть в любом случае» для идентификации драйвера.
Примечание: если у параметра «Разрешить приложения, загруженные из» стоит значение «отовсюду», предупреждающее сообщение не появится.
3.После идентификации драйвера последний будет установлен автоматически. Во время этого процесса появится окно авторизации учетной записи, введите имя пользователя и пароль, используемые в вашем компьютере MAC (если вы не знаете, что это такое и как их найти, обратитесь в службу поддержки компании Apple для получения помощи). После нажмите на кнопку «Установить программное обеспечение», чтобы продолжить процесс.
4.Теперь нажмите «Продолжить установку» и «Перезагрузка», чтобы завершить процесс установки.
5.После перезагрузки MAC нажмите на значок Wi-Fi «Открыть Wireless Utility», где вы можете выбрать свою Wi-Fi сеть и подключиться к ней. (Примечание: этот процесс может занять некоторое время, пожалуйста, ожидайте в течение примерно 1 мин.)
Теперь вы сможете воспользоваться сетью Wi-Fi.
Источник
Как исправить ошибку Kernel driver not installed (rc=-1908) в VirtualBox на macOS
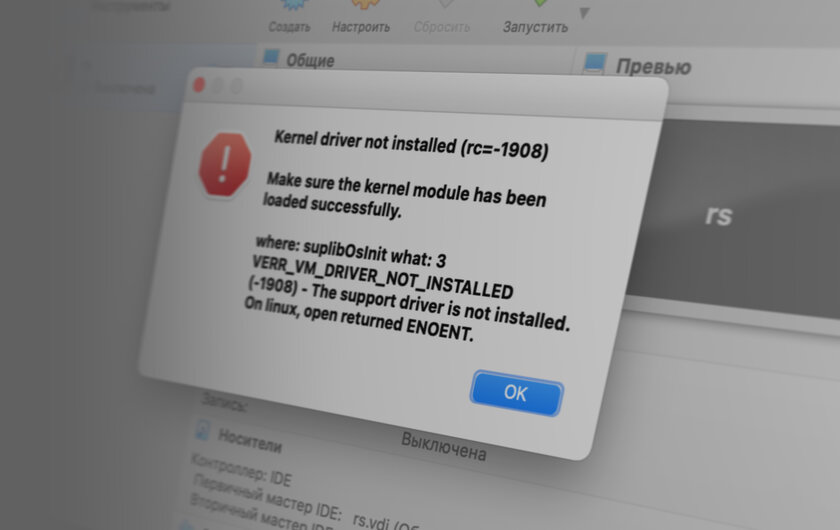
Пользователи macOS (в особенности Big Sur) сталкиваются со следующей ошибкой при использовании виртуализации VirtualBox от Oracle:
Kernel driver not installed (rc=-1908)
Make sure the kernel module has been loaded successfully.
where: suplibOsInit what: 3
VERR_VM_DRIVER_NOT_INSTALLED
(-1908) — The support driver is not installed.
On linux, open returned ENOENT.
Исправить эту ошибку крайне просто. Вероятнее всего, причина её возникновения в том, что на этапе установки VirtualBox вы проигнорировали уведомление о том, что в настойках нужно предоставить одно из разрешений:
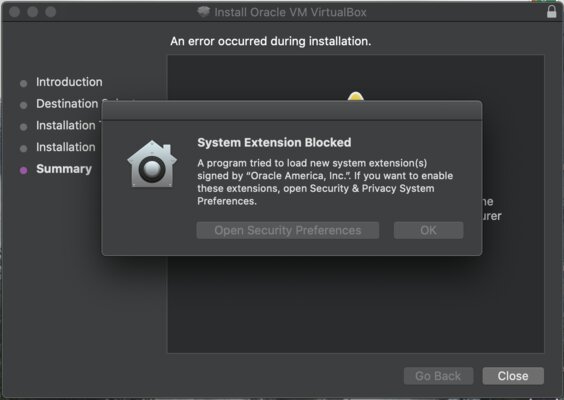
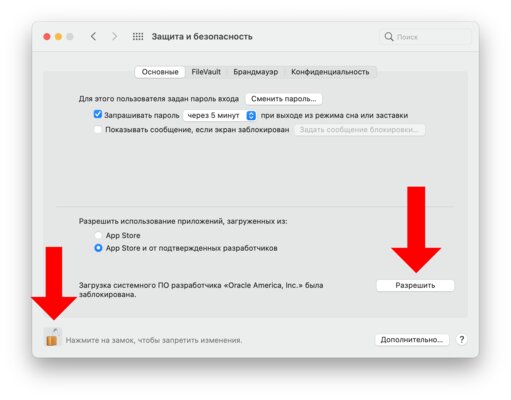
Чтобы исправить это, перейдите в «Системные настройки» macOS, откройте раздел «Защита и безопасность». В нём снимите замок в левом нижнем углу, а затем кликните на кнопку «Разрешить» рядом с появившемся пунктом «Загрузка системного ПО разработчика „Oracle America, Inc.” была заблокирована».
Если этого пункта у вас нет, попробуйте переустановить VirtualBox.
Источник
Installing the Driver on Mac OS X
Install the Drill ODBC Driver on the machine from which you connect to the Drill service.
Install the Drill ODBC Driver on a system that meets the system requirements. Complete the following steps, described in detail in this document:
System Requirements
To install the driver, you need Administrator privileges on the computer.
- Mac OS X version 10.9, 10.10, or 10.11
- 100 MB of available disk space
- iODBC 3.52.7 or later
The iodbc-config file in the /usr/local/iODBC/bin includes the version of the driver.
The client must be able to resolve the actual host name of the Drill node or nodes from the IP address. Verify that a DNS entry was created on the client machine for the Drill node or nodes. If not, create an entry in /etc/hosts for each node in the following format: .
Example: 127.0.0.1 localhost
Step 1: Download the Drill ODBC Driver
To download ODBC drivers that support both 32- and 64-bit client applications, click Drill ODBC Driver for Mac.
Step 2: Install the Drill ODBC Driver
To install the driver, complete the following steps:
- Double-click MapR Drill 1.3.dmg to mount the disk image.
- Double-click MapRDrillODBC.pkg to run the Installer.
- Follow the instructions in the Installer to complete the installation process.
- When the installation completes, click Close.
Drill ODBC Driver files install in the following locations:
- /Library/mapr/drill/ErrorMessages – Error messages files directory
- /Library/mapr/drill/Setup – Sample configuration files directory
- /Library/mapr/drill/lib – Binaries directory
Step 3: Check the Drill ODBC Driver Version
To check the version of the driver you installed, use the following command on the terminal command line:
Источник


