- Установка Anaconda в Ubuntu
- Установка Anacoda в Ubuntu
- 1. Скачивание и установка программы
- 2. Обновление Anaconda
- 3. Окружения Conda
- 4. Установка пакетов Conda
- Удаление Anaconda
- Выводы
- Installing Anaconda on Linux
- Installing Anaconda on Linux
- Steps:
- 1. Visit the Anaconda downloads page
- 2. Select Linux
- 3. Copy the bash (.sh file) installer link
- 4. Use wget to download the bash installer
- 5. Run the bash script to install Anaconda3
- 6. source the .bash-rc file to add Anaconda to your PATH
- 7. Start the Python REPL
- How to install Anaconda on Linux?
- Downloading and installing Anaconda:
- Working with Anaconda:
- How to Install Anaconda on Ubuntu 18.04 and 20.04
- Steps For Installing Anaconda
- Step 1: Update Local Package Manager
- Step 2: Download the Latest Version of Anaconda
- Step 3: Verify the Download Checksum
- Step 4: Run Anaconda Installation Script
- (Optional) Step 5: Install VSCode Editor
- Step 6: Activate and Test Installation
- How to Update Anaconda on Ubuntu
- Create and Activate Anaconda Environments
Установка Anaconda в Ubuntu
Anaconda — это очень популярный дистрибутив Python, который содержит удобный пакетный менеджер Conda, несколько предустановленных версий Python (2.7, 3.4 и 3.7), а также среду разработки IDLE Spider и множество библиотек, которые очень просто установить. Ещё здесь есть библиотеки для обработки Big Data, прогнозной аналитики и научных вычислений. Также можно всем управлять через графическую утилиту Anaconda Navigator.
В этой статье мы рассмотрим, как скачать и установить Anaconda Python Ubuntu 18.04 с официального сайта программы, а также как подготовить эту платформу к работе.
Установка Anacoda в Ubuntu
1. Скачивание и установка программы
Сначала нужно скачать установщик платформы с официального сайта. На момент написания статьи самая свежая версия программы — 2019.03. Нажмите кнопку Download, а затем выберите операционную систему Linux:

Вы можете скачать программу прямо в браузере или скопировать ссылку для загрузки через wget. Например, для текущей версии команда будет выглядеть так:

Поскольку это достаточно большой файл, после завершения загрузки желательно проверить его по контрольной суме. Найти контрольную сумму загруженного файла можно командой:
Затем её нужно сравнить с сумой, указанной на этой странице для вашей версии программы. Если полученные значения совпадают, значит всё правильно.

Далее запустите полученный скрипт:
На первом шаге установки нажмите Enter, затем наберите yes, чтобы принять лицензионное соглашение:

Далее нужно выбрать папку, куда будет установлена программа:

Затем пойдёт установка Anaconda 3 Ubuntu. Процесс установки займёт некоторое время.

В конце установки программа предложит изменить
/.bashrc таким образом, чтобы Сonda запускалась автоматически при запуске терминала. Если вы не сделали это во время установки, то это можно выполнить потом командой:
conda init bash
Затем выполните следующую команду, чтобы система перечитала настройки:
Теперь вы можете проверить, всё ли работает, выполнив такую команду:

На этом установка Anaconda Ubuntu завершена.
2. Обновление Anaconda
Обновление Anaconda тоже достаточно просто выполнить. Сначала нужно обновить инструмент conda. Для этого выполните:
conda update conda
На вопросы программы отвечайте y. Когда обновление завершится, можно обновить саму Anaconda 3:
conda update anaconda
Аналогично предыдущему пункту, нажмите y, чтобы продолжить обновление.
3. Окружения Conda
Как я уже сказал, Сonda — это пакетный менеджер, а также это менеджер окружений. Вы можете создать несколько окружений с разными версиями Python, а также с разными установленными в них библиотеками. Посмотреть список доступных окружений можно командой:
conda info —envs

Для активации окружения используется команда activate. Например, сделаем активным окружение base:
conda activate base
Также вы можете создать новое окружение с другой версией Python. Например, сделаем окружение с Python 3.5:
conda create —name ptn35env python=3.5
Программа создаст окружение и сообщит, какие пакеты ей надо установить, соглашаемся на установку:

Затем активируем нужное окружение:
conda activate ptn35env

Чтобы деактивировать текущее окружение, используйте команду deactivate:
Чтобы удалить окружение ptn35env, нужно использовать не команду uninstall, а remove:
conda remove —name ptn35env -all
4. Установка пакетов Conda
Посмотреть список установленных пакетов можно командой list:

Чтобы найти нужный пакет, используйте search, например, ищем пакетный менеджер Python — pip:
comda search pip

А для установки пакета используйте install. Например, установим tensorflow:
conda install tensorflow

Удалить пакет можно командой remove:
conda remove tensorflow
Удаление Anaconda
Чтобы удалить Anaconda из своей системы, достаточно выполнить следующие команды:
/.bashrc и удалите оттуда строки, добавленные Anaconda, обычно, находятся между тегами conda initialize:

Затем удалите скрытые папки с дополнительными файлами и конфигурацией платформы:
Выводы
Теперь установка Anaconda в Ubuntu завершена. Вы можете начать пользоваться пакетным менеджером Conda, использовать виртуальные окружения в Python и легко устанавливать пакеты. Мы разобрали только основы использования conda, чтобы изучить программу лучше, читайте официальную документацию.
Источник
Installing Anaconda on Linux
Installing Anaconda on Linux
This section details the installation of the Anaconda distribution of Python on Linux, specifically Ubuntu 18.04, but the instructions should work for other Debian-based Linux distributions as well.
Ubuntu 18.04 comes pre-installed with Python (Version 3.6) and legacy Python (Version 2.7). You can confirm the legacy version of Python is installed by opening up a terminal.
In the terminal type:
You will most likely see Python Version 2.7 is installed. If you enter:
You will most likely see Python Version 3.6 is also installed. You can use the 3.6 Version of Python, but each time a new package needs to be downloaded, the $ pip3 install command must be used.
Install the Anaconda distribution of Python to follow the examples in the book without the need to install additional third-party packages.
Steps:
Copy the bash (.sh file) installer link
Use wget to download the bash installer
Run the bash script to install Anaconda3
source the .bash-rc file to add Anaconda to your PATH
Start the Python REPL
1. Visit the Anaconda downloads page
2. Select Linux
On the downloads page, select the Linux operating system

3. Copy the bash (.sh file) installer link
In the Python 3.6 Version* box, right-click on the [64-Bit(x86) Installer] link. Select .
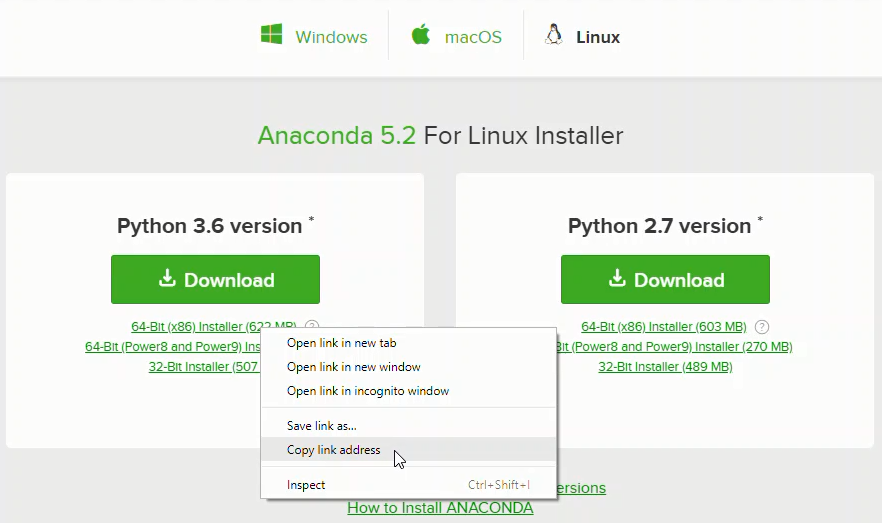
4. Use wget to download the bash installer
Now that the bash installer (.sh file) link is stored on the clipboard, use wget to download the installer script. In a terminal, cd into the home directory and make a new directory called tmp . cd into tmp and use wget to download the installer. Although the installer is a bash script, it is still quite large and the download will not be immediate (Note the link below includes . the specific release depends on when you download the installer).
5. Run the bash script to install Anaconda3
With the bash installer script downloaded, run the .sh script to install Anaconda3. Ensure you are in the directory where the installer script downloaded:
Run the installer script with bash.
Accept the Licence Agreement and allow Anaconda to be added to your PATH . By adding Anaconda to your PATH , the Anaconda distribution of Python will be called when you type $ python in a terminal.
6. source the .bash-rc file to add Anaconda to your PATH
Now that Anaconda3 is installed and Anaconda3 is added to our PATH , source the .bashrc file to load the new PATH environment variable into the current terminal session. Note the .bashrc file is in the home directory. You can see it with $ ls -a .
7. Start the Python REPL
To verify the installation is complete, open Python from the command line:
If you see Python 3.6 from Anaconda listed, your installation is complete. To exit the Python REPL, type:
Источник
How to install Anaconda on Linux?
Anaconda is an open-source software that contains Jupyter, spyder, etc that are used for large data processing, data analytics, heavy scientific computing. Anaconda works for R and python programming language. Spyder(sub-application of Anaconda) is used for python. Opencv for python will work in spyder. Package versions are managed by the package management system called conda.
To begin working with Anaconda, one must get it installed first. Follow the below instructions to Download and install Anaconda on your system:
Attention geek! Strengthen your foundations with the Python Programming Foundation Course and learn the basics.
To begin with, your interview preparations Enhance your Data Structures concepts with the Python DS Course. And to begin with your Machine Learning Journey, join the Machine Learning — Basic Level Course
Downloading and installing Anaconda:
Head over to anaconda.com and install the latest version of Anaconda. Make sure to download the “Python 3.7 Version” for the appropriate architecture.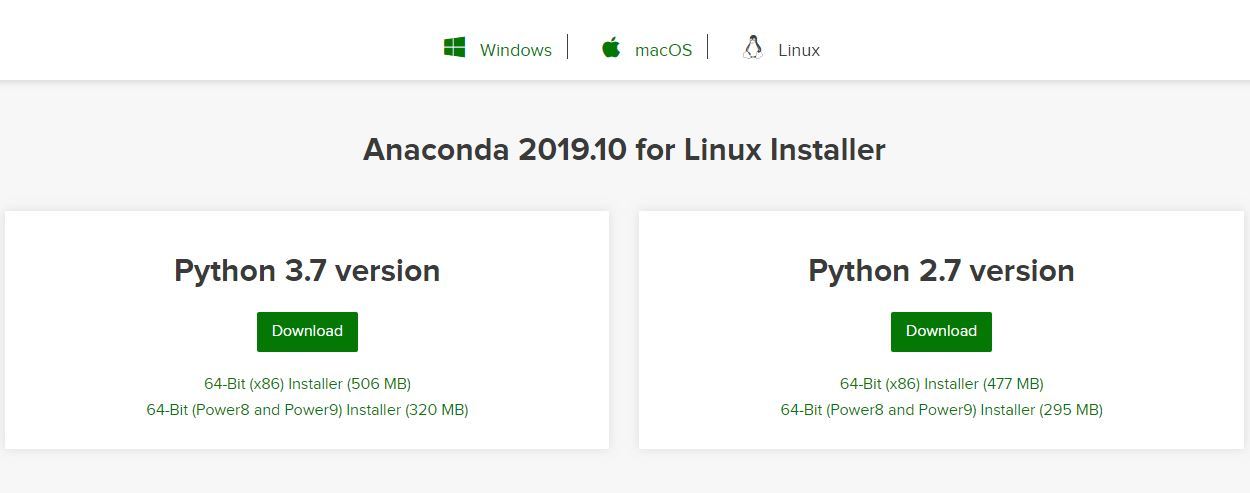
Begin with the installation process:
- Getting Started:

- Getting through the License Agreement:
- Choose Installation Location:
- Extracting Files and packages:
- Initializing Anaconda Installation:
- Finishing up the Installation:


Working with Anaconda:
Once the installation process is done, Anaconda can be used to perform multiple operations. To begin using Anaconda, use the following command to start Anaconda Navigator:
Источник
How to Install Anaconda on Ubuntu 18.04 and 20.04
Home » SysAdmin » How to Install Anaconda on Ubuntu 18.04 and 20.04
Anaconda is a package manager used in scientific computing and data science. It’s designed to provide scientific libraries and dependencies in the Python programming language. Anaconda is commonly used for machine learning and artificial intelligence applications.
This step by step guide will show you how to install Anaconda on an Ubuntu 18.04 or Ubuntu 20.04 system.

Note: This guide is also available for CentOS 7 or CentOS 8.
- A user account with sudo privileges
- Access to a command line/terminal window (Ctrl-Alt-T)
Steps For Installing Anaconda
Our tutorial on installing Anaconda on Ubuntu 18.04 or Ubuntu 20.04 includes downloading the latest version, verifying data integrity of the installer, and running the bash install script.
Step 1: Update Local Package Manager
Start by updating the local package manager. Open a terminal window and enter the following:
If your system doesn’t have curl, install it by entering:
Step 2: Download the Latest Version of Anaconda
At the time this article was written, the latest version of Anaconda is 2020.02. Check the developer’s download page to view the newest version.
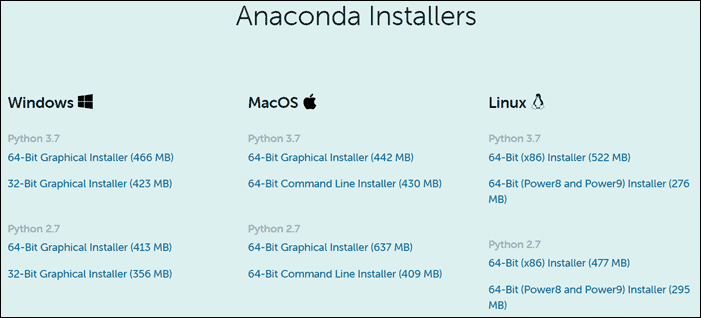
Note the URL and use it to download the correct version.
Switch to the /tmp directory and use curl to download the installer using your command terminal:
This version is designed for Python 3.7. If you are using Python 2.7, use the appropriate URL.
Step 3: Verify the Download Checksum
Checksum is a security tool used to verify the authenticity and integrity of a downloaded script.
Enter the following:
Your system will display a series of letters and numbers:
Compare those to the appropriate checksum (or hash) in the Anaconda documentation. If you have chosen a different version, make sure to check the documentation for that version’s checksum.
Step 4: Run Anaconda Installation Script
The Anaconda installer is a bash script. To run the installation script, use the command:
A license agreement will appear. Use the Enter key to review the agreement.

At the bottom, type yes to agree to the terms.
The installer will prompt you to accept the default location, or install to a different location. Use the default path unless you have a specific need to change it. (You may cancel the installation here if needed.)

The installation will finish. After sucessful installation, the following will appear:
This determines if you want to use the conda command without changing the directory. Type yes and hit enter, unless you have a specific need to do otherwise. The system will respond as follows:
(Optional) Step 5: Install VSCode Editor
The system will ask if you want to install Microsoft Visual Studio Code Editor. It will display the following:
Decide by typing yes or no to continue.
Step 6: Activate and Test Installation
Once finished, activate the installation by entering:
Use the conda command to test the installation:
The system should display a list of data similar to:
How to Update Anaconda on Ubuntu
To update Anaconda on Ubuntu, start by updating the conda utility:
Next, run the Anaconda package update command:
Create and Activate Anaconda Environments
Create a Python 3 environment named test_environment by entering the following:
Activate this environment:
The command prompt will change. This indicates that you are now in a shell environment using Python 3. You can now work in this environment.
You now have a working Anaconda installation on your Ubuntu System for use within your Python environment.
Get started with scientific computing, data processing, and predictive analytics with over 1,500 open source packages available from its repository.
You can also install Python independently by following our step by step guide on installing Python 3.7 on Ubuntu 18.04.
Источник


