- Installation guide
- Contents
- Pre-installation
- Acquire an installation image
- Verify signature
- Prepare an installation medium
- Boot the live environment
- Set the console keyboard layout
- Verify the boot mode
- Connect to the internet
- Update the system clock
- Partition the disks
- Example layouts
- Format the partitions
- Mount the file systems
- Installation
- Select the mirrors
- Install essential packages
- Configure the system
- Fstab
- Chroot
- Time zone
- Localization
- Network configuration
- Initramfs
- Root password
- Boot loader
- Reboot
- Post-installation
- Installation
- Contents
- Minimal Hardware Requirements
- Installation Overview
- The general course of action
- Diskless Mode
- Data Disk Mode
- System Disk Mode
- Additional Details
- Verifying the downloaded image-file
- Flashing (direct data writing) the installation image-file onto a device or media
- Unix/Linux
- Windows
- Verifying the written installation media
- Booting from external devices
- Custom partitioning of the harddisk
- Questions asked by setup-alpine
- Preparing for the first boot
- Rebooting and testing the new system
- Completing the installation
- Additional Documentation
- Installing
- Post-Install
- Additional Help and Information
- Other Guides
Installation guide
This document is a guide for installing Arch Linux using the live system booted from an installation medium made from an official installation image. The installation medium provides accessibility features which are described on the page Install Arch Linux with accessibility options. For alternative means of installation, see Category:Installation process.
Before installing, it would be advised to view the FAQ. For conventions used in this document, see Help:Reading. In particular, code examples may contain placeholders (formatted in italics ) that must be replaced manually.
For more detailed instructions, see the respective ArchWiki articles or the various programs’ man pages, both linked from this guide. For interactive help, the IRC channel and the forums are also available.
Arch Linux should run on any x86_64-compatible machine with a minimum of 512 MiB RAM, though more memory is needed to boot the live system for installation.[1] A basic installation should take less than 2 GiB of disk space. As the installation process needs to retrieve packages from a remote repository, this guide assumes a working internet connection is available.
Contents
Pre-installation
Acquire an installation image
Visit the Download page and, depending on how you want to boot, acquire the ISO file or a netboot image, and the respective GnuPG signature.
Verify signature
It is recommended to verify the image signature before use, especially when downloading from an HTTP mirror, where downloads are generally prone to be intercepted to serve malicious images.
On a system with GnuPG installed, do this by downloading the PGP signature (under Checksums in the Download page) to the ISO directory, and verifying it with:
Alternatively, from an existing Arch Linux installation run:
Prepare an installation medium
The installation image can be supplied to the target machine via a USB flash drive, an optical disc or a network with PXE: follow the appropriate article to prepare yourself an installation medium from the chosen image.
Boot the live environment
- Point the current boot device to the one which has the Arch Linux installation medium. Typically it is achieved by pressing a key during the POST phase, as indicated on the splash screen. Refer to your motherboard’s manual for details.
- When the installation medium’s boot loader menu appears, select Arch Linux install medium and press Enter to enter the installation environment.
To switch to a different console—for example, to view this guide with Lynx alongside the installation—use the Alt+arrow shortcut. To edit configuration files, mcedit(1) , nano and vim are available. See packages.x86_64 for a list of the packages included in the installation medium.
Set the console keyboard layout
The default console keymap is US. Available layouts can be listed with:
To modify the layout, append a corresponding file name to loadkeys(1) , omitting path and file extension. For example, to set a German keyboard layout:
Console fonts are located in /usr/share/kbd/consolefonts/ and can likewise be set with setfont(8) .
Verify the boot mode
To verify the boot mode, list the efivars directory:
If the command shows the directory without error, then the system is booted in UEFI mode. If the directory does not exist, the system may be booted in BIOS (or CSM) mode. If the system did not boot in the mode you desired, refer to your motherboard’s manual.
Connect to the internet
To set up a network connection in the live environment, go through the following steps:
- Ensure your network interface is listed and enabled, for example with ip-link(8) :
- For wireless and WWAN, make sure the card is not blocked with rfkill.
- Connect to the network:
- Ethernet—plug in the cable.
- Wi-Fi—authenticate to the wireless network using iwctl.
- Mobile broadband modem—connect to the mobile network with the mmcli utility.
- Configure your network connection:
- DHCP: dynamic IP address and DNS server assignment (provided by systemd-networkd and systemd-resolved) should work out of the box for Ethernet, WLAN and WWAN network interfaces.
- Static IP address: follow Network configuration#Static IP address.
- The connection may be verified with ping:
Update the system clock
Use timedatectl(1) to ensure the system clock is accurate:
To check the service status, use timedatectl status .
Partition the disks
When recognized by the live system, disks are assigned to a block device such as /dev/sda , /dev/nvme0n1 or /dev/mmcblk0 . To identify these devices, use lsblk or fdisk.
Results ending in rom , loop or airoot may be ignored.
The following partitions are required for a chosen device:
If you want to create any stacked block devices for LVM, system encryption or RAID, do it now.
Use fdisk or parted to modify partition tables. For example:
Example layouts
| Mount point | Partition | Partition type | Suggested size |
|---|---|---|---|
| [SWAP] | /dev/swap_partition | Linux swap | More than 512 MiB |
| /mnt | /dev/root_partition | Linux | Remainder of the device |
| Mount point | Partition | Partition type | Suggested size |
|---|---|---|---|
| /mnt/boot or /mnt/efi 1 | /dev/efi_system_partition | EFI system partition | At least 260 MiB |
| [SWAP] | /dev/swap_partition | Linux swap | More than 512 MiB |
| /mnt | /dev/root_partition | Linux x86-64 root (/) | Remainder of the device |
- /mnt/efi should only be considered if the used boot loader is capable of loading the kernel and initramfs images from the root volume. See the warning in Arch boot process#Boot loader.
Format the partitions
Once the partitions have been created, each newly created partition must be formatted with an appropriate file system. For example, to create an Ext4 file system on /dev/root_partition , run:
If you created a partition for swap, initialize it with mkswap(8) :
Mount the file systems
Mount the root volume to /mnt . For example, if the root volume is /dev/root_partition :
Create any remaining mount points (such as /mnt/efi ) using mkdir(1) and mount their corresponding volumes.
If you created a swap volume, enable it with swapon(8) :
genfstab(8) will later detect mounted file systems and swap space.
Installation
Select the mirrors
Packages to be installed must be downloaded from mirror servers, which are defined in /etc/pacman.d/mirrorlist . On the live system, after connecting to the internet, reflector updates the mirror list by choosing 20 most recently synchronized HTTPS mirrors and sorting them by download rate.[2]
The higher a mirror is placed in the list, the more priority it is given when downloading a package. You may want to inspect the file to see if it is satisfactory. If it is not, edit the file accordingly, and move the geographically closest mirrors to the top of the list, although other criteria should be taken into account.
This file will later be copied to the new system by pacstrap, so it is worth getting right.
Install essential packages
Use the pacstrap(8) script to install the base package, Linux kernel and firmware for common hardware:
The base package does not include all tools from the live installation, so installing other packages may be necessary for a fully functional base system. In particular, consider installing:
- userspace utilities for the management of file systems that will be used on the system,
- utilities for accessing RAID or LVM partitions,
- specific firmware for other devices not included in linux-firmware (e.g. sof-firmware for sound cards),
- software necessary for networking,
- a text editor,
- packages for accessing documentation in man and info pages: man-db , man-pages and texinfo .
To install other packages or package groups, append the names to the pacstrap command above (space separated) or use pacman while chrooted into the new system. For comparison, packages available in the live system can be found in packages.x86_64.
Configure the system
Fstab
Generate an fstab file (use -U or -L to define by UUID or labels, respectively):
Check the resulting /mnt/etc/fstab file, and edit it in case of errors.
Chroot
Change root into the new system:
Time zone
Run hwclock(8) to generate /etc/adjtime :
This command assumes the hardware clock is set to UTC. See System time#Time standard for details.
Localization
Edit /etc/locale.gen and uncomment en_US.UTF-8 UTF-8 and other needed locales. Generate the locales by running:
Network configuration
Add matching entries to hosts(5) :
If the system has a permanent IP address or a fully qualified domain name, see the example in Network configuration#Local hostname resolution.
Complete the network configuration for the newly installed environment, that may include installing suitable network management software.
Initramfs
Creating a new initramfs is usually not required, because mkinitcpio was run on installation of the kernel package with pacstrap.
For LVM, system encryption or RAID, modify mkinitcpio.conf(5) and recreate the initramfs image:
Root password
Boot loader
Choose and install a Linux-capable boot loader. If you have an Intel or AMD CPU, enable microcode updates in addition.
Reboot
Exit the chroot environment by typing exit or pressing Ctrl+d .
Optionally manually unmount all the partitions with umount -R /mnt : this allows noticing any «busy» partitions, and finding the cause with fuser(1) .
Finally, restart the machine by typing reboot : any partitions still mounted will be automatically unmounted by systemd. Remember to remove the installation medium and then login into the new system with the root account.
Post-installation
See General recommendations for system management directions and post-installation tutorials (like creating unprivileged user accounts, setting up a graphical user interface, sound or a touchpad).
For a list of applications that may be of interest, see List of applications.
Источник
Installation

This page explains the basics to get started. But before actually installing, it can also help to skim through the Frequenty Asked Questions (FAQ).
If something isn’t correct (anymore), or still incomplete, you will have to try figuring it out, or ask for the correct solution in the community.
And then carefully edit the wiki page.
Just as those before you did it for you.
Contents
Minimal Hardware Requirements
- At least 100 MB of RAM. [A graphical desktop system may require up to 1 GB minimum.]
- At least 0-700 MB space on a writable storage device. [Only required in «sys» or «data» mode installations (explained below). It is optional in «diskless» mode, only needed to save newer data and configurations states of a running system.]
For more information please check Requirements
Installation Overview
The general course of action
[Note: For single-board-computer (SBC) architectures which can not boot .iso images, see Alpine on ARM for peculiarities.]
As usual, the regular installation procedure starts with three basic steps (additional details for all the steps follow below):
1.) Downloading and verifying the proper stable-release ISO installation image-file for the computer’s architecture, and the corresponding sha256 (checksum) and GPG (signature) files.
2.) Either burning the ISO image-file onto a blank CD/DVD/Blu-ray disk with disk burning software, or flashing the installation image onto a bootable storage device (USB-device, CF-/MMC-/SD-card, floppy, . ).
3.) Booting the computer from the prepared disk or storage device.
The boot process copies the entire operating system into the RAM memory, then runs it from there, after which, the command line environment does not depend on reading from the (possibly slow) initial boot media.
Log-in is possible as the user root . Initially, the root user has no password.
An interactive script named setup-alpine is available at the command prompt to configure and install the initial Alpine Linux system.
The setup-alpine question-and-answer dialog can configure installations that boot into one of three different Alpinelinux disk modes, «diskless», «data», and «sys». These are explained in more detail in the following subsections. However, a newly installed system may always be configured into a fully usable, standalone, «diskless» live-system by runing setup-alpine and answering «none» when asked for the disk to use, where to store configs, and the location for the package cache.
Once a «diskless» system is configured by running setup-alpine , it’s possible to use the apk package manager to install any desired tool that may be missing in the live system to configure available hardware.
Specific hardware configuration may be desired, for example, for available disk drives. e.g. If you need to install a custom partition or filesystem scheme, and if the installation should not use and/or overwrite the entire disk (details below).
After the desired adjustments have been made using the «diskless» system, setup-lbu and setup-apkcache may be run to add persistent configuration and package cache storage to the running «diskless» system. After that, the system state may be saved with lbu commit . Or, setup-disk may be run to add a «data» mode partition, or do a classic full install of the «diskless» system onto a «sys» disk or partition.
More setup-scripts are available to configure other specifics. They may be run separately to set up a system, or to adjust only specific parts later. For example, to set up a graphical environment (covered in Post-Install below).
Diskless Mode
This is the default boot mode of the .iso images. setup-alpine configures this if «disk=none» is selected during installation. It means the entire operating system and all applications are loaded into, then run from, RAM. This is extremely fast and can save on unnecessary disk spin-ups, power, and wear. It is similar to what is called a «frugal» install running with the «toram» option as with some other distros, but without the need to remaster the install media.
Custom configurations and package selections may be preserved across reboots with the Alpine local backup tool lbu . It enables committing and reverting system states using .apkovl files that are saved to writable storage and loaded when booting. If additional or updated packages have been added to the system, these may also be made available for automatic (re)installation during the boot phase, by enabling a local package cache on the writable storage.
[FIXME-1: Storing local configs and the package cache on an internal disk still requires some manual steps to have the partition listed, i.e. making a /etc/fstab entry, mountpoint, and mount, *before* running setup-alpine. And requires manually committing the configuration to disk afterwards.]
To allow for local backups, setup-alpine can be told to store the configs and the package cache on a writable partition. (Later, directories on that same partition or another available partition may also be mounted as /home, or for important applications, e.g. to keep their run-time and user data on it.)
The boot device of the newly configured local «diskless» system may remain the initial (and possibly read-only) installation media. But it is also possible to copy the boot system to a partition (e.g. /dev/sdXY) with setup-bootable .
Data Disk Mode
This mode also runs from system RAM, thus it enjoys the same accelerated operation speed as «diskless» mode. However, swap storage and the entire /var directory tree get mounted from a persistent storage device (two newly created partitions). The directory /var holds e.g. all log files, mailspools, databases, etc., as well as lbu backup commits and the package cache. This mode is useful for having RAM accelerated servers with variable amounts of user-data that exceed the available RAM size. It enables the entire current system state (not just the boot state) to survive a system crash in accordance with the particular filesystem guarantees.
[FIXME-2: Setup-alpine can not yet configure storage of the lbu configs to the «data disk» after selecting one. It’s still necessary to first select to save configs to «none» in setup-alpine (the new data partition is not listed), and to manually edit /etc/lbu/lbu.conf to set e.g. LBU_MEDIA=sdXY, then execute a corresponding echo «/dev/sdXY /media/sdXY vfat rw 0 0» >> /etc/fstab afterwards, and save the config with lbu commit to have the partition (here, denoted as sdXY) mounted when booting.]
In data disk mode, the boot device may also remain the initial (and possibly read-only) installation media, or be copied to a partition (e.g. /dev/sdXY) with setup-bootable .
System Disk Mode
This is a traditional hard-disk install.
If this mode is selected, the setup-alpine script creates three partitions on the selected storage device, /boot , swap and / (the filesystem root). This mode may, for example, be used for generic desktop and development machines.
To install along side another operating systems, see Installing_Alpine_on_HDD_dualbooting.
Additional Details

This «Additional Details» section needs to be consolidated with the work at https://docs.alpinelinux.org (not finished) (Restructuring things there, moving and linking from here or there?).
Verifying the downloaded image-file
| OS type | SHA256 check | SHA256 calculation (to be compared manually) | GPG signature verification |
|---|---|---|---|
| Linux | sha256sum -c alpine-*.iso.sha256 | curl https://alpinelinux.org/keys/ncopa.asc | gpg —import ; |
gpg —verify alpine- .iso.asc alpine- .iso
Flashing (direct data writing) the installation image-file onto a device or media
Unix/Linux
Under Unix (and thus Linux), «everything is a file» and the data in the image-file can be written to a device or media with the dd command. Afterward, executing the eject command removes the target device from the system and ensures the write cache is completely flushed.
Be careful to correctly identify the target device as any data on it will be lost! All connected «bulk storage devices» can be listed with lsblk and blkid .
For example, if /dev/sdX is the desired target device, first make sure you un-mount all mounted partitions of the target device. For example sdX1 and sdX2:
For dd ‘s output-file ( of= ), however, do not specify a partition number. For example, write to sdX, not sdX1:
Warning: This will overwrite the target device /dev/sdX, so before executing, make sure you have a backup of the data if you can’t afford to lose it.
Windows
For example, there is the Rufus program. Rufus will enable you to create bootable USB flash drives under Windows.
Rufus has been tested and works for Alpine Linux 3.12.x with the following settings:
- Partition scheme: MBR
- Target system: BIOS or UEFI
- File system: FAT32
- Cluster size: 4096 bytes (default)
Verifying the written installation media
After detaching and re-attaching the device, a bit-wise comparison can verify the data written to the device (instead of just data buffered in RAM). If the comparison terminates with an end-of-file error on the .iso file side, all the contents from the image have been written (and re-read) successfully:
Booting from external devices
Insert the boot media to a proper drive or port of the computer and turn the machine on, or restart it, if already running.
If the computer does not automatically boot from the desired device, one needs to bring up the boot menu and choose the media to boot from. Depending on the computer, the menu may be accessed by repeatedly pressing a key quickly when booting starts. Some computers require that you press the button before starting the computer and hold it down while the computer boots. Typical keys are: `F9`-`F12`, sometimes `F7` or `F8`. If these don’t bring up the boot menu, it may be necessary to enter the BIOS configuration and adjust the boot settings, for which typical keys are: `Del.` `F1` `F2` `F6` or `Esc.`
Custom partitioning of the harddisk
It is possible to specify configurations for RAID, encryption, LVM, etc. as well as manual partitioning.
For «diskless» or «data disk» mode installs, manual partitioning may be needed to prepare the harddisk for committing local backups of the system state with lbu commit , a package cache, or to use it as the /var mount.
For a «sys» install, custom partitioning is needed only if the desired scheme differs from overwriting an entire disk, or creating the default /boot, swap and root partitions.
See Setting_up_disks_manually for the alpine options for RAID, encryption, LVM, etc. and manual partitioning.
Questions asked by setup-alpine
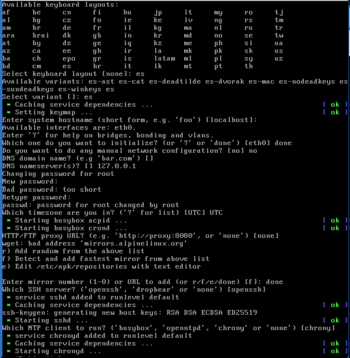
The setup-alpine script offers the following configuration options:
- Keyboard Layout (Local keyboard language and usage mode, e.g. us and variant of us-nodeadkeys.)
- Hostname (The name for the computer.)
- Network (For example, automatic IP address discovery with the «DHCP» protocol.)
- DNS Servers (Domain Name Servers to query. For privacy reasons it is NOT recommended to route every local request to servers like google’s
8.8.8.8.) - Timezone
- Proxy (Proxy server to use for accessing the web. Use «none» for direct connections to the internet.)
- Mirror (From where to download packages. Choose the organization you trust giving your usage patterns to.)
- SSH (Secure SHell remote access server. «Openssh» is part of the default install image. Use «none» to disable remote login, e.g. on laptops.)
- NTP (Network Time Protocol client used for keeping the system clock in sync with a time server. Package «chrony» is part of the default install image.)
- Disk Mode (Select between diskless (disk=»none»), «data» or «sys», as described above.)

Preparing for the first boot
If setup-alpine has finished configuring the «sys» disk mode, the system should be ready to reboot right away (see next subsection).
If the new local system was configured to run in «diskless» or «data» mode, and you do not want keep booting from the initial (and possibly read-only) installation media, the boot system needs to be copied to another device or partition.
The target partition may be identified using lsblk (after installing it with apk add lsblk ) and/or blkid , similar to previously identifying the initial installation media device.
The procedure to copy the boot system is explained at setup-bootable
Once everything is in place, save your customized configuration with lbu commit before rebooting.
Rebooting and testing the new system
First, remove the initial installation media from the boot drive, or detach it fron the port it’s connected to.
The system may now be power-cycled or rebooted to confirm everything is working correctly.
The relevant commands for this are poweroff or reboot .
Completing the installation
The installation script installs only the base operating system. No applications e.g. web server, mail server, desktop environment, or web browser are installed, and root is the only user.
Please look under «Post-Install» below, for some common things to do after installation.
Additional Documentation
Installing
- Kernels(kernel selection, e.g. for VMs or RPi)
- Directly booting an ISO file(without flashing it to a disk or device)
- Dual/multi-boot install to HDD partition
- Setting up Networking(including non-standard configurations)
Post-Install
- Fix unicode defaults: sed -i s/#unicode=»NO»\n\n#/#unicode=»NO»\n\nunicode=»YES»\n\n#/ /etc/rc.conf
- apk add musl-locales Installs a limited set of locales (languages) for musl (C library) generated console messages.
- Listing defined locales is possible with locales -a
- cp /etc/profile.d/locale.sh /etc/profile.d/locale.sh.sh Copies the default locale settings. Then the custom override file can be edited nano /etc/profile.d/locale.sh.sh .
- apk add lang Pulls in the translation packages of all installed packages.
- apk list hunspell* To list available hunspell dictionary packages.
- apk list *-xy *-xy-* To list translation packages for your specific (xy) language (for example, pt for Portuguese).
- apk add man-pages Installs basic manual pages.
- apk add mandoc Installs the man command to be able to open man pages.
- apk add mandoc-apropos Installs the apropos command to search in man pages.
- apk add docs Installs all the *-doc sub-packages of installed packages.
- Hosting services on Alpine(links to several mail/web/ssh server setup pages)
- Running applications and services in their own Firejail Security Sandbox
Additional Help and Information
- Comparison with other distros(how common things are done on Alpine)
- Running glibc programs(installation and development)
Other Guides
There may still be something useful to find and sort out of some «newbie» install notes in this wiki, but beware that these pages can lack explanations and contain highly opinionated content, redundantly on many convoluted pages.
Источник


