- How to Reinstall Windows 10 without Losing Data (3 Ways)?
- Case: Reinstall Windows 10 without losing data
- How does reinstalling Windows 10 work, will it erase your data?
- Method 1: Repair install Windows 10 without losing any dataВ
- Method 2: Fresh install Windows 10 without losing personal files
- Method 3: Clean install Windows 10 without losing data
- Reinstall Windows 10 isn’t always a perfect solution
- Backup system in case you need to restore Windows 10 without data loss
- Wrapping things up
- Installing and reinstalling Windows.
- How to: Reinstall or Restore your original Windows Installation After Upgrading to or Evaluating Windows 10
How to Reinstall Windows 10 without Losing Data (3 Ways)?
Sometimes, you may need to reinstall Windows 10 to solve system issues. This guide will show you how to reinstall Windows 10 without losing data step by step.

By AOMEI  / Last Updated March 2, 2021
Case: Reinstall Windows 10 without losing data
Hi there. I have an issue with my laptop and I was told to resolve that issue, I’d need to reinstall Windows 10. I don’t recall where I put my CD, but I have my product key. My question is, if I reinstall Windows 10, will it delete the data on my laptop or do I have to back it all up into a hard drive?»
How does reinstalling Windows 10 work, will it erase your data?
When you’ve tried many solutions to fix system errors and none of them actually works, it may be the time to reinstall Windows 10 and get all problems sorted out. But does this process delete your important data? Can you reinstall Windows 10 without any data loss?
Well, it depends on the approach you take:
By using Repair Install, you can choose to reinstall Windows 10 while keeping all personal files, apps and settings, keeping personal files only, or keeping nothing.
By using Reset This PC, you can do a fresh install to reset Windows 10 and keep personal files, or remove everything.
By using installation disk to perform a clean install, your data won’t be delete, but will be moved to Windows.old folder in the root directory of C: drive after installing.
In short, you definitely can, and have different methods to reinstall Windows 10 without losing data.В
If you are pretty sure that all your files and applications are in good conditions and have no thing to do with the problem you are facing, then you can choose a way to reinstall Windows 10 without losing files and programs.В
To do that, Windows will scan your C: drive and place all your personal data aside. And when the installation is complete, Windows will put these files and settings back.
If you are using a genuine Windows 10, Windows 10 will automatically get activated after the reinstallation.
Quick navigation for Windows 10 reinstallation:
Method 1: Repair install Windows 10 without losing any dataВ
If your Windows 10 can boot and you believe all the installed programs are fine, then you can use this method to reinstall Windows 10 without losing files and programs. If one or more of your program are damaged, you’d better keep personal files only.
1. Download the latest Windows 10 installation ISO file. You can also use Windows Media Creation tool to create an installation ISO.
2. Double click to mount the ISO file (for Windows 7, you need to use other tools to mount it). At the root directory, double-click to run the Setup.exe file.

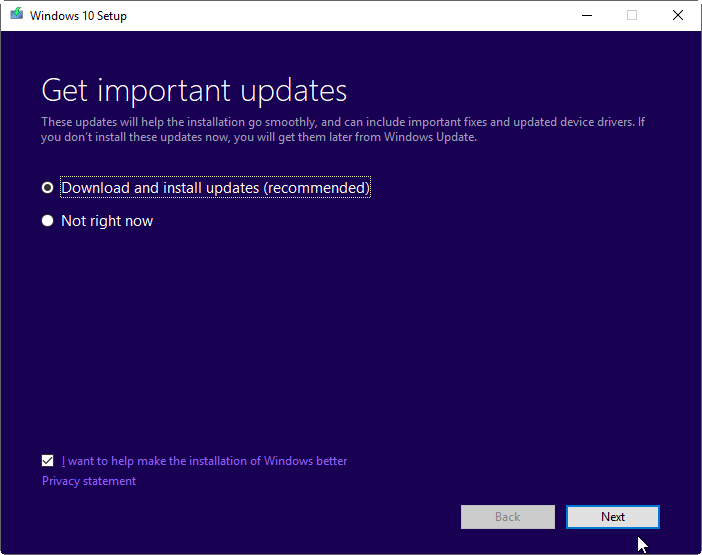
3. When the Windows 10 Setup is ready, you can whether to download updates or not based on your needs.
4. In the screen, click «Change what to keep«.
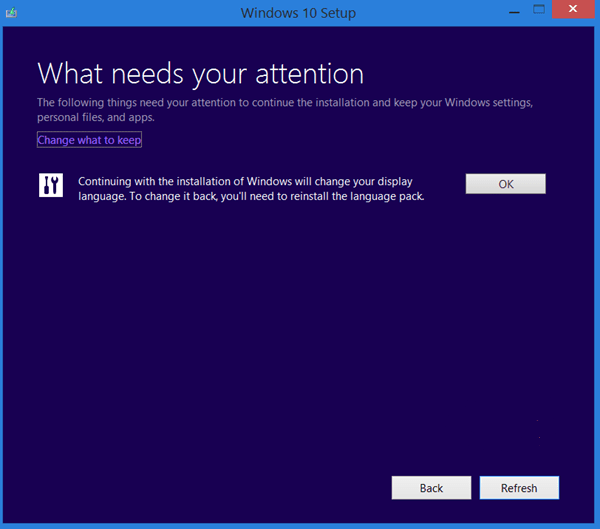
5. From there. You can select «Keep personal files, apps, and Windows settings» or «Keep personal files only«.

6. Click Next to install Windows 10.
This may take a while because it will spend extra time scanning your hard drive and moving files. If you just want to keep your files where they are, then try the next method.
Method 2: Fresh install Windows 10 without losing personal files
Windows 10 provides the feature «Reset this PC» to help you solve system problems by reinstalling Windows 10. During the process, you can choose whether to keep your personal files or not.
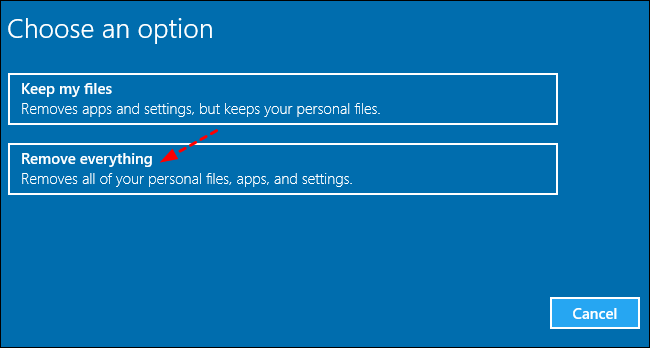
To use the feature, you can go to Settings > Update&Security > Recovery > Reset this PC, then you will have two options, «Keep my files» and «Remove everything«, select one of them and follow the on-screen instruction.
You can also reset Windows 10 from command line. The process are shown below:
1. Type “cmd” in the search box and press Enter.
2. In the listed results, right click on the Command Prompt and select «Run as Administrator«.
3. Type “systemreset” (without quotes) in the command prompt window and press Enter. If you need to reinstall Windows 10 and install new updates, you can run command “systemreset -cleanpc”.

If your system cannot boot, you can boot into recovery mode and from there, you can reset your PC. You can boot your PC from a recovery drive to reset your Windows 10.
Method 3: Clean install Windows 10 without losing data
If you prefer installing Windows 10 without losing data from USB drive or installation disc, you can choose to upgrade Windows 10 using this method. Before you do, you need to make sure your C: drive has more than 16GB of free space.
1. Insert your installation disc and boot from it. If you do not have one, you can download the Windows Media Creation tool to create one.
2. When it loads, select the language and keyboard, then click «Next«.
3. Click «Install Now«.
4. Type your product key or skip it.
5. Select the installation type «Custom«.
6. At the following screen, just select the C: drive and click Next to proceed. Then, wait patiently until the installation complete 100%.

As long as you do not format the C: drive in the Setup, you will not lose your data, but they are moved to another location. After the installation, you can find a folder Windows.old in the root directory of C: drive. All your files are saved there.
After copy all your needed files out from Windows.old folder, you can use Disk Cleanup to delete the Windows.old folder to free up disk space.
Reinstall Windows 10 isn’t always a perfect solution
Though there are several methods to choose, they all have some shortcomings in practical use. For example, the first method will keep your programs, but won’t fix problems caused by them. And the other two methods can only keep your files, so you have to spend time and effort reinstalling these apps. That’s why I say reinstallation is not a perfect way.
To avoid such trouble, you can use a free backup software to create a system image in case of possible system issues. For simplicity and effectiveness, I strongly recommend youВ AOMEI Backupper Standard to protect your Windows 10 PC.
It enables you to backup file, partition, system or even the whole disk in a simple manner.
It can save you from manual operation with the scheduled backup on daily, weekly, monthly, etc.
With theВ incremental/differential backupВ mode, you don’t need to worry about cumulative backups filling up the space.
Also, you can change the compression level, split backup images, choose backup mode, etc. as you like.
Backup system in case you need to restore Windows 10 without data loss
If you want to fix the computer without losing any important files, apps and settings, restoring system to an earlier normal state is the safer way than reinstalling from scratch.В
To simplify the process, you could set up a scheduled backup to make it run automatically. Thus when any error arises, you can easily restore Windows 10 to the latest normal state without losing data.
1. Download and install this free backup software.
2. On the main page, click the «Backup» tab and then choose «System Backup«. If you want to backup entire disk, you can choose «Disk Backup» as instead.

3. Select a destination location to receive the backup image. You can backup to any location (folder) that Windows detects, including external hard drive, NAS network location, local storage, etc.

4. In the next screen, click «Schedule» to configure scheduled backup settings if needed. After that, click «Start Backup» to start the operation.

Note: System backup in AOMEI Backupper Standard can satisfy almost users’ need. But if you have advanced needs like below, higher editions like Professional may serve you better.
• Enable encryption for backup: This feature is useful for users who store sensitive data or business data on their computer to prevent unauthorized access.
• USB Plug in:В This feature is designed for users who frequently use USB storage device, and make the backup task more convenient. Once you create a schedule backup with «USB Plug in», AOMEI Backupper will automatically start backup when USB connected to your computer.
• Scheme: This is a indispensable feature is for all users who don’t want to miss any changes, but worry about disk space issue. It can delete old backups automatically when backup versions reaches the specified number.
In a short time, the backup will be created. With a backup, whenever you have problems with your system, you can easily restore from the backup. Even when your PC fails to boot, you can restore from bootable CD. AOMEI Backupper also enables you to create a specialized recovery environment for backup/restore without booting Windows. Just go to Tools > Recovery Environment to enable it.
Wrapping things up
To reinstall Windows 10 without losing data is surely possibly using these three methods mentioned above, and it can fix system issues that your computer may have. But, honestly, it’s not perfect. And it is obvious that restoring from a backup is easier and more convenient to solve Windows issues.
The basic version AOMEI Backupper Standard is enough to prevent unexpected disaster, such as, system crash, disk failure, virus, fire etc. But if you want more advanced features, such as, USB plug in, incremental and differential backup, universal restore, you need to upgrade from the basic version.В
If you want to protect unlimited computers within your company, AOMEI Backupper TechnicianВ is worth a shot. The inbuilt AOMEI Image Deploy tool allow users to deploy/restore system image file on server-side computer to multiple client-side computers over network.
Installing and reinstalling Windows.
You can upgrade or perform a custom installation. An upgrade keeps your files, settings, and programs—it’s the easiest way to install Windows. A custom installation does not keep your files, settings, or programs. You can use a custom installation to completely replace your current operating system or to install Windows on a specific drive or partition that you select.
The basic steps for installing Windows are:
1. Turn on your PC.
2. Setup should start automatically, if it doesn’t click the Start button, click Computer, open the Windows 7 installation disc on your DVD drive and then double-click setup.exe.
3. On the Install Windows page, click Install now.
4. On the Get important updates for installation page, we recommend getting the latest updates to help ensure a successful installation and to help protect your computer against security threats. You computer will need to be connected to the Internet during Windows installation to get these updates.
5. On the Please read the license terms page, if you accept the license terms, click I accept the license terms, and then click Next.
6. On the Which type of installation do you want? page, click either Upgrade or Custom . You might see a compatibility report.
7. Continue to follow the instructions to finish installing Windows 7.
How to: Reinstall or Restore your original Windows Installation After Upgrading to or Evaluating Windows 10
Technical Level : Intermediate
Summary
Please note this article details instructions about migrating from preview builds of Windows 10 to a previous version of Windows (Windows 7 or 8/8.1). Although the article discusses pre-release Windows 10 builds, the same instructions work if you are running the final version of Windows 10 and want to reinstall your previous version Windows.
The Windows 10 Previews currently available will eventually expire. The expectation among users should be that they will either need to upgrade to the final release or reinstall their previous version of Windows after they have completed their evaluation of the Windows 10 Preview. Microsoft officials recently indicated the intention of having the preview releases support upgrades to the final version. This is the intention, but of course, things can always change on the road to RTM. With the excitement surrounding the arrival of a new major release of Windows and the more public approach to testing Windows pre-release version, a lot of persons who are normally not exposed to beta testing are jumping in without hesitation.
If you decide to pay for the final release or you would like to restore your previous version of Windows, you will need to be prepared if this becomes the eventuality. The following wiki article shows you how.
Details
If you upgraded or migrated your previous version of Windows to Windows 10 you can consider the Rollback option. If you have been diligently updating to each new build of Windows 10, you will be able to go back to the most recent build. If you somehow migrated from Windows XP, Vista, Windows 7/8/8.1 to Windows 10 and find out there is no option to go back, then you will have to prepare to do so manually. Microsoft has indicated when users upgrade or migrate to Windows 10, the recovery partition used to restore your system to its original factory state becomes inoperable. The recovery partition is used in the event you need to reinstall Windows on your computer.
What is the recovery partition?
Some computers that come preinstalled with Windows often have what is called a recovery partition. This is used to reinstall the operating system in the event of a system crash. To access it, you will need to boot into when you start your computer by pressing a function key. This can be either F1, F2, F9, F10, F11, F12 or even DEL or Tab key.
For some Windows XP, Vista and even Windows 7 users, if you don’t have a recovery partition, you might have to use the recovery media that came with your computer to reinstall Windows. The recovery media often comes on a DVD or set of CDs that are sometimes labeled Recovery, Operating System, Drivers and are installed according to how the disc is labeled (Disc 1, Disc 2, Disc 3). Unfortunately, sometimes these discs get lost or damaged. Your best course of action is to request recovery media from the manufacturer of the computer.
Below is a link to all OEM contact numbers you can use to request recovery media from the maker of your computer.
What if you upgraded to a retail copy of Windows?
If you upgraded to a retail version of Windows, then you can use your reinstall disc to reinstall Windows on your computer. See links below for
instructions. If you have an upgrade version, this will require that you first reinstall the qualifying license in order to use the upgrade
version. Please see the links below for work arounds for doing a clean install with the upgrade version:
Reinstall Windows XP:
Reinstall Windows 7:
If you lost your reinstall disc, you can request a new one from the following link or for Windows Vista/Windows 7 users you can download a copy
from the following links and create a bootable copy.
How to Replace Lost, Broken, or Missing Microsoft Software or Hardware
Download the corresponding edition of Windows 7 you have a license for from the following link. You can identify the edition on the COA sticker attached to your machine, at the bottom or within the battery compartment (laptop) or top/side if its a desktop computer.
COA Certificate of Authenticity:
http://www.microsoft.com/howtotell/content.aspx?pg=coa
What is the Windows Certificate of Authenticity?
http://windows.microsoft.com/en-US/windows7/What-is-the-Windows-Certificate-of-Authenticity
Windows Vista SP1:
(The above Windows Vista image allows you to install the appropriate edition by having the appropriate key).
UPDATE: Since publishing this article, Microsoft has discontinued availability of Windows 7 and Windows Vista ISO images through Digital River.
For the past 5 years Microsoft made it quite easy for users of the Windows 7 operating system to obtain reinstall media. If you lost your retail installation disc or recovery media; either it was damaged or faulty; you could download a copy of the edition you have a license for from an affiliate website named Digital River. Most recently, Microsoft ended availability of reinstall media which you could download as a .ISO file from Digital River, which is a digital replica of a optical disc.
This was especially handy for persons who could not easily obtain recovery media from the manufacturer, did not want to pay the cost required to obtain it or preferred a clean configuration without the manufacturers bundled software or even a non-functional recovery partition. It was easy to use, all you had to do was reinstall and reactivate using the product key located on the certificate of authenticity and download any appropriate drivers from the manufacturers website.
Since this option is no longer available, what are your options? See article for details:
ImgBurn – In addtion to supporting the creation of CD’s from .ISO files,
it supports a wide range of other image file formats, and it’s free.
(BIN, CUE, DI, DVD, GI, IMG, MDS, NRG, PDI and ISO)
Note: Always use the slowest burn speed (4x or 2x) if offered a choice.
Windows 8/8.1
Windows 8/8.1 users are sometimes limited in this respect, this is especially true for owners of certain form factors such as Ultrabooks that do not have optical drives normally used to facilitate the restoration of a system. In this case, you will have to manually download a copy of Windows 8/8.1 in order to reinstall the operating system. Unfortunately, this can be quite a chore. Fortunately, due to possible feedback and ongoing refinements and third party advancements, reinstalling Windows 8/8.1 since its release in 2012 is a lot more convenient.
Downloading Windows 8/8.1 — things to take into consideration
If you were running Windows 8.0 prior to upgrading to Windows 10, think deeply whether you want to go back to this release or just go directly to Windows 8.1 with Update 1 which can be easily downloaded. Windows 8 users have until early 2016 to upgrade to Windows 8.1 with Update 1 in order to continue receiving support. January 2016 might seem like a long time away, but its best you do it now to save you all the trouble. Besides, its way more reliable, considering that for Windows 8 installations, upgrading to Update 1 is a staged process, you have to first upgrade to Windows 8.1 through the Store, then install Update 1 through Windows Update. By simply downloading Windows 8.1 with Update 1 media, you avoid all this.
How do you do it?
Microsoft recently released a new Media Creation Tool which you directly download and create a .ISO file for Windows 8.1 with Update 1.
Lets take a look at how that is done.
First download the Media Creation Tool from the following link and save it to your Downloads folder:
http://go.microsoft.com/fwlink/p/?LinkId=510815
Double click Media Creation Tool file to launch setup.
Wait while setup begins
The following window allows you to select the Language, edition (Core or Pro), Architecture (32 or 64 bit).
The above example shows all of the selected options.
To determine if your system came preinstalled with Windows 8 Core or Pro, look at the bottom of your laptop or on the chassis of the machine for one of the stickers.

Choose how you want to prepare your files.
Install by creating media
This I think is one of the most important steps, a lot of persons do not have fast Internet Connections, or they are using metered Internet Connections which prohibits them from downloading large files using their ISP over a period of time. Windows 8 is a 2 GB download which is still significantly large for some Internet Connections.
USB flash drive
If you have a thumb drive with 3 GBs of available space, you can use that to create a bootable copy. Thumb drives are very cheap these days, so pick up a couple and create one as your first backup option. This is especially recommended for persons using Ultrabooks which do not include optical drives (DVD) or Netbooks. There are some desktop systems that do not include one.
ISO file
An ISO file is a digital or virtual replica of a physical disc. In order to use an ISO you must burn it to a optical disc. In the case of Windows 8, a blank DVD. If you are using Windows 7, you can create the .ISO and burn it using the built in Disc Image utility. If you are running Windows XP or Windows Vista, you can using a third party burning tool such as ImgBurn or Roxio/Nero.
Creating a .ISO file
For the purposes of this exercise, we are gonna use the .ISO option.

Select ISO file, then click Save

Select your location and click Save.

Wait while the .ISO image is created.
After obtaining the .iso file you use the Microsoft .iso to USB/DVD tool to create a bootable DVD or USB (requires a blank DVD or USB flash stick of at least 4 GB).

Starting the installation.
To learn how to change your BIOS options to boot from the DVD drive, see the following tutorial:

Once your computer is set to boot from the DVD, you should see this option.
If you are installing from a thumb drive, see the following instructions how to prepare your computer to boot from one:

The Windows logo will appear on screen, this might be here for a while, as long as you see the indicater, everything should be ok.
The setup screen will eventually appear, select your time and currency format then click Next.
Click Install Now
Wait while setup starts up

You will be prompted for a product key during setup. You can use a generic key which you can find at the following link.

Accept the End User License agreement and click Next

Click Custom install Windows only (advanced)

Select the system drive where Windows 8 is installed.

You will receive the following warning:
The partition you selected might contain files from a previous Windows Installation. If it does, these files and folders will be moved to a folder named Windows.old. You will be able to access the information in Windows.old, but you will be able to use your previous version of Windows.
(At all cost, do NOT click anything named Format or Delete or Partition. So even doing a custom install, your personal files are still preserved. Click OK
Setup will now start the installation. During the installation, your machine will be restarted several times.

When the installation is complete, you can complete the Out of Box experience such as selecting your computer, create a username, password, your time zone. You can then proceed to download the latest updates for Windows and reinstall your applications and drivers.

Windows 8 Out of Box Experience page
You can then recover your personal files from the Windows.old folder and reinstall all your applications and drivers. Or you can use Windows Easy Transfer to restore your backup.
How to retrieve your files from the Windows.old folder – Microsoft
Retrieve your product key:
With Windows 8, Microsoft has changed from stickers that have the product key that the user has to type in when installing the operating system to new BIOS embedded product keys. The idea is that by eliminating the sticker, you eliminate one of the easier ways for nefarious users to get a legitimate product key. Eliminating the product key sticker also removes any worry that the sticker might get damaged while at the same time eliminating the long and irritating process of typing in various letters and numbers when installing the operating system.
If the user has to reinstall the operating system on a machine that came with Windows 8, the installation process automatically grabs the software product key from the motherboard BIOS with no input from the user. This means that those familiar Windows product key stickers will no longer appear on the Windows 8 computers.
If Windows 8 setup did not retrieve your key and you had to use a generic key from the link provided, here is how to retrieve the product key from the BIOS.
Windows 10 Embedded Product Key tool by Neosmart

Designed for users of Windows 7, Windows 8, and Windows 10, our embedded product key tool will retrieve and display the Windows setup product key embedded in the BIOS or EFI, allowing you to store it for safe-keeping or use it to reinstall Windows with an official Windows setup image.
You can download it at the following link:
Press Windows key + R
Type: slui.exe 3
Enter the product key and click Next to activate over the Internet.
You can also use phone activation:
Press Windows key + X then clickRun, then type: slui.exe 4
2. Next press the ‘ENTER’ key
3. Select your ‘Country’ from the list.
4. Choose the ‘Phone Activation’ option.
5. Stay on the phone (do not select/press any options) and wait for a person to help you with activation.
6. Explain your problem clearly to the support person.
Related:
Please do not hesitate to share your feedback and suggestions, this is a huge undertaking and again underscores the benefits of dual booting instead which is a lot more convenient and less destructive.


