- Установка Drupal на Windows
- Что это такое?
- Перед установкой
- Виртуальный сервер на базе Windows
- Загрузка Drupal
- Настройка Базы данных MySQL
- Настройка PHP
- Настройка Apache
- Настройка Drupal
- Install Drupal 8 on Windows 10
- Preparation
- 1. Download the code
- 2. Install dependencies with composer
- 3. Create a database (user)
- 4. Configure installation
- 5. Run the installation script
- PHP OPCODE CACHING
- Fatal error
- 6. Status check
- Install Drupal on IIS
- Introduction
- Prerequisites
- Download and Unpack the Application
- Set Up the Database
- Run the Installation Script
- Enable Clean URLs
Установка Drupal на Windows
Руководство по установке CMS Drupal 8 на виртуальный сервер под управлением операционной системы семейства Windows со стеком WAMP.
Что это такое?
CMS с открытым исходным кодом, проста в установке, позволяет создавать сайты любого размера и легко управлять ими с помощью бэкэнд-администрирования. По сравнению с предыдущими версиями Drupal 8 включает более 200 новых функций и улучшений:
- подходит как для малого бизнеса, так и для крупных компаний;
- создание динамического контента;
- позволяет сделать контент сайта более понятными для людей с ограниченными возможностями;
- улучшено кеширование и интеграция с CDN;
- управление отображением без использования программирования;
- широкий выбор языков.
Примечание: CMS — прикладное программное обеспечение с веб-интерфейсом, которое служит для управления (например добавление, редактирование, удаление) содержимым сайта.
Перед установкой
Все действия в этой статье проделываются с правами администратора.
Перед тем, как начать работать с Drupal, на виртуальный сервер с необходимо установить WAMP-стек (Apache, MySQL, PHP). Об этом подробно написано в нашей инструкции. Альтернативой на Windows Server может быть установка Drupal 8 на веб-сервер IIS.
Теперь у вас есть права суперпользователя и нужное ПО, вы можете начать установку.
Виртуальный сервер на базе Windows
- Лицензия включена в стоимость
- Тестирование 3-5 дней
- Безлимитный трафик
Загрузка Drupal
В первую очередь загрузите архив приложения на ваш VPS с официального сайта разработчика. На момент написания инструкции актуальная версия системы — 8.3.7.

Скачайте архив в формате zip.

Создайте в каталоге C:\wamp64\www папку с названием drupal и распакуйте туда содержимое каталога.
Настройка Базы данных MySQL
Создайте новую БД MySQL для Drupal, для этого заходим в MySQL-оболочку:
cd C:\wamp64\bin\mysql\mysql5.7.14\bin
.\mysql.exe -u root -p
Зайдите в СУБД, используя пароль суперпользователя MySQL. Если это ваш первый вход используйте команду:
Создание базы данных и нового пользователя подробно описано здесь.
Настройка PHP
Сделаем несколько небольших изменений в файле конфигурации PHP. Откройте файл конфигурации Apache PHP в текстовом редакторе, например блокноте:
Раскомментируйте и установите значения следующих переменных:
allow_url_fopen = Off
expose_php = Off
max_execution_time = 300
default_charset = «UTF-8»
extension=php_curl.dll
extension=php_imap.dll
extension=php_gd2.dll
extension=php_mbstring.dll
extension=php_mysqli.dll
extension=php_tidy.dll
extension=php_pdo_mysql.dll
extension=php_zip.dll
Настройка Apache
Чтобы перейти к настройке Drupal в браузере, необходимо отредактировать файл конфигурации C:\wamp64\bin\apache\apache2.4.23\conf\httpd.conf.
Замените содержимое тега на строки:
Options FollowSymLinks
AllowOverride All
Order deny,allow
Deny from all
Примечание: если у вас несколько сайтов на сервере используйте документацию на Apache.
Настройка Drupal
Не забудьте настроить FireWall для удаленного доступа.
Установка CMS в браузере подробно описано здесь.
Install Drupal 8 on Windows 10

Drupal is a free open-source cms for web development. It’s written in PHP and has unlimited abilities. It’s not only fantastic for developers, but it is also fairly easy to start your first site. However, Drupal is quit harder to understand than, for example, WordPress, which is excellent for building a website without any line of code.
So, how to install Drupal on your local Windows machine? I installed Drupal on my PC according to the Drupal installation guide and I’m sharing my findings with you below. This is my first introduction to Drupal.
Preparation
First of all, to install Drupal, you need a web server with PHP and a database on your PC. It’s quite easy to install such an AMP stack, I had already installed XAMPP, which I highly recommend because it’s easy to use and to set up your web server. If you don’t know how to install XAMPP, you should check out this guide. Another LAMP stack is also good, but be sure you have a database and PHP installed.

It’s advisable to also install Composer, to install the Drupal code (step 1) by the composer. Installing Composer is quite easy for windows, I downloaded the Composer-setup.exe and followed the instructions. Remember that you should close opened command prompt windows and restart command prompt to use Composer from the command line.
1. Download the code
I downloaded and installed the Drupal code with composer, what’s recommended by Drupal, and by me, for it makes the installation (for Drupal and other PHP software) much easier.
So I opened the command prompt and navigated to C:/xampp/htdocs/drupal. (Or navigate to another folder where you want to install Drupal.) Then I ran the following command:
composer create-project drupal/recommended-project test_site — no-interaction
Replace test_site with how you want to name your website.
Composer installed the code and after that automatically executed the
command, so you don’t have to do that manually.
2. Install dependencies with composer
Step 2 according to the installation guide is to install dependencies with Composer, but that’s only necessary if you installed the code with git. I did not, so I could skip that part.
3. Create a database (user)
Creating a database is optional, because later in the installation process Drupal can also create a new database.
But you must create a database user with all privileges to create and edit a database. You can also enter the root credentials during the process, but that’s not recommended.
So I opened phpMyAdmin and created a new user in the User accounts section named Drupal which I granted all privileges.

4. Configure installation
Step 4 is to configure the webserver. I had already installed XAMPP with PHP and MySQL so I only had to start the Apache HTTP server and MySQL in the XAMPP Control Panel.
5. Run the installation script
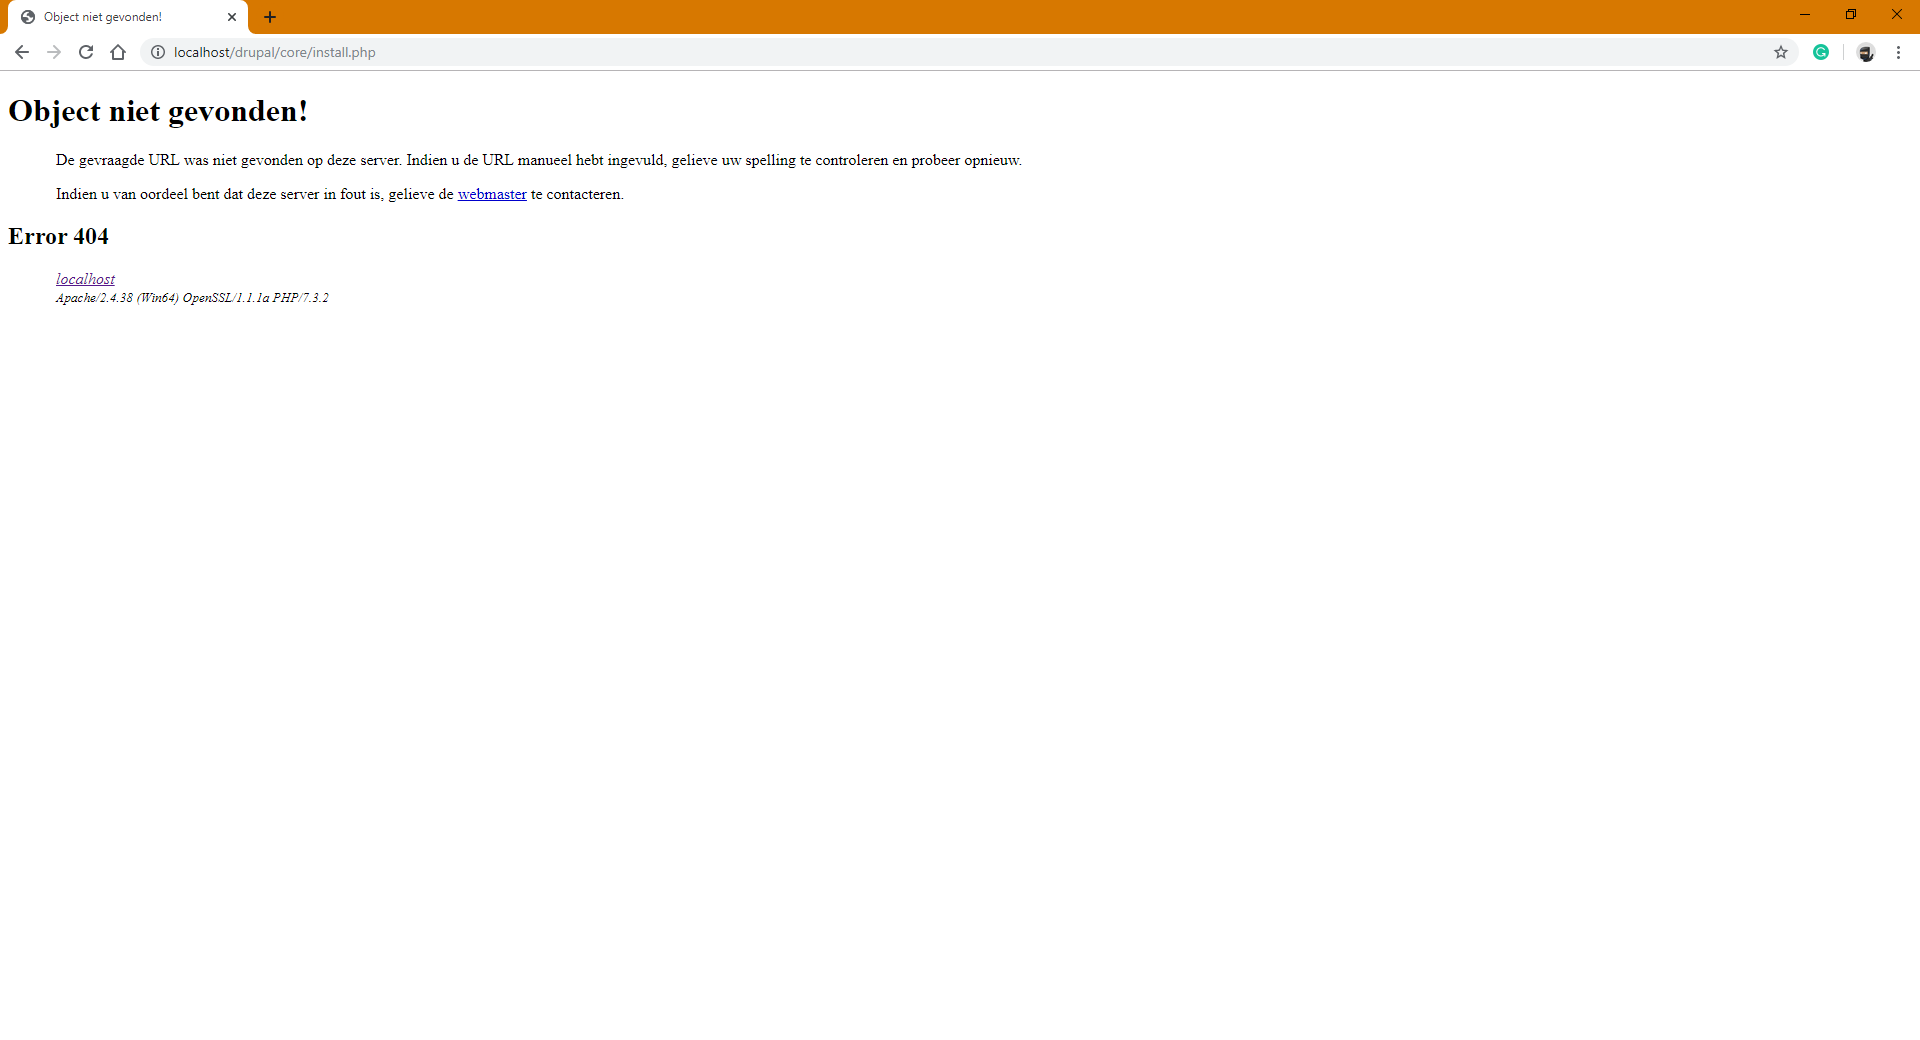
I could finally start the installation, by running the installation script in /core/install.php. But… I was not capable enough to type in the correct URL. I had Drupal installed in htdocs/drupal and I could open the installation script by navigating in my browser to localhost/drupal/test_site/web/core/install.php. I wanted too fast and did not look well where the script was. So I typed in my browser: localhost/drupal/core/install.php. Totally forgot about the /test_site/web/ folders.
But when I realised I should look into the folder structure, the problem was solved quickly.
PHP OPCODE CACHING
So I got on the installation panel and by verifying requirements it gave a warning. PHP OPCODE CACHING was not enabled. A quick search yielded I should add the following line to my php.ini file:
I also uncommented the line
Fatal error
After that, I had to configure the database. You could choose a name for your database here, Drupal will create one, but be sure you list the correct user with privileges to create and edit databases. I entered my credentials and on submit, the page started loading. And loading. And loading. After a while I got the following error:
“Fatal error: Maximum execution time of 30 seconds exceeded in C:\xampp\htdocs\…”
It turned out that the max_execution_time in php.ini was set to 30 seconds. But I didn’t know that and I thought I had done something wrong. So I reviewed all my steps, tried to run the installation script a second time but then it said:
I tried to enter the existing site, but that was not accessible. So I followed the provided steps to start over. When I had configured my database the second time I got the max execution error again.
Then I started to search on the internet and found out I should change the max_execution_time in the php.ini file, or add:
to default.settings.php. That’s useful when you don’t have access to the php.ini file. I added the line of code to default.settings.php and followed the instructions to restart the installation.
The installation of the site started and took a lot of time. About 10 minutes. Much more then I expected. It’s was maybe caused by my computer and there was another user account running in the background. But I noticed later too, that drupal was loading quite slow in comparison to websites without a framework on my localhost.
EDIT: I tried Drupal on a hosted website, and there I have no problems with speed, so it’s obviously my local machine’s guilt
After the installation of the site, I had to enter a few configuration settings in order to finish the installation. And finally, the installation was done! Almost then. I noticed there was another step on drupal.org.
6. Status check
The last step, check the status of the just installed brand new website. And there was a problem. Trusted Hosts was not set. So I followed a link to an explanation page from which I learned that I had to add the following block of code to the settings.php file (in \test_site\web\sites\default), in order to enable the trusted host mechanism for XAMPP:
After that, no problems further occurred so I could finally add my first content to my first Drupal website!
Install Drupal on IIS
Introduction
Drupal is a free, open-source content management system (CMS) software that lets individuals or communities of users easily publish, manage, and organize a wide variety of content on a Web site.
For more information about Drupal, visit the Drupal Web site.
This article describes how to install and configure Drupal for use with the FastCGI extension on Internet Information Services 7 (IIS 7) and above on WindowsВ® Web Server 2008. The instructions assume that you have set up and configured the FastCGI extension and the PHP libraries. The instructions have been tested and found to work with the following software versions:
Prerequisites
From the base default configuration file provided by PHP, modify the following lines in your Php.ini configuration:
- Define extension\_dir as c:\php\ext (for example, the location of your PHP extensions directory).
- Uncomment extension=php\_mysql.dll in the extensions list to enable MySQL support.
In order for Drupal to work correctly with IIS 7 and above, it is necessary to install an update for the IIS FastCGI module for IIS 7.
Download and Unpack the Application
First, download the latest stable release of Drupal. For this article, Drupal version 6.14 was used (future versions are likely to be similar to install). Uncompress the Drupal files and copy them to C:\Inetpub\wwwroot\drupal (or another directory of your choosing).
Before running the Drupal installer, create the configuration file Settings.php, which Drupal uses to store key configuration settings. Assign write permissions to it with the command (from the installation directory):
Copy the .\sites\default\default.settings.php file to .\sites\default\settings.php.
Grant «write» permissions to the file.
The installer will modify the Settings.php file with information provided during the installation process.
Check to ensure that the file permissions are set back to «read only» once the installation is complete. If the file permissions did not change back, you must change them manually with the command:
Drupal uses the Sites\Default\Files directory to store temporary files and therefore must be able to write and modify files in this folder.
Create the folder:
Grant «modify» permissions to the folder:
Set Up the Database
Before starting the installation procedure for Drupal, you must create a database on your server. Also create a user and grant this user «db ownership» permission to the database. This article uses the following database information:
- Database name: drupal
- Database user: drupal
- Account password: drupal
Run the Installation Script
Open a Web browser, and go to http://localhost/drupal/ . The first page of the installation script appears. Click Install Drupal in English. The Verify requirements step should proceed automatically unless you are missing requirements.

Figure 1: Choose language page
On the Database configuration page, type the following information:
Database name: drupal
User name: drupal
Password: drupal
Click Save and continue. The required database tables are created, and the configuration is saved into the Sites\Default\Settings.php file. Remove the «modify» permissions on this file.

Figure 2: Database configuration page
On the Configure site page, enter the required configuration information.

Figure 3: Configure site page
Enable Clean URLs
By default, Drupal uses query string parameters for all the URLs it generates for your Web site. With the URL Rewrite Module, however, you can create «clean URLs.»
IIS 6.0 does not have URL rewriting capabilities, so you can use a third-party URL rewriting product such as ISAPI Rewrite or Ionics ISAPI Rewrite Filter.
IIS 7 and above have URL rewriting support, which can be enabled by installing the URL Rewrite Module.
The following instructions describe how the URL Rewrite Module for IIS 7 and above can be used to enable clean URLs in Drupal.
Open the Web.config file located in C:\inetpub\wwwroot\drupal folder. If you do not have a Web.config file in the drupal directory, create it.
Copy and paste the following XML code into this file.
Save the web.config file.
Open a Web browser, and go to http://localhost/Drupal/index.php?q=admin/settings/clean-urls . 
Figure 4: Clean URLs page
Under Clean URLs, select the Enabled option button, and then click Save configuration. If you successfully changed the URL format, all the URLs are represented in a hierarchical form that does not use query string parameters (for example, http://localhost/Drupal/admin/settings/clean-urls).
This article updates: » Drupal on IIS» by Ruslan Yakushev, published on September 19, 2008.


