- Установка гостевых дополнений VirtualBox
- Гостевые дополнения VirtualBox
- Windows
- Linux
- ИТ База знаний
- Полезно
- Навигация
- Серверные решения
- Телефония
- Корпоративные сети
- Курс по сетям
- Как установить Android в VirtualBox
- Как преобразовать физический сервер Linux в виртуальную машину VMware
- Установка VMware vSphere ESXi 6.7
- Ошибка запуска виртуальной машины VMware: «Cannot open the disk»
- Ошибка «No NSX Managers available» в веб-клиенте vSphere
- Поиск и устранение проблем производительности виртуальной машины ESX/ESXi
- Загрузка и установка VMware Workstation в Windows и Linux
- Самое интересное про Guest Additions в VirtualBox
- Обзор
- Функциональные возможности
- Linux через GNOME
- Linux через консоль
- Полезно?
- Почему?
- Installing guest additions virtualbox windows
- 4.2.1.В Guest Additions for Windows
- 4.2.1.1.В Installing the Windows Guest Additions
- 4.2.1.2.В Updating the Windows Guest Additions
- 4.2.1.3.В Unattended Installation
- 4.2.1.4.В Manual File Extraction
- 4.2.2.В Guest Additions for Linux
- 4.2.2.1.В Installing the Linux Guest Additions
- 4.2.2.2.В Graphics and Mouse Integration
- 4.2.2.3.В Updating the Linux Guest Additions
- 4.2.2.4.В Uninstalling the Linux Guest Additions
- 4.2.3.В Guest Additions for Oracle Solaris
- 4.2.3.1.В Installing the Oracle Solaris Guest Additions
- 4.2.3.2.В Uninstalling the Oracle Solaris Guest Additions
- 4.2.3.3.В Updating the Oracle Solaris Guest Additions
- 4.2.4.В Guest Additions for OS/2
Установка гостевых дополнений VirtualBox

Гостевые дополнения VirtualBox
Для улучшения работы с виртуальной машиной, и взаимодействия с ней, в виртуально установленной операционной системе нужно установить специальный набор инструментов, который называется «Гостевые дополнения» («Guest Additions»). Данный набор инструментов выпускается для следующих операционных систем:
- Windows (начиная с Windows NT 4.0, и заканчивая Windows 10); Linux (официально поддерживаются Oracle Linux, Fedora, Red Hat Enterprise Linux, SUSE (в том числе openSUSE), Ubuntu); Oracle Solaris; OS/2.
Для установки гостевых дополнений VirtualBox необходимо выполнить следующие действия:
- Включаем виртуальную машину и ждем загрузки ОС.
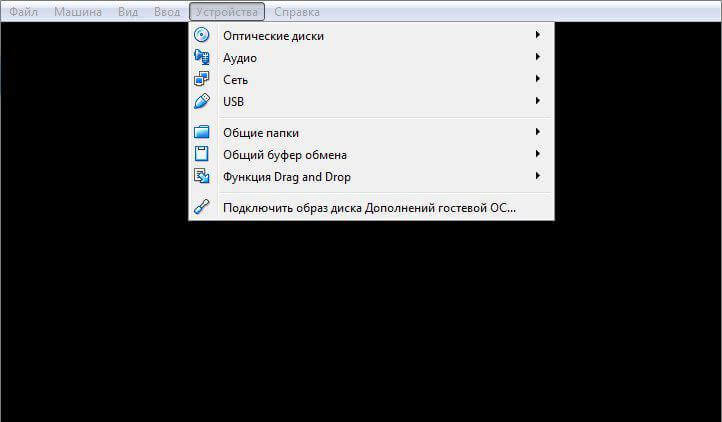
- В верхнем меню VirtualBox выбираем пункт «Устройства — Подключить образ диска Дополнений гостевой ОС. «.


Дальнейшие действия зависят от того, какая операционная система установлена в VirtualBox:
Windows
- Если в системе не отключен автозапуск, то должен запуститься установщик дополнений гостевой ОС. Если же в системе выключен автозапуск, нужно запустить установщик вручную, найдя его на подключившемся диске в виртуальной машине, под именем VBoxWindowsAdditions.exe.
- Как и установка самого VirtualBox, установка гостевых дополнений максимально упрощена, и по сути представляет из себя нажатие кнопок «Next». С первым окном именно так и следует поступить.
- На следующем будет предложено выбрать место для установки гостевых дополнений. По умолчанию, рассматривается обычная для всех программ директория Program Files.
- Последним шагом, перед непосредственно самой установкой, будет выбор устанавливаемых компонентов:
- VirtualBox Guest Additions — собственно, сами гостевые дополнения VirtualBox;
- Start menu entries — ярлыки в меню «Пуск».
- Direct3D Support — третий компонент, который не выбран по умолчанию, является экспериментальной функцией по включению полноценного 3D ускорения в виртуальной машине. Для «простой» работы он не нужен.
- После нажатия на кнопку «Next» начнется установка гостевых дополнений, во время которой может появится окно с запросом на разрешения установки программного обеспечения для устройства (драйвер), которую необходимо одобрить.
- После установки дополнений потребуется перезагрузка компьютера, которую можно выполнить сразу (оставив отмеченным пункт «Reboot now«), или выполнив её позже самостоятельно (для этого нужно отметить пункт «I want to manually reboot later«).
- После перезагрузки произойдет множество полезных изменений — появится поддержка двухстороннего буфера обмена (о том, как его включить можно прочитать здесь), функция drag-n-drop между основной операционной системой и операционной системой в виртуальной машине, автоматический выбор разрешения экрана на основе размера окна VirtualBox и т. д.


Linux
В операционных системах семейства Linux, графический установщик гостевых дополнений отсутствует, вся установка происходит через терминал. Современные дистрибутивы прекрасно сами распознают файл автозапуска на образе с гостевыми дополнениями, и предлагают его запустить автоматически. 
Можно так же запустить файл установки гостевых дополнений вручную. Для этого, нужно открыть терминал, и перейти в каталог, куда смонтирован виртуальный образ с файлами установки дополнений. Там же, нужно выполнить команду запуска файла установки:
После выполнения данной команды, начнется установка гостевых дополнений Linux, по завершению которой, понадобится перезагрузка системы. 
ИТ База знаний
Курс по Asterisk
Полезно
— Узнать IP — адрес компьютера в интернете
— Онлайн генератор устойчивых паролей
— Онлайн калькулятор подсетей
— Калькулятор инсталляции IP — АТС Asterisk
— Руководство администратора FreePBX на русском языке
— Руководство администратора Cisco UCM/CME на русском языке
— Руководство администратора по Linux/Unix
Навигация
Серверные решения
Телефония
FreePBX и Asterisk
Настройка программных телефонов
Корпоративные сети
Протоколы и стандарты
Популярное и похожее
Курс по сетям

Как установить Android в VirtualBox
Как преобразовать физический сервер Linux в виртуальную машину VMware
Установка VMware vSphere ESXi 6.7
Ошибка запуска виртуальной машины VMware: «Cannot open the disk»
Ошибка «No NSX Managers available» в веб-клиенте vSphere
Поиск и устранение проблем производительности виртуальной машины ESX/ESXi
Загрузка и установка VMware Workstation в Windows и Linux
Еженедельный дайджест
Самое интересное про Guest Additions в VirtualBox
4 минуты чтения
Привет, дорогой читатель! В сегодняшней статье, мы расскажем, как облегчить себе жизнь при работе с виртуальными машинами в среде VirtualBox. Возможно кто-то уже догадался, что речь пойдёт от о Guest Additions.
Обучайся в Merion Academy
Пройди курс по сетевым технологиям
Начать
Обзор
Guest Additions — это набор системных драйверов и приложений, которые обеспечивают более тесную интеграцию хоста виртуализации и гостевых виртуальных машин, которые развёрнуты на хосте. Эти приложения оптимизируют производительность гостевых виртуальных машин и делают работу с ними более удобной. При этом, что очень важно, дополнительные ресурсы хоста виртуализации выделять не нужно!
Стоит отметить, что данный функционал реализован почти во всех популярных средах виртуализации. Например в VmWare, аналогом Guest Additions является VmWare Tools, в в Hyper-V — Integration Services
Guest Additions поддерживается для виртуальных машин всех популярных ОС: Windows, Linux, Mac OS X, FreeBSD, OpenBSD, Solaris. Полный список поддерживаемых ОС можно найти на сайте разработчика: https://www.virtualbox.org/manual/ch03.html#guestossupport.
Поставляется в виде образа .iso CD/DVD диска, который находится в установочной директории VirtualBox и называется VBoxGuestAdditions.iso.
Ну например в Windows 7 образ можно найти в C:\Program Files\Oracle\VirtualBox, если Вы, конечно, не установили сам VirtualBox куда-то ещё.
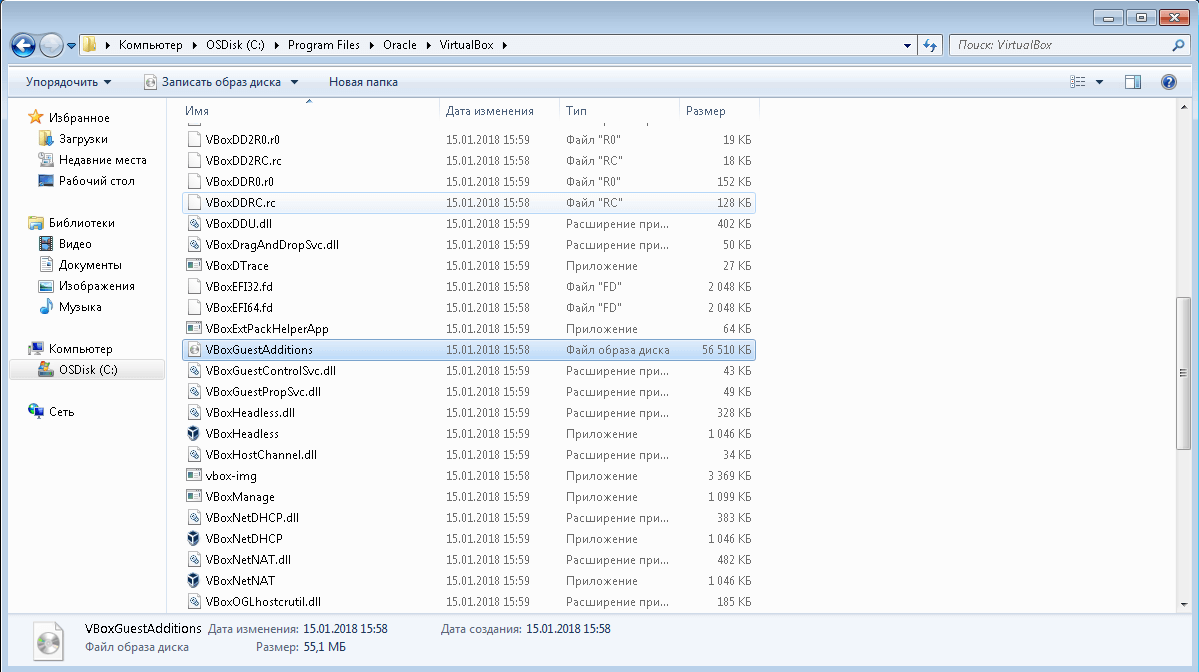
Поэтому нужно просто подмонтировать образ этого диска в виртуальной машине и запустить процесс установки.
Функциональные возможности
Итак, почему же стоит устанавливать Guest Additions? Сейчас объясню. Guest Additions включает следующий функционал:
- Интеграция указателя мыши. Больше не надо нажимать дополнительных кнопок чтобы “захватывать” (capture) и “освобождать” курсор на экране виртуальной машины.
- Общие папки. Позволяет создавать общие папки для быстрого обмена файлами между хостом и гостевой виртуальной машиной.
- Функция Drag and Drop. Позволяет переносить файлы с хоста на гостевую виртуальную машину и наоборот, захватывая контент курсором мыши.

В данном примере, мы перенесли файл text_file.txt с виртуальной машины с ОС Windows 7 на хост под управлением OS Linux Ubuntu при помощи функции Drag and Drop
Поддерживается начиная с VirtualBox 5.0. После установки Guest Additions, данный функционал необходимо включить в разделе Devices → Drag and Drop
- Улучшенная поддержка видео. Становится доступным ресайзинг окна виртуальной машины. Автоматически настраивается разрешение. Включается поддержка 3D и 2D графики и ускоренная производительность видео.
- Общий буфер обмена. Тут всё просто – теперь можно Copy/Paste как из, так и в виртуальную машину.
Включается также в разделе Devices → Clipboard
- Временная синхронизация. Включает автоматическую синхронизацию времени между хостом виртуализации и виртуальной машиной. Это важно в случае, когда например нужно “приостановить” (pause) работу виртуальной машины на большой промежуток времени.
- Одновременная работа с окнами разных ОС. Данный функционал лучше всего проиллюстрирует картинка ниже:
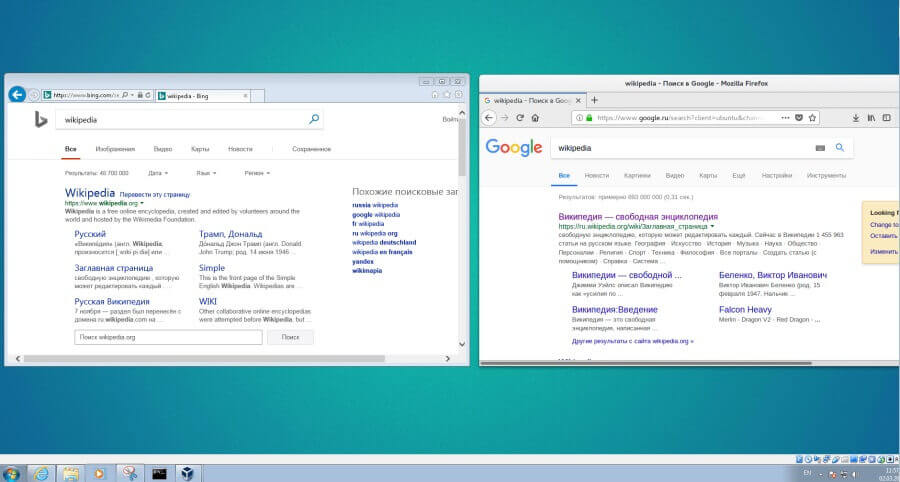
В данном примере – на хосте с OS Windows 7 в VirtualBox развёрнута виртуальная машина с OS Ubuntu Linux. Как видите, с помощью Guest Additions мы может одновременно работать с окнами этих ОС. На картинке – справа открыт Internet Explorer в Windows, а слева Mozzila Firefox в Ubuntu.
- Автоматические логины — позволяет настроить автоматический вход в виртуальную машину с помощью специальной подсистемы. Нужно только забить в ней реквизиты для доступа – имя учётной записи, пароль и домен.
В общем, если собираетесь работать с виртуальной машиной долго, то устанавливать Guest Additions – нужно! Это значительно облегчит работу. Тем более, что установка не займёт много времени. Кстати об установке.
Установка Windows
Установка Guest Additions для виртуальных машин с ОС Windows довольно тривиальна. В панели управления виртуальной машиной выбираем Устройства (Devices) → Подключить образ диска Дополнений гостевой ОС (Insert Guest Additions CD image)
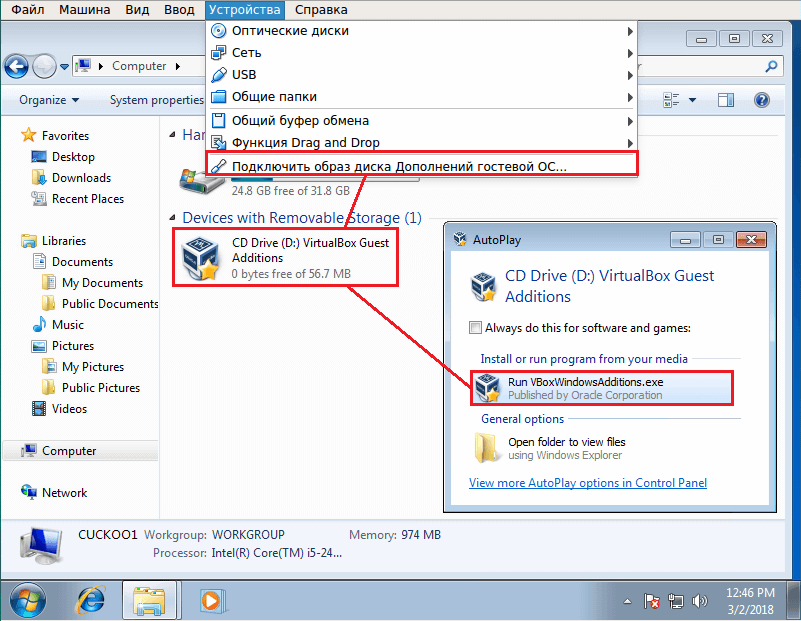
После этого система определит, что был установлен установочный диск, осталось только нажать Run и следовать стандартной процедуре установки. После установки система должна перезагрузиться, если этого не произошло, то сделайте это вручную.
Linux через GNOME
Установка на Linux с графическими интерфейсами типа GNOME также всё очень просто.
Для этого также выбираем Устройства (Devices) → Подключить образ диска Дополнений гостевой ОС (Insert Guest Additions CD image) в панели управления VirtualBox:

После этого система определит установочный диск и останется лишь нажать Run Software. После установки также требуется перезагрузить систему.
Linux через консоль
Гораздо интереснее дела обстоят с установкой на Linux без графических интерфейсов через консоль. Рассмотрим установку на примере CentOS 6. Начинаем с того, что также вставляем виртуальный диск.
После этого переходим в подмонтированный раздел: cd /mnt/cdrom/
И запускаем процесс установки следующей командой: ./VBoxLinuxAdditions.run
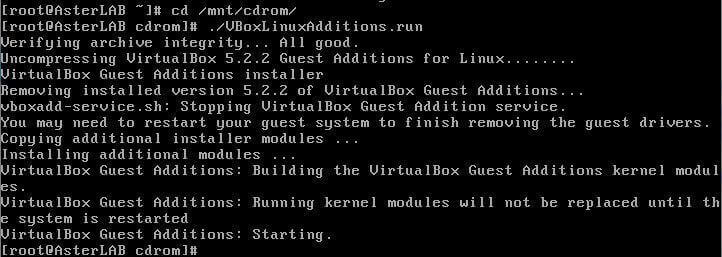
После этого делаем reboot .
Если всё прошло успешно, что появится новый модуль vboxguest. Проверить можно командой: lsmod | grep vboxguest :

Обучайся в Merion Academy
Пройди курс по сетевым технологиям
Начать
Полезно?
Почему?
😪 Мы тщательно прорабатываем каждый фидбек и отвечаем по итогам анализа. Напишите, пожалуйста, как мы сможем улучшить эту статью.
😍 Полезные IT – статьи от экспертов раз в неделю у вас в почте. Укажите свою дату рождения и мы не забудем поздравить вас.
Installing guest additions virtualbox windows
Guest Additions are available for virtual machines running Windows, Linux, Oracle Solaris, or OS/2. The following sections describe the specifics of each variant in detail.
4.2.1.В Guest Additions for Windows
The Oracle VM VirtualBox Windows Guest Additions are designed to be installed in a virtual machine running a Windows operating system. The following versions of Windows guests are supported:
Microsoft Windows NT 4.0 (any service pack)
Microsoft Windows 2000 (any service pack)
Microsoft Windows XP (any service pack)
Microsoft Windows Server 2003 (any service pack)
Microsoft Windows Server 2008
Microsoft Windows Vista (all editions)
Microsoft Windows 7 (all editions)
Microsoft Windows 8 (all editions)
Microsoft Windows 10 RTM build 10240
Microsoft Windows Server 2012
4.2.1.1.В Installing the Windows Guest Additions
In the Devices menu in the virtual machine’s menu bar, Oracle VM VirtualBox has a menu item Insert Guest Additions CD Image , which mounts the Guest Additions ISO file inside your virtual machine. A Windows guest should then automatically start the Guest Additions installer, which installs the Guest Additions on your Windows guest.
For other guest operating systems, or if automatic start of software on a CD is disabled, you need to do a manual start of the installer.
For the basic Direct3D acceleration to work in a Windows guest, you have to install the WDDM video driver available for Windows Vista or later.
For Windows 8 and later, only the WDDM Direct3D video driver is available. For basic Direct3D acceleration to work in Windows XP guests, you have to install the Guest Additions in Safe Mode. See Known Limitations for details.
If you prefer to mount the Guest Additions manually, you can perform the following steps:
Start the virtual machine in which you have installed Windows.
Select Mount CD/DVD-ROM from the Devices menu in the virtual machine’s menu bar and then CD/DVD-ROM Image . This displays the Virtual Media Manager, described in SectionВ 5.3, “The Virtual Media Manager”.
In the Virtual Media Manager, click Add and browse your host file system for the VBoxGuestAdditions.iso file.
On a Windows host, this file is in the Oracle VM VirtualBox installation directory, usually in C:\Program files\Oracle\VirtualBox .
On Mac OS X hosts, this file is in the application bundle of Oracle VM VirtualBox. Right-click on the Oracle VM VirtualBox icon in Finder and choose Show Package Contents . The file is located in the Contents/MacOS folder.
On a Linux host, this file is in the additions folder where you installed Oracle VM VirtualBox, usually /opt/VirtualBox/ .
On Oracle Solaris hosts, this file is in the additions folder where you installed Oracle VM VirtualBox, usually /opt/VirtualBox .
In the Virtual Media Manager, select the ISO file and click Select button. This mounts the ISO file and presents it to your Windows guest as a CD-ROM.
Unless you have the Autostart feature disabled in your Windows guest, Windows will now autostart the Oracle VM VirtualBox Guest Additions installation program from the Additions ISO. If the Autostart feature has been turned off, choose VBoxWindowsAdditions.exe from the CD/DVD drive inside the guest to start the installer.
The installer will add several device drivers to the Windows driver database and then invoke the hardware detection wizard.
Depending on your configuration, it might display warnings that the drivers are not digitally signed. You must confirm these in order to continue the installation and properly install the Additions.
After installation, reboot your guest operating system to activate the Additions.
4.2.1.2.В Updating the Windows Guest Additions
Windows Guest Additions can be updated by running the installation program again. This replaces the previous Additions drivers with updated versions.
Alternatively, you can also open the Windows Device Manager and select Update Driver. for the following devices:
Oracle VM VirtualBox Graphics Adapter
Oracle VM VirtualBox System Device
For each, choose the option to provide your own driver, click Have Disk and navigate to the CD-ROM drive with the Guest Additions.
4.2.1.3.В Unattended Installation
To avoid popups when performing an unattended installation of the Oracle VM VirtualBox Guest Additions, the code signing certificates used to sign the drivers needs to be installed in the correct certificate stores on the guest operating system. Failure to do this will cause a typical Windows installation to display multiple dialogs asking whether you want to install a particular driver.
On some Windows versions, such as Windows 2000 and Windows XP, the user intervention popups mentioned above are always displayed, even after importing the Oracle certificates.
Installing the code signing certificates on a Windows guest can be done automatically. Use the VBoxCertUtil.exe utility from the cert folder on the Guest Additions installation CD.
Use the following steps:
Log in as Administrator on the guest.
Mount the Oracle VM VirtualBox Guest Additions .ISO.
Open a command line window on the guest and change to the cert folder on the Oracle VM VirtualBox Guest Additions CD.
Run the following command:
This command installs the certificates to the certificate store. When installing the same certificate more than once, an appropriate error will be displayed.
To allow for completely unattended guest installations, you can specify a command line parameter to the install launcher:
This automatically installs the right files and drivers for the corresponding platform, either 32-bit or 64-bit.
By default on an unattended installation on a Vista or Windows 7 guest, there will be the XPDM graphics driver installed. This graphics driver does not support Windows Aero / Direct3D on the guest. Instead, the WDDM graphics driver needs to be installed. To select this driver by default, add the command line parameter /with_wddm when invoking the Windows Guest Additions installer. This is only required for Vista and Windows 7.
For Windows Aero to run correctly on a guest, the guest’s VRAM size needs to be configured to at least 128 MB.
For more options regarding unattended guest installations, consult the command line help by using the command:
4.2.1.4.В Manual File Extraction
If you would like to install the files and drivers manually, you can extract the files from the Windows Guest Additions setup as follows:
To explicitly extract the Windows Guest Additions for another platform than the current running one, such as 64-bit files on a 32-bit system, you must use the appropriate platform installer. Use VBoxWindowsAdditions-x86.exe or VBoxWindowsAdditions-amd64.exe with the /extract parameter.
4.2.2.В Guest Additions for Linux
Like the Windows Guest Additions, the Oracle VM VirtualBox Guest Additions for Linux are a set of device drivers and system applications which may be installed in the guest operating system.
The following Linux distributions are officially supported:
Oracle Linux as of version 5, including UEK kernels
Fedora as of Fedora Core 4
Red Hat Enterprise Linux as of version 3
SUSE and openSUSE Linux as of version 9
Ubuntu as of version 5.10
Many other distributions are known to work with the Guest Additions.
The version of the Linux kernel supplied by default in SUSE and openSUSE 10.2, Ubuntu 6.10 (all versions) and Ubuntu 6.06 (server edition) contains a bug which can cause it to crash during startup when it is run in a virtual machine. The Guest Additions work in those distributions.
Note that some Linux distributions already come with all or part of the Oracle VM VirtualBox Guest Additions. You may choose to keep the distribution’s version of the Guest Additions but these are often not up to date and limited in functionality, so we recommend replacing them with the Guest Additions that come with Oracle VM VirtualBox. The Oracle VM VirtualBox Linux Guest Additions installer tries to detect an existing installation and replace them but depending on how the distribution integrates the Guest Additions, this may require some manual interaction. It is highly recommended to take a snapshot of the virtual machine before replacing preinstalled Guest Additions.
4.2.2.1.В Installing the Linux Guest Additions
The Oracle VM VirtualBox Guest Additions for Linux are provided on the same virtual CD-ROM file as the Guest Additions for Windows. See Section 4.2.1.1, “Installing the Windows Guest Additions”. They also come with an installation program that guides you through the setup process. However, due to the significant differences between Linux distributions, installation may be slightly more complex when compared to Windows.
Installation generally involves the following steps:
Before installing the Guest Additions, you prepare your guest system for building external kernel modules. This works as described in Section 2.3.2, “The Oracle VM VirtualBox Kernel Modules”, except that this step must be performed in your Linux guest instead of on a Linux host system.
If you suspect that something has gone wrong, check that your guest is set up correctly and run the following command as root:
Insert the VBoxGuestAdditions.iso CD file into your Linux guest’s virtual CD-ROM drive, as described for a Windows guest in SectionВ 4.2.1.1, “Installing the Windows Guest Additions”.
Change to the directory where your CD-ROM drive is mounted and run the following command as root:
4.2.2.2.В Graphics and Mouse Integration
In Linux and Oracle Solaris guests, Oracle VM VirtualBox graphics and mouse integration goes through the X Window System. Oracle VM VirtualBox can use the X.Org variant of the system, or XFree86 version 4.3 which is identical to the first X.Org release. During the installation process, the X.Org display server will be set up to use the graphics and mouse drivers which come with the Guest Additions.
After installing the Guest Additions into a fresh installation of a supported Linux distribution or Oracle Solaris system, many unsupported systems will work correctly too, the guest’s graphics mode will change to fit the size of the Oracle VM VirtualBox window on the host when it is resized. You can also ask the guest system to switch to a particular resolution by sending a video mode hint using the VBoxManage tool.
Multiple guest monitors are supported in guests using the X.Org server version 1.3, which is part of release 7.3 of the X Window System version 11, or a later version. The layout of the guest screens can be adjusted as needed using the tools which come with the guest operating system.
If you want to understand more about the details of how the X.Org drivers are set up, in particular if you wish to use them in a setting which our installer does not handle correctly, see Guest Graphics and Mouse Driver Setup in Depth.
4.2.2.3.В Updating the Linux Guest Additions
The Guest Additions can simply be updated by going through the installation procedure again with an updated CD-ROM image. This will replace the drivers with updated versions. You should reboot after updating the Guest Additions.
4.2.2.4.В Uninstalling the Linux Guest Additions
If you have a version of the Guest Additions installed on your virtual machine and wish to remove it without installing new ones, you can do so by inserting the Guest Additions CD image into the virtual CD-ROM drive as described above. Then run the installer for the current Guest Additions with the uninstall parameter from the path that the CD image is mounted on in the guest, as follows:
While this will normally work without issues, you may need to do some manual cleanup of the guest in some cases, especially of the XFree86Config or xorg.conf file. In particular, if the Additions version installed or the guest operating system were very old, or if you made your own changes to the Guest Additions setup after you installed them.
You can uninstall the Additions as follows:
Replace /opt/VBoxGuestAdditions- version with the correct Guest Additions installation directory.
4.2.3.В Guest Additions for Oracle Solaris
Like the Windows Guest Additions, the Oracle VM VirtualBox Guest Additions for Oracle Solaris take the form of a set of device drivers and system applications which may be installed in the guest operating system.
The following Oracle Solaris distributions are officially supported:
Oracle Solaris 11, including Oracle Solaris 11 Express
Oracle Solaris 10 4/08 and later
Other distributions may work if they are based on comparable software releases.
4.2.3.1.В Installing the Oracle Solaris Guest Additions
The Oracle VM VirtualBox Guest Additions for Oracle Solaris are provided on the same ISO CD-ROM as the Additions for Windows and Linux. They come with an installation program that guides you through the setup process.
Installation involves the following steps:
Mount the VBoxGuestAdditions.iso file as your Oracle Solaris guest’s virtual CD-ROM drive, exactly the same way as described for a Windows guest in SectionВ 4.2.1.1, “Installing the Windows Guest Additions”.
If the CD-ROM drive on the guest does not get mounted, as seen with some versions of Oracle Solaris 10, run the following command as root:
Change to the directory where your CD-ROM drive is mounted and run the following command as root:
Choose 1 and confirm installation of the Guest Additions package. After the installation is complete, log out and log in to X server on your guest, to activate the X11 Guest Additions.
4.2.3.2.В Uninstalling the Oracle Solaris Guest Additions
The Oracle Solaris Guest Additions can be safely removed by removing the package from the guest. Open a root terminal session and run the following command:
4.2.3.3.В Updating the Oracle Solaris Guest Additions
The Guest Additions should be updated by first uninstalling the existing Guest Additions and then installing the new ones. Attempting to install new Guest Additions without removing the existing ones is not possible.
4.2.4.В Guest Additions for OS/2
Oracle VM VirtualBox also ships with a set of drivers that improve running OS/2 in a virtual machine. Due to restrictions of OS/2 itself, this variant of the Guest Additions has a limited feature set. See Known Limitations for details.
The OS/2 Guest Additions are provided on the same ISO CD-ROM as those for the other platforms. Mount the ISO in OS/2 as described previously. The OS/2 Guest Additions are located in the directory \OS2 .
We do not provide an automatic installer at this time. See the readme.txt file in the CD-ROM directory, which describes how to install the OS/2 Guest Additions manually.
Copyright В© 2004, 2020 Oracle and/or its affiliates. All rights reserved. Legal Notices


