- How to install Linux on Windows Laptop – Simple Steps
- Linux Versions
- “Note: For the systems with older CPU you have to download 32-bit Linux OS instead of 64-bit version.”
- Step by Step Instructions to install Linux on Windows Laptop PC
- Step-1 Create a bootable Ubuntu Linux USB
- Step-2 Create a Raw Partition.
- Step-3 Install Ubuntu
- Final Words
- How to Download & Install Linux (Ubuntu) in Windows PC
- What is a Linux Distribution?
- How many distributions are out there?
- The Best Linux Distribution!
- How to Install Linux
- Installing Linux using USB stick
- Installing Linux using CD-ROM
- Installing Linux using Virtual Machine
How to install Linux on Windows Laptop – Simple Steps
Why Linux? Well, the most important reason for using the Linux operating system is its resistance against malware and ransomware attacks. It’s a fast, robust and a lightweight OS that requires less space and minimum hardware resources to run. You can install Linux independently or along with other Operating Systems including Windows. In this article, I will discuss the perquisites and the installation steps needed to install Linux on Windows Laptop.
Linux Versions
Before you actually start downloading the Linux OS. There are many variants of Linux to choose from, and it is always confusing to pick the right distro (distribution) for you. There are many factors which can influence your decision while using a specific Linux distro. You need to check the support, its compatibility with different apps or software you intend to use, hardware requirements and last but not the least your own skills in Linux. Having said that, if you are a beginner you can opt for Ubuntu, OpenSUSE, Fedora and Linux Mint. On the other hand, if you are a seasoned player in Linux you can go for Gentoo, Debian or Slackware.

“Note: For the systems with older CPU you have to download 32-bit Linux OS instead of 64-bit version.”
Preparation
- Make sure the windows OS is already installed on your computer
- Check the availability of partition on the hard disk. You can check the partitions with disk management utility.
- Download an ISO file of Linux. In this tutorial we will be using Linux Mint, you can download any version since the installation steps are the same in all the Linux versions.
Step by Step Instructions to install Linux on Windows Laptop PC
Step-1 Create a bootable Ubuntu Linux USB
After you have successfully downloaded the ISO file of Linux OS, it’s time to create a bootable CD or a USB drive. You can use any of the software available for this purpose. Some of the top bootable USB tools include Rufus, WinSetupFromUSB, UnetBootin, and WintoBootic.
We will use a portable version of Rufus to create a bootable USB disk. Rufus offers two versions of software one of them is an installable version, and the other one is a portable app. Open the software and insert a blank USB in USB port (of at least 2GB of size) of your system.

Select ISO image in front of the “Create a bootable disk using” field as shown in the image above. Click on the small icon provided beside this and select the ISO image file from the location where you have saved it earlier.
Step-2 Create a Raw Partition.
You need an unallocated space on hard disk. Right click on “My Computer,” click or tap on Manage and in the next screen, under the storage click on Disk Management.
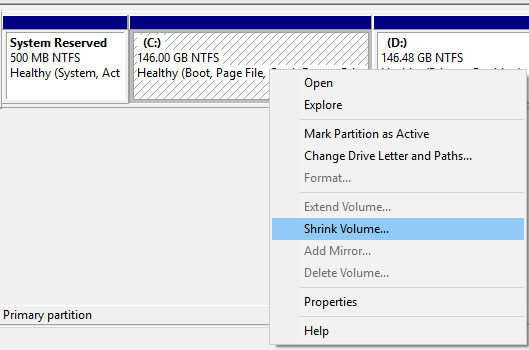
Now right click on C drive and click Shrink Volume. Enter the amount of space to shrink. It will show an unallocated space alongside primary volume.
Step-3 Install Ubuntu
Insert the Bootable USB drive in the USB port and turn on the computer. Move to Boot options; you can do so by pressing F9 or F2 keys on the keyboard. Now select the USB drive as the boot option.
The system will start loading from Ubuntu USB drive and present you following five options to you.
- Try Ubuntu without installing
- Install Ubuntu
- Check Disk for Defects
- Test memory
- Boot from the first Disk
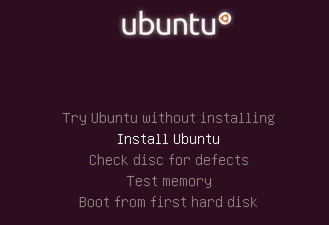
I will select the second option that says “Install Ubuntu.”
In the Next screen, you will get two options.
- Try Ubuntu. This option will open the Ubuntu desktop without writing any files on the hard disk. This is good to have a feel of Linux environment before actually installing this OS on the storage drive.
- Install Ubuntu. If you have made up your mind to install a fresh copy of Ubuntu or install it in addition to your existing windows, you have to select this option.
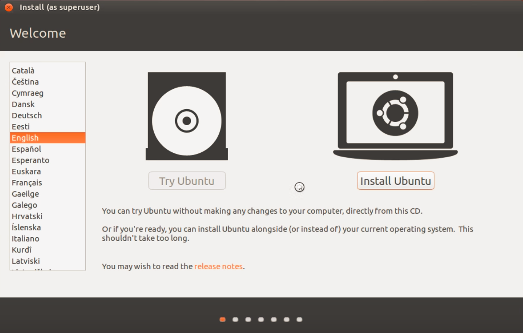
We will click on install Ubuntu and on the next screen, it will display two option to select from. You need to check both these options that say “Download updates while installing Ubuntu” and “Install third-party software for graphics and other hardware.”
Both of the above options will protect your system against any irritating notifications to update the Linux OS after completion. The second option will install all the necessary drivers for graphics, Wi-Fi, sound and other hardware.
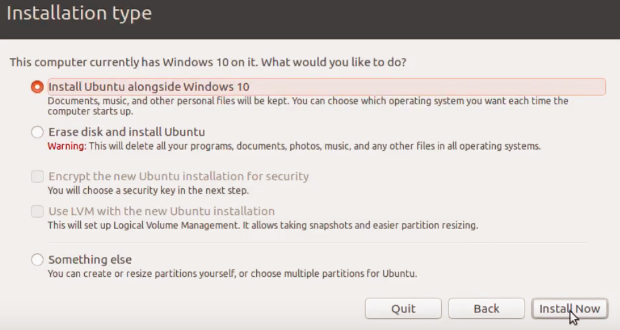
Installation Type. You can choose one of the options of installation types. Here we will select 1st option since we are installing Linux on a Windows Laptop.
- Install Ubuntu alongside Windows 10
- Erase Disk and Install Ubuntu
- Something else. Select this for managing partitions manually.
Select Region and keyboard layout. In the next two screens, select your geographical location where you are and select the keyboard layout and language.
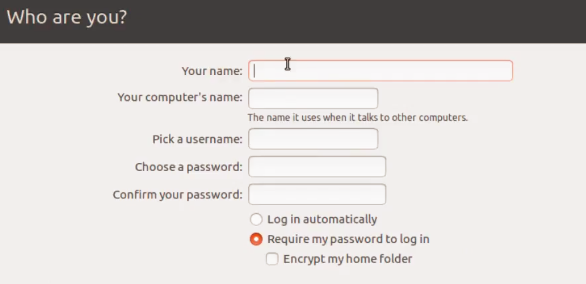
Who are you? In this step, you will be asked to fill in your credentials. Here you need to type your name and computer’s name. In the next fields you can have your username and password and select the option whether the Linux requires username and password to login or you want the Linux to open automatically.
After you have completed all the steps described above, it’s time to sit back and relax while Ubuntu Linux copies the necessary files. Finally, when (depending on the speed of your system) you get a message that “the installation is complete and you need to restart the computer in order to use Linux” go to the last step of installation.
Restart the Computer
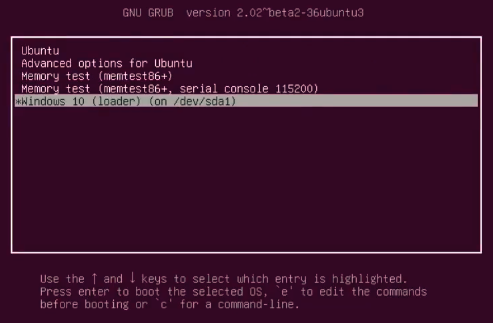
After you restart the computer, you will get the options to select Ubuntu or Windows 10. You can login to Ubuntu by inputting the username and password.
Final Words
The user-interface of Linux has improved a lot in the recent years. Users have started using it on their desktops either in a dual-boot mode or stand alone. Riding on the popularity, Linux is used both by business and corporates and home users, and the trend is on the rise. By following the instructions mentioned here, you can install multiple operating systems as well as multiple Linux distributions on a single system. Which Linux distro are you using on your system? Share your views below.
Источник
How to Download & Install Linux (Ubuntu) in Windows PC
Updated October 7, 2021
Now that we know what Linux is, it is the time that to learn how we should install it on the computer and choose which Distribution we should use. Let us start by understanding what a Linux Distribution is.
In this tutorial, we will learn –
What is a Linux Distribution?
Well, now as you know that Linux is open-source, free to use kernel. It is used by programmers, organizations, profit and non-profit companies around the world to create Operating systems to suit their individual requirements.
To prevent hacking attempts, many organizations keep their Linux operating systems private.
Many others make their variations of Linux available publicly so the whole world can benefit at large.
These versions/ types /kinds of Linux operating system are called Distributions.
Click here if the video is not accessible
How many distributions are out there?

There are hundreds of Linux operating systems or Distributions available these days. Many of them are designed with a specific purpose in mind. For example, to run a web server or to run on network switches like routers, modems, etc.
The latest example of one of the most popular smartphone-based Linux Distribution is Android!
Many of these Distributions are built to offer excellent personal computing.
Here, are a few popular Linux Distributions (also called Linux Distro) –
| Linux Distribution | Name | Description |
|---|---|---|
 | Arch | This Linux Distro is popular amongst Developers. It is an independently developed system. It is designed for users who go for a do-it-yourself approach. |
 | CentOS | It is one of the most used Linux Distribution for enterprise and web servers. It is a free enterprise class Operating system and is based heavily on Red Hat enterprise Distro. |
 | Debian | Debian is a stable and popular non-commercial Linux distribution. It is widely used as a desktop Linux Distro and is user-oriented. It strictly acts within the Linux protocols. |
 | Fedora | Another Linux kernel based Distro, Fedora is supported by the Fedora project, an endeavor by Red Hat. It is popular among desktop users. Its versions are known for their short life cycle. |
 | Gentoo | It is a source based Distribution which means that you need to configure the code on your system before you can install it. It is not for Linux beginners, but it is sure fun for experienced users. |
 | LinuxMint | It is one of the most popular Desktop Distributions available out there. It launched in 2006 and is now considered to be the fourth most used Operating system in the computing world. |
 | OpenSUSE | It is an easy to use and a good alternative to MS Windows. It can be easily set up and can also run on small computers with obsolete configurations. |
.png) | RedHat enterprise | Another popular enterprise based Linux Distribution is Red Hat Enterprise.It has evolved from Red Hat Linux which was discontinued in 2004. It is a commercial Distro and very popular among its clientele. |
 | Slackware | Slackware is one of the oldest Linux kernel based OS’s. It is another easy desktop Distribution. It aims at being a ‘Unix like’ OS with minimal changes to its kernel. |
| Ubuntu | This is the third most popular desktop operating system after Microsoft Windows and Apple Mac OS. It is based on the Debian Linux Distribution, and it is known as its desktop environment. |
The Best Linux Distribution!
The term best is relative. Each Linux distribution is built for a specific purpose-built to meet the demands of its target users.
The desktop Distributions are available for free on their respective websites. You might want to try them one by one till you get to know which Distribution you like the most. Each one of them offers its own unique design applications, and security.
We will be using Ubuntu for our learning purpose as it’s easy for a beginner to understand.
How to Install Linux
Let’s look the below Linux installation guide which has various methods we can use to Download Linux(Ubuntu) and install it.
Installing Linux using USB stick
This is one of the easiest methods of installing Ubuntu or any distribution on your computer. Follow the steps to install Ubuntu from USB.

Step 1) Download the .iso or the OS files on your computer from this link.

Step 2) Download free software like Universal USB installer to make a bootable USB stick.

Step 3) Select an Ubuntu Distribution form the dropdown to put on your USB
Select your Ubuntu iso file download in step 1.
Select the drive letter of USB to install Ubuntu and Press create button.

Step 4) Click YES to Install Ubuntu in USB.

Step 5) After everything has been installed and configured, a small window will appear Congratulations! You now have Ubuntu on a USB stick, bootable and ready to go.

Installing Linux using CD-ROM
Those who like the way a CD runs should try using this method.

Step 1) Download the .iso or the OS files onto your computer from this link http://www.ubuntu.com/download/desktop.
Step 2) Burn the files to a CD.

Step 3) Boot your computer from the optical drive and follow the instructions as they come.
Installing Linux using Virtual Machine
This is a popular method to install a Linux operating system. The virtual installation offers you the freedom of running Linux on an existing OS already installed on your computer. This means if you have Windows running, then you can just run Linux with a click of a button.
Virtual machine software like Oracle VM can install Linux on Windows in easy steps. Let us look at them.
Here the brief steps

PART A) Download and Install Virtual Box
Download Virtual box using this link
Depending on your processor and OS, select the appropriate package. In our case, we have selected Windows with AMD

Once the download is complete, Open setup file and follow the steps below:
Step-1) Click On next

Step-2) Select you’re the directory to install VirtualBox and click on next

Step-3) Select Desktop icon and click on next, now click on yes

Step-4) Click On install to install Linux on Windows.

Step-5) Now installation of the virtual box will start. Once complete, click on Finish Button to start Virtual Box

The virtual box dashboard looks like this-

PART B) Download Ubuntu
Visit this link to download Ubuntu.

You can select 32/64-bit versions as per your choice.
PART C) Create a Machine in Virtual Box
Step-1) Open Virtual box and click on new button

Step-2) In next window, give the name of your OS which you are installing in virtual box. And select OS like Linux and version as Ubuntu 32 bit. And click on next

Step-3) Now Allocate Ram Size To your Virtual OS. I recommended keeping 1024mb (1 GB) ram to run Ubuntu better. And click on next.

Step-4) Now To run OS in virtual box we have to create virtual hard disk, click on create a virtual hard drive now and click on create button.
The virtual hard disk is where the OS installation files and data/applications you create/install in this Ubuntu machine will reside

Step-5) select VHD (virtual hard disk) option and click on next.

Step-6) Click on dynamic allocated and click on next. This means that the size of the disk will increase dynamically as per requirement.

Step-7) Allocate memory to your virtual hard drive .8GB recommended. Click on create button.

Step-8) Now you can see the machine name in left panel

So a Machine (PC) with 8GB Hardisk, 1GB RAM is ready.
PART D) How to Install Ubuntu
Step 1) Select the Machine and Click on Start

Step 2) Select the Folder Option

Step 3) Select the Ubuntu iso file

Step 4) Click Start

Step-5) You have an option to Run Ubuntu WITHOUT installing. In this tutorial will install Ubuntu

Step-6) Click continue.

Step-7) Select option to erase the disk and install Ubuntu and click on install now. This option installs Ubuntu into our virtual hard drive which is we made earlier. It will not harm your PC or Windows installation

Step-8) Select your location for setting up time zone, and click on continue

Step-9) Select your keyboard layout, by default English (US) is selected but if you want to change then, you can select in the list. And click on continue

Step-10) Select your username and password for your Ubuntu admin account. This information has been needed for installing any software package into Ubuntu and also for login to your OS. Fill up your details and tick on login automatically to ignore login attempt and click on continue

Step-11) Installation process starts. May take up to 30 minutes. Please wait until installation process completes.

Step-12) After finishing the installation, you will see Ubuntu Desktop.
Источник


