- Install Linux Inside Windows Using VirtualBox [Step by Step Guide]
- Installing Linux inside Windows using VirtualBox
- Requirements
- Step 1: Download and install VirtualBox
- Step 2: Download the Linux ISO
- Step 3: Install Linux using VirtualBox
- Troubleshooting: AMD-V is disabled in the BIOS
- About Abhishek Prakash
- Установка Linux на Virtualbox
- Установка Linux на VirtualBox
- Выводы
Install Linux Inside Windows Using VirtualBox [Step by Step Guide]
Last updated April 29, 2021 By Abhishek Prakash 220 Comments
Brief: Using Linux in a virtual machine gives you the option to try Linux within Windows. This step-by-step guide shows you how to install Linux inside Windows using VirtualBox.
There are several ways to install Linux. You can clean everything from your system and install Linux. You can dual boot Linux with Windows and choose one of the operating systems at the boot time. You can even install Linux within Windows from Microsoft Store (though this only provides you with the command line version of Linux).
But if you want to use Linux without making any changes to your Windows system, you can go the virtual machine route. Basically, you install and use Linux like any regular Windows application. When you just want to try Linux for limited use, virtual machines provide the most comfortable option.
In this tutorial, I’ll show you how to install Linux inside Windows using VirtualBox.
Installing Linux inside Windows using VirtualBox
VirtualBox is free and open source virtualization software from Oracle. It enables you to install other operating systems in virtual machines. It is recommended that your system should have at least 4GB of RAM to get decent performance from the virtual operating system.
Requirements
- Good internet connection to download software and Linux ISO. (You can also use some other computer with an internet connection to download these files.)
- Windows system with at least 12 GB of free space.
- Windows system with 4GB of rRAM. (It can work with less RAM as well, but your system will start to lag while using Linux in the virtual machine.)
- Make sure to enable virtualization in the BIOS
I am installing Ubuntu 17.10 in this tutorial, but the same steps apply to any other Linux distribution. If you prefer videos, you can watch the one below from our YouTube channel:
Step 1: Download and install VirtualBox
Go to the website of Oracle VirtualBox and get the latest stable version from here:
Installing VirtualBox is not rocket science. Just double-click on the downloaded .exe file and follow the instructions on the screen. It is like installing any regular software on Windows.
Step 2: Download the Linux ISO
Next, you need to download the ISO file of the Linux distribution. You can get this image from the official website of the Linux distribution you are trying to use.
I am using Ubuntu in this example, and you can download ISO images for Ubuntu from the link below:
Step 3: Install Linux using VirtualBox
You have installed VirtualBox and you have downloaded the ISO for Linux. You are now set to install Linux in VirtualBox.
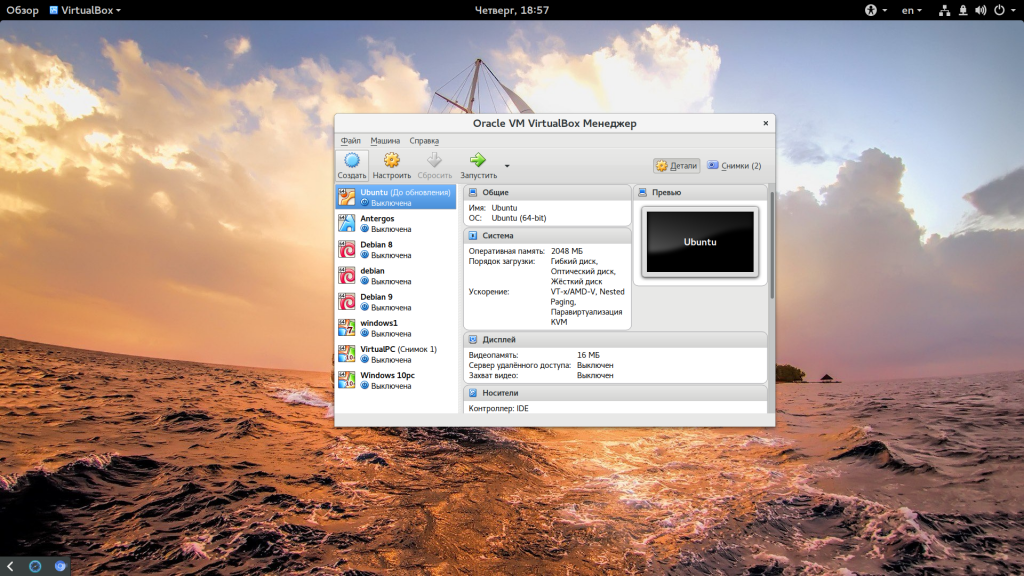
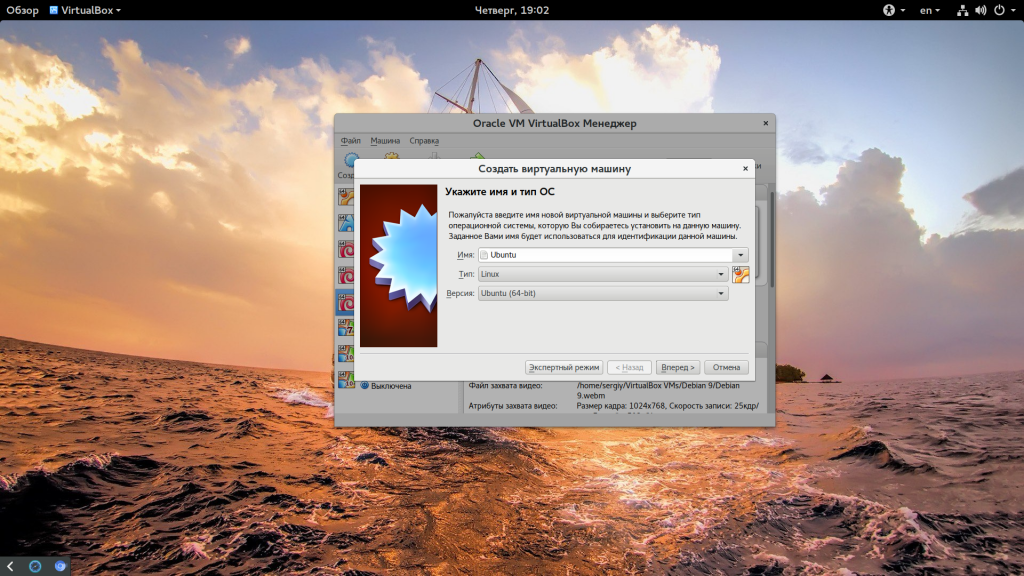
Start VirtualBox, and click on the New symbol. Give the virtual OS a relevant name.

Allocate RAM to the virtual OS. My system has 8GB of RAM and I decided to allocate 2GB of it. You can use more RAM if your system has enough extra.

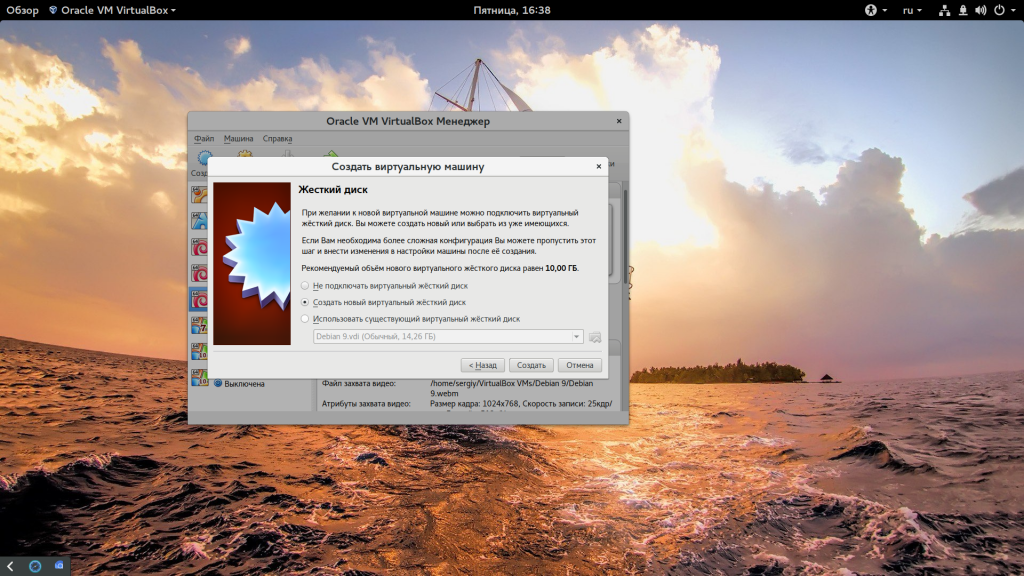
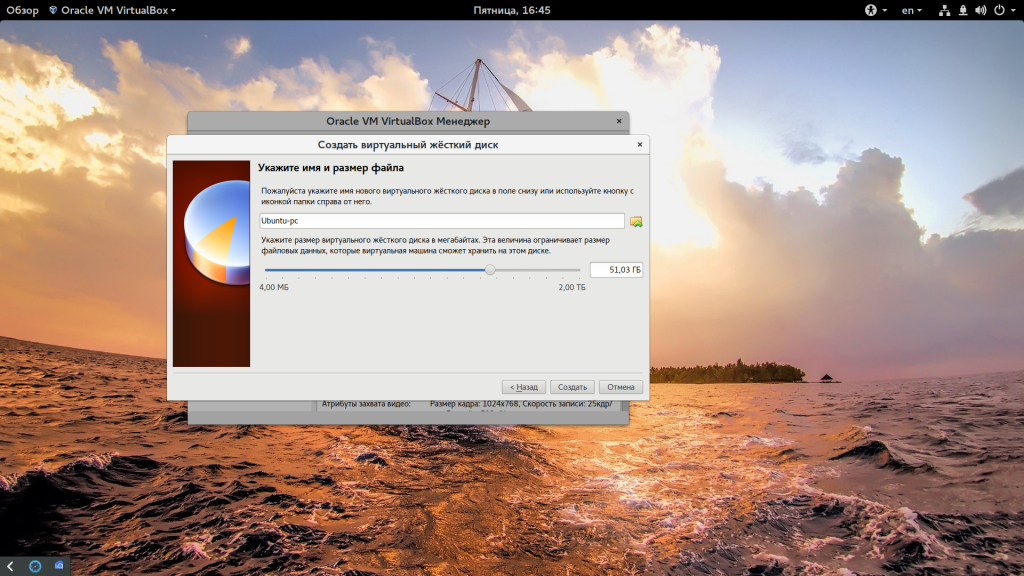
Create a virtual disk. This serves as the hard disk of the virtual Linux system. It is where the virtual system will store its files.

I recommend using the VDI file type here.

You can choose either the “Dynamically allocated” or the “Fixed size” option for creating the virtual hard disk.

The recommended size is 10 GB. However, I suggest giving it more space if possible. 15-20 GB is preferable.

Once everything is in place, it’s time to boot that ISO and install Linux as a virtual operating system.

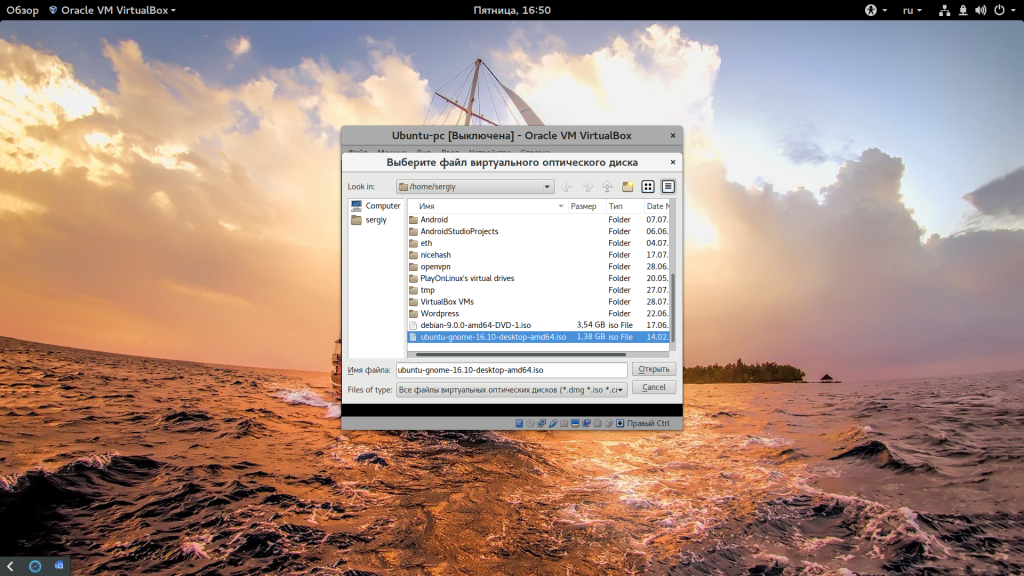
If VirtualBox doesn’t detect the Linux ISO, browse to its location by clicking the folder icon as shown in the picture below:

Soon you’ll find yourself inside Linux. You should be presented with the option to install it.
Things from here are Ubuntu-specific. Other Linux distributions may have slightly different looking steps, but it won’t be complicated at all.

You can skip to Continue.

Select ‘Erase disk and install Ubuntu’. Don’t worry. It won’t delete anything on your Windows operating system. You are using the virtual disk space of 15-20GB that we created in previous steps. It won’t impact the real operating system.

Just click on Continue.

Things are pretty straightforward from here.


Try to choose a password that you can remember. You can also reset the password in Ubuntu if you forget it.

You are almost done. It may take 10-15 minutes to complete the installation.

Once the installation finishes, restart the virtual system.

If it gets stuck on the screen below, you may close the VirtualBox.

And that’s all. From now on, just click on the installed Linux virtual machine. You’ll be able to use it directly. The installation is a one time only process. You can even delete the Linux ISO that you downloaded earlier.
I strongly recommend using VirtualBox Guest Additions on Ubuntu for it provides better compatibility and you would be able to use copy-paste and drag-drop between Linux and Windows.
Troubleshooting: AMD-V is disabled in the BIOS
If you face this error while using the virtual machine:
Not in a hypervisor partition (HVP=0) (VERR_NEM_NOT_AVAILABLE).
AMD-V is disabled in the BIOS (or by the host OS) (VERR_SVM_DISABLED).
Result Code:
E_FAIL (0x80004005)
Component:
ConsoleWrap
Interface:
IConsole
This means that virtualization is blocked on your system. You’ll have to activate it in your BIOS settings first.
Reboot your system and as soon as it powers up, press F2/F10/F12 to access BIOS settings. You have to look for the virtualization option in the BIOS and enable it.
Any questions?
That’s all you need to do to install Linux in VirtualBox on Windows. If you have any doubts, or if you encounter any issues, please feel free to ask your questions in the comment box below.
Like what you read? Please share it with others.
About Abhishek Prakash
Creator of It’s FOSS. An ardent Linux user & open source promoter. Huge fan of classic detective mysteries ranging from Agatha Christie and Sherlock Holmes to Detective Columbo & Ellery Queen. Also a movie buff with a soft corner for film noir.
Thanks for the article and for the troubleshoot step for the virtualization disabled by default 🙂
You are welcome.
I just followed your steps and it installed and ran Ubuntu just fine. Everything seems to work. I even installed Chrome easily. I’m running it on a laptop with a 1.2g Intel and 8g of RAM. Thank you for the article.
You are welcome 🙂
Just wanted to thank you for this amazing workflow.
Glad you liked it.
Thank You! I’m taking a Linux class right now at my local community college and I greatly appreciate you helping me with furthering my IT endeavors and career. Good luck with everyone else and thank you again!
Happy to be of help with your learning and career. Do subscribe to the weekly newsletter to get regular updates.
Thanks Abhishek that was very helpful and easy to follow. Post the installation of Ubuntu 20.04.3 LTS, I am having a peculiar problem. Basically the libc library and header files are not there though I have updated all the files during install. The specific error I get is :
gcc: fatal error: stdio.h: No such file or directory
on trying various fixes
e.g.
sudo apt-get install libc6-dev
I still get the following
>>>sudo apt-get install build-essential
Reading package lists… Done
Building dependency tree
Reading state information… Done
Some packages could not be installed. This may mean that you have
requested an impossible situation or if you are using the unstable
distribution that some required packages have not yet been created
or been moved out of Incoming.
The following information may help to resolve the situation:
The following packages have unmet dependencies:
build-essential : Depends: libc6-dev but it is not going to be installed or
libc-dev
Depends: g++ (>= 4:9.2) but it is not going to be installed
E: Unable to correct problems, you have held broken packages.
Any thought? I basically want to write my code in C / C++ (including system calls) and run them.
Источник
Установка Linux на Virtualbox
Для тестирования новых дистрибутивов и операционных систем не всегда удобно использовать реальный компьютер. Если хочется посмотреть что изменилось в том или ином дистрибутиве, или вам нужно запустить несколько программ, которые не устанавливаются в вашей системе, вы можете установить нужный дистрибутив на виртуальную машину. Для новичков вообще обязательно сначала установить систему на виртуальную машину и разобраться с ней.
Установка Linux на VirtualBox достаточно проста и не требует много знаний. Нужно только выбрать подходящие параметры, настроить жесткий диск и пройти процесс установки, как и при установке обычной системы. В одной из предыдущих статей мы рассматривали как пользоваться VirtualBox в более общем смысле, в этой же поговорим как установить Linux на VirtualBox.
Установка Linux на VirtualBox
Для того чтобы установить Linux на VirtualBox нам понадобиться несколько вещей:
- Образ диска с Linux — определитесь какой дистрибутив вы собираетесь устанавливать и загрузите его образ на официальном сайте, например, Ubuntu или Fedora. Также обратите внимание на архитектуру образа, если у вас 32 битная основная система, то вряд ли у вас получиться запустить 64 бит гостевую;
- Установленная виртуальная машина — VirtualBox, это кроссплатформенная программа, которая может работать не только в Linux, но и в Windows и MacOS. Поэтому вы можете запускать Linux в любой операционной системе. Для большинства из них можно скачать установщик VirtualBox на официальном сайте программы;
- Компьютер с поддержкой аппаратной виртуализации — конечно, вы можете запускать виртуальные машины и без поддержки аппаратной виртуализации, но они будут работать в разы медленнее. Большинство современных процессоров поддерживают AMD-V или Intel-VT-X. Посмотрите нельзя ли включить такую возможность в вашем BIOS.
Если у вас все это поддерживается мы можем перейти к созданию виртуальной машины. Запустите VirtualBox и нажмите кнопку создать:
 В первом окне мастера введите название вашей новой виртуальной машины, выберите тип (Linux) и дистрибутив, например, Ubuntu:
Следующий шаг — нужно выбрать количество оперативной памяти для вашей машины, но умолчанию VirtualBox предлагает количество памяти в зависимости от используемой машины, но для современных дистрибутивов будет достаточно 2 Гб, это нужно для более плавной и удобной работы, хотя система будет работать и при 1024 Мб и даже меньшем объеме.
Дальше нам необходимо создать жесткий диск для установки системы, объем диска зависит от операционной системы, но поскольку вы можете создавать динамический диск, который будет изменять размер реального файла в файловой системе по мере наполнения, то можно указать 30 или даже 50 Гб чтобы было точно достаточно.
Сначала выберите «Создать новый виртуальный жесткий диск», затем выберите тип диска:
 Наиболее часто для виртуальных машин используется диск типа VDI. Затем выберите размер диска и имя для его файла. Хотя и есть возможность использовать место по мере необходимости, лучше так не делать на HDD, лучше выделяйте все место сразу, это увеличит производительность до 10%:
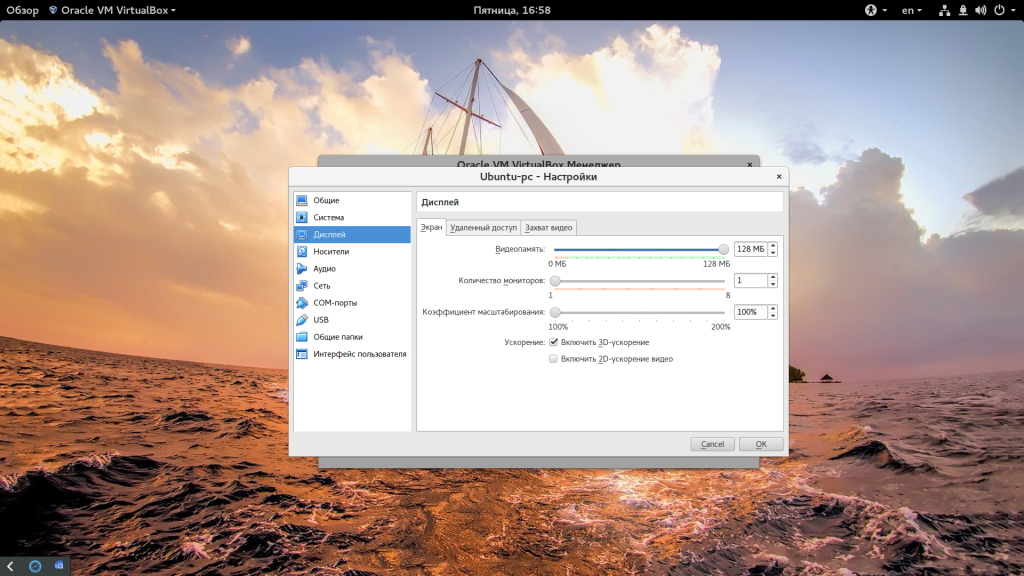
Виртуальная машина почти готова, но нужно еще кое-что настроить. По умолчанию VirtualBox выделяет 16 мегабайт оперативной памяти для машин, но современным дистрибутивам этого мало, поэтому нажмите «Настройки», а затем на вкладке «Дисплей» установите значение видеопамяти в 128 мегабайт. Этого уже должно хватить. Кроме того, отметьте галочку 3D ускорения:
Еще нас будет интересовать раздел «Система», вкладка «Материнская плата», здесь нужно выбрать чипсет » ICH9″, Linux работает с ним лучше, также отметьте галочки часов в UTC.
На вкладке «Процессор» нужно отметить использовать «PAE/NX», и не выбирайте много процессоров, одного ядра будет достаточно. В разделе «Ускорение» отметить все галочки и выбрать ваш гипервизор, в Linux лучше всего использовать KVM:

Дальше запускайте виртуальную машину:
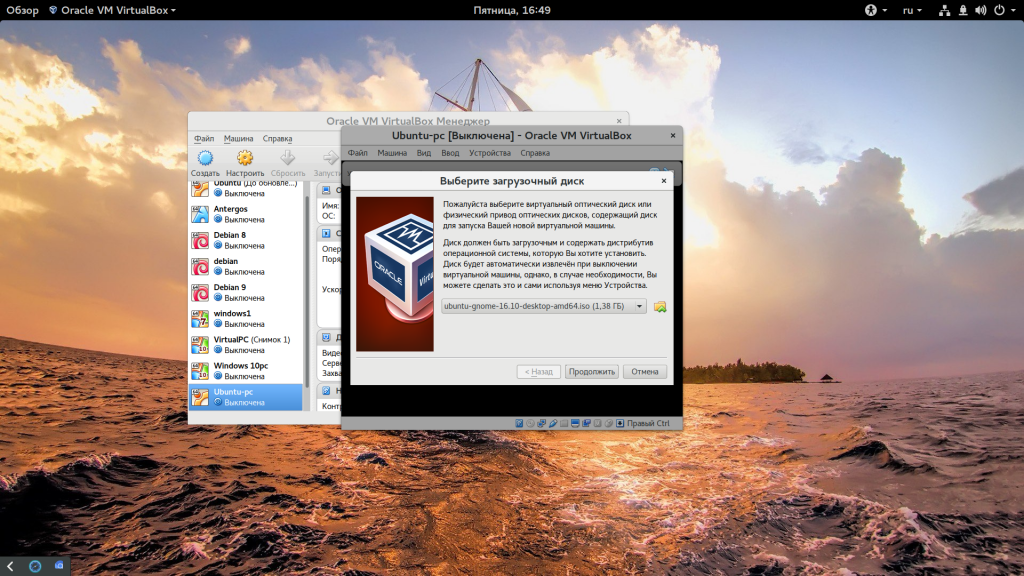
При первом запуске вам будет предложено выбрать установочный носитель, с которого будет проводиться установка, это может быть реальный CD привод или же просто образ в файловой системе:
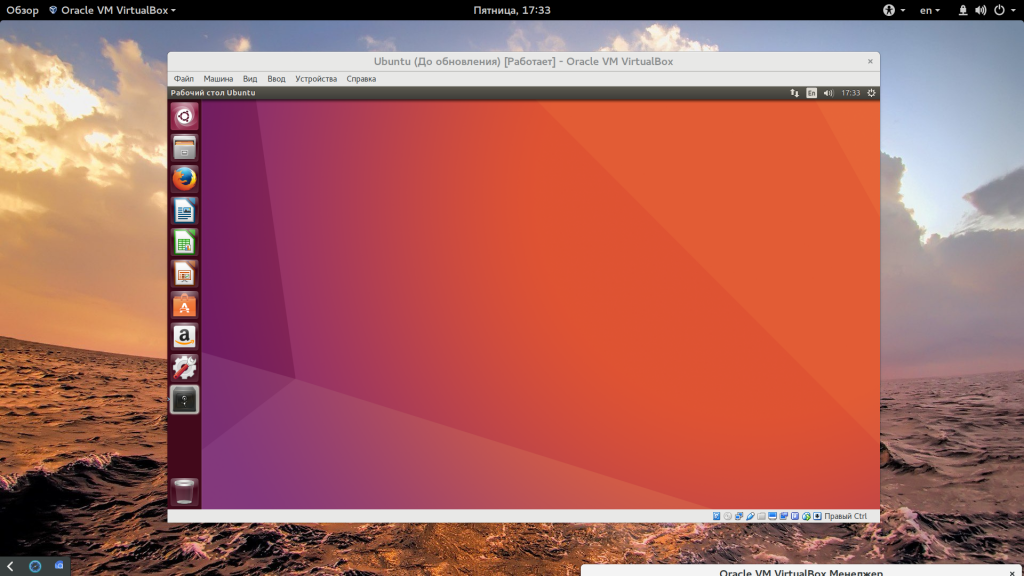
Дальше будет запущена виртуальная машина и операционная система, которую вы выбрали и вам необходимо выполнить все действия для установки:

Мы не будем рассматривать установку Ubuntu, поскольку это уже подробно описано в одной из предыдущих статей.
Но после завершения установки есть еще несколько настроек. Во-первых — вам нужно установить дополнения гостевой ОС Ubuntu или для другого выбранного вами дистрибутива. Процесс везде одинаковый. Также, если вы используете Ubuntu, нужно включить облегченный режим Unity, чтобы все работало быстрее. Для этого выполните:
gsettings set com.canonical.Unity lowgfx true
На всякий случай, команда для отключения этого режима:
gsettings set com.canonical.Unity lowgfx false
Эти команды работают в Ubuntu 17.04, в более ранних версиях такой режим можно включить только через CompizConfig. Теперь установка Linux на VirtualBox полностью завешена и система готова к использованию.
Выводы
В этой статье мы рассмотрели как установить Linux на VirtualBox, как видите, это совсем не сложно и будет очень полезным для новичков, которые хотят протестировать новую операционную систему или же для пользователей, которые часто устанавливают новые дистрибутивы. А вы используете VirtualBox? Для чего? Часто тестируете системы в виртуальных машинах? Напишите в комментариях!
Источник


