- Arch Linux на Raspberry Pi
- Запуск getty на ttyAMA0 (необязательно)
- Настройка беспроводной сети (необязательно)
- Аппаратный генератор случайных чисел
- Часовой пояс и синхронизация времени
- Обновление системы
- Расширение корневого раздела
- Добавление непривилегированного пользователя
- Установка и настройка sudo
- Настройка ssh
- Заключение
- Raspberry Pi
- Contents
- Preparation
- Installation
- Post Installation
- Update the System
- Clock-related error messages
- WiFi on boot
- Enable OpenGL (Raspberry Pi 3/4)
- WiFi drivers
- Persistent storage
- Loopback image with overlayfs
- Traditional disk-based (sys) installation
- Persistent Installation on Raspberry Pi 3
- Persistent Installation on Raspberry Pi 4
- Troubleshooting
- Long boot time when running headless
- apk indicating ‘No space left on device’
- Wireless support with older Alpine images
Arch Linux на Raspberry Pi
После довольно продолжительно использования Raspberry Pi совместно с Raspbian решил попробовать установить Arch Linux ARM. Что из этого получилось рассмотрено в статье.
Так как в месте установки RPi подключать что-либо к разъемам HDMI или RCA Video и LAN мне неудобно, я использую WiFi-подключение к сети и USB-UART для терминального доступа. Поэтому некоторые описанные шаги я отметил как необязательные.
Использованное оборудование: ноутбук с Windows, Raspberry Pi Model B, SD-карта объемом 4GB, WiFi-адаптер, UART-адаптер.
Загружаем и записываем на SD-карту образ операционной системы. В моем случае это был ArchLinuxARM-2014.01-rpi.img, запись выполнялась при помощи Win32DiskImager 0.9.5.
После установки войти в систему можно как root, пароль root. Это можно сделать как через локальный терминал так и через LAN, используя SSH.
Запуск getty на ttyAMA0 (необязательно)
Для вывода на последовательный порт загрузочных сообщений необходимо добавить в файл /boot/cmdline.txt параметр loglevel=5.
Разрешаем работу getty на последовательном порту командой:
Сигналы UART выведены на GPIO разъем Raspberry Pi:
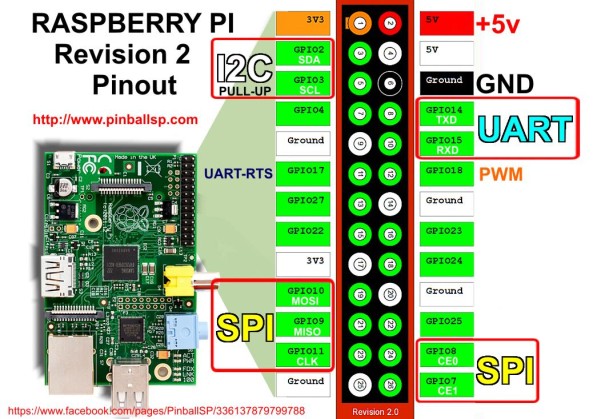
Нужно подключить к ним USB-UART конвертер и указать в терминальной программе следующие параметры подключения: скорость 115200, 8 бит данных, 1 стоп бит, без проверки четности, без управления потоком. Подробнее как использовать PuTTY для работы через последовательный порт здесь.
Настройка беспроводной сети (необязательно)
Копируем и редактируем нужный профиль, указав в нем имя сети и пароль:
Активируем созданный профиль и разрешаем его запуск при включении:
Аппаратный генератор случайных чисел
В ArchLinux для Raspberry Pi есть поддержка аппаратного генератора случайных чисел, но демону rngd нужно указать, как его найти. Для это необходимо отредактировать файл /etc/conf.d/rngd следующим образом:
И перезапустить rngd:
Часовой пояс и синхронизация времени
Удаляем часовой пояс, назначенный по умолчанию и устанавливаем нужный:
Запускаем ntpd и разрешаем его работу при включении:
Обновление системы
Просто запускаем команду:
Расширение корневого раздела
Запускаем fdisk и выводим существующую таблицу разделов:
На SD-карте, как видно, есть основной (mmcblk0p1) и дополнительный (mmcblk0p2) разделы. Дополнительный, в свою очередь, содержит один логический (mmcblk0p5) раздел. Раздел mmcblk0p1 имеет небольшой размер, монтируется как /boot и используется при загрузке. Его модифицировать не нужно. Расширить нужно раздел mmcblk0p5, который монтируется как /.
Удаляем раздел mmcblk0p2 (при этом раздел mmcblk0p5 также удалится):
Теперь нужно создать новый дополнительный раздел, занимающий все доступное свободное пространство:
После этого внутри дополнительного, нужно создать логический раздел, так же занимающий все доступное пространство:
Проверяем, что разделы созданы правильно:
Стартовые блоки созданных разделов должны быть такими же как до внесения изменений, а общее количество блоков увеличиться.
Сохраняем изменения и выполняем перезагрузку:
После перезагрузки нужно увеличить размер файловой системы на созданном логического разделе. Текущий размер:
Имеет смысл для уменьшения количества операций записи на SD-карту установить в файле /etc/fstab параметр noatime для корневого раздела:
Добавление непривилегированного пользователя
Добавляем пользователя и устанавливаем пароль:
Установка и настройка sudo
Открыв с помощью команды visudo конфигурацию раскомментируем следующую строку:
Добавляем созданного ранее пользователя pi в группу wheel:
Это позволит пользователю pi использовать sudo для выполнения команд, требующих повышенных полномочий.
Настройка ssh
Так как SSH-ключи у меня уже были, останавливаться на их создании я не буду. Как их создать можно прочитать здесь.
Копируем публичный ключ на RPi:
Открываем файл конфигурации sshd:
Устанавливаем в нем запрет входить по ssh пользователю root и отключаем аутентификацию по паролю:
Заключение
В результате выполнения перечисленных шагов получаем RPi подключенный к WiFi сети, синхронизирующий время через интернет. На RPi можно зайти через SSH как непривилегированный пользователь имея при этом возможность вызова системных команд через sudo.
Источник
Raspberry Pi

Contents
This tutorial will help you install Alpine Linux on your Raspberry Pi.
Preparation
- Download the Alpine for Raspberry Pi tarball. You should be safe using the armhf build on all versions of Raspberry Pi (including Pi Zero and Compute Modules); but it may perform less optimally on recent versions of Raspberry Pi. The armv7 build is compatible with Raspberry Pi 2 Model B. The aarch64 build should be compatible with Raspberry Pi 2 Model v1.2, Raspberry Pi 3 and Compute Module 3, and Raspberry Pi 4 model B.
- Create a bootable FAT32 partition on your SD card. The partition type should be W95 FAT32 (LBA) . (The current type can be found in the «Type» column in the output of fdisk -l .) You can use a partitioning tool such as gnome-disks or fdisk.
- Create a filesystem on the partition with mkdosfs -F 32 /dev/sdX1 (Replace sdX1 with the correct reference to the partition you just created.)
- Mount the partition and extract the tarball contents onto it.
Optionally create a usercfg.txt file on the partition to configure low-level system settings. Specifications can be found here. However, note some settings can only be set directly in config.txt, which may be overwritten after updates. In particular, gpu_mem will have no effect when specified in usercfg.txt (source). Some interesting values include:
- To enable audio: dtparam=audio=on
- If you see black edges around your screen after booting the Pi, you can add disable_overscan=1
Recent versions include Broadcom firmware files. If you’re using an older Alpine version, see section below.
Installation
Alpine Linux will be installed in diskless mode, hence you need to use Alpine Local Backup (lbu) to save your modifications between reboots.
For users who will be using their Raspberry Pi in scenarios where there is not expected to be significant changes to disk after setup (like running a static HTTP server), this is likely preferable, as running the entire system from memory will improve performance (by avoiding the slow SD card) and improve the SD card life (by reducing the writes to the card, as all logging will happen in RAM). Diskless installations still allow you to install packages, save local files, and tune the system to your needs.
- Expect there will be constant changes to the disk after initial setup (for example, if you expect people to login and save files to their home directories)
- Need logs to persist after reboot
- Plan to install packages which consume more space than can be loaded into RAM
- Want to install kernel modules (such as ZFS or Wireguard)
Then you may be better served by a sys-mode installation.
Follow these steps to install Alpine Linux in Diskless Mode:
- Insert the SD card into the Raspberry Pi and power it on
- Login into the Alpine system as root. Leave the password empty.
- Type setup-alpine
- Once the installation is complete, commit the changes by typing lbu commit -d
Type reboot to verify that the installation was indeed successful.
Post Installation
Update the System
After installation, make sure your system is up-to-date:
apk update apk upgrade
Don’t forget to save the changes:
Note: this does not upgrade the kernel. In order to upgrade the kernel, a full upgrade of the Alpine Linux version must be performed as described in upgrading Alpine Linux for removable media.
Clock-related error messages
During the booting time, you might notice errors related to the hardware clock. The Raspberry Pi does not have a hardware clock, thus you need to disable the hwclock daemon and enable swclock:
rc-update add swclock boot # enable the software clock rc-update del hwclock boot # disable the hardware clock
Since the Raspberry Pi does not have a clock, Alpine Linux needs to know what the time is by using a Network Time Protocol (NTP) daemon. Make sure you have a NTP daemon installed and running. If you are not sure, you can install an NTP client by running the following command:
The Busybox NTP client might be the most lightweight solution. Save the changes and reboot, once the NTP software is installed and running:
lbu commit -d reboot
After reboot, make sure the date command outputs the correct date and time.
WiFi on boot
If you have already configured WiFi during the setup, the connection will not return on reboot. You will need to start up a service to automatically connect to the wireless access point.
- Run rc-update add wpa_supplicant boot to connect to the wireless access point during bootup.
- Run it manually with /etc/init.d/wpa_supplicant start .
Enable OpenGL (Raspberry Pi 3/4)
Remount the boot partition writeable (i.e. /media/mmcblk0p1 ):
mount /media/mmcblk0p1 -o rw,remount
Add the following lines to /media/mmcblk0p1/config.txt :
256MB (and more on the Raspberry Pi 4) gpu_mem is also possible.
Install the Mesa drivers:
# Raspberry Pi 3: apk add mesa-dri-vc4 # Raspberry Pi 4: apk add mesa-dri-gallium
lbu_commit -d; reboot
WiFi drivers
As of Alpine 3.14, the WiFi drivers for the Raspberry Pi were moved from linux-firmware-brcm to the linux-firmware-cypress package (source?). Since the images seem to be an outdated version of the former, Wi-Fi will work during installation, but after the first update it will break. Use the ethernet interface to download the required packages:
apk add linux-firmware-cypress
Persistent storage
Loopback image with overlayfs
When you install Alpine in diskless mode, the entire system is loaded into memory at boot. If you want additional storage (for example, if you need more space than offered by your RAM) we need to create loop-back storage onto the SD card mounted with overlayfs.
First, make the SD card writable again and change fstab to always do so:
mount /media/mmcblk0p1 -o rw,remount sed -i ‘s/vfat\ ro,/vfat\ rw,/’ /etc/fstab
Create the loop-back file, this example is 1 GB:
dd if=/dev/zero of=/media/mmcblk0p1/persist.img bs=1024 count=0 seek=1048576
Install the ext utilities:
apk add e2fsprogs
Format the loop-back file:
Mount the storage:
echo «/media/mmcblk0p1/persist.img /media/persist ext4 rw,relatime,errors=remount-ro 0 0» >> /etc/fstab mkdir /media/persist mount -a
Make the overlay folders, we are using the /usr directory here, but you can use /home or anything else.
mkdir /media/persist/usr mkdir /media/persist/.work_usr echo «overlay /usr overlay lowerdir=/usr,upperdir=/media/persist/usr,workdir=/media/persist/.work_usr 0 0» >> /etc/fstab mount -a
Your /etc/fstab should look something like this:
/dev/cdrom /media/cdrom iso9660 noauto,ro 0 0 /dev/usbdisk /media/usb vfat noauto,ro 0 0 /dev/mmcblk0p1 /media/mmcblk0p1 vfat rw,relatime,fmask=0022,dmask=0022,errors=remount-ro 0 0 /media/mmcblk0p1/persist.img /media/persist ext4 rw,relatime,errors=remount-ro 0 0 overlay /usr overlay lowerdir=/usr,upperdir=/media/persist/usr,workdir=/media/persist/.work_usr 0 0
Now commit the changes: (optionally remove the e2fsprogs, but it does contain repair tools)
Remember, with this setup if you install things and you have done this overlay for /usr, you must not commit the ‘apk add’, otherwise, while it boots it will try and install it to memory, not to the persistent storage.
If you do want to install something small at boot, you can use `apk add` and `lbu commit -d`.
If it is something a bit bigger, then you can use `apk add` but then not commit it. It will be persistent (in /user), but be sure to check everything you need is in that directory and not in folders you have not made persistent.
Traditional disk-based (sys) installation

It should be merged with Classic install or sys mode on Raspberry Pi. There’s an existing page for sys-installations on RasPi. (Discuss)
It is also possible to switch to a fully disk-based installation. This is not yet formally supported, but can be done somewhat manually. This frees all the memory otherwise needed for the root filesystem, allowing more installed packages.
Split your SD card into two partitions: the FAT32 boot partition described above (in this example it’ll be mmcblk0p1 ) , and a second partition to hold the root filesystem (here it’ll be mmcblk0p2 ). Boot and configure your diskless system as above, then create a root filesystem:
apk add e2fsprogs mkfs.ext4 /dev/mmcblk0p2
Now do a disk install via a mountpoint. The setup-disk script will give some errors about syslinux/extlinux, but you can ignore them. The Raspberry Pi doesn’t need them to boot.
mkdir /stage mount /dev/mmcblk0p2 /stage setup-disk -o /media/mmcblk0p1/MYHOSTNAME.apkovl.tar.gz /stage # (ignore errors about syslinux/extlinux)
Add a line to /stage/etc/fstab to mount the Pi’s boot partition again:
/dev/mmcblk0p1 /media/mmcblk0p1 vfat defaults 0 0
Now add a root=/dev/mmcblk0p2 parameter to the Pi’s boot command line, either cmdline-rpi2.txt or cmdline-rpi.txt depending on model:
mount -o remount,rw /media/mmcblk0p1 sed -i ‘$ s/$/ root=\/dev\/mmcblk0p2/’ /media/mmcblk0p1/cmdline-rpi2.txt
You might also consider overlaytmpfs=yes here, which will cause the underlying SD card root filesystem to be mounted read-only, with an overlayed tmpfs for modifications which will be discarded at shutdown.
N.B. the contents of /boot will be ignored when the Pi boots. It will use the kernel, initramfs, and modloop images from the FAT32 boot partition. To update the kernel, initfs or modules, you will need to manually (generate and) copy these to the boot partition or you could use bind mount, in which case, copying the files to boot partition manually, is not needed.
echo /media/mmcblk0p1/boot /boot none defaults,bind 0 0 >> /etc/fstab
Persistent Installation on Raspberry Pi 3
Persistent Installation on Raspberry Pi 4
As of 3.14, setup-alpine should ask you if you want to create a sys mode partition on your Raspberry Pi 4.
Troubleshooting
Long boot time when running headless
If no peripherals are connected, the system might hang for an exceptionally long period of time while it attempts to accumulate entropy.
If this is the case, simply plugging in any USB device should work around this issue.
Alternatively, installing haveged, the random numbers generator, would speed up the process:
(Tested on a raspberry pi zero W in headless mode, no USB connected, Alpine 3.10.3)
apk indicating ‘No space left on device’
Note some models of the Raspberry Pi such as the 3A+ only have 512M of RAM, which on fresh Alpine deployment will only leave around 200M for tmpfs root. It’s important to keep this limitation in mind when using these boards.
Wireless support with older Alpine images
If you need Wi-Fi, you’ll need to download the latest Broadcom drivers to your SD card. (Replace /mnt/sdcard with the correct mount point.)
Источник


