- Как установить Linux в Windows с виртуальной машиной VMware
- Установите VMware Workstation Player
- Выберите предпочитаемую ОС Linux
- Настройте свою виртуальную машину
- Завести аккаунт
- Настройте свое виртуальное оборудование
- Установите и используйте Linux в VMware Workstation Player
- Запустите любой дистрибутив Linux на виртуальной машине под Windows!
- VMware/Install Arch Linux as a guest
- Contents
- In-kernel drivers
- VMware Tools versus Open-VM-Tools
- Open-VM-Tools
- Utilities
- Modules
- Installation
- Official VMware Tools
- Modules
- Installation (from guest)
- Xorg configuration
- Tips and tricks
- Shared Folders with vmhgfs-fuse utility
- fstab
- Systemd
- Legacy Shared Folders with vmhgfs module
- Enable at boot
- Prune mlocate DB
- 3D Acceleration
- OpenGL and GLSL support
- Time synchronization
- Host machine as time source
- External server as time source
- Troubleshooting
- Network slow on guest
- File share problems with legacy vmhgfs module and newer kernels
- Sound problems
- Mouse problems
- Boot problems
- Slow boot time
- Shutdown/Reboot hangs
- Window resolution autofit problems
- Potential solution 1
- Potential solution 2
- Potential solution 3
- Potential solution 4
- Potential solution 5
- Drag and drop, copy/paste
- Problems when running as a shared VM on Workstation 11
- Shared folder not mounted after system upgrade
Как установить Linux в Windows с виртуальной машиной VMware
Вы пробовали Linux с живого CD
, Теперь вы хотите установить его, но не уверены в двойной загрузке. Разумный вариант — установить выбранную вами операционную систему Linux на виртуальную машину (ВМ).
Это означает, что программная среда воспроизводит условия аппаратной среды: персональный компьютер. Среда основана на оборудовании вашего физического ПК и ограничена только компонентами внутри. Например, вы не можете иметь виртуальный четырехъядерный процессор на процессоре с двумя ядрами.
Однако, хотя виртуализация может быть достигнута во многих системах, результаты будут намного лучше на компьютерах, оснащенных процессором, который ее поддерживает.
Доступно несколько инструментов виртуализации, которые облегчают установку операционных систем Linux (ОС), и их много в Windows.
VMware производит самые совершенные приложения для виртуальных машин. Давайте узнаем, как установить Linux в Windows с помощью VMware Workstation Player.
Установите VMware Workstation Player
Чтобы начать, зайдите на веб-сайт VMware и загрузите последнюю версию инструмента для рабочих станций. На момент написания статьи это версия 12.5 и около 80 МБ для 64-битной версии.
VMware Workstation Player является бесплатным и доступен в ознакомительной версии для некоммерческого, личного и домашнего использования. VMware также рад за бесплатную версию для студентов и некоммерческих организаций. С точки зрения функциональности, VMware Workstation Player включает в себя все, что вам может понадобиться для стандартных задач виртуальной машины. Тем не менее, VMware предлагает широкий выбор решений для виртуализации, предназначенных для предприятий всех уровней, информацию о которых вы найдете на странице продукта веб-сайта.
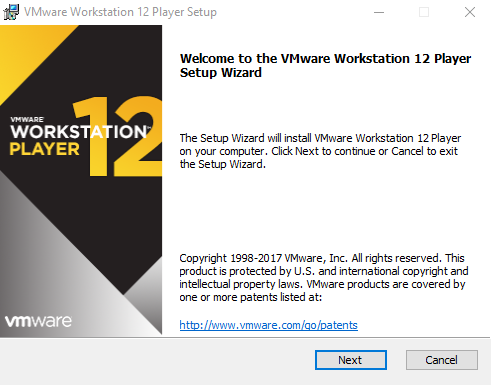
После загрузки VMware Workstation Player пришло время установить. Вам поможет стандартный мастер установки с возможностью установки драйвера расширенной клавиатуры. Эта функция предлагает лучшую обработку международных клавиатур. Возможно, вначале он вам не понадобится, но на всякий случай его стоит установить. Продолжите работу с мастером установки и перезапустите Windows при появлении соответствующего запроса.
Выберите предпочитаемую ОС Linux
Вы, наверное, знаете, какую ОС Linux вы хотите попробовать. Некоторые дистрибутивы Linux особенно подходят для работы на виртуальной машине
, но другие нет. Как правило, в VMware нельзя запускать дистрибутивы Linux для архитектуры ARM (например, Raspberry Pi).
Это потому, что ARM нельзя виртуализировать с x86 и x64. Однако это можно подражать. Если вы хотите эмулировать среду ARM в Windows, взгляните на QEMU. Ранее мы демонстрировали, как эмулировать Raspberry Pi OS Raspbian в QEMU
Однако, если вы не знаете, какую ОС выбрать, вы найдете наш регулярно обновляемый список лучших дистрибутивов Linux здесь.
Настройте свою виртуальную машину
Пока загружается ваш Linux ISO, самое время начать настройку вашей виртуальной машины. Начните с запуска VMware Workstation Player и введите свой адрес электронной почты при появлении соответствующего запроса. Это часть сделки по бесплатному приобретению программного обеспечения: вы принимаете дополнение к списку рассылки VMware.
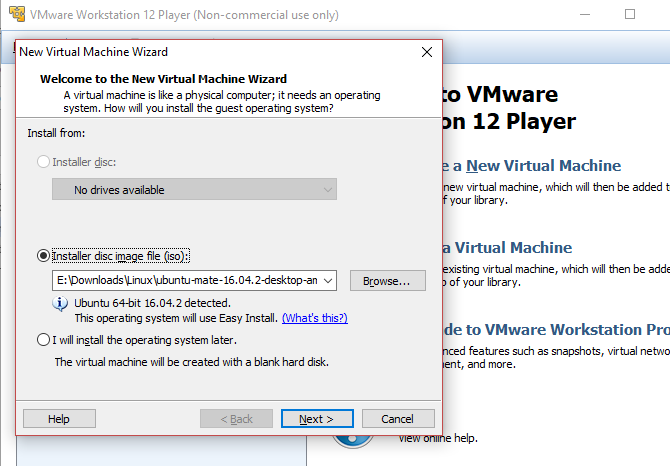
После этого будет загружено основное приложение VMware Workstation Player. Нажмите Создать новую виртуальную машину продолжать. Выберите вариант по умолчанию, Файл образа установочного диска (iso). (Можно просто создать виртуальную систему с пустым жестким диском, используя Я установлю операционную систему позже опция).
Выбрав ОС, которую вы планируете установить (известную как «гостевая» ОС), нажмите следующий. Обратите внимание на сообщение о VMware Easy Install, которое автоматизирует установку выбранной вами гостевой ОС.
Завести аккаунт
На следующем экране введите предпочитаемое имя, имя пользователя и пароль, нажмите следующий, и дать имя ВМ. Имена по умолчанию часто следуют за именем устанавливаемой ОС. Вы также можете выбрать место для виртуальной машины.
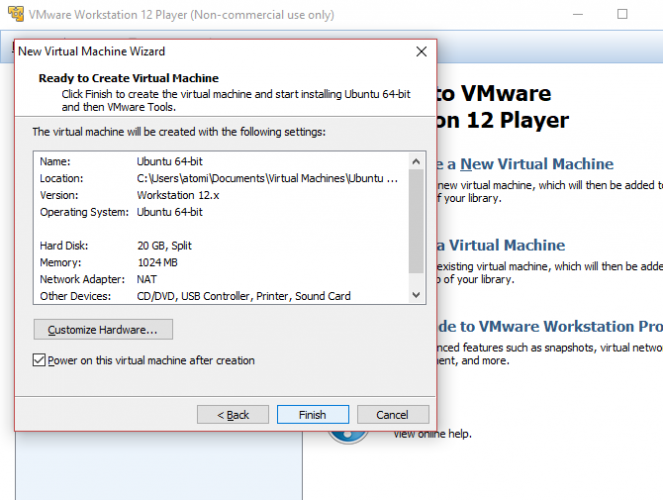
Нажмите следующий еще раз и выберите емкость диска виртуальной машины. Это виртуальный жесткий диск, который будет сохранен на физическом диске вашего компьютера в виде файла или серии файлов. Вы можете выбрать любой вариант. Между тем, для вашего виртуального жесткого диска будет использоваться рекомендуемый размер, который вы можете принять или изменить. Увеличение является более безопасным вариантом, чем сокращение! Независимо от вашего выбора, нажмите следующий, чтобы увидеть экран «Готов к созданию виртуальной машины» и возможность Конец. Нажмите на это, и пока Включите эту виртуальную машину после создания проверено, VM запустится.

Вскоре после этого вы увидите предупреждение, предлагающее установку VMware Tools для Linux пакет. В этом нет необходимости, но это часть процедуры простой установки. Лучше всего с этим согласиться, поэтому нажмите Хорошо.
Настройте свое виртуальное оборудование
Еще одна опция на экране «Готов к созданию…» — это Настроить оборудование. Здесь вы можете настроить аппаратное обеспечение виртуальной машины другими способами, помимо жесткого диска. У вас есть варианты для объем памяти, процессоры, Сетевой адаптер конфигурация и многое другое.
Стоит взглянуть на процессоры экран. На правой панели вы увидите ссылку на Механизм виртуализации. По умолчанию это установлено автоматическая. В большинстве случаев это должно быть хорошо (конечно, для Linux), но если у вас возникнут какие-либо проблемы, попробуйте установить одну из альтернатив (например, Intel VT-x).
Устраните проблемы с производительностью на экране памяти. Здесь вы увидите иллюстрацию предлагаемого объема ОЗУ, а также рекомендуемый минимум и максимум для вашей виртуальной машины. Это хорошая идея придерживаться этих рекомендаций. Слишком малый размер окажется проблемой, в то время как установка слишком большого объема ОЗУ повлияет на производительность вашего ПК, замедляя все: от стандартных системных задач до запуска программного обеспечения ВМ!
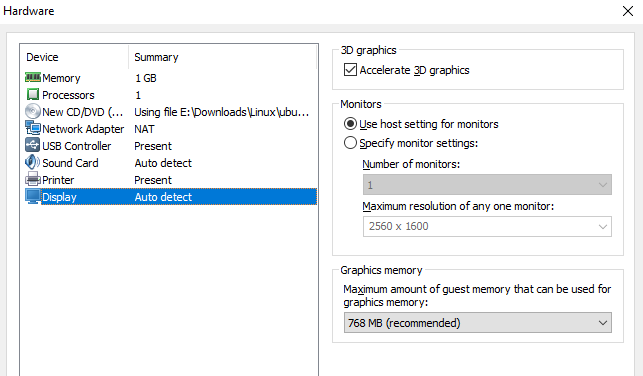
Наконец, уделите время, чтобы проверить дисплей Настройки. Здесь вы сможете включить 3D-ускорение и решить, собираетесь ли вы использовать настройки монитора на главном компьютере или настроить несколько мониторов на вашей виртуальной машине. Графическую память также можно настроить — как и в системной памяти для гостевой ОС, отображается рекомендуемое количество.
Установите и используйте Linux в VMware Workstation Player
Когда ISO-образ загружается на виртуальную машину, он будет выглядеть так, как будто вы устанавливаете ОС на физическом настольном компьютере. Использование метода Easy Install полностью автоматизирует это, используя конфигурацию хост-системы Windows для применения региональных настроек в виртуальной гостевой ОС.
Обратите внимание, что если вы выбрали Я установлю операционную систему позже Опция, вы будете иметь полный контроль над установкой ОС.
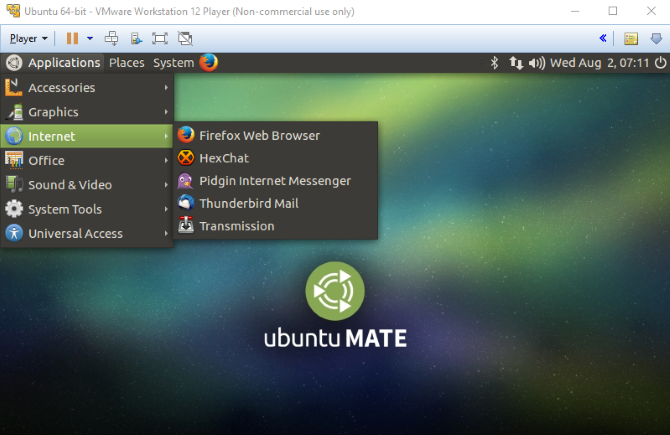
С помощью Easy Install после завершения установки вы сможете войти на виртуальную машину и начать использовать гостевую ОС. Это так просто!
Впоследствии вы можете запустить виртуальную машину, используя Откройте виртуальную машину меню.
Если вы никогда раньше не использовали Linux, взгляните на множество руководств по ОС Linux здесь на MakeUseOf. Мы также подготовили подробное руководство для начинающих по Ubuntu.
и, если вы ищете программное обеспечение, попробуйте наш список лучших приложений для Linux
Запустите любой дистрибутив Linux на виртуальной машине под Windows!
Если вы хотите, чтобы дистрибутив Linux был легко доступен, лучше всего установить его на виртуальную машину в Windows. VMware Workstation Player предоставляет лучшие инструменты для этого. Еще лучше, процесс прост:
- Загрузите бесплатный VMware Workstation Player.
- Установите и перезапустите Windows.
- Создайте и настройте вашу виртуальную машину.
- Установите Linux на виртуальной машине.
- Перезагрузите виртуальную машину и используйте Linux.
Это действительно настолько просто. Вам даже не нужно ограничивать свой выбор одной ОС. Выберите из сотен (если не тысяч) дистрибутивов Linux, которые вы можете установить на виртуальной машине на базе VMware
, Вам не нужно останавливаться на достигнутом: Windows можно установить на Mac с помощью VMWare Fusion
и macOS также можно установить на Windows 10
Вы использовали VMware Workstation Player для своей виртуальной машины Linux? Планируете установить Linux как виртуальную машину внутри Windows? Или вы предпочитаете двойную загрузку? Напишите нам в комментариях.
Источник
VMware/Install Arch Linux as a guest
This article is about installing Arch Linux in a VMware product, such as Player (Plus), Fusion or Workstation.
Contents
In-kernel drivers
- vmw_balloon — The physical memory management driver. It acts like a «balloon» that can be inflated to reclaim physical pages by reserving them in the guest and invalidating them in the monitor, freeing up the underlying machine pages so they can be allocated to other guests. It can also be deflated to allow the guest to use more physical memory. Deallocated Virtual Machine memory can be reused in the host without terminating the guest.
- vmw_pvscsi — For VMware’s Paravirtual SCSI (PVSCSI) HBA.
- vmw_vmci — The Virtual Machine Communication Interface. It enables high-speed communication between host and guest in a virtual environment via the VMCI virtual device.
- vmwgfx — For 3D acceleration. This is a KMS enabled DRM driver for the VMware SVGA2 virtual hardware.
- vmxnet3 — For VMware’s vmxnet3 virtual ethernet NIC.
- a fuse-based hgfs implementation has been added to open-vm-tools 10.0+ and is supported from kernel version 4.0+.
The following drivers are only needed if you are running Arch Linux on a hypervisor like VMware vSphere Hypervisor. Client-server applications can write to the VMCI Sock (vsock) interface to make use of the VMCI virtual device, when communicating between virtual machines.
- vsock — The Virtual Socket Protocol. It is similar to the TCP/IP socket protocol, allowing communication between Virtual Machines and hypervisor or host.
- vmw_vsock_vmci_transport — Implements a VMCI transport for Virtual Sockets.
Some modules, such as the legacy vmhgfs shared folder module, will require additional work to manually compile and systemd enable in order to function properly.
VMware Tools versus Open-VM-Tools
In 2007, VMware released large partitions of the VMware Tools under the LGPL as Open-VM-Tools. The official Tools are not available separately for Arch Linux.
Originally, VMware Tools provided the best drivers for network and storage, combined with the functionality for other features such as time synchronization. However, now the drivers for the network/SCSI adapter are part of the Linux kernel.
The official VMware Tools also had the advantage of being able to use the Unity mode feature, but as of VMWare Workstation 12, Unity mode for Linux guests has been removed due to lack of use and developer difficulties in maintaining the feature. See this thread.
Open-VM-Tools
Utilities
The open-vm-tools package comes with the following utilities:
- vmtoolsd — Service responsible for the Virtual Machine status report.
- vmware-checkvm — Tool to check whether a program is running in the guest.
- vmware-toolbox-cmd — Tool to obtain Virtual Machine information of the host.
- vmware-user — Tool to enable clipboard sharing (copy/paste) between host and guest.
- vmware-vmblock-fuse — Filesystem utility. Enables drag & drop functionality between host and guest through FUSE (Filesystem in Userspace).
- vmware-xferlogs — Dumps logging/debugging information to the Virtual Machine logfile.
- vmhgfs-fuse — Utility for mounting vmhgfs shared folders.
Modules
- vmhgfs — Legacy filesystem driver. Enables legacy sharing implementation between host and guest.
- vmxnet — for the old VMXNET network adapter.
Installation
Install open-vm-tools . If the legacy vmhgfs shared folder module is desired, the open-vm-tools-dkms AUR [broken link: package not found] package must be installed (the new vmhgfs-fuse driver is included in open-vm-tools ). Start and/or enable vmtoolsd.service and vmware-vmblock-fuse.service .
Try to install gtkmm3 manually if it does not work properly. To enable copy and paste between host and guest gtkmm3 is required.
Official VMware Tools
Modules
- vmblock — Filesystem driver. Enables drag & drop functionality between host and guest (superseded by the vmware-vmblock-fuse utility).
- vmci — High performance communication interface between host and guest.
- vmmon — Virtual Machine Monitor.
- vmnet — Networking driver.
- vsock — VMCI sockets.
Installation (from guest)
Install the dependencies: base-devel (for building), net-tools (for ifconfig , used by the installer) and linux-headers (for kernel headers). A make dependency for checking out open-vm-tools is asp .
Then, create bogus init directories for the installer:
The installer can then be mounted:
Extracted (e.g. to /root ):
The following build failures can safely be ignored:
- VMNEXT 3 virtual network card
- «Warning: This script could not find mkinitrd or update-initramfs and cannot remake the initrd file!»
- Fuse components not found on the system.
Enable vmware-vmblock-fuse systemd services (make sure the dependencies are manually installed, or that the -s flag) used. The open-vm-tools source code should be checked out using the Arch Build System.
Reboot the Virtual Machine:
Log in and start the VMware Tools:
Additionally, to auto start vmware-tools on boot, create a new file /etc/systemd/system/vmwaretools.service :
And enable the new systemd service:
Xorg configuration
These packages should be all that are required to get started with booting into a graphical target : . /etc/xdg/autostart/vmware-user.desktop will get started which will set up most of what is needed to work with the Virtual Machine.
However, if booting into multi-user.target or using an uncommon setup (e.g. multiple monitors), then vmtoolsd.service needs to be enabled. In addition to this, edit:
to give permission for loading drivers.
Tips and tricks
Shared Folders with vmhgfs-fuse utility
Share a folder by selecting Edit virtual machine settings > Options > Shared Folders > Always enabled, and creating a new share.
The shared folders should be visible with:
Now the folder can be mounted:
If the error message fusermount: option allow_other only allowed if ‘user_allow_other’ is set in /etc/fuse.conf is displayed, uncomment the following line in /etc/fuse.conf :
Other vmhgfs-fuse mount options can be viewed by using the -h input flag:
fstab
Add a rule for each share:
Create and mount the Shared Folders (if not done so already):
Systemd
Create the following .service :
Ensure the folder exists on the system. If this folder does not exist then it must be created, as the systemd service depends on it:
Enable the — .service mount target.
If all shared folders should be mounted automatically then omit .
Legacy Shared Folders with vmhgfs module
Share a folder by selecting Edit virtual machine settings > Options > Shared Folders > Always enabled, and creating a new share.
Ensure the vmhgfs driver is loaded:
The shared folders should be viewable with:
Now the folder can be mounted:
Enable at boot
Edit mkinitcpio.conf thusly:
fstab
Add a rule for each share:
Create and mount the Shared Folders:
Systemd
For shared folders to work the vmhgfs driver must be loaded. Create the following .service s:
Ensure the folder exists on the system. If this folder does not exist then it must be created, as the systemd scripts depend on it:
Enable the mnt-hgfs.automount mount target.
If all shared folders should be mounted automatically then omit .
Prune mlocate DB
When using mlocate, it is pointless to index the shared directories in the locate DB . Therefore, add the directories to PRUNEPATHS in /etc/updatedb .
3D Acceleration
If not selected at guest creation time, 3D Acceleration can be enabled in: Edit virtual machine settings > Hardware > Display > Accelerate 3D graphics.
OpenGL and GLSL support
It is possible to update OpenGL and GLSL with new kernel modules, overriding Arch-controlled versions.
Currently, OpenGL 3.3 and GLSL 3.30 can be supported. See https://bbs.archlinux.org/viewtopic.php?id=202713 for more details.
Time synchronization
Configuring time synchronization in a Virtual Machine is important; fluctuations are bound to occur more easily in a guest VM. This is mostly due to the CPU being shared by more than one guest.
There are 2 options to set up time synchronization: the host or an external source.
Host machine as time source
To use the host as a time source, ensure vmtoolsd.service is started. Then enable the time synchronization:
To synchronize the guest after suspending the host:
External server as time source
Troubleshooting
Network slow on guest
Arch Linux, as well as other Linux guests, may have slow network speeds while using NAT. To resolve this, switch the network type to Bridged mode in the guest settings on the host, changing the configuration file for the network on the guest where necessary. For more information on configuration, see Network configuration. If on a Windows host and it is not connecting properly despite correct guest configuration, open the Virtual Network Editor on the host as Administrator and press the Restore defaults button at the bottom left.
File share problems with legacy vmhgfs module and newer kernels
As the open-vm-tools-dkms AUR [broken link: package not found] package is no longer being updated, newer kernels are not patched correctly using it to be compatible with a host-guest file share. The Github repository has some patch files that can be manually applied to restore functionality.
It is also recommended that the AUR comment section be checked for this package.
Sound problems
If unacceptably loud or annoying sounds occur, then it may be related to the PC speaker. The issue may be resolved by disabling the PC speaker within the guest image:
Mouse problems
The following problems may occur with the mouse:
- The automatic grab/ungrab feature does not automatically grab input when the cursor enters the window
- Missing buttons
- Input lag
- Clicks are not registered in some applications
- Mouse cursor jumps when entering/leaving virtual machine
- Mouse position jumps to where it left the guest VM
These may be fixed by uninstalling the xf86-input-vmmouse package. xf86-input-vmmouse and xf86-input-libinput should be sufficient for handling mouse and keyboard inputs.
Adding settings to the .vmx configuration file may help (Mouse position jumps to where it left the guest VM):
VMware also attempts to automatically optimize the mouse for gaming. If problems are experienced, disabling the optimization is recommended: Edit > Preferences > Input > Optimize mouse for games: Never
Alternatively, attempting to disable the catchall event in 60-libinput.conf may be required:
Boot problems
Slow boot time
The following errors may be displayed if VMWare’s memory hot-add feature is enabled:
- add_memory failed
- acpi_memory_enable_device() error
Disable the memory hot-add feature by setting mem.hotadd = «FALSE» to the .vmx .
Shutdown/Reboot hangs
Adjust the timeout for the vmtoolsd service (defaults to 90 seconds).
Window resolution autofit problems
«Autofit» means that when the VMWare window’s size is adjusted in the host, ArchLinux in the guest should automatically follow and readjust its resolution to fit the new size of the host window.
Potential solution 1
Ensure autofit is enabled. For VMware Workstation the setting can be found in: View -> Autosize -> Autofit Guest
Potential solution 2
For some reason, autofit requires the packages gtkmm and gtk2, so ensure they are installed. If X windows is not installed or a non–GTK-based desktop environment (such as KDE) is being used, the might have to be installed independently.
Potential solution 3
The relevant modules may have to be added to mkinitcpio.conf:
Potential solution 4
If this does not work, ensure the vmtoolsd.service is restarted.
Potential solution 5
Drag and drop, copy/paste
The drag-and-drop (copy/paste) feature requires both open-vm-tools and gtkmm3 packages to be installed.
Make the command vmware-user run after X11 by either:
- Ensuring etc/xdg/autostart/vmware-user.desktop exists, and if not, running:
Problems when running as a shared VM on Workstation 11
Workstation 11 has a bug where vmware-hostd crashes if an Arch guest is running as a shared VM and vmtoolsd is running in the guest. A patch to open-vm-tools to work around the bug is here.
Shared folder not mounted after system upgrade
Most likely, this should only happen to open-vm-tools . Since the vmhgfs module belongs to open-vm-tools-dkms AUR [broken link: package not found] , the legacy filesystem driver would not be upgraded by using the command pacman -Syu . Therefore, open-vm-tools-dkms AUR [broken link: package not found] should be manually upgraded before the official repositories.
If a shared folder is not mounted after a system upgrade, then remove the shared filesystem automount, upgrade open-vm-tools-dkms AUR [broken link: package not found] , run pacman -Syu , and finally regenerate the initramfs. Do not forget to restore the filesystem automount.
Источник


