- Set up email in the Mail app for Windows 10
- Stay connected and on schedule
- Add a new email account
- Add an account using advanced setup
- Troubleshooting
- Special instructions for other accounts
- Where can I download Windows Live Mail for Windows 10?
- How to Install Windows Live Mail on Windows 10
- Get Windows Essentials
- Mailbird Personal
- How do I switch from Windows Live Mail to Outlook?
- How to install an e-mail server in Windows Server
Set up email in the Mail app for Windows 10
Stay connected and on schedule
You can be organized, on time, and buttoned up with Outlook — your life organizer.
If you log on to Windows 10 using a Microsoft account with an Outlook.com, Live, Hotmail, or MSN address, that account is added to the Mail and Calendar apps. You can add that and many other email accounts to the Mail and Calendar apps to start sending and receiving email and creating and managing events.
Seeing a message that your account is out of date? You probably need to update your account settings. See Fixing an out-of-date account for more information.
Did you set up your email, but you don’t see your messages? Change your mailbox sync settings.
Add a new email account
Open the Mail app by clicking the Windows Start menu and choosing Mail.

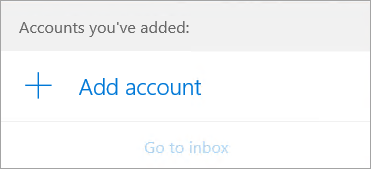
If this is the first time you’ve opened the Mail app, you’ll see a Welcome page. Select Add account to get started.
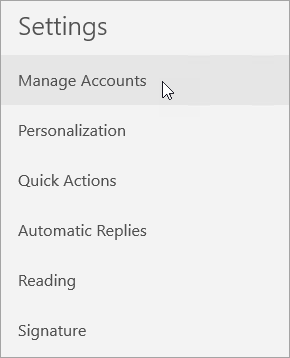
If you’ve used the Mail app before, at the bottom of the left navigation pane, select Settings  , and then choose Manage Accounts.
Note: On a phone or tablet, tap the three dots at the bottom of the page to access Settings.
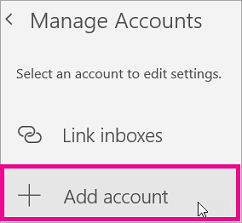
Select Add account.
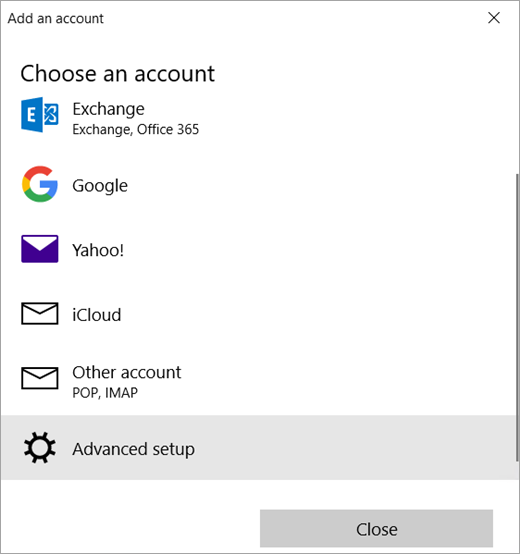
Choose the type of the account you want to add.
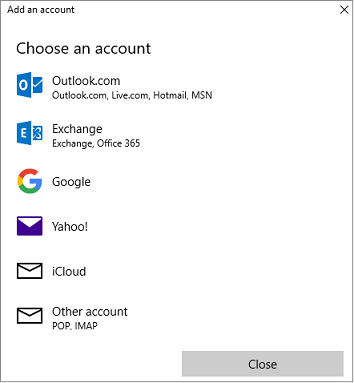
You may need to scroll down the Add an account dialog box to view all options.
If you choose Google, you’ll need to sign in to your Google account, enter your 2-step verification code if you’ve enabled that security feature, and give Windows permission to access your information. Click Allow and your account will be created.
If you choose another email account, you’ll need to follow the special instructions under Special instructions for other accounts below.
Enter the required information and click Sign in. For most accounts, this is your email address, password, and the account name. The account name is what you’ll see in both the left pane of Mail for Windows 10 as well as the Manage Accounts pane.
Note: If you receive the message “We couldn’t find info for that account. Make sure that the email address is correct and then try again,” you’ll need to click Try again three times before the button changes to Advanced. Click Advanced and follow the steps in the next section to add your account.
Click Done. Your data will start syncing as soon as your account is set up.
Note: It may take a few minutes for your account to synchronize. During this time, you may see «Not synced yet» in the message pane. If this message persists, see Resolve sync issues in Mail and Calendar apps in Windows 10.
Add an account using advanced setup
There are two ways you can access the Advanced setup options for your email account.
Click Advanced setup if your automatic email setup fails in Step 3 above.
Click Advanced setup from the Choose an account window in Step 2 above. The Advanced setup option is the last option on the list, and you may have to scroll to see it.
You can choose an Exchange ActiveSync account or an Internet email account. Unless your administrator has instructed you to use Exchange ActiveSync, click Internet email.
Enter the following information in the Advanced setup window.
Email address This is the name you’ll see in the left pane of the Mail app.
User name This is your full email address.
Password Enter your email account password.
Account name This is the name that you’ll see in the left pane of Mail for Windows 10, as well as in the Manage Accounts pane. You can choose any name you want.
Send your messages using this name Enter the name you want recipients to see when they receive your message.
Incoming email server You can get this information from your ISP or administrator. Usually, an incoming mail server address is in the format of mail.contoso.com or imap.google.com . For many email accounts, you can find this information in our POP and IMAP server name reference.
Account type Choose POP3 or IMAP4. Most email accounts use IMAP4. If you don’t know which one to choose, contact your ISP.
Outgoing (SMTP) email server You can get this information from your ISP or administrator. Usually, an outgoing email server address is in the format of mail.contoso.com or smtp.contoso.com .
By default, all four checkboxes at the bottom of the window will be selected. Most email accounts don’t require any changes to these options.
Your email provider can give you the settings you need to fill in the Advanced setup but you can also go to the POP and IMAP server name reference we’ve provided for the most popular email providers.
After you’ve entered the required information, click Sign in > Done.
Note: If you’re adding an account other than Gmail, see Special instructions for other accounts.
Troubleshooting
If you’re having problems setting up your account, try the following.
If you upgraded to Windows 10, you will need to re-add your accounts to Mail for Windows 10.
Make sure your email address and password are correct. Passwords are case-sensitive.
If you see your most recent messages but no older messages, you probably need to change your email sync duration.
If you see a message that your account is out-of-date, you probably need to either update your password, your incoming or outgoing servers, or your SSL settings. See Fixing an out-of-date account for more information.
Special instructions for other accounts
If you’ve enabled two-factor authentication on your iCloud account, you’ll need to generate an app-specific password to add your iCloud account to the Mail app.
Select Generate Password below App-Specific Passwords.
Follow the instructions on your screen.
Microsoft has added OAuth support for Yahoo! accounts in the Windows 10 Creators update. To install the Creators Update now, go to the software download site, and select Update now. For more information about the update, see Windows 10 Creators Update is here.
If you have a Japanese Yahoo! email account you will need to do the following:
You’ll need to add your Yahoo! account as an IMAP account. To do this, follow the steps in Add an account using advanced setup using imap.mail.yahoo.co.jp for your incoming mail server and smtp.mail.yahoo.co.jp for your outgoing mail server.
To sync your QQ mailbox with the Mail and Calendar apps, you need to enable IMAP on QQ.
Sign in to your QQ account.
Select Settings > Account > POP3/IMAP/SMTP/Exchange/CardDAV/CalDAV Service > Find IMAP/SMTP Service > Open.
You might need to send a text message to enable this service. After you select Open in step 2, a dialog might appear prompting you to use your phone to send a message to the displayed phone number.
After the text message is sent, QQ will open a new dialog with an authorization code. Copy the authorization code as you’ll need this to add your QQ mail account in the Mail and Calendar apps.
In the Mail and Calendar apps, remove your QQ account and add it again using the authorization code.
Your QQ account should now sync automatically.
When you try to connect your GMX.de or WEB.de account to the Mail and Calendar apps, you’ll receive an email in your GMX.de or WEB.de mailbox with instructions about how to enable access.
In a web browser, sign in to your GMX.de or WEB.de account.
Find the email message with instructions about how to connect your account to the Mail and Calendar apps, and follow the instructions.
Your account should now sync with the Mail and Calendar apps automatically.
Where can I download Windows Live Mail for Windows 10?

- If you’re nostalgic, after upgrading to Windows 10 you can still use Windows Live Mail.
- But some system changes are necessary, and we’re showing you exactly what needs to be done.
- We’ve extensively covered this topic in our Windows Live Mail area, so make sure to check it out.
- And, in our separate Windows 10 Download Hub you’ll find useful guides on getting software compatible with your OS.
- Sync all your email account into one inbox
- Search for specific attachments
- Let you manage all your contacts from Inbox folder
- Work without email opening errors
Email made easy & beautiful
Some people still prefer using Live Mail 2012, before using the Mail universal app. But unfortunately, Live Mail was ceased at Windows 7, and it doesn’t come with Windows 10.
But even if it isn’t pre-installed in Windows 10, Windows Live Mail is still compatible with Microsoft’s newest operating system.
So, you can install it afterward, but you’ll have to do a few things more, to make Windows Live Mail work on Windows 10 without any problems.
How to Install Windows Live Mail on Windows 10
Get Windows Essentials
Windows Live Mail comes as a part of Windows Essentials, a package of Microsoft’s programs that debuted in Windows 7.
It consists of Photo Gallery, Movie Maker, Windows Live Writer, OneDrive, and of course Windows Live Mail.
To install Windows Live Mail (as a part of Windows Essentials), do the following:
- Download Windows Essentials from this third-party source.
- Run the installer
- When you run the installer, choose Windows Live Mail from the list of programs you want to install (of course, you can install other programs from the package, as well)
- Wait until the installation is finished
Until recently, just installing Windows Live Mail would be enough to run it normally on Windows 10, but that’s not the case anymore. Microsoft recently announced changes to its Outlook, Hotmail, Live and MSN services, and you need to install a certain update to keep it working.
So, after installing Windows Live Mail, just head to this page, download and uninstall the Update KB3093594, which will allow you to run Windows Live Mail on Windows 10.
Even though you’re able to run and use Windows Live Mail on Windows 10, we can’t tell how long will it last, because Microsoft encourages users to switch to the built-in universal Mail app, and it’s possible that the support for Windows Live Mail 2012 will eventually end.
If you’re willing to try new things, we also strongly recommend for you to check out Mailbird.
Mailbird is a great email client app that supports multiple email accounts. You can open your HTML emails and search easily for a specific email from one of your accounts.
Also, you can group and customize your email categories in order to make your work more pleasant and easy. We strongly recommend you this awesome tool, currently the best on the market.
- Download now Mailbird for free

Mailbird Personal
How do I switch from Windows Live Mail to Outlook?
If downloading a particular update (KB3093594) and setting up Windows Live Mail takes too much time, you can always switch to Outlook.
You can easily export all your Windows Live Mail data to your new Outlook account including your contacts, messages, and attachments.
What’s your favorite email client for Windows 10? Are you using Windows 10’s Mail app, or you’d like to go old school, and receive your emails on Windows Live Mail?
Tell us in the comments and also make sure to check out our list of the best email clients for your Windows PC.
How to install an e-mail server in Windows Server
You want to send and receive e-mails with your Windows server and connect to it by using your clients on PC, smartphone or tablet? In this tutorial we will explain how you can setup your own e-mail server on a Windows system with a static public IP. This tutorial will work for our VPS as well as for our dedicated servers. hMailServer is a free open source program, the setup is rather simple and can be done in just a few easy steps. Next to the default features like SMTP, POP3 and IMAP, the software is capable to detect spam and also a free virus protection like ClamWin can be added.
Installation
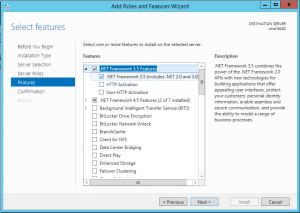
hMailServer needs NET Framework 3.5. to run correctly. Therefore you should add it to Windows before you install hMailServer. To do so, please open the Server Manager. The next steps will differ a little in the different versions of Windows Server. We will explain it by using the example of Windows Server 2012. Please click on “Manage” on the right upper side and choose “Add Features and Roles”. In the window that opens you can click four times on “Next” and leave all the settings the way they are. Now you can choose the features you need to install. You just have to choose the NET Framework 3.5 like shown in the image. With “Next” again, you confirm this selection and “Install” will start the installation. As soon as the process is finished, you can close the window and proceed with the installation of your e-mail server.
Please download the latest version of the software from this site:
Please do not choose a version that is still in beta, since it might contain bugs and vulnerabilities. After you received the installation package, you can execute it and accept the terms of service.
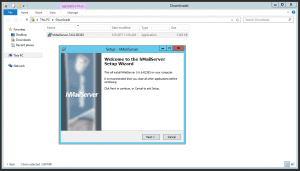
You should leave the default installation directory as is and continue with “Next”. Now you can choose the required products for installation. You will need the full installation, so please let “Server” and “Administrative Tools” checked and proceed with “Next”. For an easy installation, we do recommend to choose “Use built-in database engine” in the next step. In the following window let the name be hMailServer and proceed. hMailServer will need a password for administrative tasks in the future. So please create a password you want to use to protect your service and write it down. The last step will be to start the installation. It should finish without error.
hMailServer Configuration
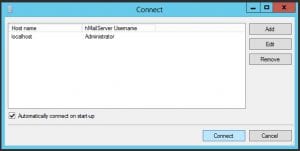
Please open the hMailServer Administrator. In the first window you have to activate “Automatically connect on Start-up” and click on “Connect”.
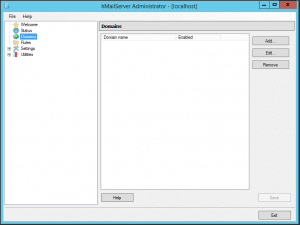
In the next window, please go to “Domains”, choose “Add…” and insert your domain you want to use for sending e-mails.
After the domain got saved, you can add new e-mail addresses in the menu “Accounts”.
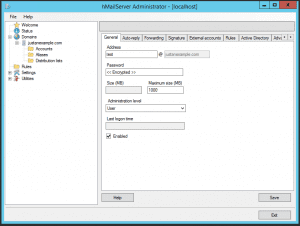
Now please go to Settings >> Protocols >> SMTP >> Delivery of e-mail. There, please add the local host name of your server that should be used for introducing your server to other e-mail servers. It has to be a valid domain and has to resolve to the IP of your server. So please add an A record to your DNS zone if necessary. You also should set an identical PTR for the IP address of your server. This can be done in the Contabo customer control panel. The host name should consist of three parts. That means it has to be an FQDN and it may not contain too many numbers, since it might seem to be generic. A good name for example might be: “mail.justanexample.com”. When you are done, please save your new settings.
Firewall Configuration
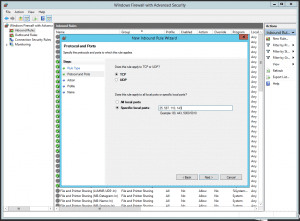
The main configuration is done. But you still have to open all used e-mail ports in the firewall to make it work. Please open the Windows Firewall settings and choose “Inbound Rules”. On the right side click on “New Rule”. A window will open and you have to choose “Port” and click on “Next”. In the next window please insert the ports 25, 110, 143 and 587, as shown in the image.
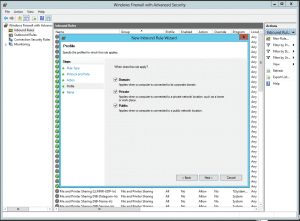
In the following window please choose “Allow The Connection” and after “Next”, please check “Domain”, “Private” and “Public”.
In the last window you can enter a name for the new rule. For example “Ports for hMailServer”. Please finish the setup and close the firewall settings.
Now you should add an SPF record to your DNS zone. Many e-mail servers will reject e-mails from your server if it does not exist. Therefore please add this TXT record to your zone:
justanexample.com 86400 in TXT “v=spf1 ip4:1.2.3.4
“justanexample.com” has of course to be replaced with your domain and 1.2.3.4 with your IP.
You should also add an MX record to your DNS zone, if it does not exist already. The MX record should look like this:
justanexample.com 86400 in MX 10 “mail.justanexample.com”
The value “mail.justanexample.com” has to be replaced with the the host name you have chosen for your e-mail server.
The basic setup of your e-mail server is now complete. It should be able to send and receive e-mails as soon as the DNS changes are active and you can now connect with any e-mail client like Outlook, Thunderbird or Apple Mail.
Client Configuration
Please use the following settings for your e-mail client.
protocol: IMAP; port: 143; security: none; server: the IP or host name of your server
protocol: SMTP; port: 587; security: none; server: the IP or host name of your server
Security
If you want to do some optimizations to the server security like transport encryption, spam checks and malware protection, please take a look at our second tutorial: E-mail server in Windows Server, part 2: Security.


