- Как установить Minecraft-сервер версии 1.15.2 на Windows
- Подключение к серверу
- Отключения режима повышенной безопасности IE
- Установка Java Runtime Environment на сервер
- Загрузка сервера с официального сайта
- Установка и настройка сервера
- Увеличение выделенной ОЗУ для работы Minecraft сервера
- Запуск сервера
- Как создать сервер майнкрафт с модами и Forge
- Создадим сервер:
- Настройка сервера:
- Работа с сервером:
- Как установить моды:
- Правила сервера с модами:
- Как создать сервер Minecraft на Windows
- Tutorials/Setting up a server
- Contents
- Warning
- OpenJDK vs OracleJDK
- JRE vs JDK
- Headless Java
- Common instructions
- Java options
- Minecraft options
- Example command line
- Windows instructions
- Installing Java
- macOS instructions
- Installing Java
- Setting up the Minecraft server
- Using Time Capsule
- Linux instructions
- Installing Java
- Solus
- Debian, Ubuntu, Raspbian
- openSUSE
- Arch Linux
- Gentoo
- Other distros
- A simple installer script (also installs Java)
- FreeBSD instructions
- Installing Java
- Launching Minecraft Server
- Plan 9
- Cloudron
- Docker
- Getting docker (for Linux, Mac & Windows)
- Docker image
- Updating Docker image
- Minecraft Versions in Docker
- Server Port
- Updating Docker image
- Configuring the environment
- Writing a script to launch the server
- On Windows
- On macOS, Linux, and FreeBSD
- On Plan 9
- Startup and maintenance script
- Port forwarding
Как установить Minecraft-сервер версии 1.15.2 на Windows
Данная инструкция актуальна и проверена на Windows Server 2016, Windows Server 2019. Минимальные системные требования для сервера: 2 ГБ оперативной памяти, 2 ядра, например, как на тарифе «Разгон».
Подключение к серверу
Для начала установки подключимся к серверу по RDP.
Отключения режима повышенной безопасности IE
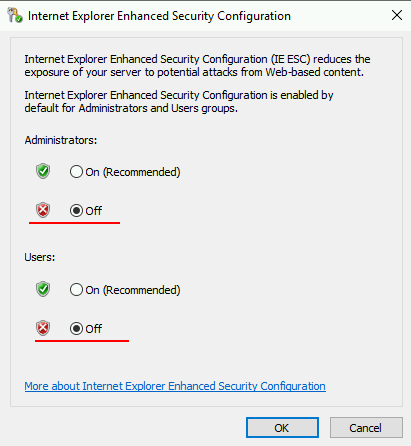
Для удобства работы отключим режим повышенной безопасности в браузере Internet Explorer. Для этого в окне Server Manager , которое откроется сразу после подключения по RDP, перейдем во вкладку Local Server .
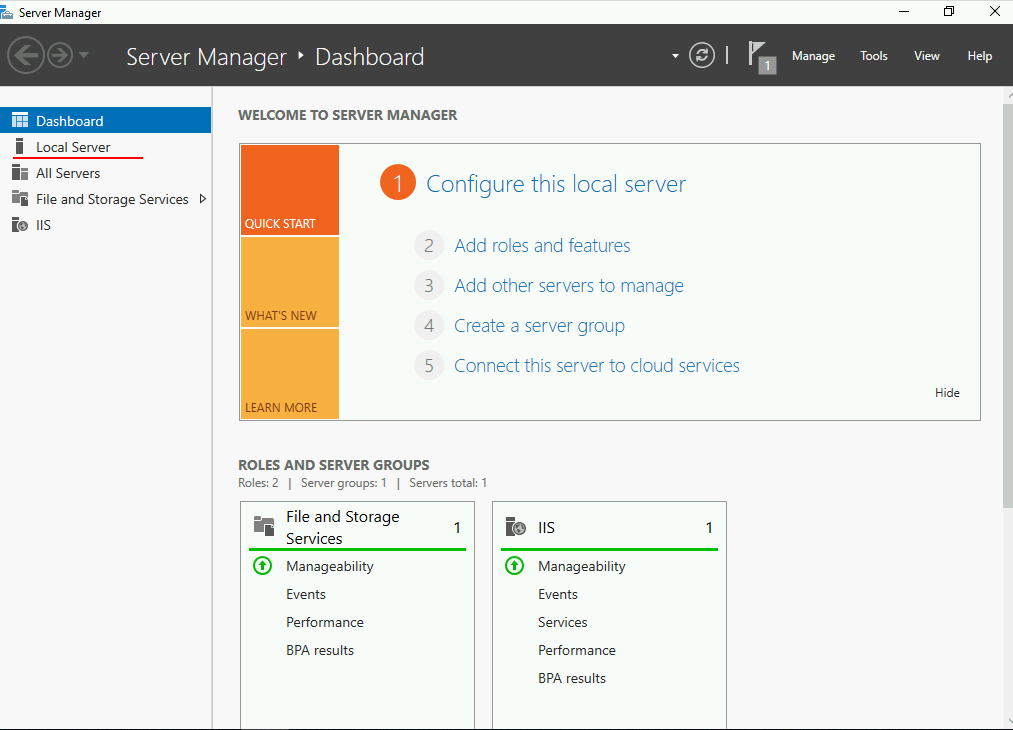
После чего найдём пункт о настройках повышенной безопасности IE Enhanced Security Configuration .

Перейдем в него и отключим режим повышенной защиты.
Установка Java Runtime Environment на сервер
Для работы minecraft сервера необходимо установить Java Runtime Environment. Данное ПО необходимо для работы и запуска сервера Minecraft.
О том, что такое java, и каково её применение можно узнать здесь.
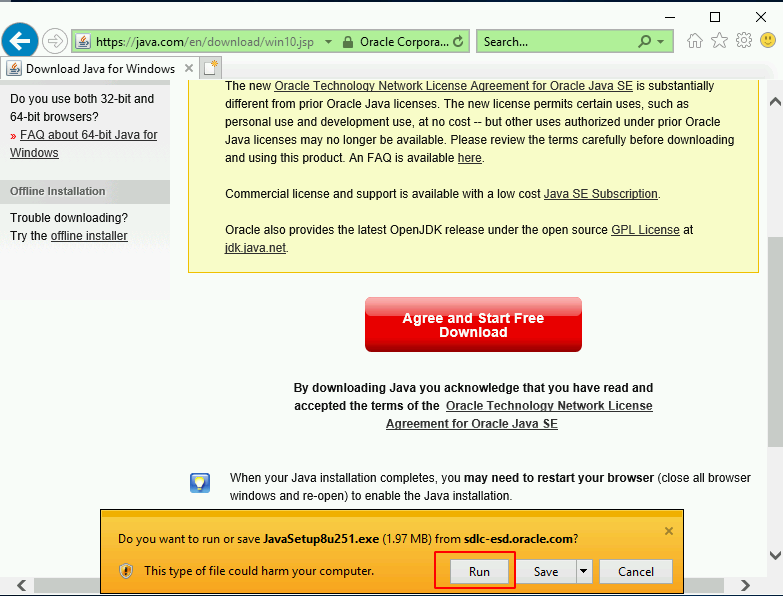
Для установки нужного ПО откроем браузер Internet Explorer и скачаем java по ссылке с официального сайта java.com. Для начала загрузки нажмите на кнопку Java Download .
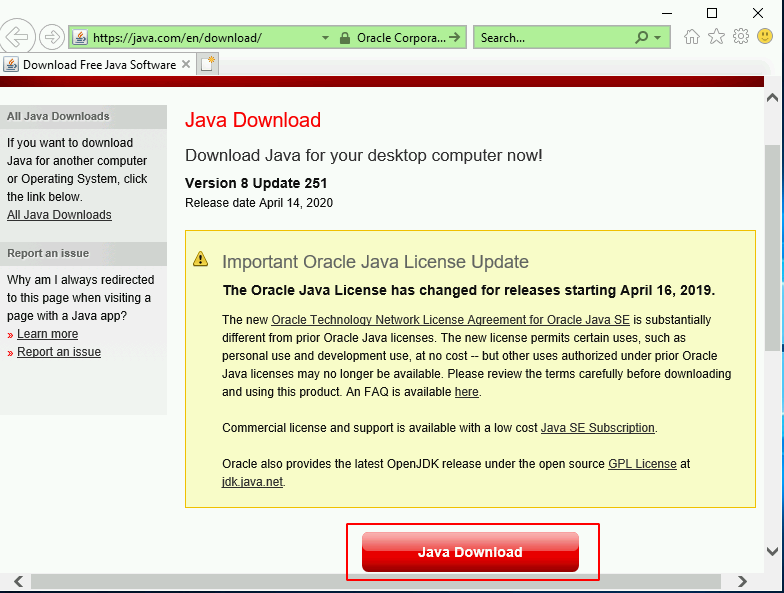
Теперь необходимо согласиться с правилами использования и нажать на кнопку Agree and Start Free download .
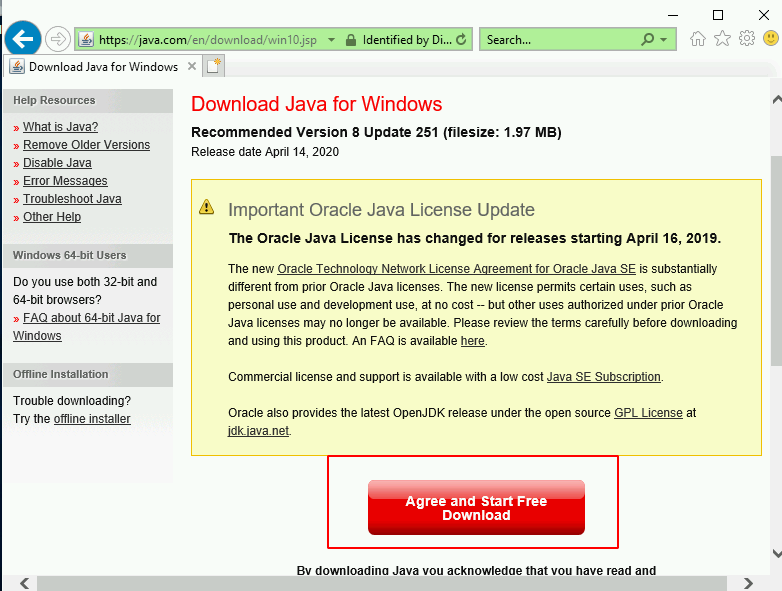
Перед тем как начать загрузку, браузер предложит нам три варианта: запустить, сохранить, отменить. Так как нам необходимо установить Java Runtime Environment, выбираем запуск.
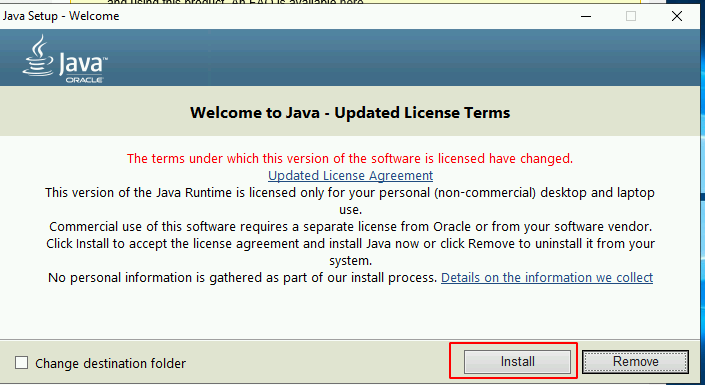
После чего откроется окно с установкой java.
Необходимо нажать на кнопку Install и дождаться окончания установки.
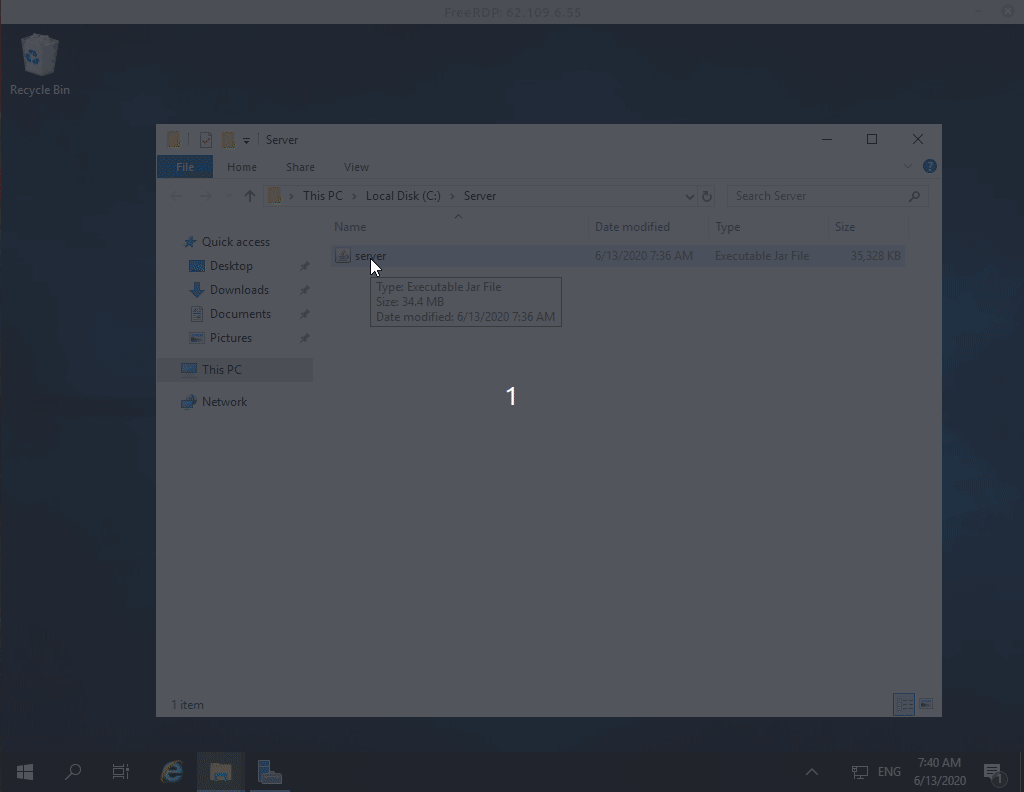
Загрузка сервера с официального сайта
Для работы сервера нам необходим сам сервер minecraft, для этого скачаем его с официального сайта Майнкрафт.
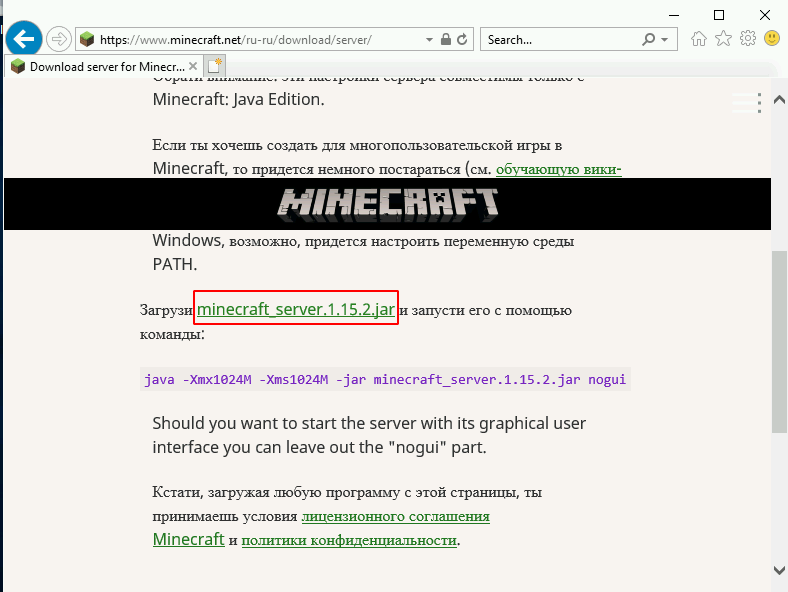
Скачаем и сохраним файл в нужную нам директорию, например в C:\Server
Установка и настройка сервера
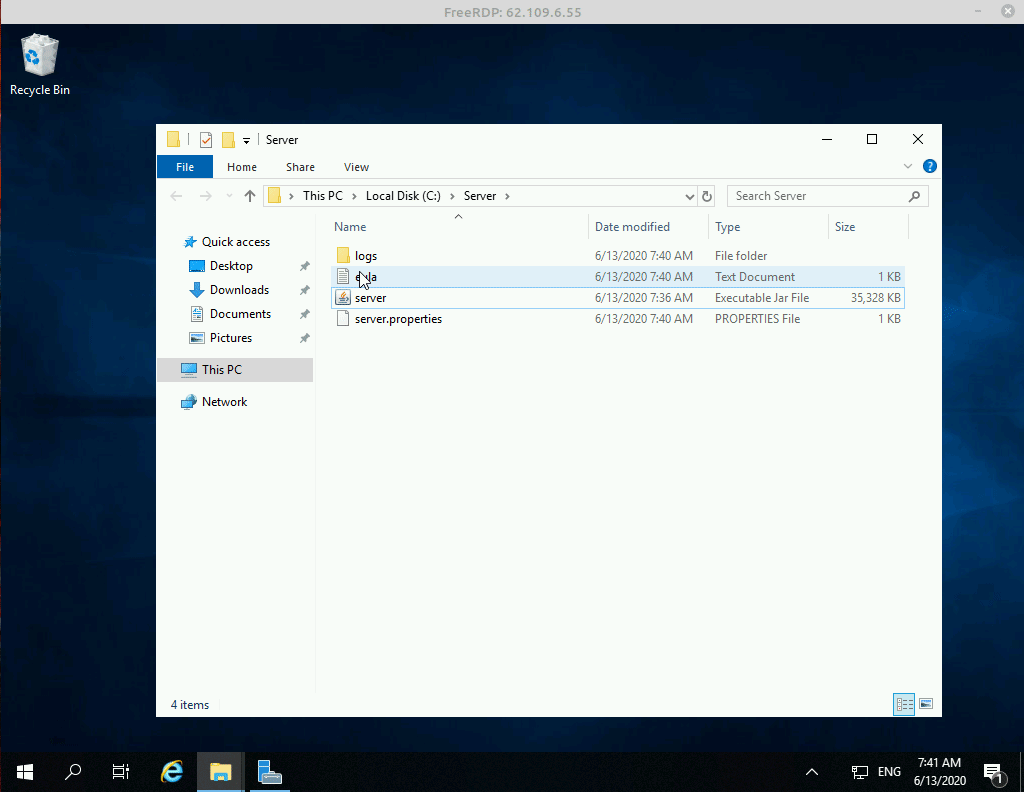
После того, как мы скачали сервер, его необходимо запустить, это делается для того, чтоб сервер создал все необходимые для его работы файлы и директории.
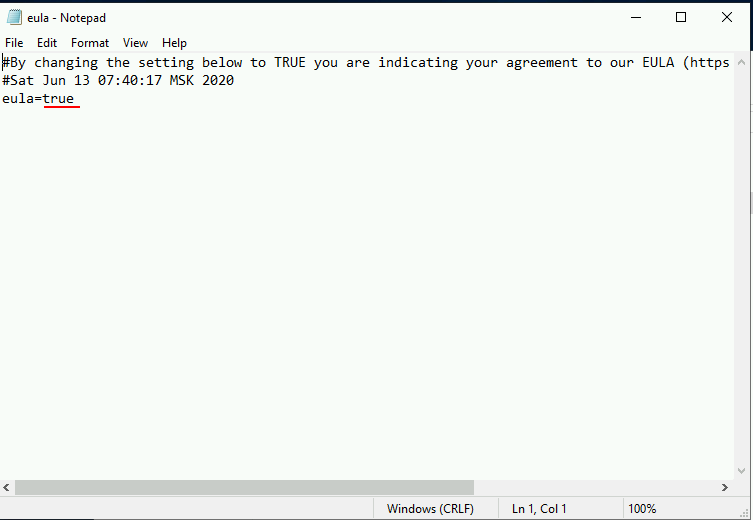
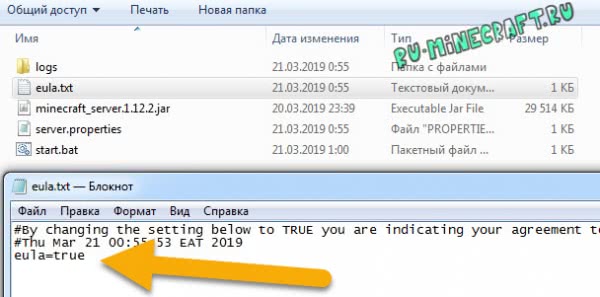
В результате этих действий появится файл eula. EULA означает «End User License Agreement» — соглашение конечного пользователя. Для работы сервера потребуется его принять.
Открываем файл eula.txt любым текстовым редактором и меняем значение:
Увеличение выделенной ОЗУ для работы Minecraft сервера
По умолчанию Java выделяет для сервера Minecraft всего 100 Мб оперативной памяти, что несомненно мало для корректной работы сервера Minecraft. Для увеличения выделяемой памяти (при условии, что на сервере есть требуемое количество памяти) следует создать пакетный файл следующим образом:
1. Создайте и откройте файл в блокноте и поместите туда следующее содержимое:
где 1G — это размер ОЗУ в Гб. Укажите на свое усмотрение.
2. Сохраните его, назвав, к примеру, start_server.bat и поместите в директорию, откуда запускается server.jar
Обращаем ваше внимание, что расширение должно быть .bat
Запуск сервера
Для запуска сервера Minecraft версии 1.15.2 необходимо запустить пакетный файл start_server.bat созданный ранее.
В этом случае java запустит сервер с нужными нам параметрами, выделив для него 1ГБ оперативной памяти.
Как создать сервер майнкрафт с модами и Forge

В этой инструкции я расскажу как создать и запустить простой сервер майнкрафт вместе с модами для игры со своими друзьями используя хамачи или общую сеть и даже интернет.
В данной статье я буду использовать официальный сервер майнкрафт на который будет произведена установка Forge, установлены моды и вы сможете играть с друзьями в сборки.
Создадим сервер:
Скачайте установочник Minecraft forge необходимой версии, exe или jar, не важно.
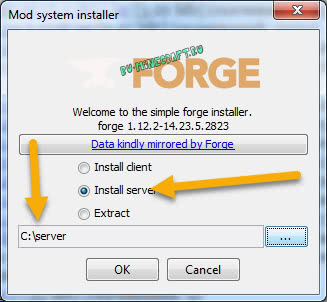
Запустите скачанный файл, в данном окне выберите Install server, а ниже укажите произвольную папку в которой будет ваш сервер, нажмите Ok.
Установочник сам все скачает, необходим интернет.
Перейдите в папку которую указали, там вы увидите примерно это:
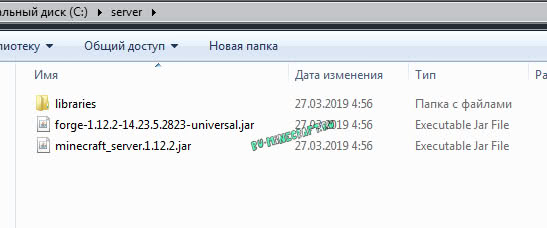
Вам необходимо запустить файл fоrge-1.12.2-14.23.5.2823-universal.jar (будет ваша версия форджа, более новая)
Если этот файл открывается при помощи Winrar или любой другой программы, то смотрите информацию под спойлером.
Я настоятельно рекомендую создать start.bat для запуска, это займет всего пол минуты.
Создайте в папке сервера текстовый документ, поместите внутрь такую строчку:
Внимание название файла сервера указывается в строке, в данном случае forge-1.12.2-14.23.5.2823-universal.jar, если вы переименовали, либо у вас другая версия, измените название на ваше.
Так же значение 1024 указывает максимальное количество оперативной памяти доступной для сервера, если модов много, то необходимо выделять больше памяти.
Важным моментом является параметр nogui, он отключает окно сервера которое показывает игроков и график нагрузки на сервер, да, это окно может быть удобным, но лично у меня оно очень сильно нагружает процессор при работе сервера, НАСТОЯТЕЛЬНО рекомендую отключать GUI сервера.
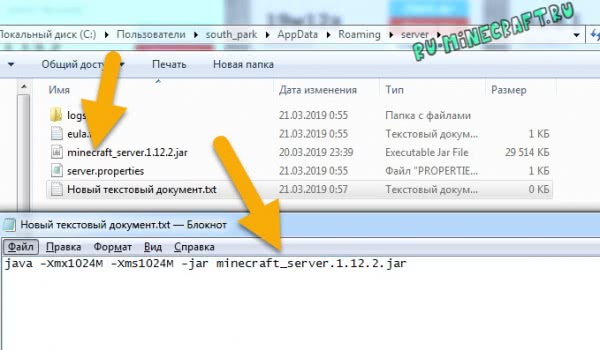
Сохраните файл, переименуйте его например в start и замените расширение .txt на .bat

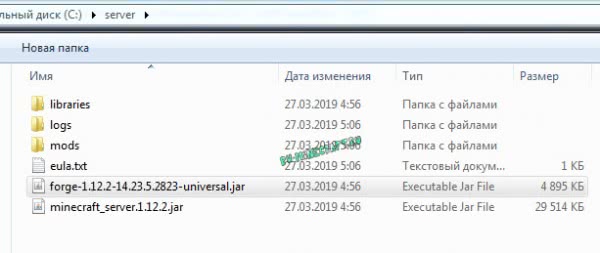
После того как вы запустите файл, в папке появятся несколько папок и файлов:
Откройте файл eula.txt, внутри измените eula=false на eula=true
Запустите сервер при помощи двойного клика по fоrge-1.12.2-14.23.5.2823-universal.jar или по start.bat
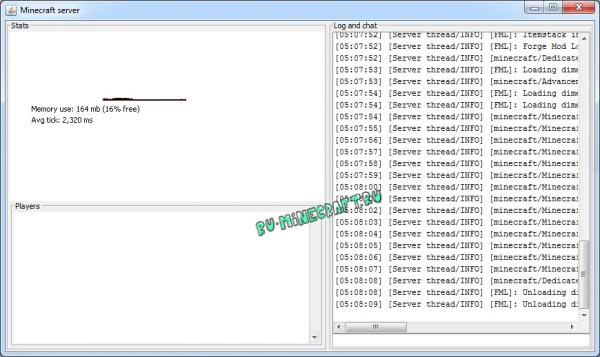
У вас должно открыться окно c консолью сервера:
Если у вас пиратка, обязательно читайте раздел настройки.
Настройка сервера:
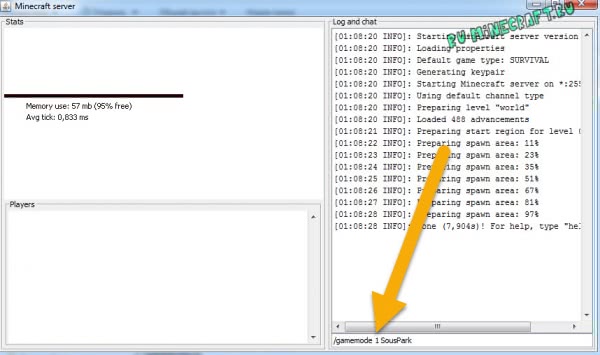
Перейдем к базовой настройке, закройте окно сервера если оно открыто.
1) Откройте файл server.properties в нем есть основные настройки сервера, я затрону только базовые необходимые.
2) Если у вас пиратка, то что бы вас пускало на сервер найдите параметр online-mode=true и измените его на online-mode=false
3) Укажите IP своего сервера в параметре server-ip=
Вы можете указать IP своего пк в интернете (не забывайте открыть порты), IP в хамачи, локальный адрес пк если ваши игроки находятся в одной сети ( подключены к одному вайфай или проводом)
Инструкция как настроить хамачи.
Инструкция как играть по сети
4) Значение — max-players=20 указывает максимальное количество игроков, все прочие настройки вы легко найдете поискав в гугле.
Работа с сервером:
Как установить моды:
Моды устанавливаются подобно обычному майнкрафту, вы помещаете мод и зависимости в папку mods вашего выключенного сервера, хотя есть несколько правил.
Правила сервера с модами:
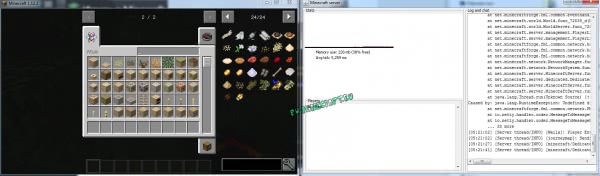
Если ваш сервер не запускается, то читайте файл лога в папке logs, там может быть написан проблемный мод и причину сбоя.
Как создать сервер Minecraft на Windows

Каждый игрок в Майнкрафт хочет поиграть со своими друзьями на серверах, но найти достойный сервер очень трудно, да и хочется быть самому админом, поэтому можно создать свой сервер Minecraft. Мы написали данную статью и отсняли видео, в котором разложили по полочкам всё, что относится к серверу и после её, вы вряд ли заходитесь вопросом как создать сервера Майнкрафт на Windows.
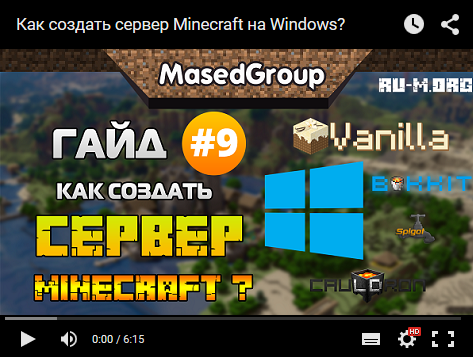
Существует множество ядер серверов Майнкрафт, о четырёх самых популярных мы расскажем.
Vanilla — официальное ядро от разработчиков. Плюсы: Выходит сразу после релиза новой версии; Минусы: Не так много плагинов; Низкая оптимизация использования ресурсов; Придётся устанавливать отдельно Forge, если необходимы моды.
Bukkit — Ядро, основанное на Vanilla. Плюсы: Высокая оптимизация по сравнению со стандартным ядром; Множество написанных плагинов от сторонних разработчиков. Минусы: Придётся устанавливать отдельно Forge, если необходимы моды; Проект был полностью закрыт на версии 1.6.4, на официальном сайте поддержки нет. Существует теперь вместе со Spigot.
Spigot — Более оптимизированное ядро, основанное на Bukkit. Плюсы: Множество улучшений по сравнению с баккит; Все плагины, написанные на баккит спокойно работают и на данном ядре. Минусы: Для новичка, установка может показаться сложной; Придётся устанавливать отдельно Forge, если необходимы моды.
Cauldron (ранее MCPC+) — Ядро, основанное на Spigot, которое включает предустановленные Forge. Плюсы: Так как Forge уже предустановленным, если захочется установить модов, не нужно самому его устанавливать; Все плагины, написанные на баккит спокойно работают и на данном ядре. Минусы: На новые версии Майнкрафт приходится ждать сборку довольно долго, так как сначала разработчики ждут выхода обновлённого Spigot.
Теперь вам нужно решить для каких целей вам нужен сервер и отталкиваясь от этого, выбрать ядро на котором будете разрабатывать сервер. Мы же, покажем создание сервера на примере каждого ядра.
1) Для начала скачиваем сам сервер нужной вам версии:
Скачать server-1-16-1.jar
[36,21 Mb] (cкачиваний: 4574)
Tutorials/Setting up a server
Contents
This tutorial takes you through the steps of setting up your own server using the default server software that Mojang Studios distributes free of charge. The software may be installed on most operating systems, including Windows, macOS, GNU/Linux and BSD.
For more tutorials, see the bottom of this page or the Tutorials page. For more information on Minecraft servers, see the Server page.
- Setting up a server takes some time, and some technical knowledge. Don’t try to set up a server unless you have some basic computer and networking abilities. Probably, your best bet can be to look on the Internet for a guide on how to set up a server.
- A Minecraft server does not need to be a high-end machine, but netbooks and notebooks don’t usually make for good server machines. They typically have lower-end hardware and bad I/O performance in comparison to desktop computers.
- Hosting and playing on the same machine is also possible, if your computer is powerful enough.
- Having many players in a wireless network (WLAN and especially WWAN) is not recommended. Use a wired network instead, such as Ethernet.
- If you decide you don’t want to host, but still want to play online, check out the public server options on a Minecraft server listing website.
- If you still want to manage a server, but not from home, check out the Minecraft server hosting area of the Minecraft forum or other websites. Expect to pay monthly for this type of server since finding free hosting is a rarity, but you save the hassle of constantly maintaining a server and ensure it is always online for your players.
Note: There is also custom server software available, which most large servers use, but these applications are not supported by Mojang Studios.
Warning
Since you’re about to run your own server, you should be aware of the possible dangers. Running by the instructions below should not put you at any risk, but this is a wiki which everybody is allowed to edit, and we don’t know about your system configuration, so we can’t guarantee you’ll be 100% out of danger.
In order to run your server and stay out of trouble, we highly suggest that you should at least know about the following:
- Using the command-line and editing configuration files
- Networking in general (IP, DHCP, ports, etc.)
- Your system configuration
- Your network configuration
- Your router configuration (if you want other people to connect over the Internet)
Java is a programming language designed to create programs for the Java Virtual Machine (JVM). The JVM supports many different platforms. By doing this, developers write code for the JVM and any platform supported by the JVM can run the program. Further reading.
This section is designed to answer some frequently asked questions about Java and guide you through some decisions regarding Java.
OpenJDK vs OracleJDK
OpenJDK and OracleJDK are very similar. OpenJDK is the official open source reference implementation of Java. OpenJDK is an open source codebase that almost all other JDKs are built on. Excluding packaging, cosmetic and license differences OpenJDK is the same as OracleJDK.
Do note that OracleJDK (Oracle’s «OTN») builds require a paid subscription for commercial and production purposes. This likely includes running a minecraft server even if it is non-profit. Oracle does provide its own OpenJDK builds, but they are not packed into an installer format for easy use.
JRE vs JDK
JRE stand for Java Runtime Environment. JDK stands for Java Development Kit. JRE is a package tool designed to run Java programs. JDK is a package of tools designed to develop Java programs. The JDK comes with the JRE which comes with the JVM. If you have JDK then you have JRE and JVM. Vanilla Minecraft does not need JDK, but plugins may require it.
Headless Java
A headless Java installation is a trimmed down version of Java. It does not have a GUI or mouse/keyboard support. Headless Java is frequently used in Servers or other environments where a GUI is not needed.
There are several virtual packages used in Debian for Java. These cover runtime compatibility and come in two flavors; headless (omits graphical interfaces) and normal.
Common instructions
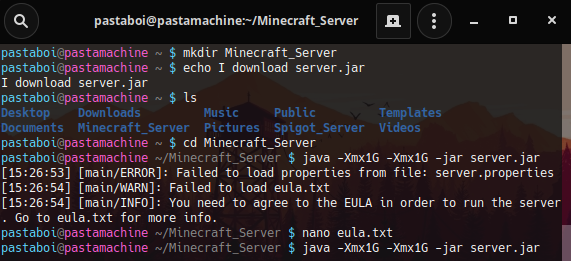
The general gist of running a minecraft server is that you will need to install java , run the server, accept the EULA, and run it again. Once you have installed java and opened up a command line, everything is basically the same.
- Check the system requirements for CPU, RAM, and disk space.
- Install Java. Use the OS-specific instructions below for this.
- Download your server jar file from the download page.
- Make a new folder for the jar file and move it there. This will be where all the configuration and the world files will be stored, so you don’t want these to just sit in «Downloads».
- Open a command prompt or a terminal interface.
- Check again if Java is available. Type java -version .
- Type cd (change directory), followed by the path to the folder where you placed your server jar file. You can drag the folder into the terminal window to get the path, if you have a GUI open.
- Run the server for the first time by typing java -jar minecraft_server.jar —nogui (replacing the jar name by whatever you named the jar file to be).
- Accept the EULA. A file called eula.txt will be generated. Open it in a text editor and change eula=false to eula=true . It signifies that you have read and understood the end user license agreement that you’ll follow when using the software. If you don’t do this, the server will shut down immediately when you try to start it.
- Now the server has been set up, and you can simply run it with java -jar minecraft_server.jar . If you don’t want a GUI for typing commands, add a space and —nogui to the command. (Some people say it makes the server much much faster.) You can also use a few other switches described below.
At this point you should have a basic server running. See Configuring the environment for more information about configuring your server. One of the things you definitely want to do is writing a script to launch the server so you don’t have to remember the command line.
Java options
Java options should be added before the -jar part on the command line.
- The most important thing for a minecraft server is memory to run with. Use the -Xmx switch to change how much memory it’s allowed to use. -Xmx2G is usually more than enough.
- -Xms (the initial memory size) does not affect performance in the long run, but you can set it too. -Xms512M should be enough.
- A «soft max heap size» ( -XX:SoftMaxHeapSize=1G ) is available for some versions of JRE. The JRE will try to only use that much memory, but will go over to a maximum of -Xmx if necessary. If you are running many things on your server, this may be useful.
- Use -d64 if your server is on a 64-bit Solarissystem using 64-bit Java.
Minecraft options
Options for the server JAR go after the -jar minecraft_server.jar part. Run with —help to see all available arguments that can be passed to the server. Below is a list of available commandline options for the server.
- —bonusChest
- If a bonus chest should be generated, when the world is first generated.
- —demo
- If the server is in demo mode. (Shows the players a demo pop-up, and players cannot break or place blocks or eat if the demo time has expired)
- —eraseCache
- Erases the lighting caches, etc. Same option as when optimizing single player worlds.
- —forceUpgrade
- Forces upgrade on all the chunks, such that the data version of all chunks matches the current server version (same as with sp worlds).
- —help
- Shows this help.
- —initSettings
- Initializes ‘server.properties’ and ‘eula.txt’, then quits.
- —nogui
- Doesn’t open the GUI when launching the server.
- —port
- Which port to listen on, overrides the server.properties value. (default: -1)
- —safeMode
- Loads level with vanilla datapack only.
- —serverId
- Gives an ID to the server. (??)
- —singleplayer
- Runs the server in offline mode (unknown where is used for, probably used internally by mojang?)
- —universe
- The folder in which to look for world folders. (default: .)
- —world
- The name of the world folder in which the level.dat resides.
Older Commandline Options
Some options worked in older versions but were removed or replaced by newer ones.
- -o true
- to tell the server to run in online mode so only authenticated users can join. (This may no longer work in newer versions)
Example command line
- Running a world found in the folder «cold» on port 1337, with 1G of RAM allowed: java -Xmx1G -jar minecraft_server.jar —port 1337 —nogui —world cold .
Windows instructions
Installing Java
The Minecraft server requires the Java Runtime Environment (also called JRE or simply Java). For your security, you should only use the most recent version of Java. To verify that you have the latest version, do one of the following:
- Open Windows Control Panel, find Java (it may be inside the Programs category), and click on Update Now.
- Visit http://java.com/en/download/installed.jsp. This will perform an automatic version check from your browser. However, the Google Chrome and Firefox browsers do not run Java content and therefore cannot check Java through the browser.
- Open a command window and enter the command java -version . If a version number is reported, then check the Java website to see what the most recent version number is.
If you don’t have Java or your version is outdated, then download it at https://adoptopenjdk.net/ (OpenJDK) or http://www.java.com/download/ (Oracle «OTN» JDK)
macOS instructions
Keep in mind that the server won’t run correctly on macOS 10.4 and earlier and may crash your machine.
Installing Java
Open the terminal.
- Check if you have java by running java -version . Make sure it’s
newer than 1.6 (best if newer than 1.8).
- If you don’t have java, you can install it via HomeBrew:
- Run /bin/bash -c «$(curl -fsSL https://raw.githubusercontent.com/Homebrew/install/master/install.sh)» to install HomeBrew first.
- Run brew cask install adoptopenjdk to install java (OpenJDK).
- Run java -version again. You should get something this time.
Setting up the Minecraft server
Using Time Capsule
Some homes use AirPort Time Capsule as a wireless router instead of other brands. This section will teach you how to set one up without messing up your file server.
NOTE: Make sure you have your admin username and password.
- Open System Preferences > Network.
- Click the Advanced button and go under TCP/IP.
- Where it says Configure IPv4, change that option to Using DHCP with manual address.
- Change the IP address to 10.0.1.x, where x is a number between the last number of the two numbers under DHCP range (i.e. 10.0.1.2 to 10.0.1.254 would be anywhere between 2 and 254).
- Now go to the Sharing section and make sure that Internet Sharing is on.
- Now, open up AirPort Utility and edit your Time Capsule settings.
- Go under Network and make sure the option Router Mode is set to DHCP and NAT. Now, click the + button under the Port Settings.
- Type in the following:
- Description: Minecraft Server (or whatever you want to call it)
- Private IP Address: The address you chose for the 4th step.
- Change everything with the word port in it to 25565.
- Now, hit Save and update the Time Capsule.
That’s it! You’re now ready to configure your server.
Linux instructions
Linux comes in many different varieties called distributions (distros). Some of these distros are designed or better suited for running a server. If you are setting up a dedicated server it is recommended to use one of these distros.
Linux, in general, is more welcoming to open source programs. So where applicable it is recommended you use open source programs, such as OpenJDK.
Installing Java
OpenJDK is in most distribution’s repositories. You can install it there. For Oracle Java refer to Oracle’s Download Page.
Note: While not affecting minecraft server, JavaFX or other proprietary aspects of Java while need to be installed separately.
Solus
Run sudo eopkg install openjdk-8 to install OpenJDK.
For OracleJDK refer to Solus Help Center
Note: OpenJDK 11 is not in Solus’ repositories.
Debian, Ubuntu, Raspbian
Note: You might need to install the package «software-properties-common» by running sudo apt-get install software-properties-common and/or «python-software-properties» by running sudo apt-get install python-software-properties to use the apt-add-repository command.
Due to licensing issues, the repository frequently used to install Oracle Java has been discontinued. It is now recommended that you install OpenJDK 8 or above.
OpenJDK can be installed with one command: sudo apt update; sudo apt-get install openjdk-8-jdk-headless
Removing the ‘headless’ part of the command will install all components of Java.
Note: Tested in Ubuntu 18.04.
openSUSE
Note: Due to possible instability openSuse Tumbleweed is not recommended as a dedicated server.
Just run the command from the terminal: sudo zypper in java-1_8_0-openjdk
Java should be installed.
Note: Tested in openSuse Leap 15.1
Arch Linux
Note: OpenJDK 7 — 12 are the only officially supported versions of Java.
Just run pacman -S jdk8-openjdk-headless . Remove «-headless» for the full JRE if you want to run with GUI.
If you encounter issues it is recommended that you refer to the ArchWiki
Gentoo
Run emerge —ask virtual/jdk
Other distros
Check your distro’s documentation. It should have information on how to install OpenJDK.
Alternatively, you can visit Java’s website directly to download the Java package for Linux. Most distros work with this (either 32 or 64-bit). Instructions for the installation of those different packages are given on the site.
If during installation, it asks for a password, enter your password. If you get asked «Is this OK [Y/N]» Enter Y and press enter if required. Java should now be installed.
A simple installer script (also installs Java)
Note: this is a very early project, designed with offline installation in mind, and will be updated periodically to make it more user friendly.
FreeBSD instructions
This part was tested with FreeBSD 10.0 amd64 and ‘jre-7u65-linux-i586.tar.gz’
Installing Java
Due to performance and crash issue with OpenJDK and Minecraft server, we will install Oracle JRE made for linux.
Before installing this JRE, you have to install the linux binary compatibility on FreeBSD, you can follow this documentation.
Jave requires some information about the proc. You have to mount linprocfs, type:
and add this line to /etc/fstab :
The Oracle JRE has a dependency marked as forbidden and the installation will fail. Go to /usr/ports/textproc/linux-f10-expat2.0.1/ and in the Makefile remove the line which starts with FORBIDDEN= .
Next you have to manually get the linux tarball due to licence issue (like `jre-7u65-linux-i586.tar.gz’) from java official web site and copy the file to /usr/ports/distfiles . Then to install the JRE, go to /usr/ports/java/linux-sun-jre17/ and run make install distclean .
Note: The previous version of this part, tested on FreeBSD 9.2 amd64, was explained like this: You may have to set JRE_UPDATE_VERSION variable in your Makefile to the actual number (e.g. 45 like in this example) and run ‘make install NO_CHECKSUM=1’.
Try running java -version . You may end up with a message that it cannot find libjli.so . One way to fix it is to add your java paths to the search explicitly. Make a symlink:
And in /compat/linux/etc/ld.so.conf.d/java.conf add:
Run /compat/linux/sbin/ldconfig . Now java -version should work.
Launching Minecraft Server
Create a folder and copy the minecraft server jar in it.
In the actual version you will get this exception syscall epoll_create not implemented if you run the server in the usual way, so we add this line to the command to fix that -Djava.nio.channels.spi.SelectorProvider=sun.nio.ch.PollSelectorProvider .
The command to launch is like:
Plan 9
Cloudron
Cloudron is a platform to self-host apps on your server. Minecraft is available as a one click app on Cloudron. It comes with a web interface to manage Minecraft from the browser. You can also have multiple installations of Minecraft on the same server. You can try a demo here (username: cloudron password: cloudron)
Docker
Docker is a free container based platform which helps to isolate instances of a Minecraft Server from each-other and from the host system. Docker and the owner of the repository of the container are not affiliated with Mojang.
Getting docker (for Linux, Mac & Windows)
Docker image
- Download the image by running docker pull sirplexus/minecraft-server-standalone:latest
- Set up the container with port 25565 open, 1G ram assigned and named «MyServer»: docker container create —publish 25565 :25565/tcp —name «MyServer» —env RAM = 1G sirplexus/minecraft-server-standalone
- Start the container: docker container start MyServer
Updating Docker image
- For updating minecraft-server-standalone run
Minecraft Versions in Docker
For a specific version, add -e VERSION= to the command. For example, use the following command to use the latest snapshot:
For version 1.7.9
Server Port
To change the port that the server is hosted on, we utilize the docker port mapping functionality. This directs some specified port on the host system to port 25565 within container. To run a server using a port other than 25565:
Updating Docker image
To update the docker image. Please note that this does not update minecraft, this updates the container itself.
Configuring the environment
Writing a script to launch the server
It’s definitely boring to have to remember the command-line options for your server every time you launch it. Luckily, we can write it down in a file and just run that instead.
On Windows
The windows version of a script is called a batch file. Create a text file in the folder where you put the jar as «start.bat», and then right click it to edit using notepad. Paste the following in:
Double click the file to start your server. You may get a «Class_Not_Found» and ServerGuiConcole error, just ignore these errors and you should see your «Server Thread/INFO» dialog start the server.
The «pause» command is there to keep the window open so you can read what happened after the server stops.
On macOS, Linux, and FreeBSD
All these systems use a common scripting language called the «POSIX shell script» on the command line. Create a text file in the folder where you put the jar as «start.sh» and write the following in:
Now save the file. Run chmod a+x start.sh (or path to wherever you put the script) to make it executable. You can now run the file by double-clicking or by running ./start.sh in the folder (or using a whole path from outside there).
If you want to add a pausing part like the Windows example, remove the exec word, and add a line of read -n 1 -p «Waiting. » to the end. This is useful if you are running the script by double-clicking on the GUI.
On Plan 9
(I don’t use Plan 9, so I have absolutely no idea how to use the rc, psh, acme, snarf magic. Someone please add it.)
Startup and maintenance script
Alternatively, you can manage/automate the startup and shutdown of the Minecraft server using a script such as the ones listed below:
- Minecraft Server Control Script (MSCS) is a server-management script for UNIX and Linux powered Minecraft servers. Features include:
- Run multiple Minecraft worlds.
- Start, stop, and restart single or multiple worlds.
- Create, delete, disable, and enable worlds.
- Includes support for additional server types: Forge, BungeeCord, SpigotMC, etc.
- Automatically backup worlds, remove backups older than X days, and restart worlds.
- Visit the Minecraft Server Control Script Github page for more information.
- Minecraft Server Manager A comprehensive startup script for Minecraft and Bukkit servers (support Debian, such as Ubuntu).
- MSM can also periodically create World Edit compatible backups.
- Keeps players informed with configurable in-game messages, such as «Shutting down in 10 seconds!»
- Expose in-game commands (such as «say», «op» and «whitelist») to the terminal.
- Tab completion on all commands makes learning easy.
- Visit Minecraft Server Manager’s GitHub page for the full list of features.
- Server startup script
- FreeBSD startup script
- OpenBSD startup script
- Ubuntu startup script
- rfwadmin startup script with web interface (for Linux servers). Nice web interface for quickly saving and loading maps.
- Minecraft Systemd Service A fully systemd-integrated minecraft service:
- Working on CentOS and Fedora
- Protecting the server with various readonly and inaccessible jails
- Safe restart and stop operations using rcon
- Can be combined with a Minecraft Command Center Script for ease of administration
- Arch Linux systemd wrapper
Port forwarding
Port forwarding is used when you have a router and you wish to let users connect to your server through it. If you wish to host your server for local reasons, it is not required that you do so. Keep in mind that port forwarding might cause security risks.
When port forwarding, it varies on how your router will ask you for the information. If you don’t understand on how your router wants you to input the information, try visiting PortForward.com for a tutorial.
Once you have managed to locate your router’s admin page, and find the Port Forwarding page; hit add new service (may not work) (if you use Belkin, this can be very difficult to perform) or custom service. When you get a page asking to setup the new rule, it should prompt you on what you want to call it. You may name it as you wish, but for simplicity, name it «minecraft«. Then, you want to look for «type». If «TCP/UDP» or «Both» isn’t an option you will have to create two rules for both protocols. For the ports (internal and external), enter 25565. If it asks for anything else other than output IP (or internal IP, server IP), leave it alone and continue.
To find your computer’s IP address, use the following steps:
 Windows Press ⊞ Win + R ; this should be up to the «Run» dialog box. Type cmd and hit ↵ Enter . This should open a command window with a black background. From there, type ipconfig and press ↵ Enter . You should be given a list of text. Scroll up to «Wireless LAN» (if using wireless) or «Ethernet» (if using a wired connection), and look at «IPv4 address». To the right of this should be a string of numbers (of the form xxx.xxx.xxx.xxx). Copy this down by right-clicking the window and selecting «Mark», then highlight the area and hit Enter. Don’t copy any parenthesis or letters.


