- How to Install Nessus on Kali Linux 2021 Complete Guide for Beginners
- Step 1: Access activation code and Download Nessus for Kali Linux 2021
- Step 2: Install Nessus on Kali Linux 2021
- Step 3: Accessing Web Interface of Nessus:
- How to install nessus on Kali Linux 2021 – Video Guide in Hindi
- Installing Nessus on the Kali Linux
- Installation and Simple Vulnerability Windows Scanning
- Instructions to install
- Create a new custom policy
- Conclusion:
- Как установить сканер уязвимостей Nessus на Kali Linux 2020.x
- Как установить сканер уязвимостей Nessus на Kali Linux 2020.x
- Установите сканер уязвимостей Nessus в Kali Linux
- Запустите службу Nessus в Kali Linux
- Настройте сканер уязвимостей Nessus в Kali Linux
How to Install Nessus on Kali Linux 2021 Complete Guide for Beginners
Hello friends, Welcome again!
We are studying of Penetration Testing Tutorial This article will cover how to download, install, activate, and access the web interface of Nessus on Kali Linux.
This post is origin How to Install Nessus on Kali Linux Move forward and start your tutorial. In a previous post you have completed Nessus Vulnerability Scanner Tutorial If you did not read it, please read now.
Step 1: Access activation code and Download Nessus for Kali Linux 2021
Nessus is a one of the most famus tool for finding vulenrability in applications and system.
It is a powerful vulnerability scanner tool, And we are going to use it in Kali Linux for penetration testing.
You can’t use it as other tools like Metasploit, because it is not pre-installed in Kali Linux. So you will have to download Nessus first.

Keep in mind architecture 32/64 bit of file for installation.
If you are using 32 bit Kali Linux then download 32-bit Nessus otherwise download 64 bit. You can use the following commands to check the architecture of installed Linux OS.
In the above example you can see I am running 64 bit Kali Linux.
And Fill the form and register yourself for activation. When you finished you will be redirected on Nessus downloading page. Click the download button you will be there for downloading, just Click on Linux Menu will be open click on Debian option for Kali Linux. Agreement window will appear, read terms and condition carefully and accept and save file
Step 2: Install Nessus on Kali Linux 2021
One downloading process will finish, you can start next process. It is installation process.
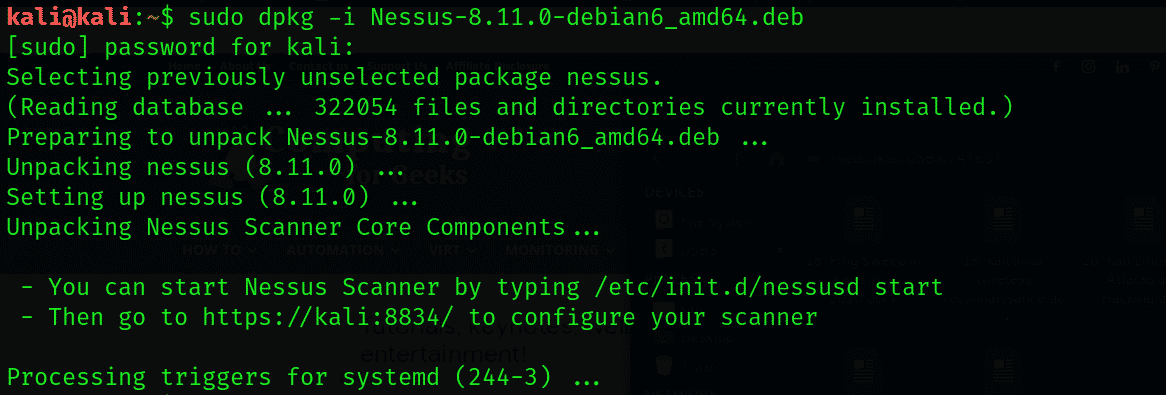
By default, the Nessus file is downloaded in the Download directory so first go inside the Download directory and run the following command to install Nessus on Kali Linux.
#cd Downloads/
/Downloads$ ls
LibreOffice_6.4.4.2_Linux_x86-64_deb Nessus-8.12.0-debian6_amd64.deb
LibreOffice_6.4.4_Linux_x86-64_deb.tar.gz
Now you can use dpkg command to install nessus
And after complete installation run another command to start service.
#/etc/init.d/nessusd start
Step 3: Accessing Web Interface of Nessus:
Nessus is an amazing tool for penetration testing it has a more user-friendly web interface for work.
So you can access it by using the web browser. Nessus web interface is running through the https protocol, it has a secure connection.
The web browser does not have a valid SSL certificate for Nessus So you will get an untrusted connection error.
You can resolve this error to add this site as an exception. https://locatlhost:8834 or https://192.168.0.102:8834
For adding exception you can follow the given instruction.
Step 1: Open link https://locatlhost:8834
Step 2: You will get access to the window with a certificate error. Click on Advanced then more options will appear. Click on “Add exception”.

Step 3: New window will be open to confirm security exception so Click on “Confirm Security Exception”.

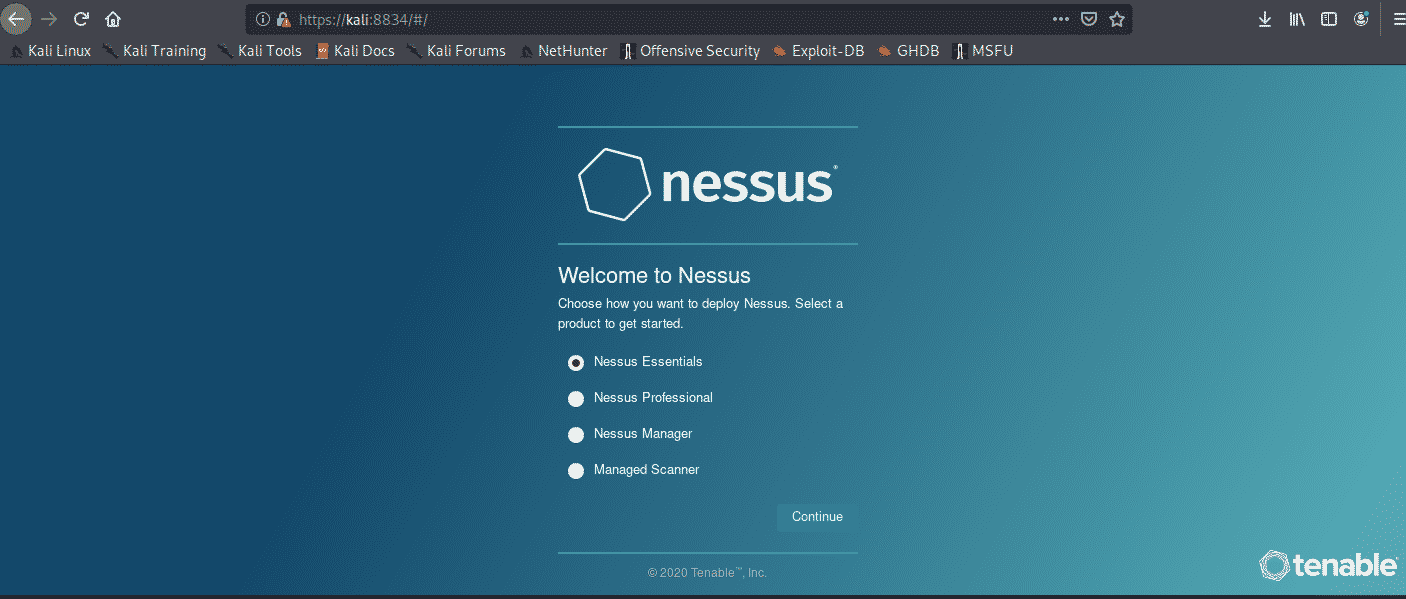
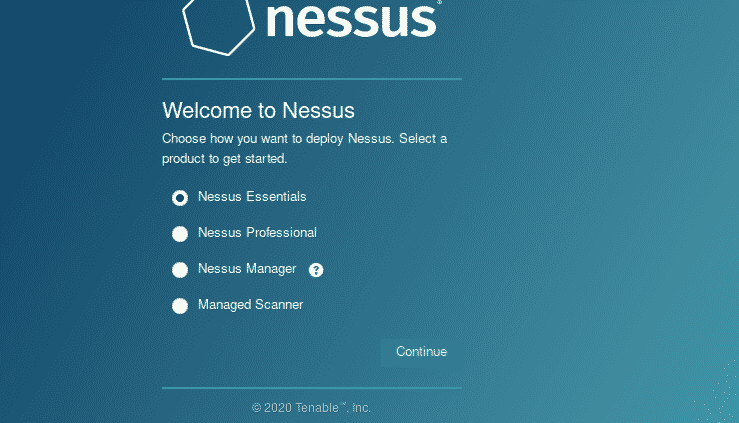
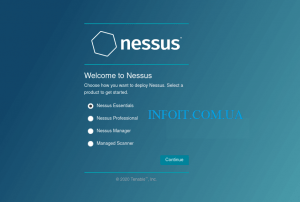
Step 4: Its time to select the Nessus product you want to deploy. I have selected “Nessus Essentials” and click on “Continue”

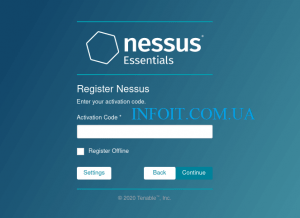
Step 5: you will have requirements of activation code to run Nessus successfully. So My dear friend you should give the right information of your name and email address.
Fill the given form and click on “Email”. The activation code will be mailed to you.

Step 6: New will open and ask for activation code, mailed you in last step. Check your inbox you will find activation code.
Copy and enter the code here, then click on “Continue” to move forward.

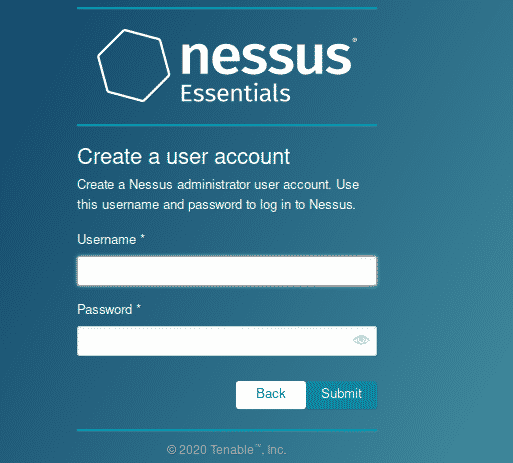
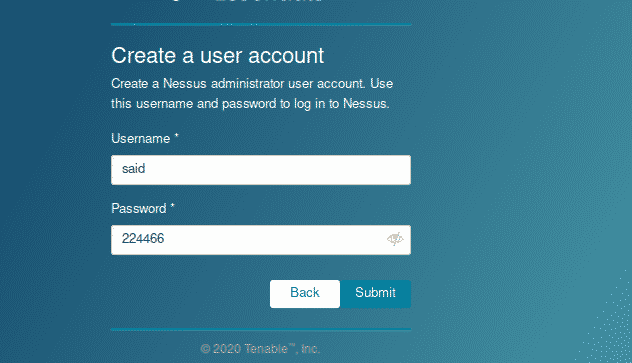
Step 7: Its time to create an account to access Nessus later. So give the username and password.
Make sure your password should follow the strong password policy.
Now click on the “Submit” button to submit your request for creating a account.

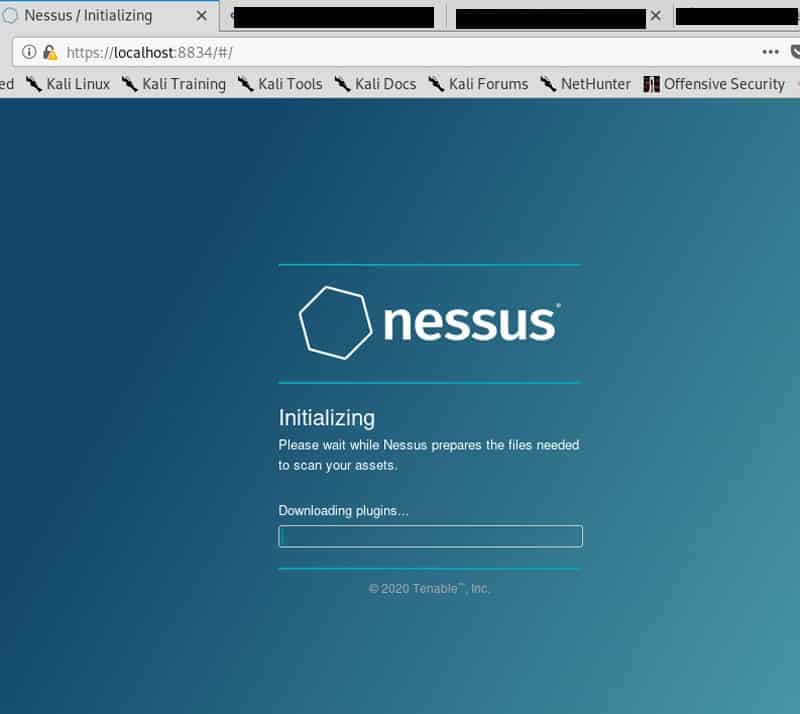
Step 8: Downloading will be started. Have a coffee and your Nessus vulnerability scanner is ready for working strongly after some time.


How to install nessus on Kali Linux 2021 – Video Guide in Hindi
MODULE 5:- Scanning Network and Vulnerability
Источник
Installing Nessus on the Kali Linux
Installation and Simple Vulnerability Windows Scanning
Nessus has a lot of interesting features. Some of them are listed below:
- It has a nice GUI, which is easy for use.
- The scan can be done easily and more quickly. Also, it is easy to set up the scan.
- It will generate a report that is formatted nicely, and the resulting output will be organized and neat.
In this article, we will see how to execute a simple windows vulnerability scan and to set up the Nessus essentials. For this purpose, we will use the 32-bit Kali Linux on VM.
Instructions to install
The following steps are to be followed to install the Nessus on the kali Linux for a 32-bit operating system. For a different operating system, similar steps should be followed.
1. For registration, click on the link below:
Once the link is open, enter your first and last name with an email address. This is done to get an activation code after registration.
2. Choosing the Right Version: In the next step, select the appropriate version for the operating system and press the download button.
3. License Agreement: Now, agree with the terms of condition and the license agreement to save it on your system.
4. Unpacking Nessus: Now unpack the Nessus by going to the download directory through terminal.
5. Begin the Nessus daemon with the help of the following command:

It can also be done during the boot time by the command:

6. Security error and allow Nessus: A security error will have occurred when we browse the GUI Nessus using this link.
To allow Nessus, click on Advanced, then on Add Exception, and finally on Confirm Security.
7. Selecting Nessus Essentials: Select it and press Continue.
8. Skipping the Activation Code Registration
9. Entering the Activation Code: An email will be received. Go to your inbox and copy the activation code to paste it in Nessus. Then press continue.
10. Creating a User Account; Now create the user account by giving the details and submit it. This account is used to login to the Nessus.
11. Patience: Here, wait for 45-60 minutes until the Nessus finish its installation. Some times it will take a longer time to install.
Create a new custom policy
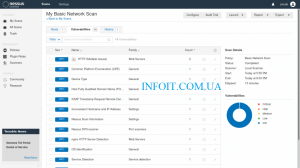
By performing a simple Windows Vulnerability Scan, we will try out some features after installing the Nessus. It is based on scan policies that include what to look for or not.
First of all, change the policies from the sidebar. Then press on New policy. The Nessus show a lot of predefined policies. We can also create policy according to the user with the help of scratch, which can be customized according to the need of the user. Then click on the Advanced Scan. Now give the name to policy and a short description.
Different drop-down menus are shown on the left side. Click on the discovery; we see different options of setting in the host discovery. To scan arrange of hosts or network, uncheck the option Test the local Nessus host. This option will not allow Nessus to scan, and only the host with single windows will be scanned. Now keep the default settings and leave as it is.
In the next step, we will go to the section of port scanning. Here we see that the SYN option is active by default while the TCP option is not active. This is because the Nessus will use the quick SYN scan then the normal TCP scan. Furthermore, the UDP option can be enabled, but it takes a longer time, and it is not effective.
We will also see more setting options for vulnerability scanning. There is also the tab of credentials where we enter the login details to allow the various protocols such as SSH and SNMP to carry out the authenticate scan.
Now, go to the Plugin tab. They are like separate modules to carry out the vulnerability assessment of various components.
Plugins are also available for different types of Linux, web servers, DNS, firewalls, and FTP, etc. To make vulnerability assessment more accurate and perfect, mix the variety of plugins. It is necessary to select the right plugins to avoid the scanning of irrelevant vulnerabilities like cisco vulnerabilities on a Linux target.
As here, we are scanning the normal host of windows 7. To do this, click the option disable all and go with the Windows: Microsoft Bulletins option. For exploring more about plugins. Now go on a specific plugin by clicking on it. After doing that, a popup will appear that contains the descriptions, solutions, and risk ratings. After configuring the settings, click to save it.
Conclusion:
In this article, I have shown you how to install Nessus software tool in Kali Linux. I have also explained how this tool works and its usage.
Источник
Как установить сканер уязвимостей Nessus на Kali Linux 2020.x

Как установить сканер уязвимостей Nessus на Kali Linux 2020.x
Как установить Nessus на Kali Linux 2020.x ?. Добро пожаловать в одно из руководств по Kali Linux по установке сканера уязвимостей Nessus на Kali Linux 2020.x. Nessus — это широко используемый проприетарный инструмент оценки уязвимости как для веб-приложений, так и для мобильных. Nessus создан, чтобы помочь вам уменьшить поверхность атаки вашей организации и обеспечить соответствие требованиям в виртуальных, физических, мобильных и облачных средах.
Nessus имеет самую большую в мире постоянно обновляемую библиотеку проверок уязвимостей и конфигурации. Это гарантирует, что существует стандарт скорости и точности. С помощью Nessus вы можете проводить аудит следующих сред:
- Сетевые устройства : межсетевые экраны / маршрутизаторы / коммутаторы (Juniper, Check Point, Cisco, Palo Alto Networks), принтеры, хранилища
- Виртуализация : VMware ESX, ESXi, vSphere, vCenter, Hyper-V и Citrix Xen Server
- Операционные системы : Windows, Mac, Linux, Solaris, BSD, Cisco iOS, IBM iSeries
- Базы данных : Oracle, SQL Server, MySQL, DB2, Informix / DRDA, PostgreSQL, MongoDB
- Веб-приложения : веб-серверы, веб-сервисы, уязвимости OWASP
- Облако : сканирует облачные приложения и экземпляры, такие как Salesforce и AWS.
- Соответствие : помогает соответствовать государственным, нормативным и корпоративным требованиям.
- Соответствует требованиям PCI DSS за счет аудита конфигурации и сканирования веб-приложений.
Установите сканер уязвимостей Nessus в Kali Linux
Пакеты сканера Nessus доступны на странице загрузок Nessus . Подтвердите последний выпуск Nessus для Debian / Kali Linux. На момент написания этой статьи доступен выпуск Nessus — 8.9.0 .
Загрузите пакет и убедитесь, что он доступен для установки локально.
Установите просканированную уязвимость Nessus в Kali Linux, используя команду ниже.
Эта же команда будет использоваться при обновлении сканера уязвимостей Nessus в Kali Linux. Вы только измените имя файла.
Запустите службу Nessus в Kali Linux
После установки пакета необходимо запустить службу, необходимую для работы сканера уязвимостей Nessus.
Убедитесь, что nessusd действительно запущен и работает.
$ systemctl status nessusd.service
● nessusd.service — LSB: Starts and stops the Nessus
Loaded: loaded (/etc/init.d/nessusd; generated)
Active: active (running) since Sun 2020-02-23 08:37:47 EST; 1s ago
Docs: man:systemd-sysv-generator(8)
Process: 19079 ExecStart=/etc/init.d/nessusd start (code=exited, status=0/SUCCESS)
Tasks: 19 (limit: 2318)
Memory: 70.2M
CGroup: /system.slice/nessusd.service
├─19081 /opt/nessus/sbin/nessus-service -D -q
└─19082 nessusd -q
.
Демон Nessus привязывается к TCP-порту 8834 .
Настройте сканер уязвимостей Nessus в Kali Linux
Посетите веб-интерфейс Nessus на IP- адресе сервера или на порту 8834 имени хоста, чтобы завершить установку и активацию Nessus.
Для меня это будет:
На первой странице выберите продукт Nessus для использования.
Поскольку я выбрал установку Nessus Essentials, я предоставлю личную информацию, чтобы получить электронное письмо с бесплатным кодом активации Nessus Essentials.

Теперь зарегистрируйте Nessus, введя код активации, полученный по электронной почте.
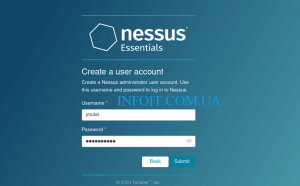
На следующей странице создайте учетную запись администратора Nessus.
Сканер Nessus начнет подготовку файлов, необходимых для сканирования ваших активов.
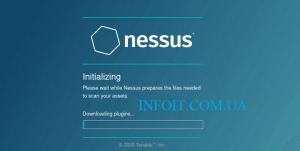
Имейте в виду, что это может занять некоторое время, поскольку Nessus загрузит подключаемые модули и подготовит файлы, необходимые для сканирования ваших ресурсов.
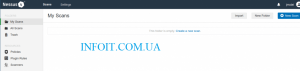
Страница Nessus по умолчанию при входе в систему должна выглядеть примерно так, как показано ниже..
Добавьте свои сети, чтобы начать сканирование.
Вы успешно установили сканер уязвимостей Nessus в Kali Linux.
Источник


