- ИТ База знаний
- Полезно
- Навигация
- Серверные решения
- Телефония
- Корпоративные сети
- Курс по сетям
- 15 примеров команды PING для диагностики сети
- Руководство по команде grep в Linux
- Рекурсивно найти слово в файлах и папках Linux
- 10 команд Linux, которые убьют ваш сервер
- Использование опций команды apt-get для очистки системы
- Как сбросить пароль в Debian
- Работа с процессами в Linux
- Как пользоваться утилитой screen в Linux?
- Немножко теории
- Установка screen в Linux
- Установка screen в Ubuntu и Debian
- Установка screen в CentOS и Fedora
- Запуск screen в Linux
- Сессия screen с именем
- Как правильно работать с окнами в Windows
- Выход из screen сессии
- Возврат к screen сессии
- Немножко кастомизации screen под вас
- Типовой сценарий использования screen
- Выводы
- Handling Screen Savers
- About Screen Savers
- Using the Screen Saver Functions
- Creating a Screen Saver
- Screen saver library
- Supporting the configuration dialog box
- Supporting the screen saver window procedure
- Creating a module-definition file
- Installing New Screen Savers
- Adding Help to the Screen Saver Configuration Dialog Box
ИТ База знаний
Курс по Asterisk
Полезно
— Узнать IP — адрес компьютера в интернете
— Онлайн генератор устойчивых паролей
— Онлайн калькулятор подсетей
— Калькулятор инсталляции IP — АТС Asterisk
— Руководство администратора FreePBX на русском языке
— Руководство администратора Cisco UCM/CME на русском языке
— Руководство администратора по Linux/Unix
Навигация
Серверные решения
Телефония
FreePBX и Asterisk
Настройка программных телефонов
Корпоративные сети
Протоколы и стандарты
Популярное и похожее
Курс по сетям

15 примеров команды PING для диагностики сети
Руководство по команде grep в Linux
Рекурсивно найти слово в файлах и папках Linux
10 команд Linux, которые убьют ваш сервер
Использование опций команды apt-get для очистки системы
Как сбросить пароль в Debian
Работа с процессами в Linux
Еженедельный дайджест
Как пользоваться утилитой screen в Linux?
Окно в «новую жизнь»
Сейчас вы точно прочувствуете важное команды screen . Бывало ли у вас такое, что вы выполняете (очень долго) команду в консоли — CLI на удаленной машине, будучи подключенным через SSH? Команда долго выполняется и близится к завершению как вдруг пропадает подключение, рвется SSH подключение и все, что вы делали — пропало?
Обучайся в Merion Academy
Пройди курс по сетевым технологиям
Начать
Прости, что напомнили. Знаем, это болезненно. Что же, вытрем слезы. Для этих ситуаций есть команда screen о которой мы и поговорим.
Немножко теории
Так называемый screen это терминальный мультиплексор (нас тоже пугает это слово). Другими словами, оно дает нам возможность внутри действующей сессии открыть сколько угодно много виртуальных окон/терминалов. Что важно — процесс, запущенный внутри сессии через screen, будет продолжаться даже тогда, когда вы отключитесь от самой первой сессии.
Установка screen в Linux
Вообще, пакет screen предустановлен на большинстве современных Linux — дистров. Проверить можно командой:

Если случилось так, что у вас его нет — это можно быстро исправить простой установкой.
Установка screen в Ubuntu и Debian
Установка screen в CentOS и Fedora
Запуск screen в Linux
Чтобы запустить screen в консоли, просто наберите screen . Что может быть проще, не правда ли?
У вас откроется новая сессия в новом окне. Уже здесь вы можете вводить все нужные shell команды. Находясь в режиме скрина (screen) вы можете посмотреть список доступных вам команд управления этим режимом. Вот так:
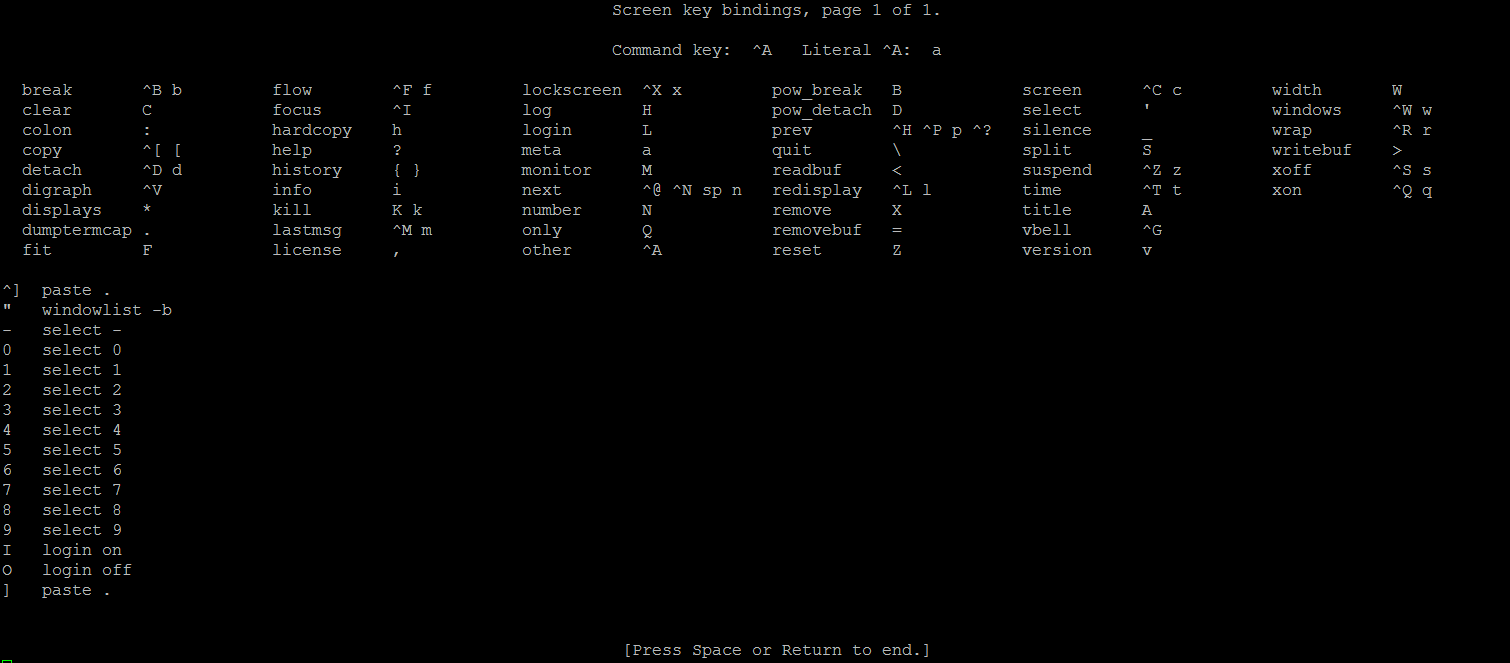
Если не получается нажать указанную выше комбинацию, можно поступить проще: нажмите отдельно Ctrl+a , отпустите, а затем в консоль наберите ? и нажмите Enter
Сессия screen с именем
Ну очень удобная фича. Если вы делаете несколько процессов параллельно, просто обзовите их так, чтобы потом понять, что и где выполняется. Синтаксис такой:
Например, вы можете запустить ping — замер хоста с 1С и назвать сессию так:
Всегда используйте скрин именно так. Будет значительно удобнее.
Как правильно работать с окнами в Windows
Как мы уже сказали, когда вы создаете новую screen — сессию, вы создадите новое окно с shell оболочкой внутри. И что интересно — внутри скрин сессии вы можете создать множество дополнительных окон. Чтобы это сделать, воспользуйтесь командой (внутри скрина) Ctrl+a и c . Новому окну будет назначен номер от 0 до 9 (первый свободный).
Ниже мы собрали все команды, которые понадобятся вам для управления скринами:
- Ctrl+a и c — создать дополнительное окно ;
- Ctrl+a и » — показать список всех имеющихся окон;
- Ctrl+a и 0 — переключиться на окно с номером 0 (номер может быть иной);
- Ctrl+a и A — переименовать текущее окно;
- Ctrl+a и S — разделить окно по горизонтали на две области;
- Ctrl+a и | — разделить окно по вертикали на две области;
- Ctrl+a и tab — переключить рабочий фокус на следующую область разделенного окна;
- Ctrl+a и Ctrl+a — переключить рабочий фокус на предыдущую область разделенного окна;
- Ctrl+a и Q — закрыть все разделенные области кроме;
- Ctrl+a и X — закрыть текущую область;
Выход из screen сессии
Вы можете легко выйти из screen — сессии набрав:
Самое важное: запущенная вами в этот момент команда не остановится и будет продолжать свое выполнение.
Возврат к screen сессии
Чтобы вернуть к screen — сессии используйте команду:
Если у вас запущено больше чем одна screen — сессия, то после ключа r нужно указать ее ID. Узнать его просто с помощью команды:
Вывод этой команды будет выглядеть вот так:
В выводе выше мы выделили ID — сессий. Например, чтобы вернуться к сессии 32328 (pings_towards_1C), дайте команду:
Немножко кастомизации screen под вас
Когда screen запускается, он считывает свои конфигурационные параметры из /etc/screenrc и
/.screenrc , если файл присутствует. Так вот — мы можем легко перенастроить предпочтения использования screen и сделать это в файле .screenrc .
Посмотрите пример с комментариями, как мы закастомили screen для себя:
Типовой сценарий использования screen
Общий случай, так сказать. Обычно он состоит из следующих шагов:
- После SSH подключения к серверу, набираем screen ;
- Запускаем интересующую нас команду в режиме screen — сессии;
- Выполняем команду Ctrl + a и d , чтобы выйти из режима работы с экран-сессией
- Через какое-то время возвращаемся к запущенному ранее экрану командой screen -r
Выводы
Мы разобрались, как создавать screen сессии, управлять ими внутри, открывая новые окна, выходить из их режима управления (без прекращения выполнения команды), делить горизонтально и вертикально экраны.
Ах да, ещё мы научились кастомизировать screen под себя. Профит!
Handling Screen Savers
The Microsoft Win32В API supports special applications called screen savers. Screen savers start when the mouse and keyboard have been idle for a specified period of time. They are used for these two reasons:
- To protect a screen from phosphor burn caused by static images.
- To conceal sensitive information left on a screen.
This topic is divided into the following sections.
About Screen Savers
The Desktop application in the Windows Control Panel lets users select from a list of screen savers, specify how much time should elapse before the screen saver starts, configure screen savers, and preview screen savers. Screen savers are loaded automatically when Windows starts or when a user activates the screen saver through the Control Panel.
Once a screen saver is chosen, Windows monitors keystrokes and mouse movements and then starts the screen saver after a period of inactivity. However, Windows does not start the screen saver if any of the following conditions exist:
- The active application is not a Windows-based application.
- A computer-based training (CBT) window is present.
- The active application receives the WM_SYSCOMMAND message with the wParam parameter set to the SC_SCREENSAVE value, but it does not pass the message to the DefWindowProc function.
Security Context of the Screen Saver
The security context of the screen saver is dependent on whether a user is interactively logged on. If a user is interactively logged on when the screen saver is invoked, the screen saver runs in the security context of the interactive user. If no user is logged on, the security context of the screen saver is dependent on the version of Windows being used.
- Windows XP and Windows 2000 — screen saver runs in the context of LocalSystem with accounts restricted.
- Windows 2003 — screen saver runs in the context of LocalService with all privileges removed and administrators group disabled.
- Does not apply to Windows NT4.
The security context determines the level of privileged operations which can be done from a screen saver.
Windows Vista and later: If password protection is enabled by policy, the screen saver is started regardless of what an application does with the SC_SCREENSAVE notification.
Screen savers contain specific exported functions, resource definitions, and variable declarations. The screen saver library contains the main function and other startup code required for a screen saver. When a screen saver starts, the startup code in the screen saver library creates a full-screen window. The window class for this window is declared as follows:
To create a screen saver, most developers create a source code module containing three required functions and link them with the screen saver library. A screen saver module is responsible only for configuring itself and for providing visual effects.
One of the three required functions in a screen saver module is ScreenSaverProc. This function processes specific messages and passes any unprocessed messages back to the screen saver library. Following are some of the typical messages processed by ScreenSaverProc.
| Message | Meaning |
|---|---|
| WM_CREATE | Retrieve any initialization data from the Regedit.ini file. Set a window timer for the screen saver window. Perform any other required initialization. |
| WM_ERASEBKGND | Erase the screen saver window and prepare for subsequent drawing operations. |
| WM_TIMER | Perform drawing operations. |
| WM_DESTROY | Destroy the timers created when the application processed the WM_CREATE message. Perform any additional required cleanup. |
ScreenSaverProc passes unprocessed messages to the screen saver library by calling the DefScreenSaverProc function. The following table describes how this function processes various messages.
| Message | Action |
|---|---|
| WM_SETCURSOR | Set the cursor to the null cursor, removing it from the screen. |
| WM_PAINT | Paint the screen background. |
| WM_LBUTTONDOWN | Terminate the screen saver. |
| WM_MBUTTONDOWN | Terminate the screen saver. |
| WM_RBUTTONDOWN | Terminate the screen saver. |
| WM_KEYDOWN | Terminate the screen saver. |
| WM_MOUSEMOVE | Terminate the screen saver. |
| WM_ACTIVATE | Terminate the screen saver if the wParam parameter is set to FALSE. |
The second required function in a screen saver module is ScreenSaverConfigureDialog. This function displays a dialog box that enables the user to configure the screen saver (an application must provide a corresponding dialog box template). Windows displays the configuration dialog box when the user selects the Setup button in the Control Panel’s Screen Saver dialog box.
The third required function in a screen saver module is RegisterDialogClasses. This function must be called by all screen saver applications. However, applications that do not require special windows or custom controls in the configuration dialog box can simply return TRUE. Applications requiring special windows or custom controls should use this function to register the corresponding window classes.
In addition to creating a module that supports the three functions just described, a screen saver should supply an icon. This icon is visible only when the screen saver is run as a standalone application. (To be run by the Control Panel, a screen saver must have the .scr file name extension; to be run as a standalone application, it must have the .exe file name extension.) The icon must be identified in the screen saver’s resource file by the constant ID_APP, which is defined in the Scrnsave.h header file.
One final requirement is a screen saver description string. The resource file for a screen saver must contain a string that the Control Panel displays as the screen saver name. The description string must be the first string in the resource file’s string table (identified with the ordinal value 1). However, the description string is ignored by the Control Panel if the screen saver has a long filename. In such case, the filename will be used as the description string.
Using the Screen Saver Functions
This section uses example code taken from a screen saver application to illustrate the following tasks:
Creating a Screen Saver
At intervals ranging from 1 through 10 seconds, the application in this example repaints the screen with one of four colors: white, light gray, dark gray, and black. The application paints the screen each time it receives a WM_TIMER message. The user can adjust the interval at which this message is sent by selecting the application’s configuration dialog box and adjusting a single horizontal scroll bar.
Screen saver library
The static screen saver functions are contained in the screen saver library. There are two versions of the library available, Scrnsave.lib and Scrnsavw.lib. You must link your project with one of these. Scrnsave.lib is used for screen savers that use ANSI characters, and Scrnsavw.lib is used for screen savers that use Unicode characters. A screen saver that is linked with Scrnsavw.lib will only run on Windows platforms that support Unicode, while a screen saver linked with Scrnsave.lib will run on any Windows platform.
Supporting the configuration dialog box
Most screen savers provide a configuration dialog box to let the user specify customization data such as unique colors, drawing speeds, line thickness, fonts, and so on. To support the configuration dialog box, the application must provide a dialog box template and must also support the ScreenSaverConfigureDialog function. Following is the dialog box template for the sample application.
You must define the constant used to identify the dialog box template by using the decimal value 2003, as in the following example:
The following example shows the ScreenSaverConfigureDialog function found in the sample application.
In addition to providing the dialog box template and supporting the ScreenSaverConfigureDialog function, an application must also support the RegisterDialogClasses function. This function registers any nonstandard window classes required by the screen saver. Because the sample application used only standard window classes in its dialog box procedure, this function simply returns TRUE, as in the following example:
Supporting the screen saver window procedure
Each screen saver must support a window procedure named ScreenSaverProc. Like most window procedures, ScreenSaverProc processes a set of specific messages and passes any unprocessed messages to a default procedure. However, instead of passing them to the DefWindowProc function, ScreenSaverProc passes unprocessed messages to the DefScreenSaverProc function. Another difference between ScreenSaverProc and a normal window procedure is that the handle passed to ScreenSaverProc identifies the entire desktop rather than a client window. The following example shows the ScreenSaverProc window procedure for the sample screen saver.
Creating a module-definition file
The ScreenSaverProc and ScreenSaverConfigureDialog functions must be exported in the application’s module-definition file; RegisterDialogClasses should not be exported, however. The following example shows the module-definition file for the sample application.
Installing New Screen Savers
When compiling the list of available screen savers, the Control Panel searches the Windows Startup directory for files with the .scr extension. Because screen savers are standard Windows executable files with .exe extensions, you must rename them so they have .scr extensions and copy them to the correct directory.
Adding Help to the Screen Saver Configuration Dialog Box
The configuration dialog box for a screen saver typically includes a Help button. Screen saver applications can check for the Help button identifier and call the WinHelp function in the same way Help is provided in other Windows-based applications.


