- Installing a New Window in an Old House
- 1. Preparation
- 2. Preparing the new Window for an old House
- The Installation of a Window in a New Construction
- 1. Planning
- 2. Installing a Window in a new Building
- a) Preparing the Construction Parts for Installation
- b) The Installation of the Window Frame
- c) Mounting and foaming the Window in a new Building
- d) Inserting the Window Casement
- 3. Installing a secure Window in new or old House
- How to Install a Window
- Preparing a Rough Opening
- Mounting a Window
- Finishing a Window
- Installing a Window In New Construction
Installing a New Window in an Old House
Installing windows is a job that does not necessarily demand professional window fitters. If you want to install new windows by yourself, you must be aware of some important aspects. Windows do not only differ in terms of design and material. They also have different opening types, resulting in various possible installing methods. windows24.com provides you with a universal manual on how to install a new window in an old house without complications.
Table of Contents
- Construction foam with cleaner
- Vapour resistant foil and diffusion foil
- Screws and washers for the new frame
- Impact drill with Stone or wood bits (6 mm)
- Tape measure and bubble lebel
- Construction foam gun
1. Preparation
When installing a new window, you will need a detailed manual for the procedures employed for an old house, since there are different methods, depending on design and opening type. But before the actual installing procedure begins, you should make sure to have all the tools.
You have to remove old construction pieces before you can start installing a new window in an old house. If this procedure still has to be performed, you can watch this detailed video manual on the topic and learn how to do it.
When installing a new window or front door professionally, it must be done according to RAL standards. In an old house this also includes multiple cleanings of the reveals, because dust and dirt can cause sealing tapes to exceed their full adhesive potential (Fig. 1). Even do-it-yourself enthusiasts should therefore install components in accordance to these regulations.
Take the measurements of the reveals before installing the components in an old house. This can ensure that your new window will fit in the wall openings and that the process can be performed smoothly. These measurements will also help, if you consider installing an insect protection later, as you will already have the respective dimensions. Here you will find a detailed video manual on taking measurements.
Installing a new window in an old house requires manpower. windows24.com recommends getting a helping hand for this job. The work can then be performed more safely and it will prevent accidents.
2. Preparing the new Window for an old House
Your new wooden window and front door is generally covered with protection foil. This is to protect the colours, handles, glazing bars and the glass plates during transport. The foil on the outer part of the frame should be removed before the installing procedure can begin, as removing is very difficult after (Fig. 2b). The rest of the foil can remain at the frame until the end of the installing procedure, as it will further protect glass, handles and bars.
All protective foils must be removed from the components within 3 months after delivery, because they could damage the colour of the new aluminium, wooden or uPVC door or window.
The Installation of a Window in a New Construction
The installation of new wooden, aluminium or uPVC windows and doors is one of the most important steps during the construction of a house. Poorly adjusted windows lower burglary protection and incorrect jointing can make the heating costs a nightmare. But with the right tools and materials, do-it-yourself enthusiasts can easily perform the installation of any window in a new house on their own. This manual can teach you the installation procedure for a window in a new house in about 2 — 3 hours working time – without spending a lot of money on professionals.
Table of Contents
- Frame, casement and fittings
- Depending on the insulation method: foil or construction foam
- Construction foam and construction foam cleaner
- Screws
- Washers
- Impact drill with stone or wood bits
- Folding rule or tape measure
- Construction foam gun
- Bubble level
1. Planning
Whether in a new or an old house – it is important to have all necessary materials at the cleared working space before you start with the installation of aluminium, wooden or uPVC windows in a new building. Please do not underestimate these simple preparation steps. The working time is unnecessarily prolonged, when important materials are not in the right place.
The installation of the entire construction should be performed in a group of two.
Please re-measure the dimensions of the reveal in the new building construction and compare them to the measurements of the new window (Fig. 1). This simple procedure can prevent problems from the beginning. For an installation in accordance with RAL regulations you should also make sure that all surfaces in the reveal are plain and free of dust. This will ensure that the seals can be perfectly attached to the masonry.
At this point you should also start to think about an appropriate sealing type for a later step of the installation. The space between reveal and frame is separated into three levels with different requirements. It must be vapour resistant inside, filled with insulating materials in the centre and open to vapour diffusion outside. Poorly insulated reveals can have a negative impact on the U-value of glazing as well as on the construction parts of the frame. There are various insulation materials for these three sealing levels (inner, middle and outer):
- Vapour resistant foil for the inner sealing of a window
- Construction foam for the middle sealing
- Pre-compressed tape or foil for the outer sealing
- Multifunction sealing tapes are an alternative product for a new building construction, combining the necessary properties of all three levels. Find more information about sealing types here.
Filling materials like mineral or cotton fibres are perfectly suitable for the installation in the «middle» level in a new building construction. Especially, when people show allergic reactions to 1-component-PU construction foam.
2. Installing a Window in a new Building
a) Preparing the Construction Parts for Installation
Before you can start with the installation you have to prepare the new window:
- Remove the window casement for a smooth installation. Remove the locking pin with a screwdriver in a downward direction. Open the casement and lift it upwards (Fig. 2a).
- Remove the protection foil from the area around the handle position. All other foils should remain at the window to protect glass and lacquer from damage during the installation(Fig. 2b).
- Mount the handle at the casement and place it in a safe area until the system is installed in the new building construction(Fig. 2c).
- Now remove the protective foil from the exterior part. The foil should remain on the other parts of the construction as well. To prevent the uncovered parts from soiling, you have to remove the foil from the exterior part of the frame only when you are ready for the next step of the installation procedure.
- After you have chosen the appropriate sealing material, it can now be applied (Fig. 3a). Please be aware of the three different sealing levels and the respective insulation conditions (mentioned above).
b) The Installation of the Window Frame
After the frame is prepared for installation, it can be inserted and adjusted:
- Carefully place the window frame in the wall opening (Fig. 3b).
- Check the frame’s vertical and horizontal orientation adjust it with the accompanying washers. It is very important to work precisely, to ensure that the window can be opened and closed smoothly afterwards (Fig. 3c).
c) Mounting and foaming the Window in a new Building
The following steps can only be performed, after the sealing has been successfully installed and the element is perfectly adjusted in the wall opening.
- Drill in the mounting holes with the impact drill. Use a wood or stone bit, depending on the material of the wall.
- Screw in the mounting screws (Fig. 4).
- Once you are certain that the construction element is vertically adjusted perfectly in the new building construction, you can start to foam the gaps between the insulation of the frame and the wall (Fig. 5a). If the outer sealing is sealing tape and the inner foil, you have to wait for the tape to fully expand in the reveal. Start to fill the construction foam into the space between window and wall.
- Attach the inner insulation foil to the wall after the foaming procedure(Fig. 5b).
Always be careful with dosing the construction foam, as it expands after contact with fresh air. Superfluous construction foam can be cut off after the installation, but it will create a certain amount of added effort.
d) Inserting the Window Casement
After the construction foam between the new house and frame has hardened, you can start with the installation of the casement:
- Carefully insert the casement and re-attach the locking pin (Fig. 6). Close the casement and make sure that it can be properly opened and closed.
- The new casement has to be perfectly adjusted to ensure a reliable thermal insulation after the installation. Here you can find a detailed manual for the adjustment of a window (or door).
This manual only covers the installation of a window in a new building construction. The installation in an old building requires different steps. The replacement of the window itself is the biggest difference in the procedure.
3. Installing a secure Window in new or old House
These installation instructions will help you to install your windows in a new house easily – as long as the measuring, mounting and foaming has been performed correctly. Always consider that poorly adjusted windows and front doors (of all opening types) will not work properly and will not insulate sufficiently. This will also lead to a loss of energy. With sufficient working time and patience, you will not only save money on professional help. It will also have a very valuable effect on the efficiency of your new windows.
How to Install a Window
January 29, 2021
Step-by-step instructions for how to open up a wall, and mount and finish a pre-hung window.
Many windows are sold “pre-hung,” meaning they come assembled with frames. Because you install the entire unit, installation of pre-hung windows is far easier than the method of building a frame and installing a window in it.
The task does require moderate carpentry skills and materials. If you do not feel confident about tackling this job on your own, call in a qualified window installer.
Following are general instructions for how to install a pre-hung window. Directions will vary slightly from product to product, so always read your manufacturer’s instructions before beginning.
Also note: You will need to open up the interior side of the wall and rough frame an opening where the window will go. This rough framing will include extra wall studs on each side, a doubled 2-by-4 sill, and a header over the window, as discussed in depth in Wall Framing for a Window .  A clad window’s mounting flange is screwed to sheathing; a level is used to check for plumb. ©Don Vandervort, HomeTips
Below are the steps for installing a new window in a newly-framed rough opening.
To gain an overview of this job, here is a pretty helpful video that shows a similar project. Some of the steps are a little different than the ones we show in the photos below, but the principles are basically the same. The primary differences are with how the moisture seal is applied because the video shows working with an opening where the siding has been removed beyond the trim.
Preparing a Rough Opening
1 From inside the house, drive nails through the wall to mark the corners of the window. Then, outside, outline the opening for the window.
2 Cut through the siding and the sheathing with a power saw, making sure to use the correct blade. Place the window up to the opening and check for fit. Continue trimming if necessary. 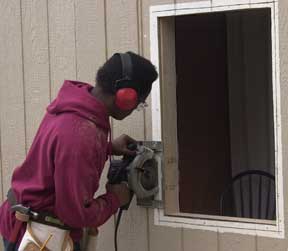 Use a power saw to cut the window’s opening.
3 Place the window into the opening to verify that it will fit. Be sure to make the opening slightly larger than the actual window. Check the manufacturer’s instructions to see exactly how much space you should leave. Cut through the siding and drywall again, if necessary, to provide ample space.
4 Line the opening with 8-inch-wide strips of moisture seal and tuck them into the siding. Slit the corners of the moisture seal diagonally with a utility knife, and fold the pieces toward the interior. Trim the strips if necessary until they extend just inside the interior edge of the opening. Then staple them, working from the bottom up.
5 At this point, put two small 1/2-inch spacers at the bottom of the opening, about 1/2 inch in from the sides. Check for level, and add shims if needed.
Use dabs of silicone or two 6d (2-inch) nails per pair of shims to affix them to the opening (if you use nails, pre-drill nail holes). After they are secured, cut them so they are flush with the siding.  Check the sill of the opening for level.
After preparing the opening for a new window (see How to Install a Window), it’s time to actually mount the window. Here are the steps to follow:
Mounting a Window
From outside the house, rest the bottom of the window on the spacers, and then slowly push the top into the opening. Be sure it is right-side up—it may have drain holes at the bottom that allow moisture to drain.
Drive a nail partway through the trim at one of the upper corners. Check that the window is level, make any necessary adjustments to the shims, and then finish driving the nail. Re-check the level.
Then go inside and make sure everything looks okay from that side.
Drive nails at the other corners and then around the perimeter.  After positioning the window, secure the flange.
Insert shims along the sides near the top and bottom of the window and at the midpoint, and adjust them as needed until the window is plumb. Check to make sure the window is operational, and then secure the window to the opening by driving nails into the brick mold or casing. Apply flashing and sealant (outside and inside) according to the manufacturer’s instructions.
Finishing a Window
Affix the trim on the outside, and caulk the space between the window and the siding, according to the manufacturer’s directions.
On the inside, check the window for level and add shims around the sides until the window is snug in the opening.
Using 8d (2 1/2-inch) finishing nails, nail through the jamb and the shims into the trimmer studs; use a nailset to set the nailheads just below the surface. Add insulation between the jambs and the trimmer studs, cut the shims so they are flush with the wall, and then affix the interior trim. ![]() Shim and fasten the window frame.
Shim and fasten the window frame.
Inside, you can apply molding to complete your project: a stool, apron, and side casings for single- or double-hung windows.
Installing a Window In New Construction
Installing a window in new construction is easier than putting one in an existing wall, thanks to the fact that you don’t have deal with interior wallboard, exterior siding, existing trim, and the like.
Here is an excellent video from This Old House on the right way to do this job:


