- Installing Node.js® and NPM on Mac
- What’s Node.js® and NPM?
- Prerequisites
- Installation Overview
- Installation Steps
- Test it!
- How to Update Node and NPM
- How to Uninstall Node and NPM
- Установка node.js на Mac OS
- Что такое Node.js
- Установка Node.js
- Пакеты Node.js
- Создание пакета package.json
- Читайте также
- Как установить Node.js и NPM в Mac OS
- Как установить Node.js и NPM через Homebrew
- Как установить Node.js и NPM через установщик
- Как узнать, установлены ли NPM и Node.js на Mac
- Как проверить работу Node.js
- Latest Guide to Install npm and node js in Mac OS
- Prerequisites
- Install npm and node js in Mac OS
- How to Update Node and NPM
- How to Uninstall Node and NPM
- Leave a Comment Cancel reply
- LearnInstall Node.js and NPM on a Mac: How-To Guide
- Prerequisites
- Why Homebrew?
- Installation
- Check and Update Your Node and NPM Versions with Homebrew
- How to Uninstall Node and NPM
- Learn with Treehouse
- 100 Responses to “Install Node.js and NPM on a Mac: How-To Guide”
Installing Node.js® and NPM on Mac
What’s Node.js® and NPM?
Node.js® is a JavaScript-based environment which you can use to create web-servers and networked applications. You can also use it to perform helpful tasks on your computer such as concatenating and minifying JavaScript files and compiling Sass files into CSS.
NPM is a “package manager” that makes installing Node “packages” fast and easy. A package, also called a module, is just a code library that extends Node by adding useful features. For example, the “request” module simplifies the process of making HTTP requests so you can easily get web resources from other sites.
NPM is installed when you install Node.js®
Although there is a Mac installer program on the Node website, we recommend using Homebrew to install and update Node.
Prerequisites
- You should have some familiarity with the Mac Terminal application since you’ll need to use it to install and test Node and NPM. You’ll also need the Terminal to use Node.js and NPM. The Terminal application is located in the Utilities folder in the Applications folder.
- Dependencies. Although you can install Node in other ways, we recommend using Homebrew. Homebrew lets you avoid possible security problems associated with using the sudo command to install software like Node and Node modules.
- Install Homebrew. Follow the steps on the How to Install Homebrew on a Mac instruction guide to install Homebrew.
Installation Overview
Installing Node.js® and NPM is pretty straightforward using Homebrew. Homebrew handles downloading, unpacking and installing Node and NPM on your system. The whole process (after you have Homebrew installed) should only take you a few minutes.
Installation Steps
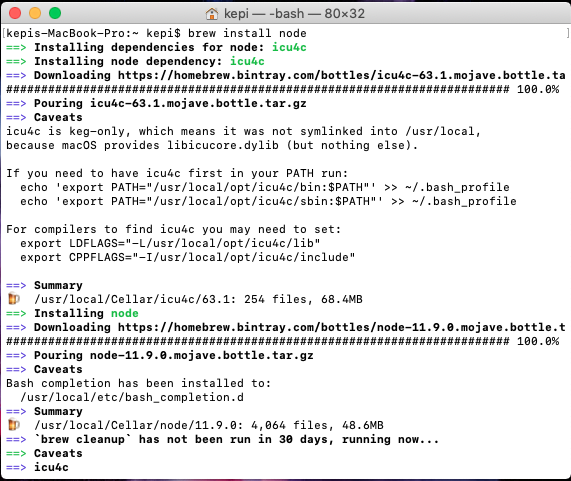
- Open the Terminal app and type brew update . This updates Homebrew with a list of the latest version of Node.
- **Type brew install node .
- Sit back and wait. Homebrew has to download some files and install them. But that’s it.
Test it!
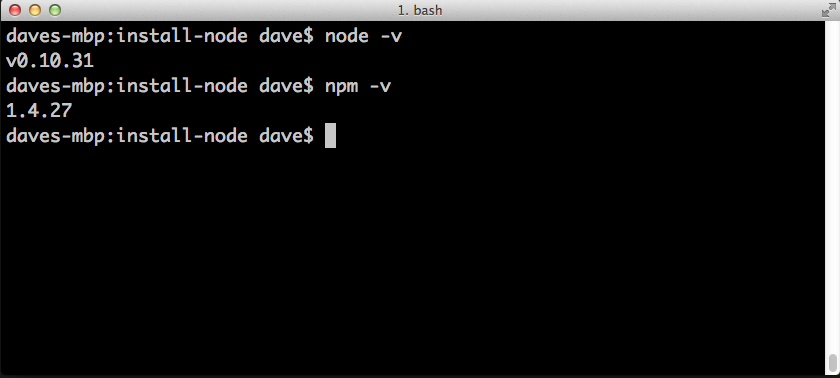
Make sure you have Node and NPM installed by running simple commands to see what version of each is installed:
- Test Node. To see if Node is installed, type node -v in Terminal. This should print the version number so you’ll see something like this v0.10.31 .
- Test NPM. To see if NPM is installed, type npm -v in Terminal. This should print the version number so you’ll see something like this 1.4.27
How to Update Node and NPM
New versions of Node and NPM come out frequently. You can use Homebrew to update the software it installs.
- Make sure Homebrew has the latest version of the Node package. In Terminal type brew update
- Upgrade Node: brew upgrade node
How to Uninstall Node and NPM
You can use Homebrew to uninstall packages that it installed:
Источник
Установка node.js на Mac OS
Node.js, также просто Node — программная платформа для разработчиков.
Для проверки кода на ошибки, часто необходимо наличие на компьютере установленного Node.js.
Что такое Node.js
Node.js – интерпретатор языка JavaScript. Другими словами это программа (написанная на языке C++) умеющая читать js файлы и выполнять их содержимое.
Для того чтобы Node.js прочитал файл, заходим в Терминал, переходим в папку со скриптом js. И там набираем:
Результат обработки файла будет отображен здесь же в консоли.
Установка Node.js
Заходим на официальный сайт и скачиваем стабильную сборку:
nodejs.org
Устанавливаем на компьютер
![]()
Node.js будет установлен в папке:
Пакеты Node.js
Пакеты в Node.js это один или несколько JavaScript файлов.
Node имеет свой собственный установщик пакетов (npm). И одновременно с его установкой будет создана папка для них:
Программа для установки пакетов:
Показать список всех установленных пакетов:
Проверить версию установленного Node через Терминал можно так:
Создание пакета package.json
В файле package.json находится информация о приложении, его название, версия, зависимости и прочее. Директория в которой находится файл package.json автоматически становится пакетом Node.js.
Для создания пакета Node.js заходим в любую директорию, где нужно создать такой файл и запускаем в консоле команду:
Читайте также
Кстати, на сайте нет рекламы. У сайта нет цели самоокупаться, но если вам пригодилась информация можете задонатить мне на чашечку кофе в макдаке. Лайкнуть страницу или просто поблагодарить. Карма вам зачтется.
Источник
Как установить Node.js и NPM в Mac OS
Node JS – популярная платформа Javascript, которая широко используется разработчиками, а npm – это аккомпанирующий её менеджер пакетов. Когда вы установите Node.js, npm установится автоматически. Соответственно, если вам нужен npm, придётся установить и NodeJS.

Есть несколько способов установить Node.js и NPM на Mac, включая использование установщика и использование Homebrew. В данной статье мы расскажем об обоих способах, которые должны работать во всех современных версиях MacOS.
Как установить Node.js и NPM через Homebrew
Самый простой способ установить node.js и npm – через утилиту командной строки Homebrew. Естественно, для этого у вас должен быть установлен менеджер пакетов Homebrew. Кроме того, не помешает обновить программу перед тем, как приступать к инструкции. Выполните следующую команду:
После этого в программе Terminal выполните такую команду, чтобы установить сразу Node.js и npm:
Данный способ самый простой из всех, и с его помощью node.js и npm легко обновлять. Кроме того, удалить их будет так же просто.
Как установить Node.js и NPM через установщик
Если вы по какой-то причине не хотите использовать Homebrew, можете использовать установщик с сайта nodejs.org:
Запустите установщик, как любую другую программу на Mac.
Как узнать, установлены ли NPM и Node.js на Mac
Вы можете узнать, установлены ли node.js и npm на вашем компьютере, использовав следующие команды:
Как проверить работу Node.js
Когда программная платформа node.js будет установлена, вы можете проверить его работу, создав простой сервер. Создайте файл с названием «app.js» со следующим кодом:
Сохраните файл app.js, а затем запустите сервер следующей командой:
Затем откройте браузер и перейдите по этой ссылке:
Вы должны увидеть сообщение « Hello from Node.js».
Это самый простой веб-сервер, созданный с помощью node.js. Вы также можете установить программу Grunt CLI для тестирования node и npm с помощью такой команды:
После этого запустите в командной строке «grunt».
Выше мы рассказали о самых простых способах установить NodeJS и npm на Mac. Надеемся, они вам помогут.
Источник
Latest Guide to Install npm and node js in Mac OS
Just like other JavaScript frameworks React Native also requires npm to manage the dependency so here is the Latest Guide to Install npm and node js in Mac OS.
For those who are new in the Javascript framework world
npm is a package manager for the JavaScript programming language. It is the default package manager for the JavaScript runtime environment Node.js. It consists of a command line client, also called npm, and an online database of public and paid-for private packages, called the npm registry.
We can say that npm is a package manager for Node.js with hundreds of thousands of packages.
Although it does create some of your directory structure/organization, this is not the main purpose. The main goal, as you touched upon, is the automated dependency and package management.
Whenever you work with npm/node you can see it manages a file called package.json in which it stores all the dependency you have used in your project under the dependency section. Which means you can specify your project’s dependencies in the package.json file and any time you or anyone else needs to get started with your project they can just need to run npm install which will install all the dependencies in the node_module directory. On top of this, it is also possible to specify what versions your project depends upon to prevent updates from breaking your project.
In this example, we will show you how to install npm and node js in Mac OS, If you have a Linux or Windows machine then please visit Latest Guide to Install npm and node js for Ubuntu and Windows.
Prerequisites
Before you can install Node, you’ll need to install two other applications. Fortunately, once you’ve got these on your machine, installing Node takes just a few minutes.
- XCode. Apple’s XCode development software is used to build Mac and iOS apps, but it also includes the tools you need to compile software for use on your Mac. XCode is free and you can find it in the Apple App Store.
- Homebrew. Homebrew is a package manager for the Mac — it makes installing most open source sofware (like Node) as simple as writing
You can learn more about Homebrew at the Homebrew website. To install Homebrew just open Terminal and type
You’ll see messages in the Terminal explaining what you need to do to complete the installation process.
Install npm and node js in Mac OS
1. First of all, you need to check whether Homebrew is installed in your Mac or not? To check this run
If you already have Homebrew installed it will show you the installed version of Homebrew

else will show brew: command not found

2. If you have Homebrew installed then you can skip this step else install Homebrew using

3. Now after installing brew you can run the following command to install node and npm in your Mac. This will completely install node into your Mac.
4. After installation of node. You can check using
This will show the installed version of node and npm in your Mac.
 5. Now install watchman (It is a tool by Facebook for watching changes in the filesystem)
6. Install JDK (If you already have JDK installed in your system then you can skip this step, make sure it is JDK 8 or newer.)
7. Install React Native CLI: Node comes with npm, which will help you to install this using
How to Update Node and NPM
New versions of node and npm come out frequently. You can use Homebrew to update the software it installs.
1. Make sure Homebrew has the latest version of the Node package
How to Uninstall Node and NPM
You can use Homebrew to uninstall packages
This was the best way to install the nodejs and npm in Mac OS. If you are facing any problem or if you have any doubt about the topic you can comment below or contact us here.
Hope you liked it 🙂
Leave a Comment Cancel reply
This site uses Akismet to reduce spam. Learn how your comment data is processed.
Источник
LearnInstall Node.js and NPM on a Mac: How-To Guide
Dave McFarland
writes on October 8, 2014
If you’re looking to take your JavaScript coding to another level, Treehouse offers unlimited-access courses in JavaScript (and many other subjects) starting at $25/month. Try our program out with a free seven-day trial today.
JavaScript is one of the most popular programming languages in the world. Because it’s built into most web browsers, programmers and web designers can use JavaScript to add interactive features to websites that reach billions of people. But in the past couple of years, JavaScript has started to play a larger role outside of the browser, due in large part to Node.js.
Node.js is a tool for building fast network applications. It’s known as a “JavaScript runtime environment” which simply means it lets you write JavaScript code that can run on your computer free of any web browser. Node.js is used to create fast web servers by companies like Walmart, eBay and Netflix.
But because Node.js can be used on your desktop computer, programmers have created useful Node-based tools that help with the process of building web sites. For example, Grunt is a popular tool used to automate common tasks like compiling Sass files to CSS, making JavaScript files smaller so they load in less time, and compressing images to smaller file size. While these tools run through the Node.js environment, you’ll use another tool, NPM, to install them. NPM is what’s called a “package manager.” NPM makes installing a tool like Grunt as easy as npm install -g grunt-cli .
But before you can use Node.js or NPM you need to install them — while the NodeJS website includes an installer, there’s a better way to install them on a Mac. In this article, I’ll take you through the process of installing Node.js and NPM on a Mac using Homebrew. In another article, I’ll show you Windows users how to install them on the Windows operating system.
Prerequisites
Before you install Node.js and NPM you’ll first need to have some familiarity with the Mac Terminal application. Terminal lets you dig into the underbelly of the operating system and issue text commands to your computer. You’ll need to use Terminal (or a similar application like iTerm) to not only install Node.js but also to use it and NPM.
Before you can install Node, you’ll need to install two other applications. Fortunately, once you’ve got these on your machine, installing Node takes just a few minutes.
- XCode. Apple’s XCode development software is used to build Mac and iOS apps, but it also includes the tools you need to compile software for use on your Mac. XCode is free and you can find it in the Apple App Store.
- Homebrew. Homebrew is a package manager for the Mac — it makes installing most open source sofware (like Node) as simple as writing brew install node . You can learn more about Homebrew at the Homebrew website. To install Homebrew just open Terminal and type ruby -e «$(curl -fsSL https://raw.githubusercontent.com/Homebrew/install/master/install)» . You’ll see messages in the Terminal explaining what you need to do to complete the installation process.
Why Homebrew?
Observant readers will notice in the screenshot above that there’s an installer for NodeJS. You can download it directly from NodeJS.org. I recommend Homebrew over that installer for a few reasons:
- When installing Node via the installer, you have to use the sudo command to make sure it installs properly (there is a workaround for this, but it’s complicated). sudo lets the installer place files in areas of your file system that are only accessible to administrators. One nice thing about Homebrew is that it doesn’t require access to administrator-only areas of your computer in order to install NodeJS (or any other package). This is a safer approach as it makes sure that any package you install with Homebrew can’t wreak havoc on your computer.
- After installing Node via the installer you have to add the path to the node executable to your system $PATH. This involves mucking around with your shell login file. For experienced Terminal users or Unix-people this isn’t a big deal, but for those new to the command line that step can be daunting. Although the Homebrew method involves installing several different pieces of software, it’s generally just a simple process of point-click-and-wait. It takes a bit longer this way but there’s less room for error.
- Homebrew is a great tool for web developers. First, it makes removing Node very easy (otherwise you have to crawl through your file system and delete a bunch of files manually). Second, it greatly simplfies the installation of other useful packages like Git, Ruby, or the very useful wget utility.
Installation
Installing Node.js and NPM is pretty straightforward using Homebrew. Homebrew handles downloading, unpacking and installing Node and NPM on your system. The whole process (after you have XCode and Homebrew installed) should only take you a few minutes.
- Open the Terminal app and type brew install node .
- Sit back and wait. Homebrew downloads some files and installs them. And that’s it.
To make sure you have Node and NPM installed, run two simple commands to see what version of each is installed:
- To see if Node is installed, type node -v in Terminal. This should print the version number so you’ll see something like this v0.10.31 .
- To see if NPM is installed, type npm -v in Terminal. This should print the version number so you’ll see something like this 1.4.27
Check and Update Your Node and NPM Versions with Homebrew
New versions of Node and NPM come out frequently. You can use Homebrew to update the software it installs.
- Make sure Homebrew has the latest version of the Node package. In Terminal type brew update
- Upgrade Node: brew upgrade node
How to Uninstall Node and NPM
You can use Homebrew to uninstall packages that it installed: brew uninstall node
With Node.js and NPM installed you’ll soon be able to take advantage of the huge world of NPM modules that can help with a wide variety of tasks both on the web server and on your desktop (or laptop) machine. The NPM site lists all of the official Node packages making it easy to make the choice. Have fun and check out my current courses at Treehouse.
Learn with Treehouse
Learning with Treehouse starts at only $25 per month. If you think you’re ready to start exploring if tech is right for you, sign up for your free seven day trial.
What sets Treehouse apart is their dedication to helping you find your perfect job or develop your own business. – SwitchUp.org
Follow us on Twitter, Instagram, and Facebook for our favorite tips, and to share how your learning is going. We’ll see you there!
If you liked reading this article, you should also look at these two:
100 Responses to “Install Node.js and NPM on a Mac: How-To Guide”
‘brew install node’ installed node 10.1
‘npm -v’ was 5.6 although 6.01 is the most recent
‘brew upgrade npm’ did not upgrade to latest version of npm
‘npm install -g npm ‘ Will upgrade to the latest version of npm
Hope this helps someone else!
i am getting error when i checking the version npm -v
ERROR: npm is known not to run on Node.js v0.10.40
You’ll need to upgrade to a newer version in order to use this
version of npm. Supported versions are 4, 6, 7, 8, 9. You can find the
latest version at https://nodejs.org/
What confuses me is that I have npm all set up in some projects at work and it works fine. However, I just downloaded a new project and when I run “npm -v” in that project, I get “npm: command not found”. I can’t seem to find any docs on installing node per project. They all seem to be global, including this one.
So how is it npm works in one project but not another? And if there is a way to install it per project, how is that done?
You need node.js and npm installed on your home machine, too. “Command not found” means it’s not installed. Follow the instructions above, and you’ll have everything you need to destroy your free time with work stuff.
You need to install NodeJS globally. NPM comes with it and that is how you’re going to be building your project dependancies. Now if you don’t want to install all those packages that your project requires, then you’re going to want to have your JSON file call them up as devDependancies. Take a look at the link below, it might explain it better than I can.
Источник


