- Installing NumPy
- Python and NumPy installation guide
- Recommendations
- Beginning users
- Advanced users
- Windows or macOS
- Linux
- Alternative if you prefer pip/PyPI
- Python package management
- Pip & conda
- Reproducible installs
- NumPy packages & accelerated linear algebra libraries
- Troubleshooting
- Установка NumPy в Windows с помощью PIP
- Установка Python в Windows
- Установка PIP в Windows
- How to install Numpy in Python 3.7 in Windows 10
- Step 1: Download Python for Windows 10/8/7
- Step 2: Run the Python executable installer
- Step 3: Install pip on Windows 10/8/7
- Step 4: Install Numpy in Python using pip on Windows 10/8/7
- Check Numpy Version
- Installing NumPy and SciPy on 64-bit Windows (with Pip)
Installing NumPy
The only prerequisite for installing NumPy is Python itself. If you don’t have Python yet and want the simplest way to get started, we recommend you use the Anaconda Distribution — it includes Python, NumPy, and many other commonly used packages for scientific computing and data science.
NumPy can be installed with conda , with pip , with a package manager on macOS and Linux, or from source. For more detailed instructions, consult our Python and NumPy installation guide below.
CONDA
If you use conda , you can install NumPy from the defaults or conda-forge channels:
PIP
If you use pip , you can install NumPy with:
Also when using pip, it’s good practice to use a virtual environment — see Reproducible Installs below for why, and this guide for details on using virtual environments.
Python and NumPy installation guide
Installing and managing packages in Python is complicated, there are a number of alternative solutions for most tasks. This guide tries to give the reader a sense of the best (or most popular) solutions, and give clear recommendations. It focuses on users of Python, NumPy, and the PyData (or numerical computing) stack on common operating systems and hardware.
Recommendations
We’ll start with recommendations based on the user’s experience level and operating system of interest. If you’re in between “beginning” and “advanced”, please go with “beginning” if you want to keep things simple, and with “advanced” if you want to work according to best practices that go a longer way in the future.
Beginning users
On all of Windows, macOS, and Linux:
- Install Anaconda (it installs all packages you need and all other tools mentioned below).
- For writing and executing code, use notebooks in JupyterLab for exploratory and interactive computing, and Spyder or Visual Studio Code for writing scripts and packages.
- Use Anaconda Navigator to manage your packages and start JupyterLab, Spyder, or Visual Studio Code.
Advanced users
Windows or macOS
- Install Miniconda.
- Keep the base conda environment minimal, and use one or more conda environments to install the package you need for the task or project you’re working on.
- Unless you’re fine with only the packages in the defaults channel, make conda-forge your default channel via setting the channel priority.
Linux
If you’re fine with slightly outdated packages and prefer stability over being able to use the latest versions of libraries:
- Use your OS package manager for as much as possible (Python itself, NumPy, and other libraries).
- Install packages not provided by your package manager with pip install somepackage —user .
If you use a GPU:
- Install Miniconda.
- Keep the base conda environment minimal, and use one or more conda environments to install the package you need for the task or project you’re working on.
- Use the defaults conda channel ( conda-forge doesn’t have good support for GPU packages yet).
- Install Miniforge.
- Keep the base conda environment minimal, and use one or more conda environments to install the package you need for the task or project you’re working on.
Alternative if you prefer pip/PyPI
For users who know, from personal preference or reading about the main differences between conda and pip below, they prefer a pip/PyPI-based solution, we recommend:
- Install Python from python.org, Homebrew, or your Linux package manager.
- Use Poetry as the most well-maintained tool that provides a dependency resolver and environment management capabilities in a similar fashion as conda does.
Python package management
Managing packages is a challenging problem, and, as a result, there are lots of tools. For web and general purpose Python development there’s a whole host of tools complementary with pip. For high-performance computing (HPC), Spack is worth considering. For most NumPy users though, conda and pip are the two most popular tools.
Pip & conda
The two main tools that install Python packages are pip and conda . Their functionality partially overlaps (e.g. both can install numpy ), however, they can also work together. We’ll discuss the major differences between pip and conda here — this is important to understand if you want to manage packages effectively.
The first difference is that conda is cross-language and it can install Python, while pip is installed for a particular Python on your system and installs other packages to that same Python install only. This also means conda can install non-Python libraries and tools you may need (e.g. compilers, CUDA, HDF5), while pip can’t.
The second difference is that pip installs from the Python Packaging Index (PyPI), while conda installs from its own channels (typically “defaults” or “conda-forge”). PyPI is the largest collection of packages by far, however, all popular packages are available for conda as well.
The third difference is that conda is an integrated solution for managing packages, dependencies and environments, while with pip you may need another tool (there are many!) for dealing with environments or complex dependencies.
Reproducible installs
As libraries get updated, results from running your code can change, or your code can break completely. It’s important to be able to reconstruct the set of packages and versions you’re using. Best practice is to:
- use a different environment per project you’re working on,
- record package names and versions using your package installer; each has its own metadata format for this:
- Conda: conda environments and environment.yml
- Pip: virtual environments and requirements.txt
- Poetry: virtual environments and pyproject.toml
NumPy packages & accelerated linear algebra libraries
NumPy doesn’t depend on any other Python packages, however, it does depend on an accelerated linear algebra library — typically Intel MKL or OpenBLAS. Users don’t have to worry about installing those (they’re automatically included in all NumPy install methods). Power users may still want to know the details, because the used BLAS can affect performance, behavior and size on disk:
The NumPy wheels on PyPI, which is what pip installs, are built with OpenBLAS. The OpenBLAS libraries are included in the wheel. This makes the wheel larger, and if a user installs (for example) SciPy as well, they will now have two copies of OpenBLAS on disk.
In the conda defaults channel, NumPy is built against Intel MKL. MKL is a separate package that will be installed in the users’ environment when they install NumPy.
In the conda-forge channel, NumPy is built against a dummy “BLAS” package. When a user installs NumPy from conda-forge, that BLAS package then gets installed together with the actual library — this defaults to OpenBLAS, but it can also be MKL (from the defaults channel), or even BLIS or reference BLAS.
The MKL package is a lot larger than OpenBLAS, it’s about 700 MB on disk while OpenBLAS is about 30 MB.
MKL is typically a little faster and more robust than OpenBLAS.
Besides install sizes, performance and robustness, there are two more things to consider:
- Intel MKL is not open source. For normal use this is not a problem, but if a user needs to redistribute an application built with NumPy, this could be an issue.
- Both MKL and OpenBLAS will use multi-threading for function calls like np.dot , with the number of threads being determined by both a build-time option and an environment variable. Often all CPU cores will be used. This is sometimes unexpected for users; NumPy itself doesn’t auto-parallelize any function calls. It typically yields better performance, but can also be harmful — for example when using another level of parallelization with Dask, scikit-learn or multiprocessing.
Troubleshooting
If your installation fails with the message below, see Troubleshooting ImportError.
Установка NumPy в Windows с помощью PIP

NumPy (Numerical Python) — это библиотека с открытым исходным кодом для языка программирования Python. Она используется для научных вычислений и работы с массивами. Помимо объекта многомерного массива, он также предоставляет функциональные инструменты высокого уровня для работы с массивами. В этой статье я покажу вам, как установить NumPy с помощью PIP в Windows 10.
В отличие от большинства дистрибутивов Linux, Windows по умолчанию не поставляется с языком программирования Python.
Установка Python в Windows
Чтобы установить NumPy с помощью PIP в Windows 10, вам сначала необходимо загрузить (на момент написания этой статьи последняя версия Python 3 — 3.8.5) и установить Python на свой компьютер с Windows 10.
Убедитесь, что вы выбрали установку запуска для всех пользователей и отметили флажками Добавить Python 3.8 в PATH. Последний помещает интерпретатор в путь выполнения.
После того, как у вас будет установлена последняя версия Python, вы можете приступить к установке NumPy с помощью PIP в Windows 10.
Установка PIP в Windows
Теперь, если вы используете старую версию Python в Windows, вам может потребоваться установить PIP вручную. ПИП автоматически устанавливается вместе с Python 2.7.9+ и Python 3.4+.
Вы можете легко установить PIP в Windows, загрузив установочный пакет, открыв командную строку и запустив установщик. Вы можете установить ПИП в Windows 10 через командную строку CMD, выполнив команду:
Возможно, вам потребуется запустить командную строку от имени администратора. Если вы получите сообщение об ошибке, в котором говорится, что у вас нет необходимых разрешений для выполнения задачи, вам нужно будет открыть приложение от имени администратора.
Установка пипа должна начаться. Если файл не найден, еще раз проверьте путь к папке, в которой сохранили файл.
Можете просмотреть содержимое вашего текущего каталога, используя следующую команду:
Команда dir возвращает полный список содержимого каталога.
После того, как вы установили PIP, вы можете проверить, прошла ли установка успешно, набрав следующее:
How to install Numpy in Python 3.7 in Windows 10
What is Numpy? and how to install Numpy, Scipy, Matplotlib, iPython, Jupyter, Pandas, Sympy and Nose on Windows 10/8 or Windows 7 using Python PiP. Here in this article, we discuss it.
Quite simply, Numpy is a scientific computing library for Python that provides the functionality of matrix operations, which are generally used with Scipy and Matplotlib. In fact, the list already provides a matrix-like representation, but it provides us with more functions. If you have using Matlab, Scilab, then this tool is very good for you.
Numpy is one of the basic libraries that must be mastered for data analysis in Python. It can be used to store and process large matrices, and Numpy provides many advanced numerical programming tools such as matrix data types, vector processing, and precision. The computational library is designed for rigorous digital processing.
It is a powerful scientific computing package based on python. To install Numpy you must first install python. The installation of python is very simple, I installed python3.7. The installation steps for installing Numpy for Windows will be the same for Ubuntu and other Linux systems. The only difference will be the installation process of Python
Tools/supported things required
- Installed python program
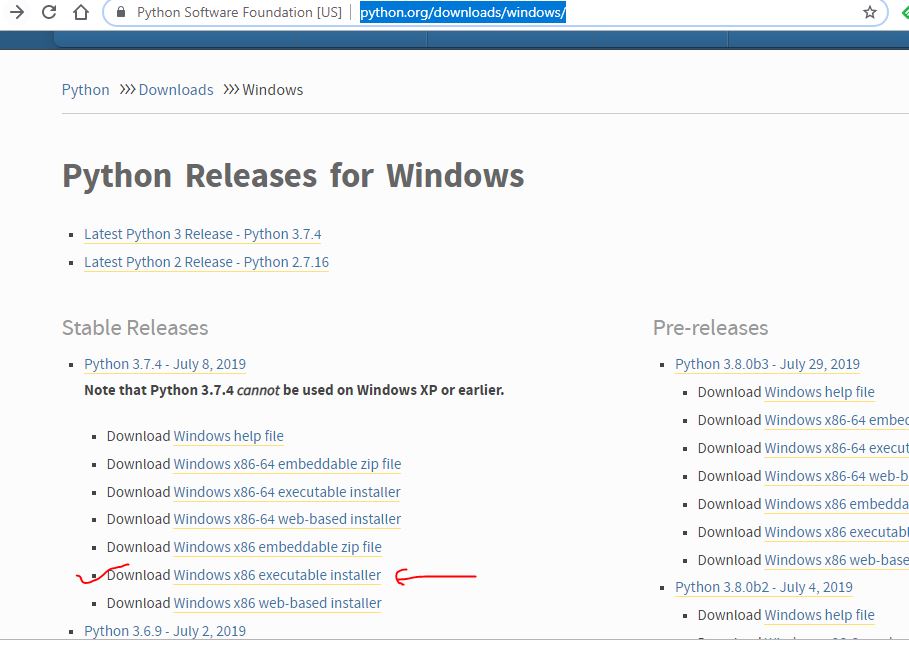
Step 1: Download Python for Windows 10/8/7
First, download the Python executable binaries on your Windows 10 system from the official download the page of the Python. Here is the link for that. It is available in different forms, go for executable one to easily install and setup Python on your system.
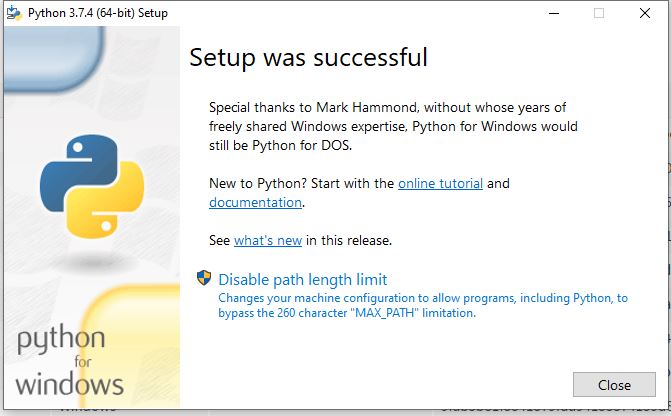
Step 2: Run the Python executable installer
Once the setup of Python gets downloaded, run it as administrator. Check the box given for “Add Python 3.7 to Path” and after that click on Install Now option.

Once done close the setup…
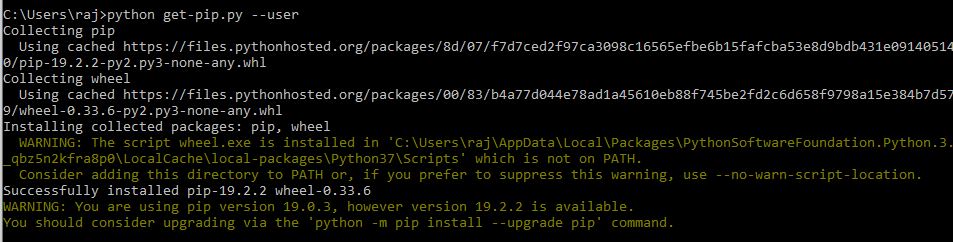
Step 3: Install pip on Windows 10/8/7
After successful installation of Python, open the command prompt and run the following command to install pip using python.
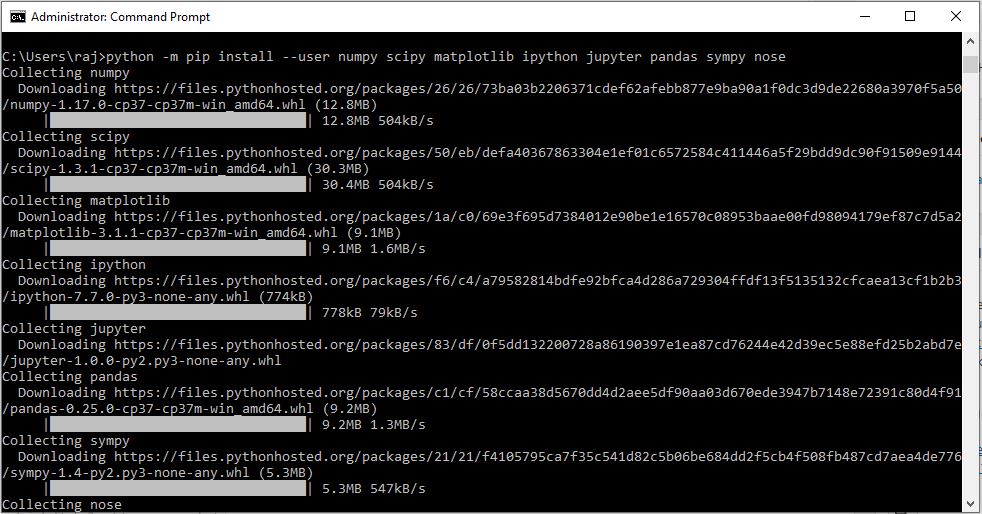
Step 4: Install Numpy in Python using pip on Windows 10/8/7
So, finally, everything is ready and now its time to fire command for installing Numpy, Scipy, Matplotlib, iPython, Jupyter, Pandas, Sympy and Nose. We can either use a single command to install all of them or only one which we want to install particularly.
Check Numpy Version
Here is the command to check the numpy version:
The output of the above command in our case:

In this way, you can also check the versions of scipy, matplotlib, ipython, jupyter, pandas, sympy and nose.
Example:

Let create some graph using matplotlib and scipy
Installing NumPy and SciPy on 64-bit Windows (with Pip)
I found out that it’s impossible to install NumPy/SciPy via installers on Windows 64-bit, that’s only possible on 32-bit. Because I need more memory than a 32-bit installation gives me, I need the 64-bit version of everything.
I tried to install everything via Pip and most things worked. But when I came to SciPy, it complained about missing a Fortran compiler. So I installed Fortran via MinGW/MSYS. But you can’t install SciPy right away after that, you need to reinstall NumPy. So I tried that, but now it doesn’t work anymore via Pip nor via easy_install . Both give these errors:
- There are a lot of errors about LNK2019 and LNK1120 ,.
- I get a lot of errors in the range of C : C2065, C2054 , C2085 , C2143`, etc. They belong together I believe.
- There is no Fortran linker found, but I have no idea how to install that, can’t find anything on it.
- And many more errors which are already out of the visible part of my cmd-windows.
The fatal error is about LNK1120 :
build\lib.win-amd64-2.7\numpy\linalg\lapack_lite.pyd : fatal error LNK1120: 7 unresolved externals error: Setup script exited with error: Command «C:\Users\me\AppData\Local\Programs\Common\Microsoft\Visual C++ for Python\9.0\VC\Bin\amd64\link.exe /DLL /nologo /INCREMENTAL:NO /LIBPATH:C:\BLAS /LIBPATH:C:\Python27\libs /LIBPATH:C:\Python27\PCbuild\amd64 /LIBPATH:build\temp.win-amd64-2.7 lapack.lib blas.lib /EXPORT:initlapack_lite build\temp.win-amd64-2.7\Release\numpy\linalg\lapack_litemodule.obj /OUT:build\lib.win-amd64-2.7\numpy\linalg\lapack_lite.pyd /IMPLIB:build\temp.win-amd64-2.7\Release\numpy\linalg\lapack_lite.lib /MANIFESTFILE:build\temp.win-amd64-2.7\Release\numpy\linalg\lapack_lite.pyd.manifest» failed with exit status 1120
What is the correct way to install the 64-bit versions NumPy and SciPy on a 64-bit Windows machine? Did I miss anything? Do I need to specify something somewhere? There is no information for Windows on these problems that I can find, only for Linux or Mac OS X, but they don’t help me as I can’t use their commands.


