- How to Install macOS on VMware in Windows PC [Mojave]
- Install macOS Mojave on VMware in Windows PC
- 1. Install VMware Workstation Player Pro
- 2. Install VMware Unlocker Patch Tool
- 3. Create a new macOS Virtual Machine
- 4. Configure Virtual Machine
- 5. Add Config Key in VMX File
- How to reinstall macOS
- Start up from macOS Recovery
- Apple silicon
- Intel processor
- Reinstall macOS
- Other macOS installation options
- Installing osx on windows
- How to Run Mac On Windows -XP,7,8,8.1,10
- Methods to Dual Boot Mac alongside Windows on PC or Laptop
- Requirements to Run Mac On Windows
- Tools Needed to Install Mac On Windows PC or laptop
- How To Run Mac On Windows [Guide]
How to Install macOS on VMware in Windows PC [Mojave]

Jun 24, 2020 · 6 min read
Want to install Mac OS X on Windows PC. Here is a guide on How to Install macOS Mojave on VMware Workstation Player in Windows 10, 7.
I know macOS Catalina Final is already out there.
And still, I am installing the Mojave version on Windows PC.
This is only because Mojave is the only latest Stable version that can be installed on Vmware Workstation right now.
In the recent post, I have already shown a step by step guide on installing macOS Mojave on Virtualbox Virtual machine.
And now I am showing it on the Vmware virtual machine.
S o without wasting any time let’s move to the installation process.
And follow this Step by Step guide.
Install macOS Mojave on VMware in Windows PC
But before dive in further.
Please make sure that you downloaded all the essential files mentioned below from the given link.
VMware Workstation Player: Download Link
Mac OS VMware Image: Download Link
Unlocker for VMware Patch Tool: Download Link
Now, After downloading all the files, Extract them one by one & Follow the Given Steps…
Note:- Please Enable VT-X or AMD-V Virtualization technology from your BIOS Settings.
So Let’s Get Started.
1. Install VMware Workstation Player Pro
Download and Install VMware Workstation from the given link.

Note:- Please do not run Vmware after installing it. First, install the VMware Unlocker & then launch it properly.
2. Install VMware Unlocker Patch Tool
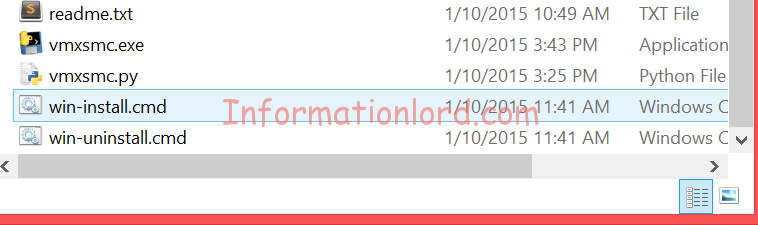
Now Extract the VMware Unlocker tool and Open the Folder & Search for win-install. Now Right Click on it and select Run as administrator.

Now it will load some VMware files and will automatically close.
3. Create a new macOS Virtual Machine
Now Open the Vmware Workstation and Click on Create a New Virtual Machine.

Now Select “ Typical (recommended)” and click on Next.

Now in the Guest Operating System Installation section, select “ I will install the Operating System later” option and click on Next.

Now in the Guest operating system, select “Apple Mac OS X” and then in the Version select “macOS 10.14” and click on Next.

Now Type the Virtual Machine Name as “macOS Mojave” and then in the location, click on Browse & select the folder where you want to install the macOS Mojave on VMware and then click on Next.

Next step is to select the disk size as 100gb and the minimum recommended size is 40gb. And select “ Store virtual disk as a single file” and then click on Next.

Now your macOS Virtual machine is ready to create so click on Finish.

4. Configure Virtual Machine
Now its time to configure some advanced settings for the virtual machines to work properly. So, Open VMware workstation and then select “macOS Mojave” & then Click on Edit Virtual machine settings.

Now in the Virtual machine settings, click on the Memory tab and then adjust the 50% of your physical machine to it. Like I have set it to 8gb.
Note:- Minimum recommended memory is approx 4gb.

Similarly, Go to Processors and then assign a minimum of 2 processors to the virtual machine.

Next step, Go to CD/DVD (SATA) and then select “Use ISO image file” and click on Browse.

And then locate the macOS Mojave ISO file that you have downloaded earlier. And then Click on Open.

Now Go to USB Controller and then in USB compatibility select USB 3.0 from the dropdown menu. And Close the Vmware completely.

5. Add Config Key in VMX File
Note:- Please make sure, before doing this advanced configuration the Vmware workstation must be closed. Or I recommend you to please restart your PC before Adding Config Key in VMX File.
Now Open the folder where you have set up your virtual machine. And in that folder, you will find a white color file of the extension .vmx . Now Open that VMware virtual machine configuration file using Notepad.
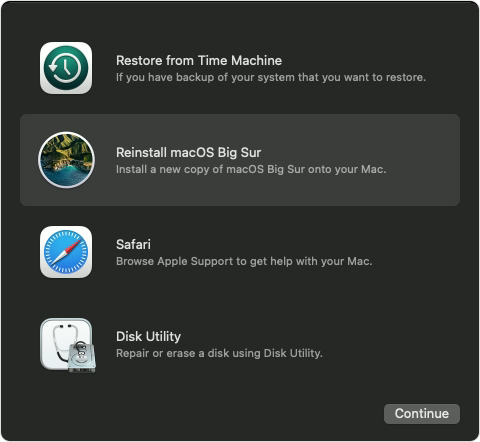
How to reinstall macOS
Use macOS Recovery to reinstall the Mac operating system.
Start up from macOS Recovery
Apple silicon
Turn on your Mac and continue to press and hold the power button until you see the startup options window. Click the gear icon labeled Options, then click Continue.
Intel processor
Make sure that your Mac has a connection to the internet. Then turn on your Mac and immediately press and hold Command (⌘)-R until you see an Apple logo or other image.
If you’re asked to select a user you know the password for, select the user, click Next, then enter their administrator password.
Reinstall macOS
Select Reinstall macOS from the utilities window in macOS Recovery, then click Continue and follow the onscreen instructions.
Follow these guidelines during installation:
- If the installer asks to unlock your disk, enter the password you use to log in to your Mac.
- If the installer doesn’t see your disk, or it says that it can’t install on your computer or volume, you might need to erase your disk first.
- If the installer offers you the choice between installing on Macintosh HD or Macintosh HD — Data, choose Macintosh HD.
- Allow installation to complete without putting your Mac to sleep or closing its lid. Your Mac might restart and show a progress bar several times, and the screen might be empty for minutes at a time.
After installation is complete, your Mac might restart to a setup assistant. If you’re selling, trading in, or giving away your Mac, press Command-Q to quit the assistant without completing setup. Then click Shut Down. When the new owner starts up the Mac, they can use their own information to complete setup.
Other macOS installation options
When you install macOS from Recovery, you get the current version of the most recently installed macOS, with some exceptions:
- On an Intel-based Mac: If you use Shift-Option-Command-R during startup, you’re offered the macOS that came with your Mac, or the closest version still available. If you use Option-Command-R during startup, in most cases you’re offered the latest macOS that is compatible with your Mac. Otherwise you’re offered the macOS that came with your Mac, or the closest version still available.
- If the Mac logic board was just replaced, you may be offered only the latest macOS that is compatible with your Mac. If you just erased your entire startup disk, you may be offered only the macOS that came with your Mac, or the closest version still available.
You can also use these methods to install macOS, if the macOS is compatible with your Mac:
- Use the App Store to download and install the latest macOS.
- Use the App Store or a web browser to download and install an earlier macOS.
- Use a USB flash drive or other secondary volume to create a bootable installer.
Installing osx on windows

- UEFI bios:
- Скидываем все настройки в default.
- AHCI — enable;
- Vt-d: Disable (+ в Clover дропнуть DMAR таблицу)
- Vt-x: Enable (только для 10.13 и если используете виртуальные машины)
- Intel Virtualization Technology — Enable
- Serial-port: Disable
- XHCI Hand-off: Disable (рекомендуеться)
- XHCI Hand-off: Enabled (только если что то не работает в режиме Disable )
- IOAPIC 24-119 Entries: Enabled (подмечено что у многих с этим пунктом паникует, поэтому тестируйте)
- CSM: Disable (по возможности)
- Fasboot: Disable
- Secure boot: Disable or Other OS
Legacy bios:
. .
[i]Примечание:
- HDD должен быть подключен к SATA-0, контролер Intel.
- . [/i]
Для установки потребуется флешка не менее 8Гб.
- ПК на ОС Windows XP/7/8.
- Скачать утилиту Boot Disk Utility с страницы разработчика cvad или с форума applelife.ru со страницы посвящённой данной утилите.
- Установить по инструкции
- Зайти на флешку в папку EFI\CLOVER\ и удалить папку OEM и файл config-sample (не путать с config.plist).
- Зайти на https://github.com/aci…pleSupportPkg/releases скачать ApfsDriverLoader.efi и скопировать его в папку EFI\CLOVER\drivers64UEFI (необходимо для macOs 10.13 и выше!)
- Добавить в EFI\CLOVER\Kext\Other https://github.com/acidanthera/Lilu/releases
- Добавить в EFI\CLOVER\Kext\Other https://github.com/aci…WhateverGreen/releases
- Скачать образ Mac OS X по указанным ссылкам:
Нажми и качай! - Развернуть скаченный образ на подготовленную флешку.
- Инструкция с applelife.ru пункт «Заливка дистрибутива macOS на второй том загрузочного USB Flash drive:«:
- Перед распаковкой образа необходимо нажать кнопку ^Format disk^.
- В основном окне программы -> Destination Disk — выбираем наш USB Flash Drive -> Part2.
- Нажимаем кнопку «Restore Partition».
- В открывшемся окне проводника выбираем распакованный файл с расширением *.hfs.
- Тем, кто устанавливает на ноутбук (или имеет PS/2 мышь или клавиатуру) , обязательно скачать
 VoodooPS2Controller.kext.zip ( 97,46 КБ )
, новая версия:VoodooPS2Controller.kext.zip ( 93,86 КБ )
положить в папку EFI/CLOVER/KEXT/10.X или Other - Всё, установочная флешка готова, можно приступать к установке.
 VoodooPS2Controller.kext.zip ( 97,46 КБ )
За данный споcоб установки благодарим cvad и Skvo
Данная инструкция написана по материалам с applelife.ru
Установить один из загрузчиков на диск (если он не входит в состав сборки) :
— Загрузчик №1 — Clover (рекомендуется для большинства пользователей);
Как это сделать: UEFI, Legacy BIOS.
— Загрузчик №2 — OpenCore (для опытных пользователей)
— Загрузчик №3 — Chameleon (на данный момент существует для очень старых систем и особых случаев);
*загрузчик устанавливаем только один, на ваш выбор
После входа в macOS первое, что делаем:
- Устанавливаем кекст для сетевой карты;
- Настраиваем SMbios;
- «Заводим» видео-карту (разрешение должно быть правильным, и верхняя строка прозрачная);
- Поднимаем «нативное управление питанием» процессора;
- Поднимаем звук через AppleALC или VoodooHDA
.
21. Ставим програмулинки и «рюшечки».
How to Run Mac On Windows -XP,7,8,8.1,10
Mac OS X is an advanced operating system, easy to use and extremely stable when used daily, and sometimes one would prefer to have OSX on PC rather than using Windows 7 or latest Windows 10. Well we have brought something interesting for you – The Guide to Run OSX on Windows which means users can Run Mac OS alongside Windows 7,8,8.1. The aim of installing Mac On Windows will be achieved by Virtual Technology. Many users aspire to buy Apple powered Macbook or any other premium Mac OS X running Apple device, but as we know that all can’t afford it, but atleast one can make ends meet by getting Mac OSx experience on Windows with very few steps.
Here is the glimpse of the result that you will see after you install mac on windows 7 on laptop :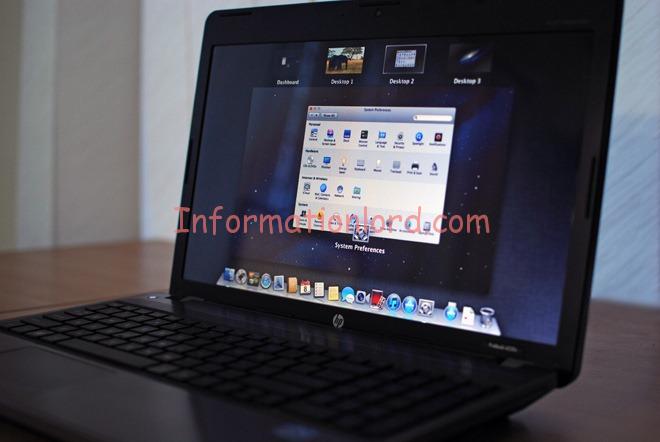
Methods to Dual Boot Mac alongside Windows on PC or Laptop
We actually have two methods by which you will be able to use Mac On Windows PC –
- Buy Apple’s Macbook which will cost you three times you buy a new Window powered Laptop.
- Use this tutorial and little tech work which will cost you nothing but will give you a feeling of self-satisfaction that you have installed Mac OS on PC without spending even a penny.
So I would like to go by procedure 2 as that is very easy and hope you will not mind it 😛 So now the basic question that arises is – How to Run Mac On Windows -XP,7,8,8.1,10 – Follow up this easy tutorial to Install or Run OSX on Windows PC without losing important data or compromising with the Speed of your PC.
Requirements to Run Mac On Windows
The Basic Requirements to Run MAC on PC or Laptop or to Install Mac OS X (10.5 and above) on Virtual Machine VMWare. As VMWare is a virtual machine so it runs alongside windows and unlike other Operating System which we run using VMware, we need little more hardware requirements to run Mac on Vmware.
- 8 GB RAM will give you more than enough speed to cope up with the load of Mac OS on Virtual Machine
- Intel Core i3, i5, i7 will work like a charm.
- 128 GB of storage available on the hard disk to make Mac run without errors on PC.
It is not compulsory to have the above requirements. But lower than this will result into slow performance by the VMWare Workstation while loading MAC. But one can always give it a try to Run OSX on Windows with whatever config you have.
Tools Needed to Install Mac On Windows PC or laptop
To run mac on windows VMware one need to have few essentials that will equip you up to Run MAC OS-X alongside windows smoothly.first and the foremost software we require is the VMWare Virtual Machine itself. Download
First and the foremost software we require is the VMWare Virtual Machine itself. Download VMware Workstation from here.
VMWare is not the only one software required to Install MAC on Windows 7,8 or 10; You require an essential Unlocker as well. Download Latest MaC Unlocker required to Install Mac OSX on Windows from link in the Social Locker Below. [Like/+1/Tweet in order to Download latest Mac Unlocker]
Now Download the Essential VMDK Disk image of OSX that you will be using for running mac on windows from here and extract the same with xnohat as password 🙂
How To Run Mac On Windows [Guide]
- Step 1: Install the latest virtual technology powered VMWare Workstation which can be done easily by following on-screen instructions.
- Step 2: Now the real task starts here- Unzip the Unlocker 2.0.8 which you downloaded from second link and then Run the file named “win-install.cmd“. We would recommend that you run the file as Administrator.
You can hereafter link your CD Drive, Internet connection etc via editing settings of the Virtual Machine! If you are facing any problem to run OS-X on windows or if you want to share your views, do comment here, We will be at your service!
Running Mac OS X on Windows via Dual Boot is not a very hard task as well, but then the procedure mentioned here to Install Mac alongside Windows using VMware is of much use compared to totally formatting the system for Hackintosh. Do let us know if you are looking for Hackintosh tutorials in the comments section. This setup is all for free to get Mac Os X running on your Windows pc with all official udpates.


