- Linux downloads (Ubuntu)
- PostgreSQL Apt Repository
- Included in distribution
- Linux downloads (Debian)
- PostgreSQL Apt Repository
- Included in distribution
- Linux downloads (Red Hat family)
- PostgreSQL Yum Repository
- Included in Distribution
- Post-installation
- For RHEL / CentOS / SL / OL 6
- For RHEL / Rocky Linux / CentOS / SL / OL 7, 8 or Fedora 31 and later derived distributions:
- Direct RPM download
- Install PostgreSQL Linux
- Install PostgreSQL on Ubuntu
- Connect to the PostgreSQL database server via psql
- Load the sample database
- Установка и настройка PostgreSQL 13 на Linux Ubuntu Server 20.04
- Установка PostgreSQL 13 на Ubuntu Server 20.04
- Шаг 1 – Подключение репозитория и обновление списка пакетов в системе
- Шаг 2 – Установка необходимых пакетов для PostgreSQL
- Шаг 3 – Проверка установки
- Настройка PostgreSQL 13 в Ubuntu Server 20.04
- Создание пользователя и базы данных в PostgreSQL
- Разрешаем подключение к PostgreSQL по сети
- Видео-инструкция – Установка и настройка PostgreSQL 13 на Ubuntu Server
Linux downloads (Ubuntu) 

PostgreSQL is available in all Ubuntu versions by default. However, Ubuntu «snapshots» a specific version of PostgreSQL that is then supported throughout the lifetime of that Ubuntu version. Other versions of PostgreSQL are available through the PostgreSQL apt repository.
PostgreSQL Apt Repository
If the version included in your version of Ubuntu is not the one you want, you can use the PostgreSQL Apt Repository. This repository will integrate with your normal systems and patch management, and provide automatic updates for all supported versions of PostgreSQL throughout the support lifetime of PostgreSQL.
The PostgreSQL Apt Repository supports the current versions of Ubuntu:
on the following architectures:
- amd64
- arm64 (18.04 and newer; LTS releases only)
- i386 (18.04 and older)
- ppc64el (LTS releases only)
To use the apt repository, follow these steps:
For more information about the apt repository, including answers to frequent questions, please see the PostgreSQL Apt Repository page on the wiki.
Included in distribution
Ubuntu includes PostgreSQL by default. To install PostgreSQL on Ubuntu, use the apt-get (or other apt-driving) command:
apt-get install postgresql-12
The repository contains many different packages including third party addons. The most common and important packages are (substitute the version number as required):
| postgresql-client-12 | client libraries and client binaries |
|---|---|
| postgresql-12 | core database server |
| postgresql-contrib-9.x | additional supplied modules (part of the postgresql-xx package in version 10 and later) |
| libpq-dev | libraries and headers for C language frontend development |
| postgresql-server-dev-12 | libraries and headers for C language backend development |
| pgadmin4 | pgAdmin 4 graphical administration utility |


Copyright © 1996-2021 The PostgreSQL Global Development Group
Источник
Linux downloads (Debian)

PostgreSQL is available in all Debian versions by default. However, the stable versions of Debians «snapshot» a specific version of PostgreSQL that is then supported throughout the lifetime of that Debian version. The PostgreSQL project also maintains an apt repository with all supported of PostgreSQL available.
PostgreSQL Apt Repository
If the version included in your version of Debian is not the one you want, you can use the PostgreSQL Apt Repository. This repository will integrate with your normal systems and patch management, and provide automatic updates for all supported versions of PostgreSQL throughout the support lifetime of PostgreSQL.
The PostgreSQL apt repository supports the currently supported stable versions of Debian:
on the following architectures:
- amd64
- arm64 (Buster and newer)
- i386 (Buster and older)
- ppc64el
To use the apt repository, follow these steps:
For more information about the apt repository, including answers to frequent questions, please see the apt page on the wiki.
Included in distribution
Debian includes PostgreSQL by default. To install PostgreSQL on Debian, use the apt-get (or other apt-driving) command:
The repository contains many different packages including third party addons. The most common and important packages are (substitute the version number as required):
| postgresql-client-12 | client libraries and client binaries |
|---|---|
| postgresql-12 | core database server |
| postgresql-contrib-9.x | additional supplied modules (part of the postgresql-xx package in version 10 and later) |
| libpq-dev | libraries and headers for C language frontend development |
| postgresql-server-dev-12 | libraries and headers for C language backend development |
| pgadmin4 | pgAdmin 4 graphical administration utility |
Copyright © 1996-2021 The PostgreSQL Global Development Group
Источник
Linux downloads (Red Hat family)

The Red Hat family of distributions includes:
- Red Hat Enterprise Linux
- Rocky Linux
- CentOS
- Fedora
- Scientific Linux
- Oracle Linux
PostgreSQL is available on these platforms by default. However, each version of the platform normally «snapshots» a specific version of PostgreSQL that is then supported throughout the lifetime of this platform. Since this can often mean a different version than preferred, the PostgreSQL project provides a repository of packages of all supported versions for the most common distributions.
PostgreSQL Yum Repository
The PostgreSQL Yum Repository will integrate with your normal systems and patch management, and provide automatic updates for all supported versions of PostgreSQL throughout the support lifetime of PostgreSQL.
The PostgreSQL Yum Repository currently supports:
- Red Hat Enterprise Linux
- Rocky Linux
- CentOS
- Scientific Linux
- Oracle Linux
- Fedora *
* Note: due to the shorter support cycle on Fedora, all supported versions of PostgreSQL are not available on this platform. We do not recommend using Fedora for server deployments.
To use the PostgreSQL Yum Repository, follow these steps:
- Select version:
- Select platform:
- Select architecture:
- Copy, paste and run the relevant parts of the setup script:
Included in Distribution
These distributions all include PostgreSQL by default. To install PostgreSQL from these repositories, use the yum command on RHEL 6 and 7:
yum install postgresql-server
or dnf command on RHEL 8 and Fedora:
dnf install postgresql-server
Which version of PostgreSQL you get will depend on the version of the distribution:
| Distribution | Version |
|---|---|
| RHEL/Rocky Linux/CentOS/OL 8 | 13, 12, 10 and 9.6 via modules |
| RHEL/CentOS/SL/OL 7 | 9.2 (also supplies package rh-postgresql10, rh-postgresql96, rh-postgresql95 and rh-postgresql94 via SCL) |
| RHEL/CentOS/SL/OL 6 | 8.4 (also supplies package rh-postgresql96, via SCL) |
| Fedora 34 | 13 |
| Fedora 33 | 12 |
Other Red Hat family distributions may ship a different version of PostgreSQL by default, check with your distribution vendor to be sure.
The repository contains many different packages including third party addons. The most common and important packages are (substitute the version number as required):
| postgresql-client | libraries and client binaries |
|---|---|
| postgresql-server | core database server |
| postgresql-contrib | additional supplied modules |
| postgresql-devel | libraries and headers for C language development |
Post-installation
Due to policies for Red Hat family distributions, the PostgreSQL installation will not be enabled for automatic start or have the database initialized automatically. To make your database installation complete, you need to perform the following steps, based on your distribution:
For RHEL / CentOS / SL / OL 6
For RHEL / Rocky Linux / CentOS / SL / OL 7, 8 or Fedora 31 and later derived distributions:
Direct RPM download
If you cannot, or do not want to, use the yum based installation method, all the RPMs that are in the yum repository are available for direct download and manual installation as well.
Copyright © 1996-2021 The PostgreSQL Global Development Group
Источник
Install PostgreSQL Linux
Summary: in this tutorial, you will learn how to download and install PostgreSQL on Linux.
Most Linux platforms such as Debian, Red Hat / CentOS, SUSE, and Ubuntu have PostgreSQL integrated with their package management.
It is recommended that you install PostgreSQL this way since it ensures a proper integration with the operating system including automatic patching and other update management functionality.
To download and install PostgreSQL on Linux, you visit the download page and select your Linux distribution.
In this tutorial, we’ll show you how to install PostgreSQL on Ubuntu 20.04.
Install PostgreSQL on Ubuntu
Once visiting the PostgreSQL download for Ubuntu page, you find the script that allows you to install PostgreSQL on Ubuntu. You need to execute them one by one
First, execute the following command to create the file repository configuration:
Second, import the repository signing key:
Third, update the package list:
Finally, install the latest version of PostgreSQL:
If you want to install a specific version, you can use postgresql-version instead of postgresql . For example, to install PostgreSQL version 12, you use the following command:
It will take few minutes to download and install the PostgreSQL.
Connect to the PostgreSQL database server via psql
In PostgreSQL, a user account is referred to as a role. By default, PostgreSQL uses ident authentication.
It means that PostgreSQL will associate its roles with the system accounts of Linux. If a role exists in PostgreSQL, the same Linux user account with the same name is able to log in as that role.
When you installed PostgreSQL, the installation process created a user account called postgres associated with the default postgres role.
To connect to PostgreSQL using the postgres role, you switch over to the postgres account on your server by typing:
It’ll prompt for the password of the current user. You need to provide the password and hit the Enter keyboard.
Then, you can access the PostgreSQL using the psql by typing the following command:
You’ll access the postgres prompt like this:
From here, you can interact with the PostgreSQL like issuing a query.
To quit the PostgreSQL prompt, you run the following command:
This above command will bring you back to the postgres Linux command prompt.
To return to your regular system user, you execute the exit command like this:
Load the sample database
To load the sample database into the PostgreSQL database server, you follow these steps:
First, switch over the postgres account using the following command:
It’ll prompt you for the password of the current user. You need to type the password of the current user and press the Enter keyboard.
Second, download the sample database using the curl tool:
Third, unzip the dvdrental.zip file to get the dvdrental.tar file:
Fourth, access the PostgreSQL using the psql tool:
Fifth, create the dvdrental database using the CREATE DATABASE statement:
Sixth, quit the psql by using the \q command:
Seventh, use the pg_restore tool to restore the dvdrental database:
Eighth, access PostgreSQL database server again using psql :
Ninth, switch to the dvdental database:
Now, you’re connected to the dvdrental database:
Finally, enter the following command to get the number of films in the film table:
Here is the output:
Congratulations! you have successfully installed PostgreSQL on Ubuntu, connect to PostgreSQL database server using psql, and load the sample database.
Источник
Установка и настройка PostgreSQL 13 на Linux Ubuntu Server 20.04
Всем привет! Сегодня мы разберем процесс установки PostgreSQL 13 на операционную систему Linux Ubuntu Server 20.04, а также выполним первоначальную настройку PostgreSQL. В результате у нас получится полноценный сервер баз данных, реализованный на базе Ubuntu Server + PostgreSQL, и данный сервер можно будет использовать в сети предприятия.

Установка PostgreSQL 13 на Ubuntu Server 20.04
Итак, давайте перейдем к установке и рассмотрим все шаги, которые необходимо выполнить, чтобы установить PostgreSQL 13 на Ubuntu Server 20.04.
Установку я буду производить удаленно, для подключения к Ubuntu Server буду использовать программу PuTTY.
Заметка! О том, как установить Ubuntu Server, я подробно рассказывал в материале – Установка Linux Ubuntu Server 20.04.
Шаг 1 – Подключение репозитория и обновление списка пакетов в системе
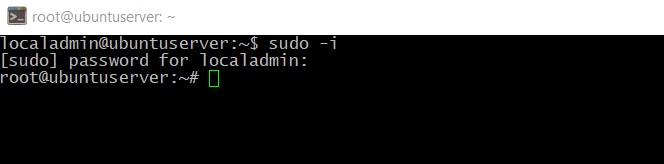
Установку и настройку PostgreSQL необходимо выполнять с правами пользователя root, поэтому давайте сразу переключимся на root.
Для этого пишем команду sudo -i и вводим пароль.
Далее, подключаем репозиторий, который будет содержать актуальную версию PostgreSQL, на текущий момент актуальной версией является PostgreSQL 13, поэтому в данном репозитории хранится именно эта версия, которую мы и будем устанавливать.
Однако, если Вам требуется установить не самую последнюю версию, то на этапе установки пакетов нужно будет указать номер версии в названии пакета, чуть ниже, на соответствующем шаге, я поясню, где именно необходимо указать номер конкретной версии.
Для подключения репозитория вводим следующую команду, которая создает файл в источниках с адресом нужного репозитория.
После этого нам необходимо импортировать ключ подписи репозитория, для этого вводим команду.
Осталось обновить список пакетов в системе, это делаем стандартной командой.
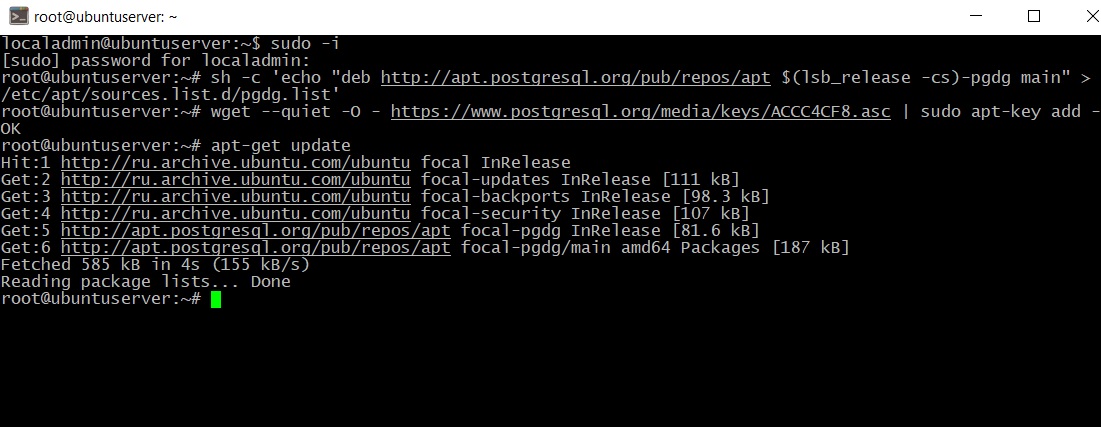
И для проверки того, что теперь нам доступны пакеты PostgreSQL 13, давайте запустим команду поиска пакетов.
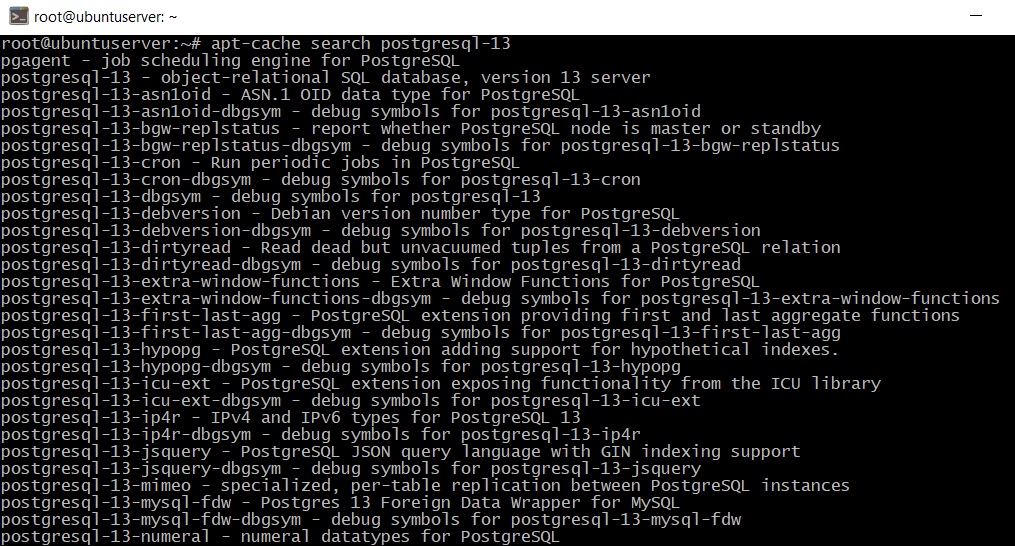
Нужные пакеты нам доступны, и мы можем переходить к установке PostgreSQL 13.
Шаг 2 – Установка необходимых пакетов для PostgreSQL
Для установки актуальной версии, т.е. PostgreSQL 13 и базовых стандартных утилит, необходимо установить пакет postgresql, это делается следующей командой.
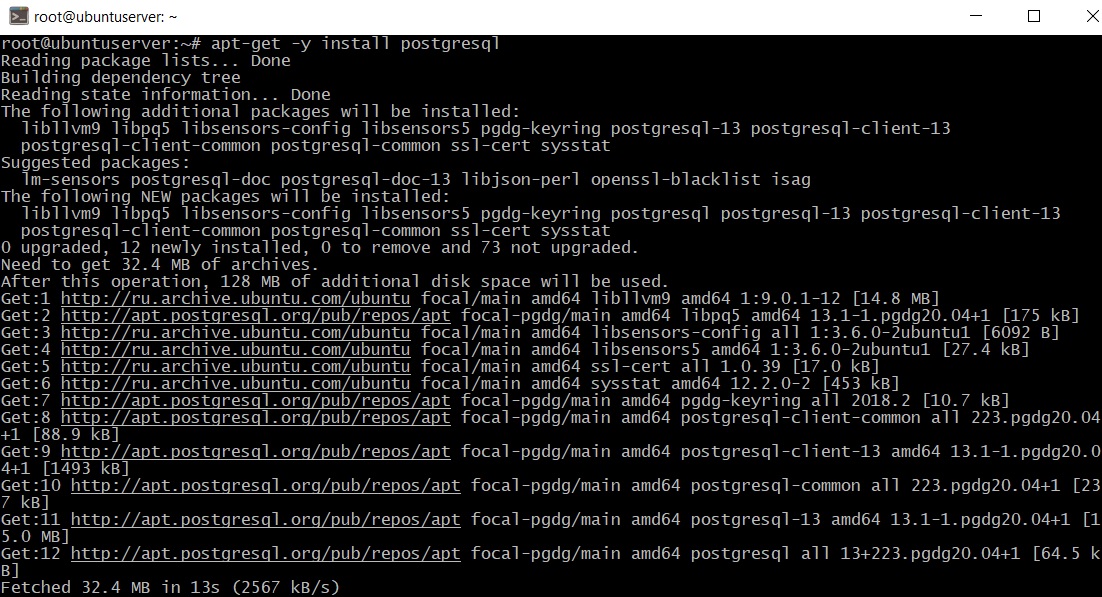
Чтобы установить какую-то конкретную версию PostgreSQL, необходимо указать номер этой версии в названии пакета, например, для 12 версии необходимо установить пакет postgresql-12.
Шаг 3 – Проверка установки
Чтобы проверить, установился и запущен ли PostgreSQL, давайте выполним следующую команду, которая покажет статус сервиса PostgreSQL.
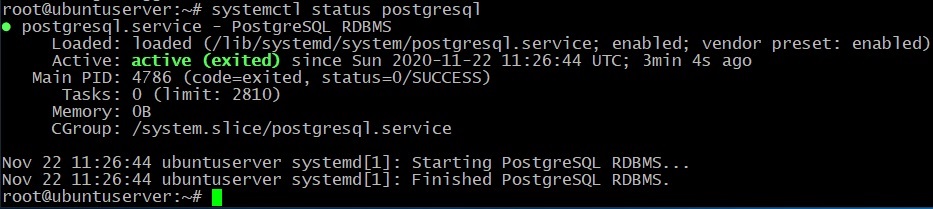
Как видим, PostgreSQL 13 установился и работает.
Настройка PostgreSQL 13 в Ubuntu Server 20.04
PostgreSQL у нас установлен, однако на текущий момент им пользоваться пока нельзя, поэтому нам необходимо его настроить, в частности создать пользователя, указать, какие сетевые интерфейсы будет прослушивать сервер, а также разрешить подключения по сети.
Создание пользователя и базы данных в PostgreSQL
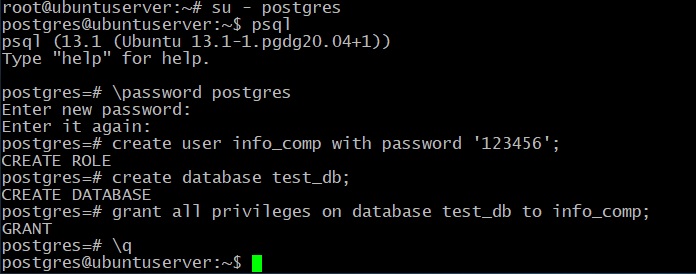
После установки к серверу PostgreSQL мы можем подключиться только с помощью системного пользователя postgres, причем без пароля.
Давайте переключимся на пользователя postgres (данная учетная запись была создана автоматически во время установки PostgreSQL).
Затем запускаем утилиту psql – это консоль для PostgreSQL.
Первым делом нам нужно задать пароль для пользователя postgres.
Затем создаем нового пользователя на сервере PostgreSQL, так как работать от имени postgres крайне не рекомендуется.
где info_comp – это имя пользователя, ‘123456’ – это его пароль, Вы, соответственно, придумываете и подставляете свои данные.
Далее давайте создадим базу данных.
где test_db – это имя новой базы данных.
Теперь давайте дадим права на управление базой данных нашему новому пользователю.
Все готово, выходим из консоли.
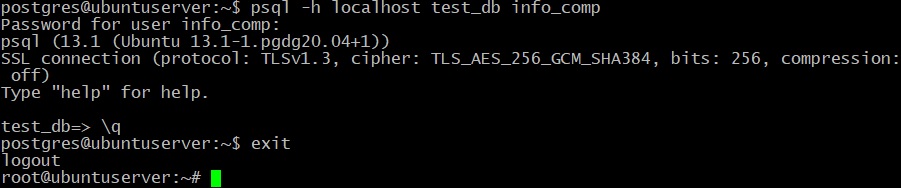
Для проверки давайте подключимся к PostgreSQL от имени нового пользователя, на предложение о вводе пароля вводим пароль от новой учетной записи.
Все работает, я подключился. Для выхода снова набираем \q.
Для переключения обратно на root вводим exit.
Разрешаем подключение к PostgreSQL по сети
По умолчанию PostgreSQL прослушивает только адрес localhost, поэтому, для того чтобы мы могли подключаться по сети, нам нужно указать, какие сетевые интерфейсы будет просушивать PostgreSQL. Я для примера укажу, что прослушивать нужно все доступные интерфейсы. Если у Вас несколько сетевых интерфейсов, и Вы хотите, чтобы PostgreSQL использовал только один конкретный, то Вы его можете указать именно здесь.
Чтобы это сделать, открываем файл postgresql.conf, например, редактором nano.
Находим следующую строку.
и вносим следующие изменения (вместо звездочки Вы в случае необходимости указываете IP адрес нужного интерфейса).
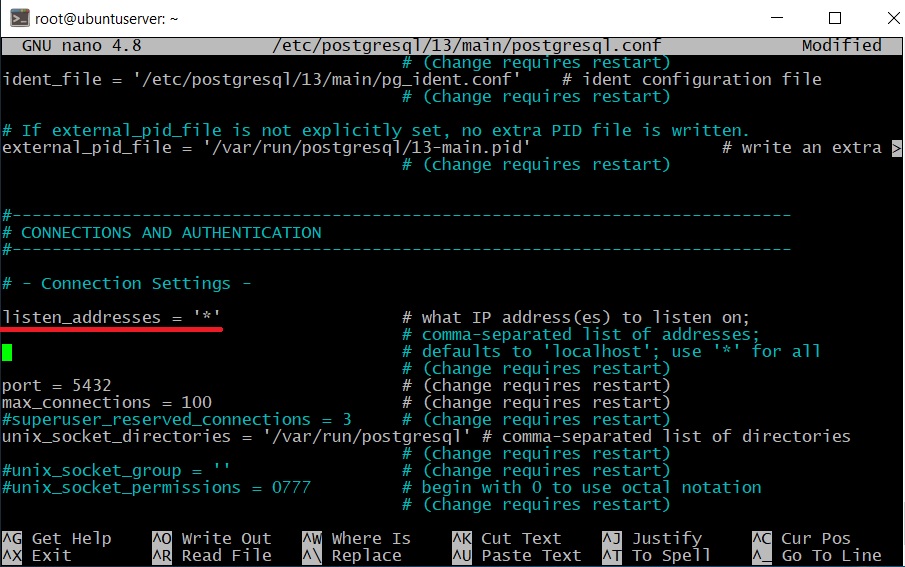
Сохраняем изменения сочетанием клавиш CTRL+O и подтверждаем нажатием Enter, затем просто закрываем редактор nano сочетанием клавиш CTRL+X.
Теперь давайте разрешим подключение из сети, я для примера разрешу подключаться из сети 192.168.0.0/24 с методом аутентификации md5.
Для этого открываем файл pg_hba.conf
Ищем следующие строки.
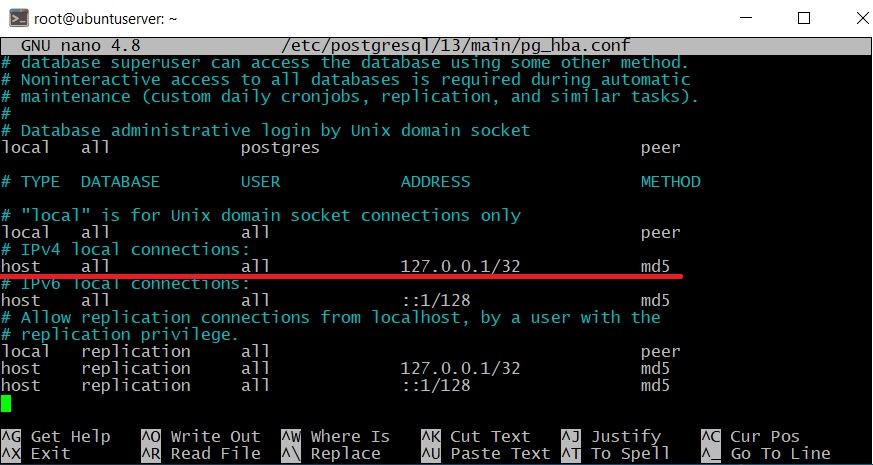
И указываем нужную нам сеть (если IPv6 Вы не будете использовать, то можете закомментировать соответствующие строки знаком #).
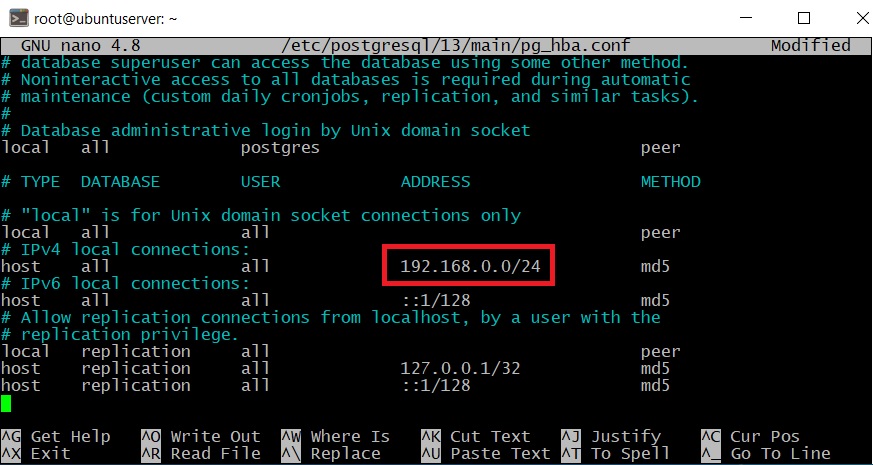
Далее точно так же сохраняем изменения сочетанием клавиш CTRL+O, подтверждаем нажатием Enter и закрываем редактор nano сочетанием клавиш CTRL+X.
Перезапускаем PostgreSQL, чтобы изменения вступили в силу.
Теперь можно подключаться к нашему серверу PostgreSQL удаленно по сети.
Таким образом, мы установили и настроили систему управления базами данных PostgreSQL 13 на операционной системе Ubuntu Server 20.04.
В следующем материале мы рассмотрим процесс установки на клиентский компьютер инструментов для работы с базами данных PostgreSQL и настроим удаленное подключение к PostgreSQL 13.
Видео-инструкция – Установка и настройка PostgreSQL 13 на Ubuntu Server
На сегодня это все, надеюсь, материал был Вам полезен, пока!
Источник


