- mac OS packages
- Interactive installer by EDB
- Platform support
- Postgres.app
- Homebrew
- MacPorts
- Postgres.app
- The easiest way to get started with PostgreSQL on the Mac
- Installing Postgres.app
- Graphical Clients
- How to connect
- Django
- Flask
- SQLAlchemy
- Rails
- Sinatra
- ActiveRecord
- DataMapper
- Sequel
- Support
- How to Start a PostgreSQL Server on Mac OS X
- Using Homebrew
- (Optional) Creating a Custom Data Directory
- Using PostgreSQL App
- Using Terminal with the PostgreSQL App
- Установка и подключение PostgreSQL на Mac Os
- Установка PostgreSQL на Mac Os
- Не обязательно
- Подключение к PostgreSQL на Mac OS
- Как подключиться к PostgreSQL на Mac OS
- Подключение в сторонней программе к БД
- DataGrip
- Исправление ошибок
- Читайте также
mac OS packages 

You can get macOS PostgreSQL packages from several different sources.
Interactive installer by EDB
Download the installer certified by EDB for all supported PostgreSQL versions.
This installer includes the PostgreSQL server, pgAdmin; a graphical tool for managing and developing your databases, and StackBuilder; a package manager that can be used to download and install additional PostgreSQL tools and drivers. Stackbuilder includes management, integration, migration, replication, geospatial, connectors and other tools.
This installer can run in graphical, command line, or silent install modes.
The installer is designed to be a straightforward, fast way to get up and running with PostgreSQL on macOS.
Advanced users can also download a zip archive of the binaries, without the installer. This download is intended for users who wish to include PostgreSQL as part of another application installer.
Platform support
The installers are tested by EDB on the following platforms. They will generally work on newer versions of macOS as well:
| PostgreSQL Version | 64-bit macOS Platforms |
|---|---|
| 13 | 10.14 — 11.0 |
| 12 | 10.13 — 10.15 |
| 11 | 10.12 — 10.14 |
| 10 | 10.11 — 10.13 |
| 9.6 | 10.10 — 10.12 |
Postgres.app
Postgres.app is a simple, native macOS app that runs in the menubar without the need of an installer. Open the app, and you have a PostgreSQL server ready and awaiting new connections. Close the app, and the server shuts down.
Homebrew
PostgreSQL can also be installed on macOS using Homebrew. Please see the Homebrew documentation for information on how to install packages.
A list of PostgreSQL packages can be found using the Braumeister search tool.
MacPorts
PostgreSQL packages are also available for macOS from the MacPorts Project. Please see the MacPorts documentation for information on how to install ports.
A list of PostgreSQL packages can be found using the portfiles search tool on the MacPorts website.
PostgreSQL packages are available for macOS from the Fink Project. Please see the Fink documentation for information on how to install packages.
A list of PostgreSQL packages can be found using the package search tool on the Fink website.


Copyright © 1996-2021 The PostgreSQL Global Development Group
Источник
Postgres.app
The easiest way to get started with PostgreSQL on the Mac
Postgres.app is a full-featured PostgreSQL installation packaged as a standard Mac app. It includes everything you need to get started, and we’ve even included the popular extension PostGIS for geo data.
Postgres.app has a beautiful user interface and a convenient menu bar item. You never need to touch the command line to use it – but of course we do include all the necessary command line tools and header files for advanced users.
Postgres.app can install minor updates automatically, so you get bugfixes as soon as possible.
Installing Postgres.app
Download ➜ Move to Applications folder ➜ Double Click
If you don’t move Postgres.app to the Applications folder, you will see a warning about an unidentified developer and won’t be able to open it.
Click «Initialize» to create a new server
Configure your $PATH to use the included command line tools (optional):
Done! You now have a PostgreSQL server running on your Mac with these default settings:
| Host | localhost |
| Port | 5432 |
| User | your system user name |
| Database | same as user |
| Password | none |
| Connection URL | postgresql://localhost |
To connect with psql, double click a database. To connect directly from the command line, type psql . If you’d rather use a graphical client, see below.
NOTE: These instructions assume that you’ve never installed PostgreSQL on your Mac before. If you have previously installed PostgreSQL using homebrew, MacPorts, the EnterpriseDB installer, consider removing other PostgreSQL installations first. We also have instructions for upgrading from older versions of Postgres.app.
Graphical Clients
Postgres.app includes psql , a versatile command line client for PostgreSQL. But it’s not the only option; there are plenty of great graphical clients available for PostgreSQL. Two popular tools are:
pgAdmin 4 is a feature rich open source PostgreSQL client. It has support for almost every feature in PostgreSQL. The only downside is that the cross-plattform UI really doesn’t live up to the expectations of a native Mac app.
Postico on the other hand, is a very modern Mac app. It’s made by the same people that maintain Postgres.app, and we think you’ll like it! We put a lot of effort into making it a joy to use. However, it doesn’t have the extensive feature set of pgAdmin, and it’s a commercial app rather than open source.
Aside from those two options, there are a lot more to choose from! Check the documentation for a list of amazing Mac apps for PostgreSQL.
How to connect
After your PostgreSQL server is up and running, you’ll probably want to connect to it from your application. Here’s how to connect to PostgreSQL from popular programming languages and frameworks:
To connect from PHP, make sure that it supports PostgreSQL. The version included with macOS doesn’t support PostgreSQL. We recommend MAMP for an easy way to install a current version of PHP that works.
You can use PDO (object oriented):
Or the pg_connect() functions (procedural):
To connect to a PostgreSQL server with Python, please first install the psycopg2 library:
Django
In your settings.py, add an entry to your DATABASES setting:
Flask
When using the Flask-SQLAlchemy extension you can add to your application code:
SQLAlchemy
To install the pg gem, make sure you have set up your $PATH correctly (see Command-Line Tools), then execute the following command:
Rails
In config/database.yml, use the following settings:
Sinatra
In config.ru or your application code:
ActiveRecord
Install the activerecord gem and require ‘active_record’, and establish a database connection:
DataMapper
Install and require the datamapper and do_postgres gems, and create a database connection:
Sequel
Install and require the sequel gem, and create a database connection:
Java
- Download and install the PostgreSQL JDBC driver
- Connect to the JDBC URL jdbc:postgresql://localhost
For more information see the official PostgreSQL JDBC documentation.
libpq is the native C client library for connecting to PostgreSQL. It’s really easy to use:
Now compile the file with clang and run it:
You can just use the C API in Swift! First include libpq in your bridging header:
Then make sure to link with libpq.
On iOS, you’ll need to build libpq yourself.
On macOS you can use the system provided libpq (does not support SSL) or use libpq provided by Postgres.app by adding the following build settings:
| Other Linker Flags | -lpq |
|---|---|
| Header Search Paths | /Applications/Postgres.app/Contents/Versions/latest/include |
| Library Search Paths | /Applications/Postgres.app/Contents/Versions/latest/lib |
Now you can use the libpq C library to connect to PostgreSQL:
Support
We have a list of common problems in the troubleshooting section in the documentation.
For general questions concerning PostgreSQL, have a look at the official PostgreSQL documentation.
Источник
How to Start a PostgreSQL Server on Mac OS X
Last modified: August 09, 2021
There are two main ways to install PostgreSQL on mac OS X.
Using Homebrew
Homebrew can be installed by running the following command in a terminal:
/usr/bin/ruby -e «$(curl -fsSL https://raw.githubusercontent.com/Homebrew/install/master/install)»
If Homebrew is already installed, make sure that it is up to date by running:
Then ensure there are no conflicts or errors using:
Homebrew is a powerful package manager with many uses, including installing and running postgreSQL. This can be done by typing the following command into a terminal: 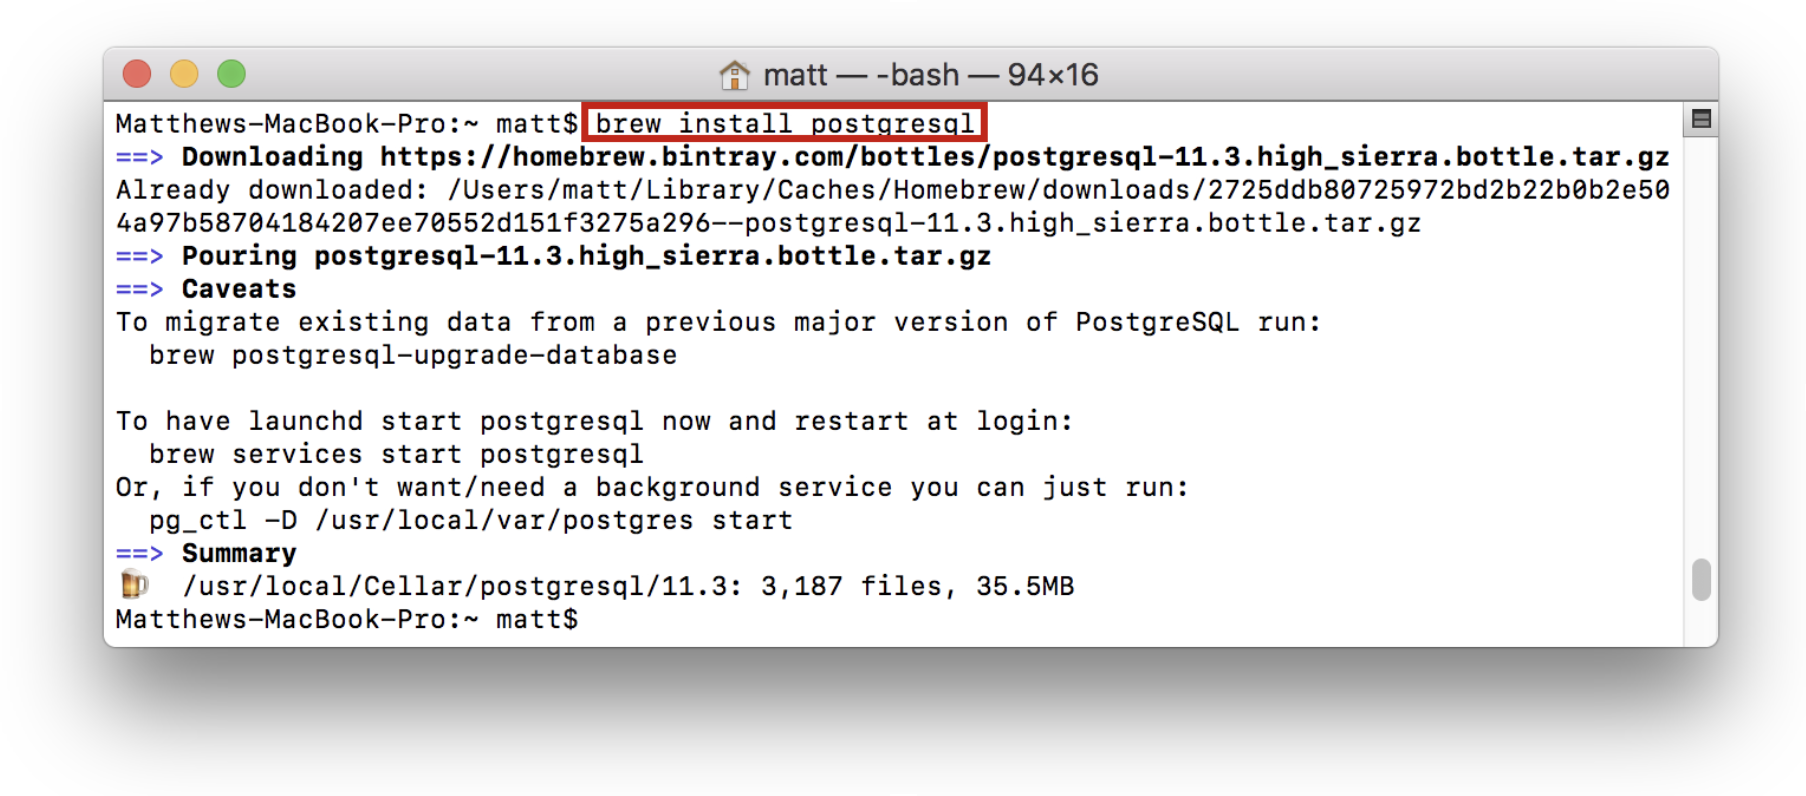
Now that postgres is installed the default server can be started by running the command:
This will start up a postgres server hosted locally on port 5432. The server will be run out of the directory /usr/local/var/postgres .
It can now be accessed by typing the following command:
This will connect to the server and access the postgres database. Once this is done:
- Schemas and tables can be created
- Data can be loaded and deleted from the database
- Queries can be run
The process should look like this: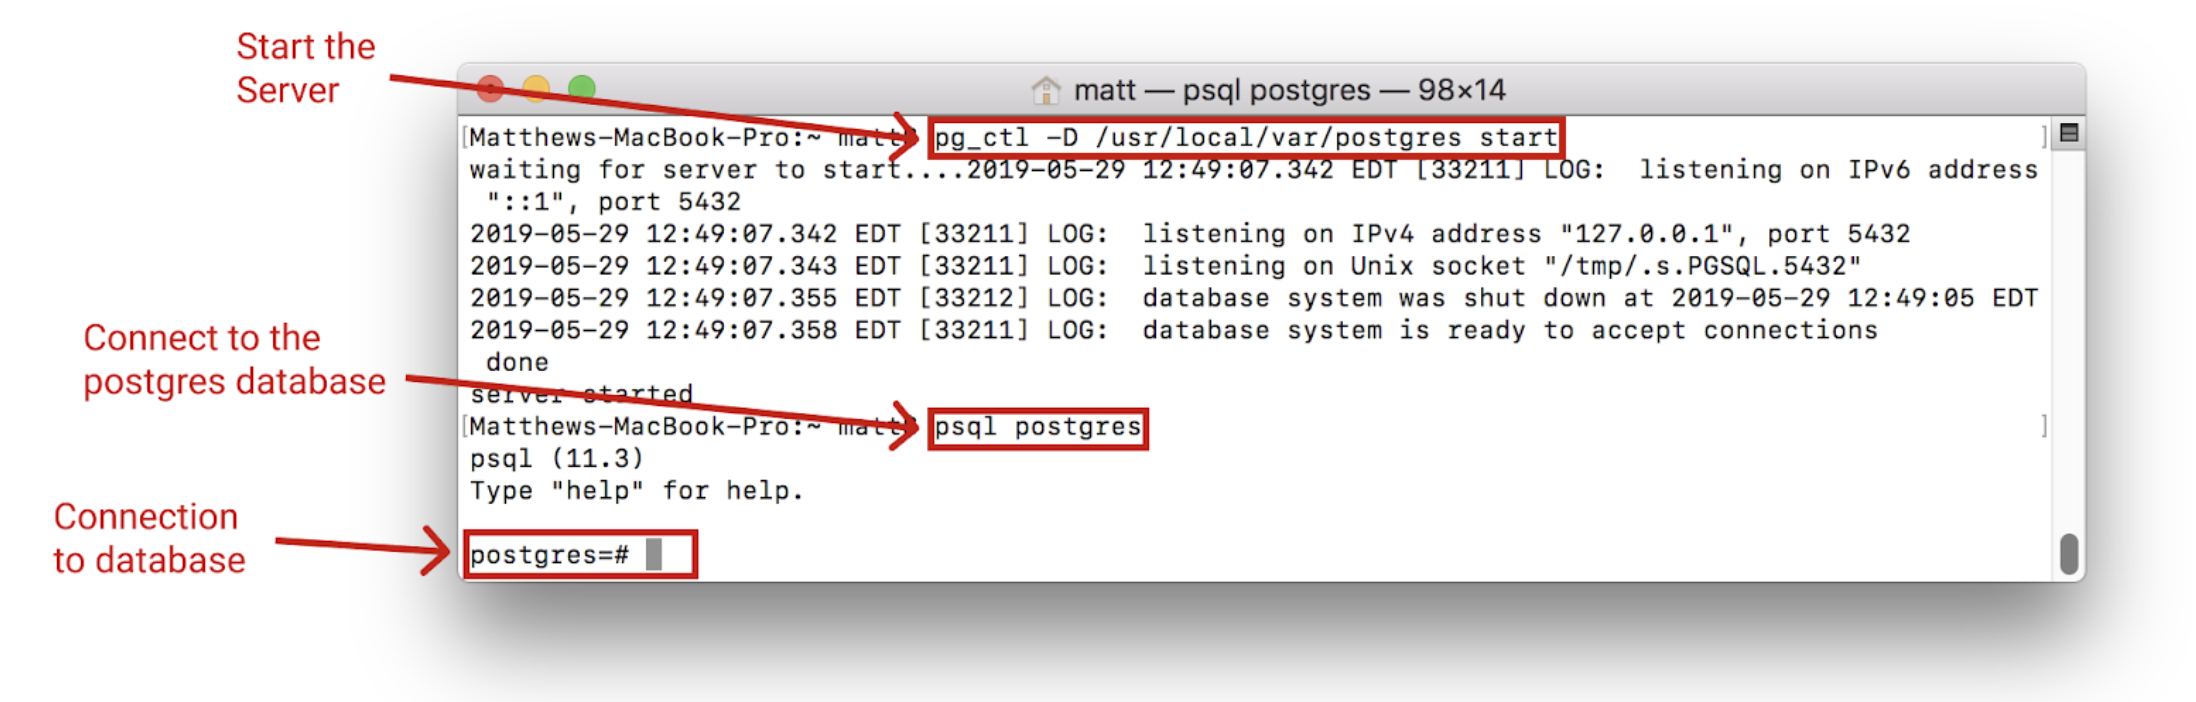
This shows that the server has been started and can be connected to.
(Optional) Creating a Custom Data Directory
A custom data directory can also be used for a server. To do this, first create a directory to be used as the server location. For example, create a directory called myData in the home directory: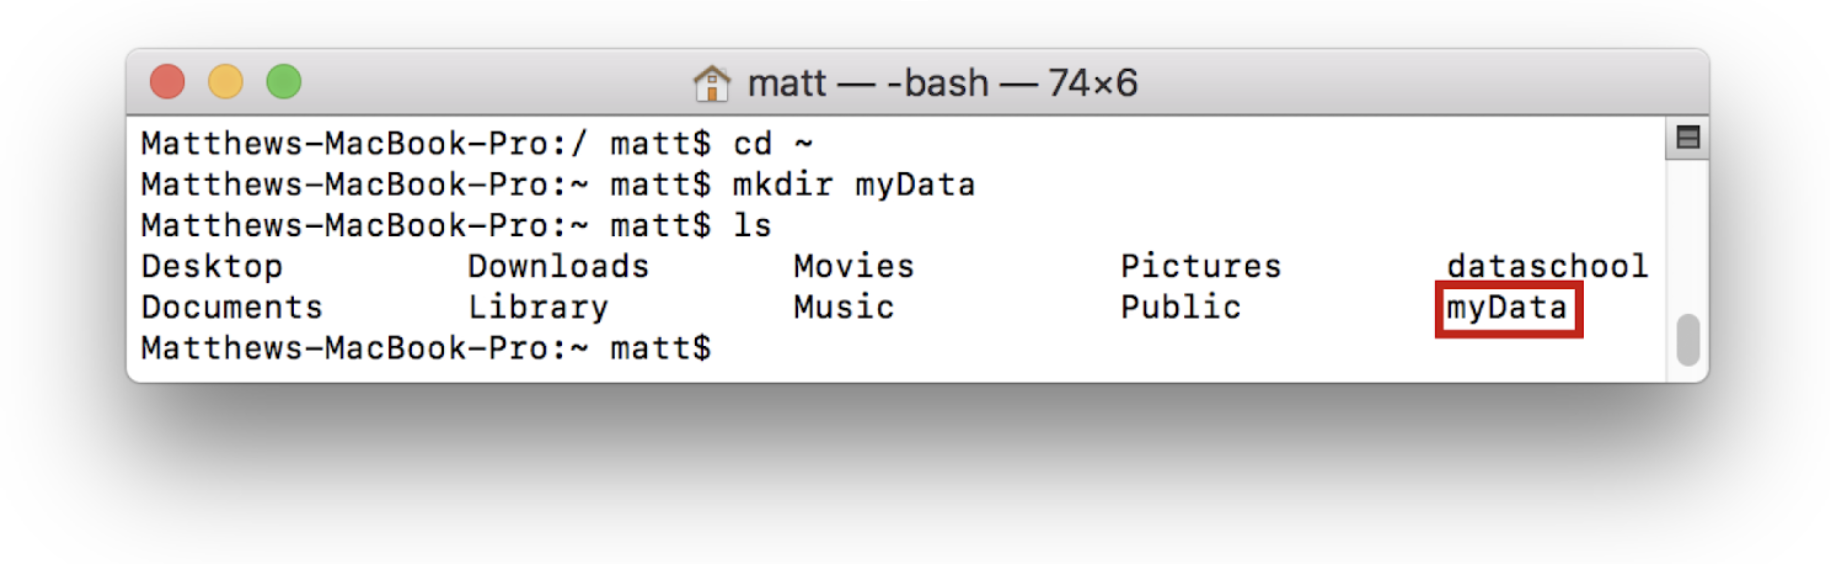
Once the directory is created, the server can be initialized. This means that we configure the directory and add the necessary files to run the server. To do this run the initdb command as shown: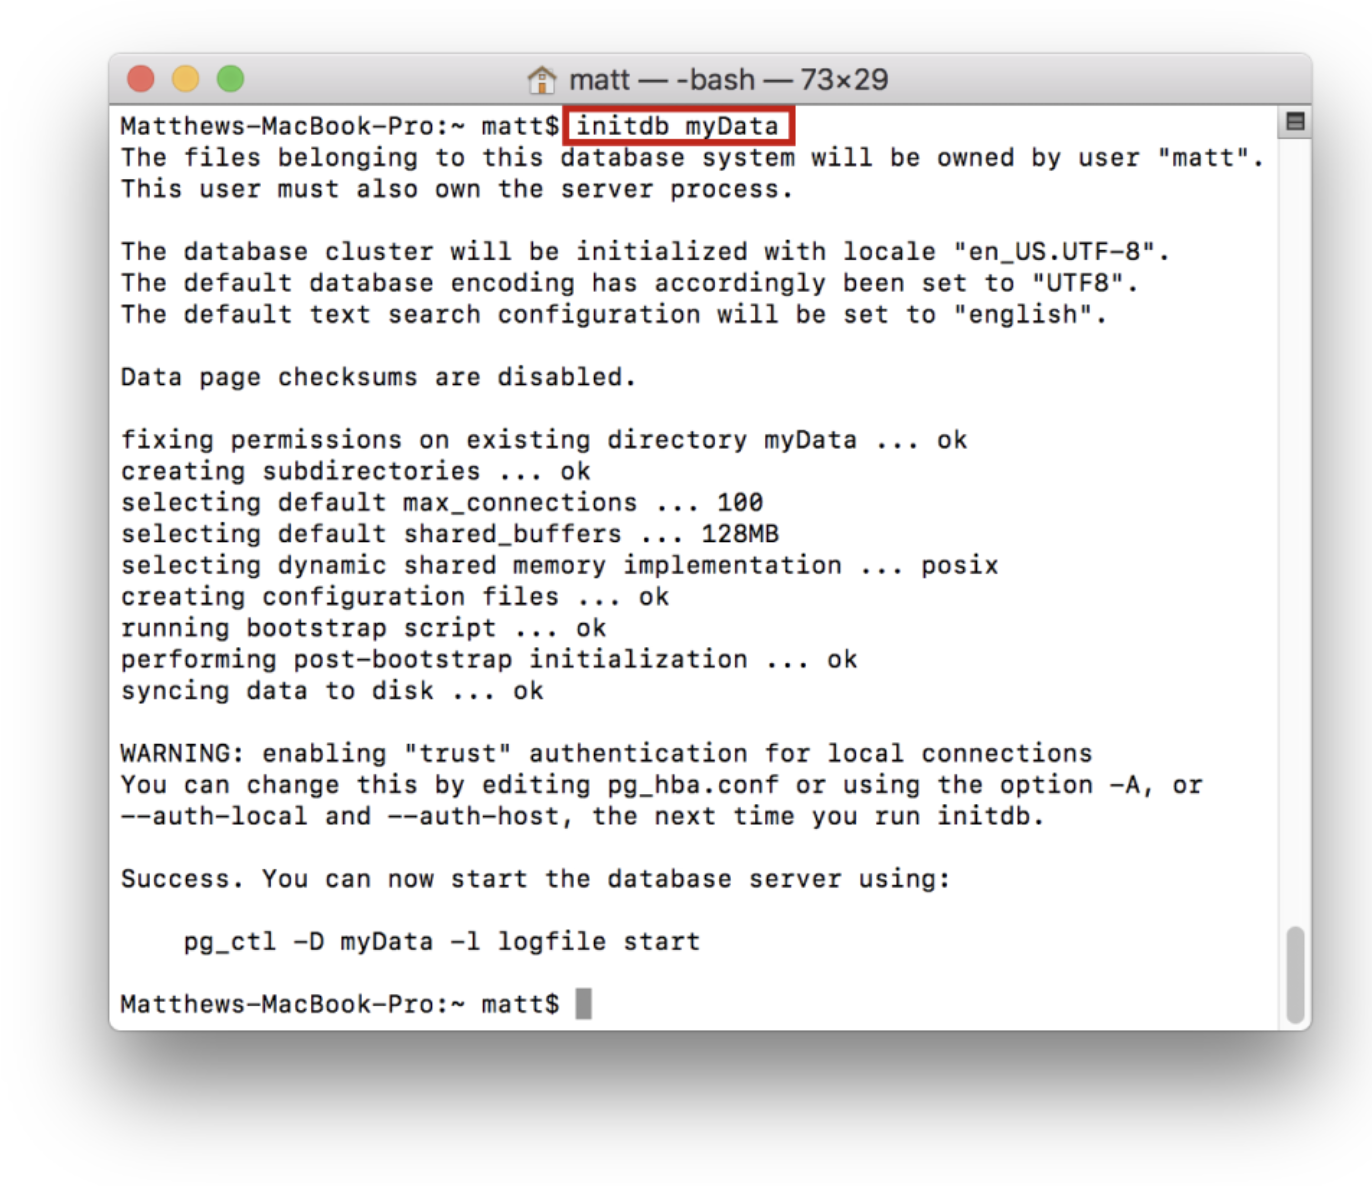
This will fill the myData directory with files necessary to run the server:
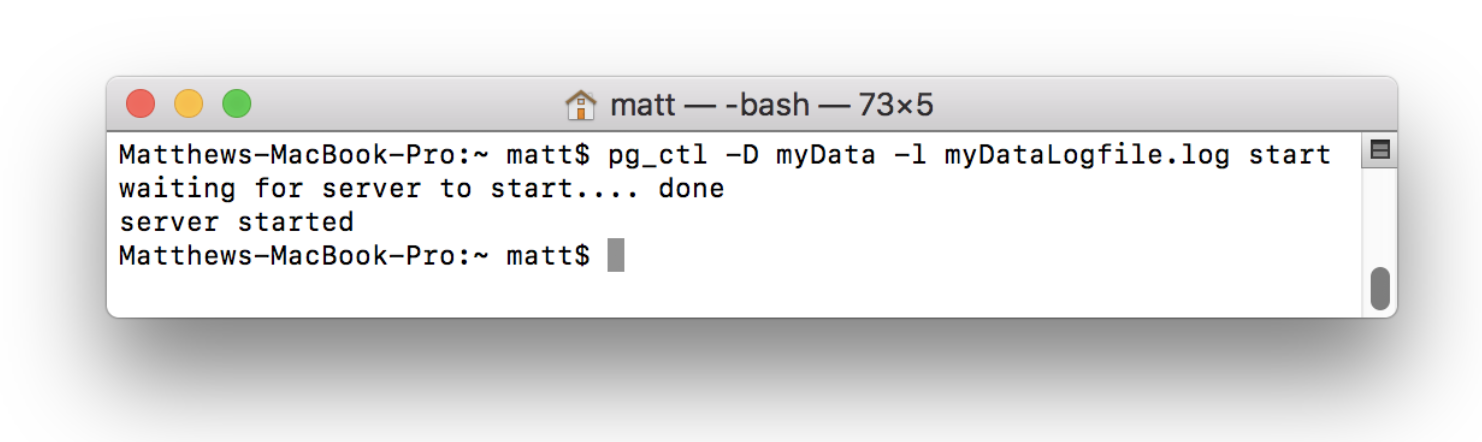
Now that the server is initialized and the log file is created, you can start the server from this directory. To do this use the command and substitute in for the specified values:
The “Data Directory” refers to the directory that was just initialized (in this case myData). The “Log file” is a file that will record server events for later analysis. Generally log files are formatted to contain the date in the file name (e.g. “2018-05-27.log” or “myData-logfile-2018-05-27.log”) and should be stored outside of the database that they are logging so as to avoid unnecessary risks. Log files can be dense to read but are very useful for security and debugging purposes:
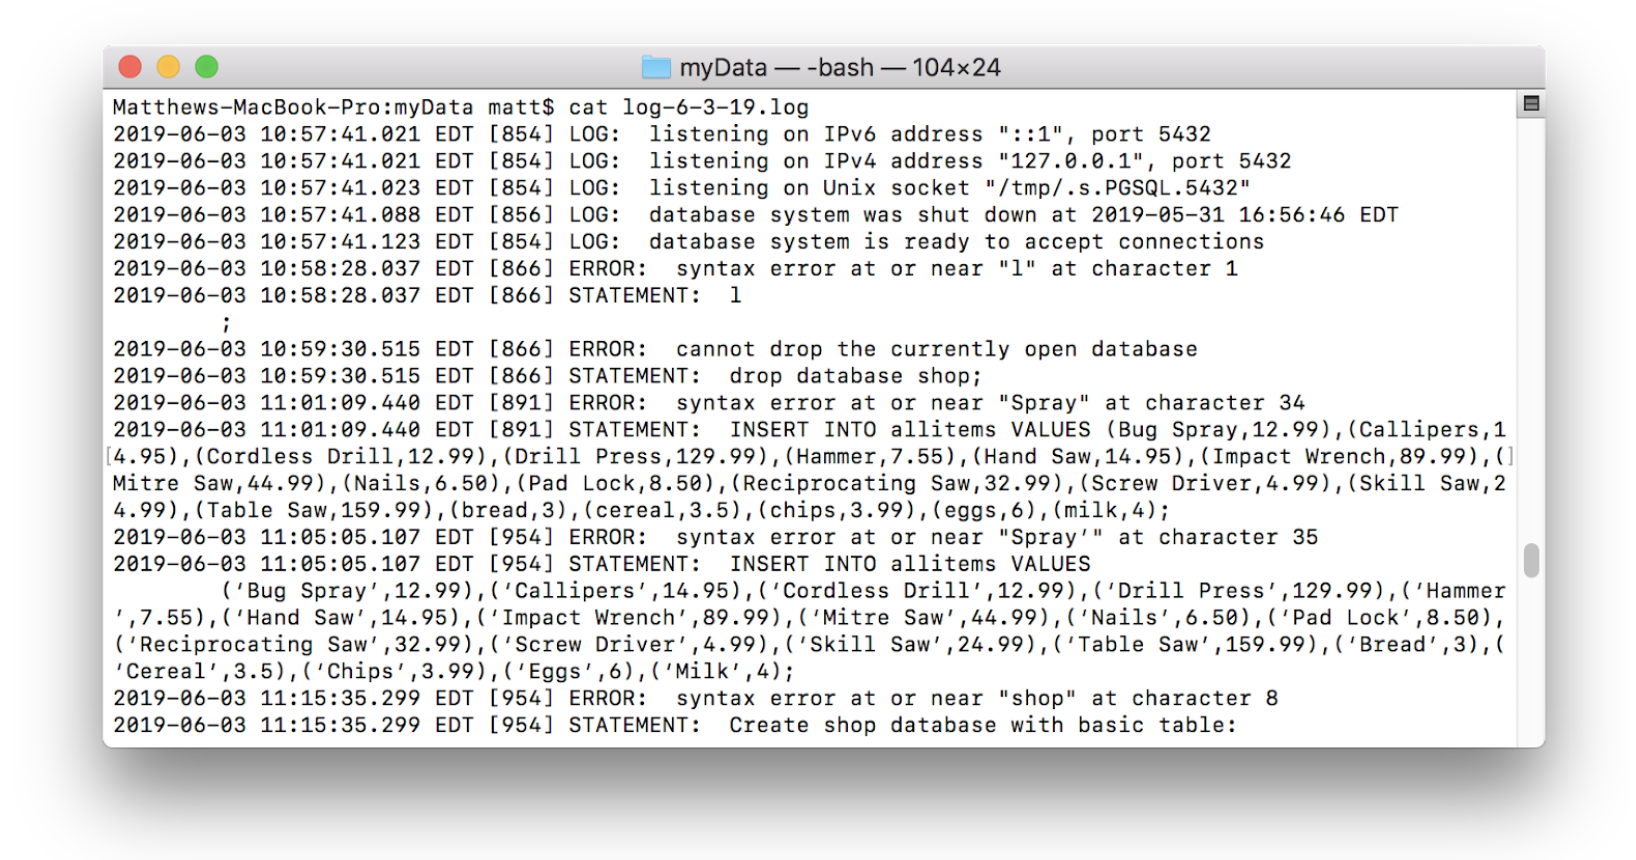
The command above will generate a log file like the one shown, start the server, and tie the log file to the server. If a log file is not specified, events will be logged to the terminal:
The server will only start if the port is free. If the default server is running it must first be stopped using the pg_ctl -D /usr/local/var/postgres stop command:
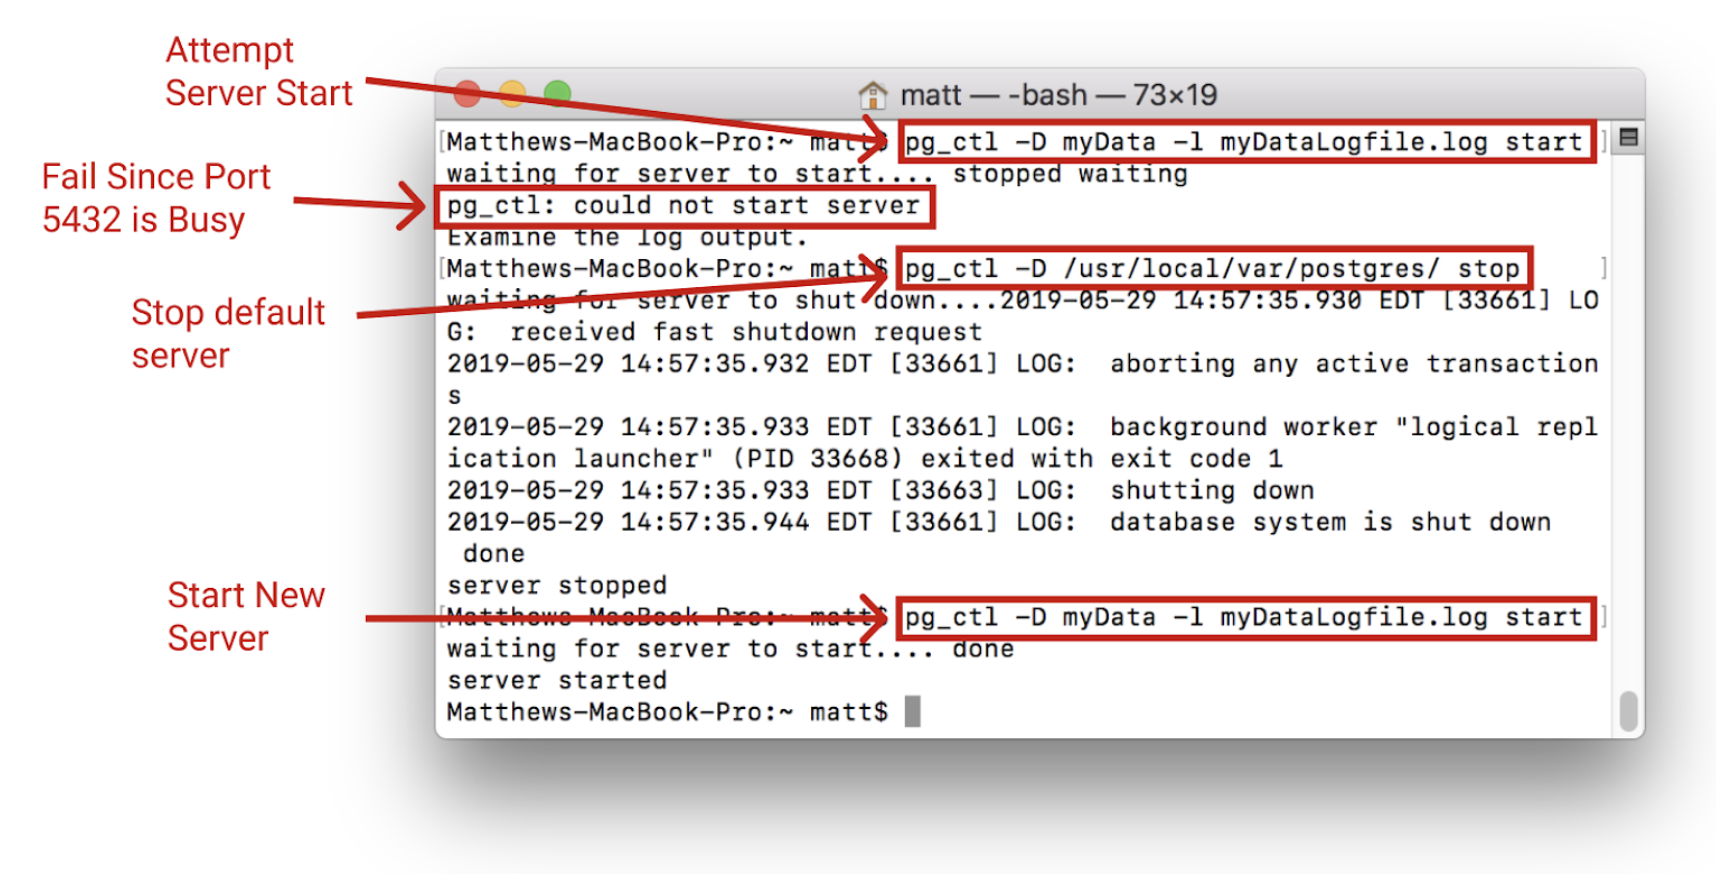
Once started, it can be connected to the same way as before using:
Using PostgreSQL App
To run a server through the postgres app, the first step is to download the program. The app can be downloaded on postgresapp.com. Once the app is downloaded and moved into the applications folder, the app can be opened.
Open the Postgres app:
In order to start the server, click the start button.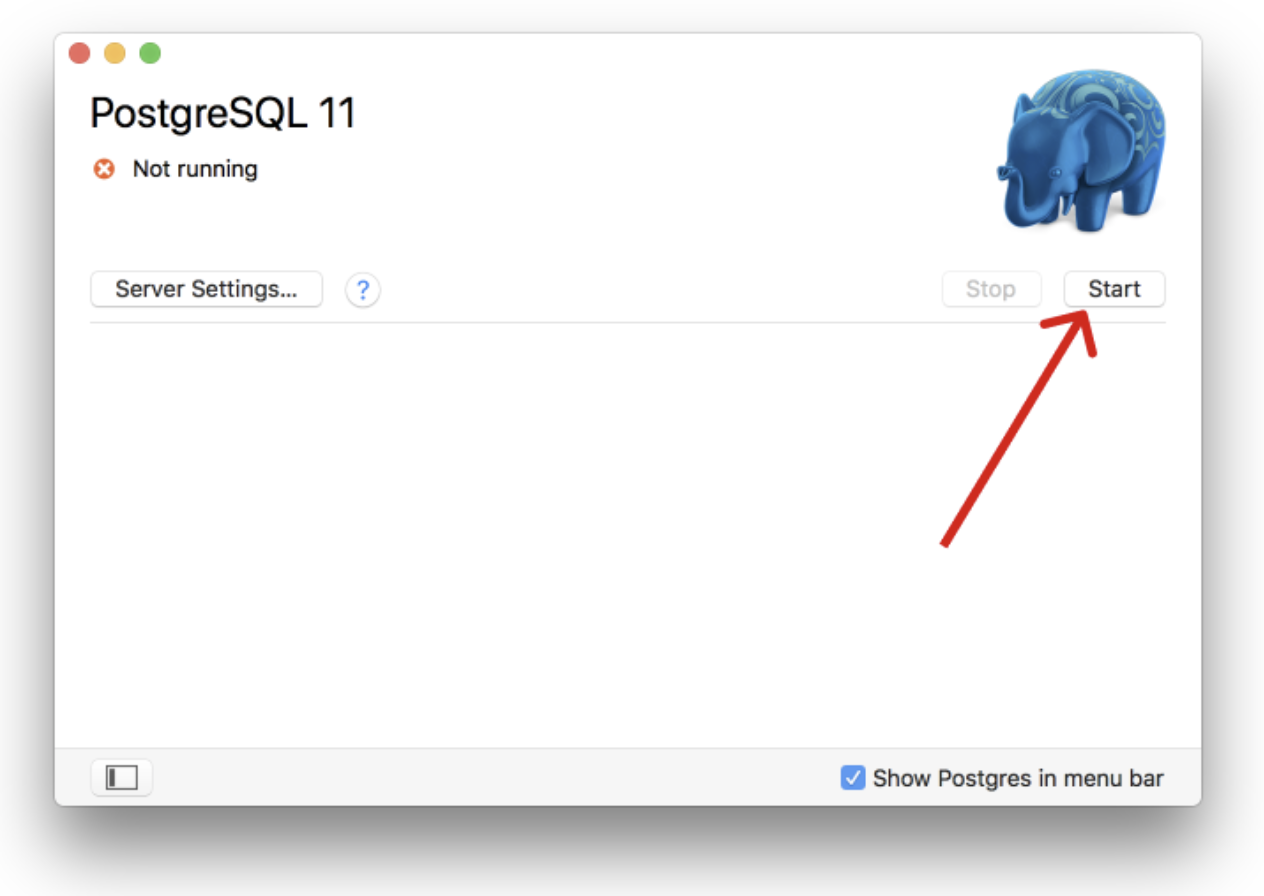
This will start the server. Details on the server can be found by opening the server settings: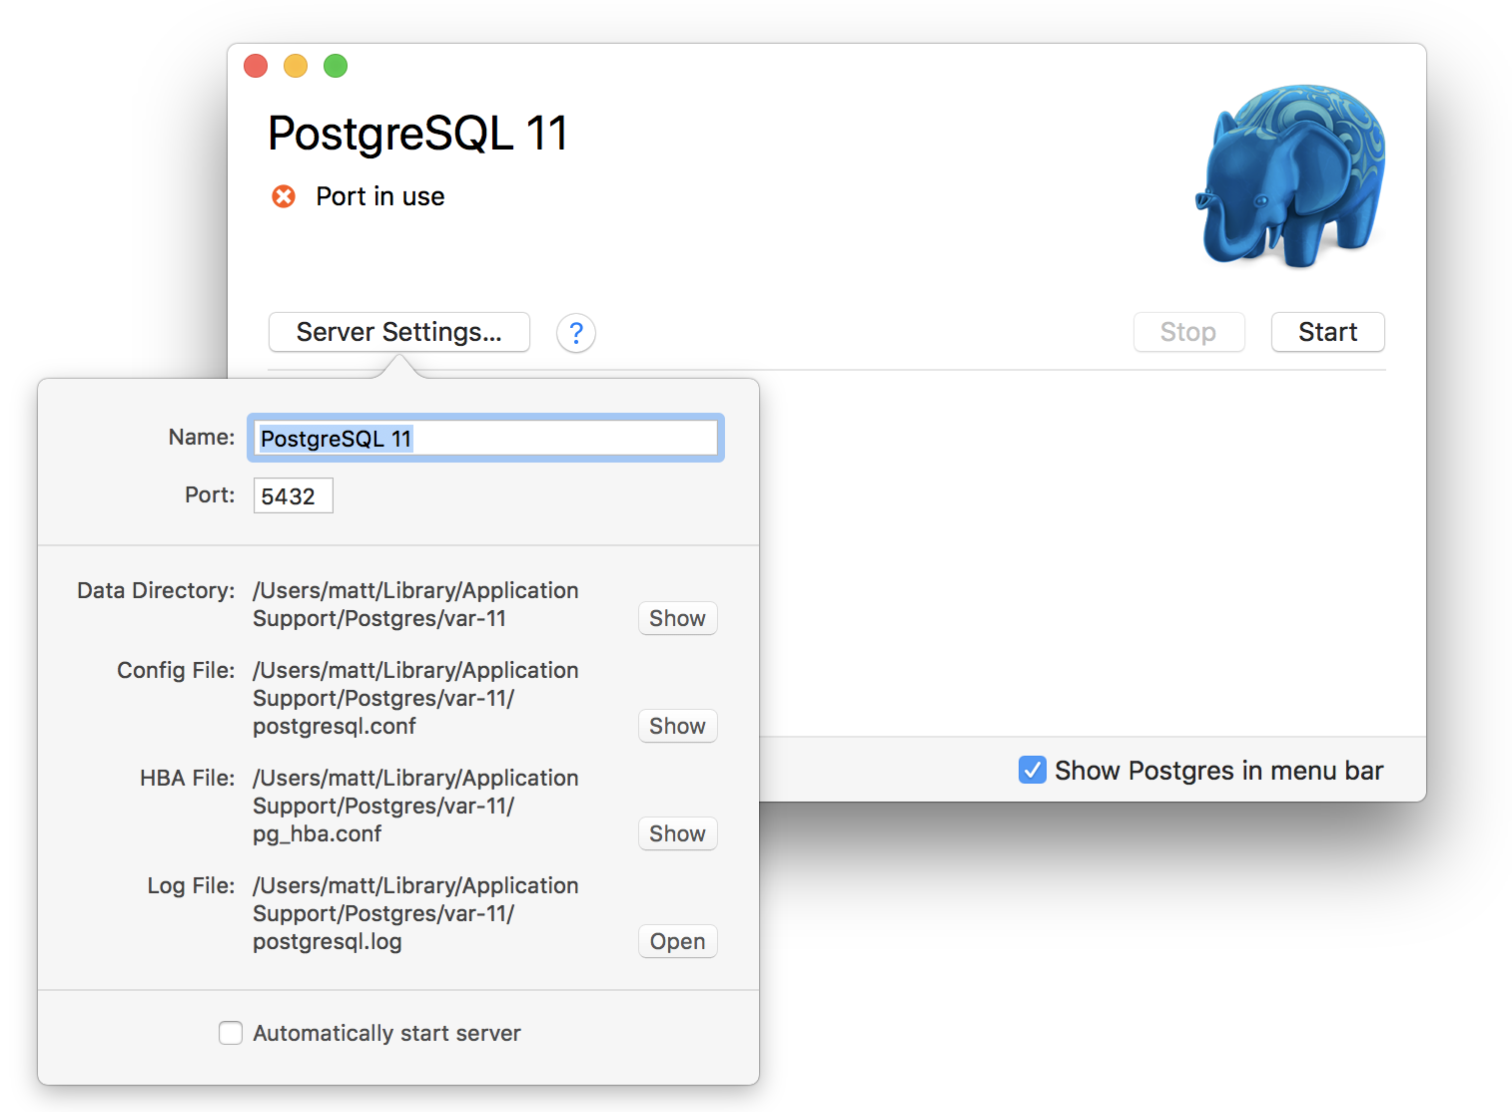
This interface shows all the essential information regarding the server. It also allows the port to be changed very easily. This is useful because multiple PostgreSQL servers can
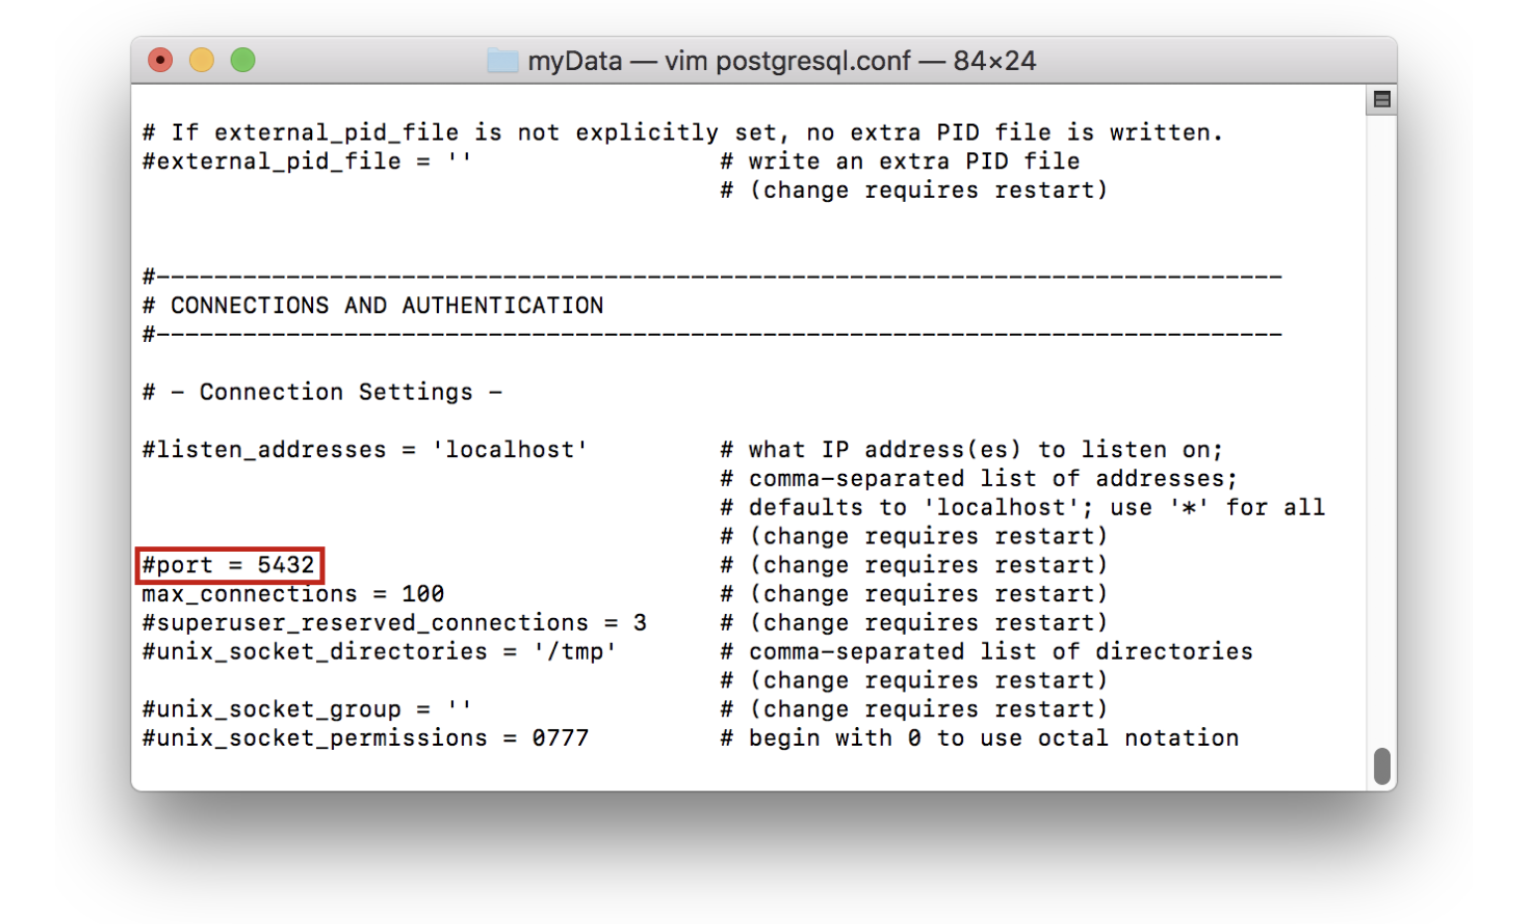
Note: To change the port in the terminal, the вЂpostgres.conf’ file (which can be found in the data directory) must be edited. This looks like the following:
Using Terminal with the PostgreSQL App
Once the app has been downloaded, command line tools can be used as well. These tools can be accessed by typing:
For example, the вЂpostgres’ database on the server can be connected to using the psql tool with postgres as an argument:
Rather than typing out the full path each time however, the path can be added to a file that will allow significantly easier access to the tools, allowing the tools be accessed from any directory on the computer. To do this, the following command can be run in the terminal:
Once this is done, the вЂpostgres’ database can be accessed by simply typing:
Источник
Установка и подключение PostgreSQL на Mac Os
Устанавливаем PostgreSQL на Mac OS.
Установка PostgreSQL на Mac Os
Добавляем в автозапуск при старте системы Mac OS.
Также можно запустить вручную:
Не обязательно
Если автозагрузка не сработает. Можно провести такие манипуляции:
Директория автозагрузки находится здесь:
Добавляем в автозагрузку
Подключение к PostgreSQL на Mac OS
Подключение на Mac OS немного отличается от Linux. Проверим пользователей:
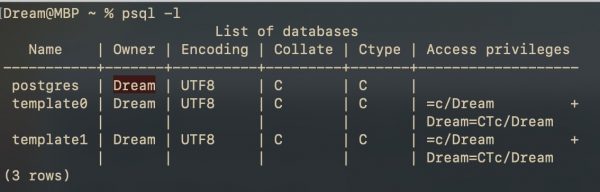
Для подключения указываем Owner из таблицы выше:
Как создать БД и пользователя, следовать инструкции:
https://ploshadka.net/postgresql/
Если коротко, то для локалки достаточно ввести в консоль:
Как подключиться к PostgreSQL на Mac OS
На localhost достаточно создать базу данных и подключиться к ней указав только её имя:
Остальное подхватиться по умолчанию.
Подключение в сторонней программе к БД
DataGrip
На примере программы DataGrip:
![]()
Исправление ошибок
Статья по исправлению некоторых ошибок с правами доступа.
Читайте также
Кстати, на сайте нет рекламы. У сайта нет цели самоокупаться, но если вам пригодилась информация можете задонатить мне на чашечку кофе в макдаке. Лайкнуть страницу или просто поблагодарить. Карма вам зачтется.
Источник


