- Psycopg 2.8.7.dev0 documentation
- Quick Install
- psycopg vs psycopg-binary
- Change in binary packages between Psycopg 2.7 and 2.8
- Prerequisites
- Build prerequisites
- Runtime requirements
- Non-standard builds
- Creating a debug build
- Non-standard Python Implementation
- Running the test suite
- If you still have problems
- How to Install Psycopg2 in Windows
- Introduction
- Prerequisites
- Install and setup the Python 3 in Windows 10
- Set the paths for python3 and pip3
- Create a Python virtual environment on Windows 10
- Upgrade pip3 using the py command
- Install the psycopg2 module in Windows 10
- Create a Python script that connects into PostgreSQL database
- Create table using the cursor command
- Conclusion
- Just the code
- Pilot the ObjectRocket Platform Free!
- Installing psycopg2 on windows
Psycopg 2.8.7.dev0 documentation
Psycopg is a PostgreSQL adapter for the Python programming language. It is a wrapper for the libpq, the official PostgreSQL client library.
Quick Install
For most operating systems, the quickest way to install Psycopg is using the wheel package available on PyPI:
This will install a pre-compiled binary version of the module which does not require the build or runtime prerequisites described below. Make sure to use an up-date-date version of pip (you can upgrade it using something like pip install -U pip ).
You may then import the psycopg package, as usual:
psycopg vs psycopg-binary
The psycopg2-binary package is meant for beginners to start playing with Python and PostgreSQL without the need to meet the build requirements.
If you are the maintainer of a published package depending on psycopg2 you shouldn’t use psycopg2-binary as a module dependency. For production use you are advised to use the source distribution.
The binary packages come with their own versions of a few C libraries, among which libpq and libssl , which will be used regardless of other libraries available on the client: upgrading the system libraries will not upgrade the libraries used by psycopg2 . Please build psycopg2 from source if you want to maintain binary upgradeability.
The psycopg2 wheel package comes packaged, among the others, with its own libssl binary. This may create conflicts with other extension modules binding with libssl as well, for instance with the Python ssl module: in some cases, under concurrency, the interaction between the two libraries may result in a segfault. In case of doubts you are advised to use a package built from source.
Change in binary packages between Psycopg 2.7 and 2.8
In version 2.7.x, pip install psycopg2 would have tried to install automatically the binary package of Psycopg. Because of concurrency problems binary packages have displayed, psycopg2-binary has become a separate package, and from 2.8 it has become the only way to install the binary package.
If you are using Psycopg 2.7 and you want to disable the use of wheel binary packages, relying on the system libraries available on your client, you can use the pip —no-binary option, e.g.:
which can be specified in your requirements.txt files too, e.g. use:
to use the last bugfix release of the psycopg2 2.7 package, specifying to always compile it from source. Of course in this case you will have to meet the build prerequisites .
Prerequisites
The current psycopg2 implementation supports:
- Python version 2.7
- Python 3 versions from 3.4 to 3.8
- PostgreSQL server versions from 7.4 to 12
- PostgreSQL client library version from 9.1
Build prerequisites
The build prerequisites are to be met in order to install Psycopg from source code, from a source distribution package, GitHub or from PyPI.
Psycopg is a C wrapper around the libpq PostgreSQL client library. To install it from sources you will need:
The Python header files. They are usually installed in a package such as python-dev or python3-dev. A message such as error: Python.h: No such file or directory is an indication that the Python headers are missing.
The libpq header files. They are usually installed in a package such as libpq-dev. If you get an error: libpq-fe.h: No such file or directory you are missing them.
The pg_config program: it is usually installed by the libpq-dev package but sometimes it is not in a PATH directory. Having it in the PATH greatly streamlines the installation, so try running pg_config —version : if it returns an error or an unexpected version number then locate the directory containing the pg_config shipped with the right libpq version (usually /usr/lib/postgresql/X.Y/bin/ ) and add it to the PATH :
You only need pg_config to compile psycopg2 , not for its regular usage.
Once everything is in place it’s just a matter of running the standard:
or, from the directory containing the source code:
Runtime requirements
Unless you compile psycopg2 as a static library, or you install it from a self-contained wheel package, it will need the libpq library at runtime (usually distributed in a libpq.so or libpq.dll file). psycopg2 relies on the host OS to find the library if the library is installed in a standard location there is usually no problem; if the library is in a non-standard location you will have to tell somehow Psycopg how to find it, which is OS-dependent (for instance setting a suitable LD_LIBRARY_PATH on Linux).
The libpq header files used to compile psycopg2 should match the version of the library linked at runtime. If you get errors about missing or mismatching libraries when importing psycopg2 check (e.g. using ldd) if the module psycopg2/_psycopg.so is linked to the right libpq.so .
Whatever version of libpq psycopg2 is compiled with, it will be possible to connect to PostgreSQL servers of any supported version: just install the most recent libpq version or the most practical, without trying to match it to the version of the PostgreSQL server you will have to connect to.
Non-standard builds
If you have less standard requirements such as:
- creating a debug build ,
- using pg_config not in the PATH ,
- supporting mx.DateTime ,
then take a look at the setup.cfg file.
Some of the options available in setup.cfg are also available as command line arguments of the build_ext sub-command. For instance you can specify an alternate pg_config location using:
Use python setup.py build_ext —help to get a list of the options supported.
Creating a debug build
In case of problems, Psycopg can be configured to emit detailed debug messages, which can be very useful for diagnostics and to report a bug. In order to create a debug package:
- Download and unpack the Psycopg source package (the .tar.gz package).
- Edit the setup.cfg file adding the PSYCOPG_DEBUG flag to the define option.
- Compile and install the package.
- Set the PSYCOPG_DEBUG environment variable:
- Run your program (making sure that the psycopg2 package imported is the one you just compiled and not e.g. the system one): you will have a copious stream of informations printed on stderr.
Non-standard Python Implementation
The psycopg2 package is the current mature implementation of the adapter: it is a C extension and as such it is only compatible with CPython. If you want to use Psycopg on a different Python implementation (PyPy, Jython, IronPython) there is a couple of alternative:
- a Ctypes port, but it is not as mature as the C implementation yet and it is not as feature-complete;
- a CFFI port which is currently more used and reported more efficient on PyPy, but please be careful of its version numbers because they are not aligned to the official psycopg2 ones and some features may differ.
Running the test suite
Once psycopg2 is installed you can run the test suite to verify it is working correctly. From the source directory, you can run:
The tests run against a database called psycopg2_test on UNIX socket and the standard port. You can configure a different database to run the test by setting the environment variables:
- PSYCOPG2_TESTDB
- PSYCOPG2_TESTDB_HOST
- PSYCOPG2_TESTDB_PORT
- PSYCOPG2_TESTDB_USER
The database should already exist before running the tests.
If you still have problems
Try the following. In order:
- Read again the Build prerequisites .
- Read the FAQ .
- Google for psycopg2 your error message. Especially useful the week after the release of a new OS X version.
- Write to the Mailing List.
- If you think that you have discovered a bug, test failure or missing feature please raise a ticket in the bug tracker.
- Complain on your blog or on Twitter that psycopg2 is the worst package ever and about the quality time you have wasted figuring out the correct ARCHFLAGS . Especially useful from the Starbucks near you.
How to Install Psycopg2 in Windows
![]()
Introduction
In this article we talk in detail about how to install psycopg2 in Windows. Included are the command line commands and code you’ll need to do it yourself.
Prerequisites
Before we can install psycopg2 on windows operating system we must make certain prerequisites
Make sure to install and set up Python3 on your local device because Python2 is already deprecated and losses its support.
Basic knowledge on using Python and PostgreSQL database.
Install and setup the Python 3 in Windows 10
To install Python using the interactive EXE installer make sure to download it first and include the path. Also check the py launcher and pip checkboxes as well.
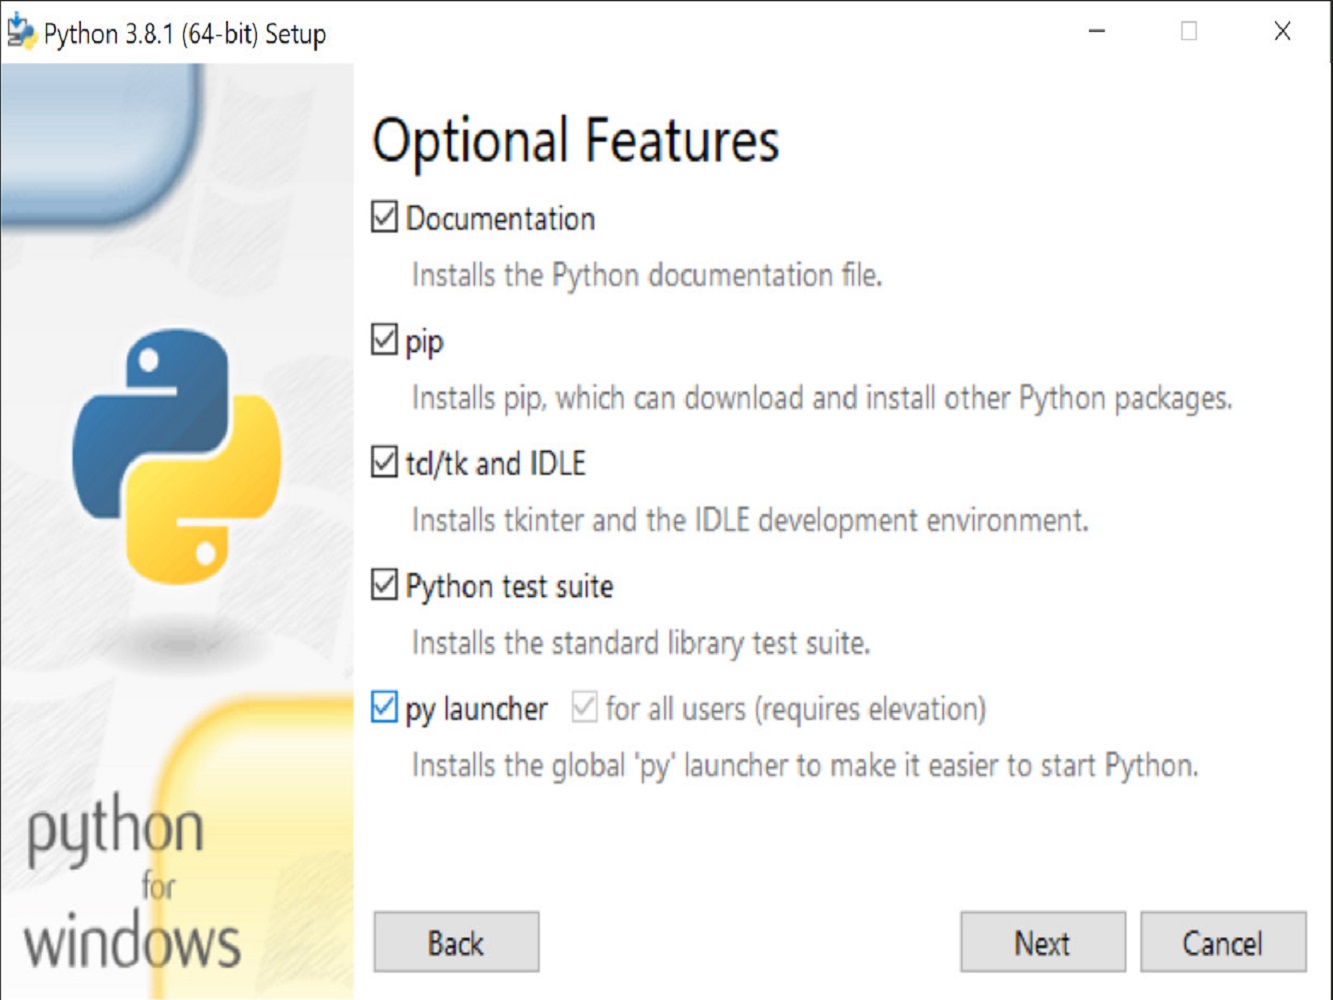
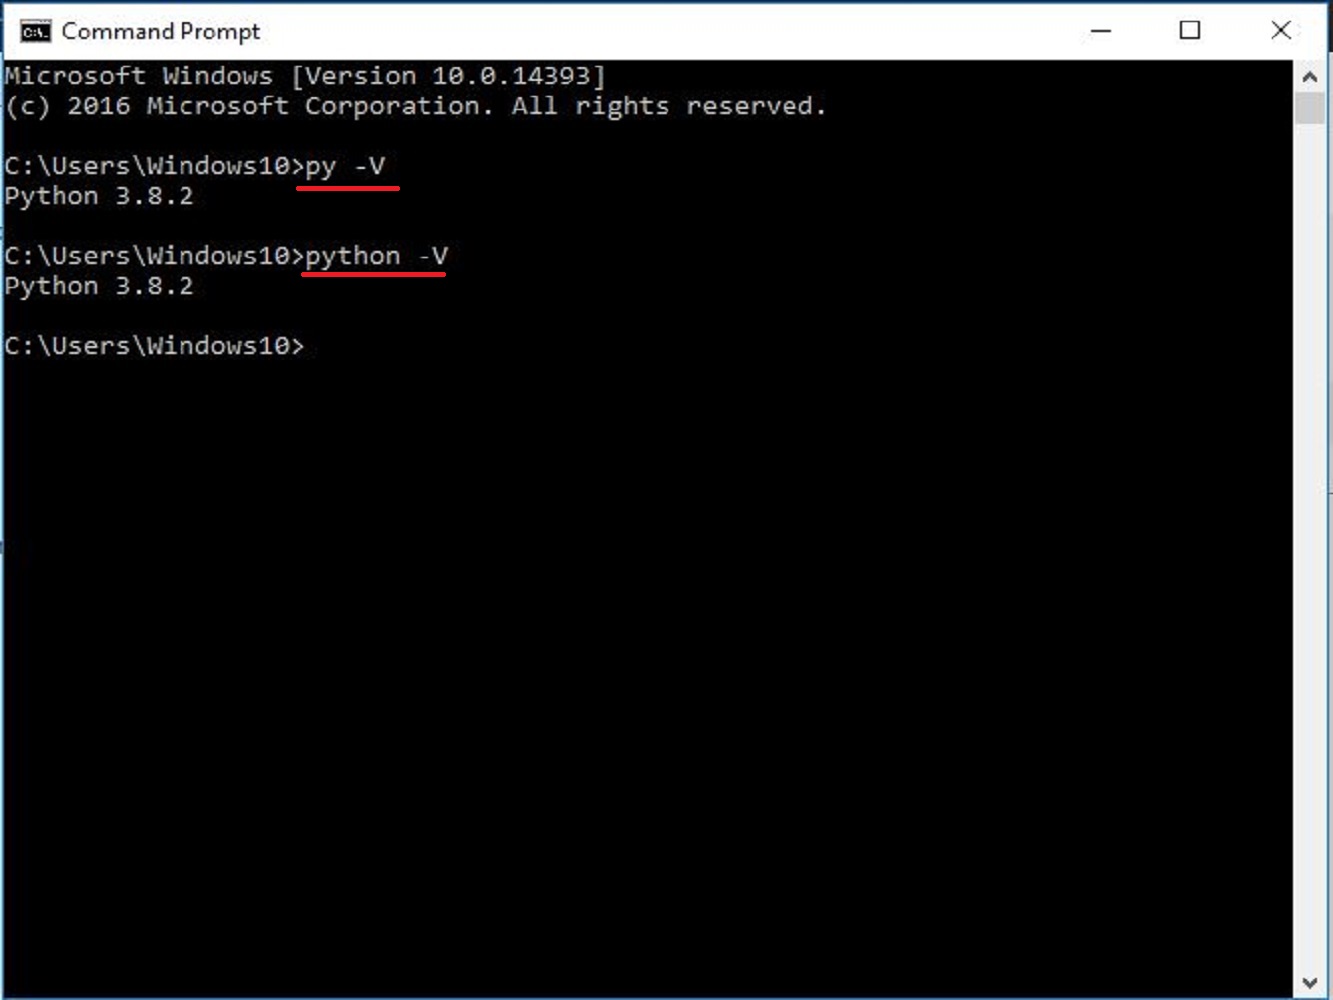
After it’s done installing, open the command prompt window terminal to verify if the Python3 is properly installed and working on your device :
The command above will return the Python version number.
Set the paths for python3 and pip3
To prevent an error when starting up python in your command prompt window, setup the PATH variable location of the Python so that the system will recognize it.
Create a Python virtual environment on Windows 10
To install several packages from the PIP3 command and use it for your environment, you can create a virtual environment in Python. Use the command py -m with the venv tag for virtual environment and followed by the name of the virtual env you desire.
Once it’s finished you can input dir , and you should see the demo directory. Enter into the directory with the following:
Now go inside the Scripts directory and execute the activate.bat file to enter inside the virtual environment:
Upgrade pip3 using the py command
If you get an error message about the user permission, you can use the —user flag while installing it.
The python3 and pip3 wrappers for the respective Python3 and PIP3 commands are now deprecated in Windows10, you can use the py and py -m pip instead.
Execute the command py in your command prompt window to open the and enter into the interactive interpreter for Python 3. Just press the button CTRL + Z and then RETURN to exit the interface.
To check and verify the version of the PIP3 in your device, use the command below :
It should return something like this : pip 20.0.2 from C:\Path\To\AppData\Roaming\Python\Python38\site-packages\pip (python 3.8) because of the upgrade flag that we have used earlier.
Install the psycopg2 module in Windows 10
Now that we have our virtual environment setup and ready, install the psycopg2 module to create a simple connection in the PostgreSQL database cluster.
Make sure to upgrade the pip command to avoid error when installing a package module from python in a virtual environment.
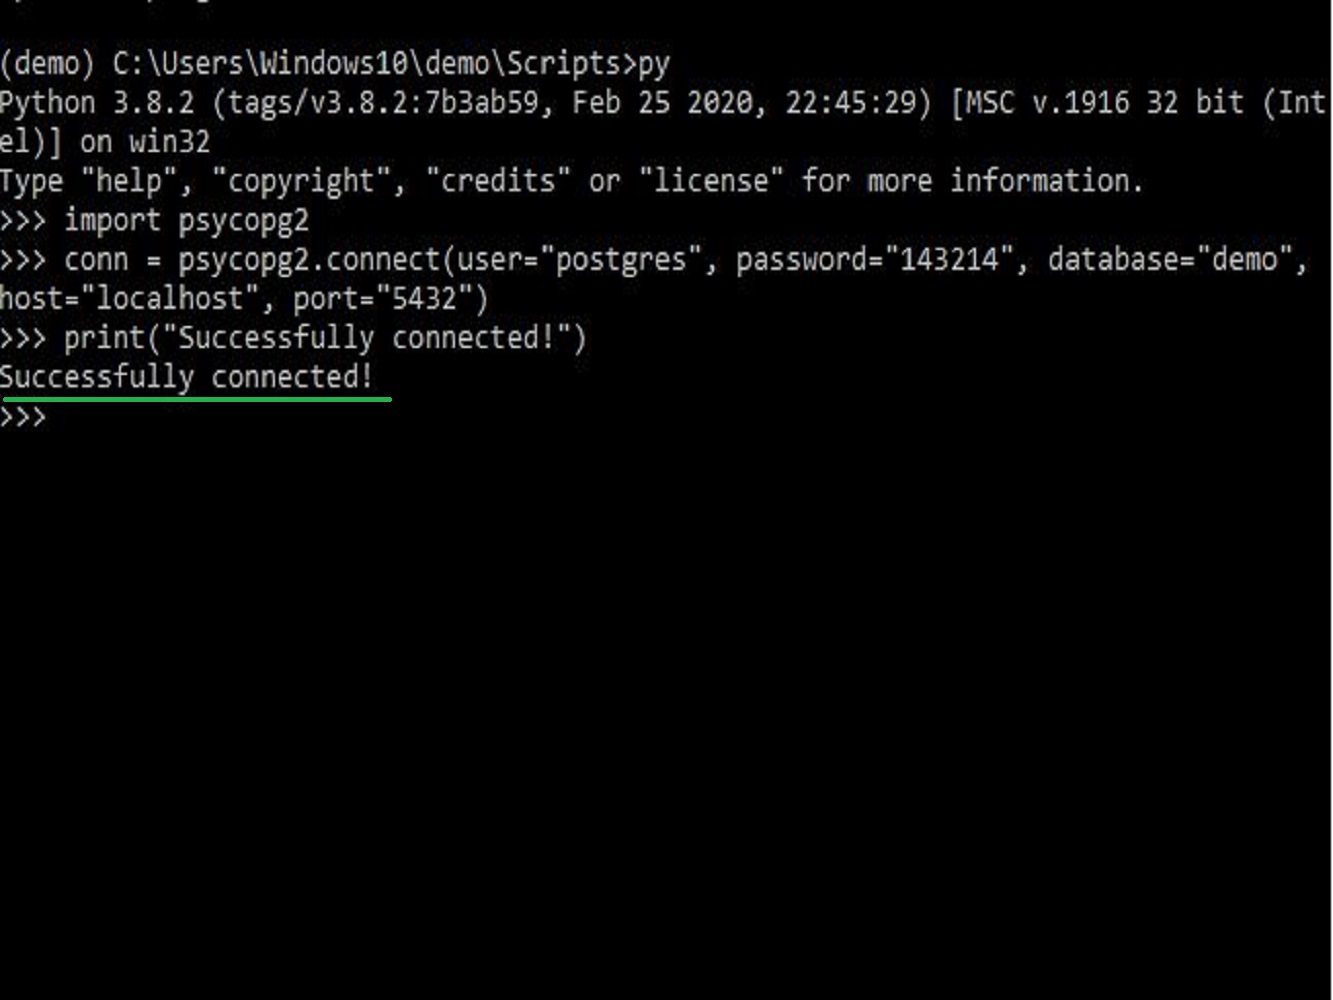
Create a Python script that connects into PostgreSQL database
On your command prompt window, use the command py or python to enter the Python interface.
And now we will try to use the cursor command to perform any PostgreSQL database queries and operations using the Python script.
Then, print the version of the PostgreSQL installed in your device.
Let’s take a look at the output:
Create table using the cursor command
Another example on performing PostgreSQL commands would be creating a table inside the database demo .
Next is to insert some record of rows inside the table.
Then create a commit function and display that the record is successfully inserted.
Now go to your PostgreSQL shell or the psql to verify that the table has been created using the command \d in your database demo .
And use the SELECT statement to verify the records of row inserted.
The result is the following:
Conclusion
In this article we have covered how to install psycopg2 in Windows. Below is a recap of the code we used in this tutorial in case you’d like to use or repurpose it.
Just the code
import psycopg2
conn = psycopg2. connect ( user = «postgres» , password = «143214» , database = «demo» , host = «localhost» , port = «5432» )
print ( «Successfully connected!» )
cursor = conn. cursor ( )
cursor. execute ( «SELECT VERSION();» )
version = cursor. fetchone ( )
print ( «Connected into — » , version )
cursor. execute ( «CREATE TABLE py_tbl(id SERIAL PRIMARY KEY, str_col VARCHAR(50),int_col INT);» )
print ( «Table successfully created!» )
cursor. execute ( «INSERT INTO py_tbl(str_col, int_col) VALUES(‘Hello World!’, 110);» )
cursor. execute ( «INSERT INTO py_tbl(str_col, int_col) VALUES(‘Welcome to ObjectRocket!’, 120);» )
cursor. execute ( «INSERT INTO py_tbl(str_col, int_col) VALUES(‘Greetings!’, 130);» )
conn. commit ( )
print ( «Records Successfully Inserted!)»
conn. close ( )
Pilot the ObjectRocket Platform Free!
Try Fully-Managed CockroachDB, Elasticsearch, MongoDB, PostgreSQL (Beta) or Redis.
Installing psycopg2 on windows
Pip, windows, AND virtualenv friendly versions of psycopg2. This works because everything is pre-compiled and beautiful.
- Easy installation of psycopg2 on windows
- Pip install works for windows
- Virtualenv friendly
- No .exe to wrangle with
Every time I need to set up psycopg2 on windows, I wind up wanting to shoot something. For years, I’ve been managing my virtualenv with Jason Erickson’s awesome set of pre-compiled libraries. Recently, I decided to quit making my like so difficult and just pipify everything for windows.
Depending on your environment, you’ll want to use the appropriate script. All branches are using version 2.5.3 of psycopg2. Since psycopg2 is for PostgreSQL, you’ll obviousely want to have that installed first.
If you want to specify your version, you may do so by installing by tag instead of branch. The naming convention is identical to branches, except you append the psycopg2 version (eg. @win32-py25-psycopg2-253). The following psycopg2 versions are available:
I’ve built a primitive test suite that builds python python virtual enviroments and then pip installs psycopg2. Pip becomes difficult to install starting with python 2.6 and I can’t find MSI installs for 2.5. Because of this, I’ve not fully tested either of those python versions. That said, I’ve put together a .bat file that builds 32 and 63 bit virtualenvs for pythons 2.7, 3.2, and 3.3. It then installs psycopg2 into each virtualenv. To keep testing easy, I’ve included python installations in the tests folder. I realize that this is not very space sensitive, so the test directory is only in the master branch. Since each compiled version of psycopg2 is kept in a separate branch, installing via pip will not download 6 python installations.
If you do want to run the tests themselves, simply clone/checkout master and run tests\scrapt.bat. From there you may read the scripts output and also check each virtualenv to ensure that the psycopg2 was installed successfully. If you wan’t to help out and have a different environment, please help with the tests. If you want to help expand the test suite, feel free to help and/or ask any questions.
The test suite assumes that you have a primary python installation with virtualenv already installed.
Successfully tested with virtualenv on Windows 7 64 bit:


