- Getting Started with PySpark on Windows
- Installing Prerequisites
- Python
- Installing Apache Spark
- Configuring the Spark Installation
- Installing winutils
- Configuring the log level for Spark
- Summary
- References
- How to install PySpark locally
- Installation
- Python Version Supported
- Using PyPI
- Using Conda
- Manually Downloading
- Installing from Source
Getting Started with PySpark on Windows
I decided to teach myself how to work with big data and came across Apache Spark. While I had heard of Apache Hadoop, to use Hadoop for working with big data, I had to write code in Java which I was not really looking forward to as I love to write code in Python. Spark supports a Python programming API called PySpark that is actively maintained and was enough to convince me to start learning PySpark for working with big data.
In this post, I describe how I got started with PySpark on Windows. My laptop is running Windows 10. So the screenshots are specific to Windows 10. I am also assuming that you are comfortable working with the Command Prompt on Windows. You do not have to be an expert, but you need to know how to start a Command Prompt and run commands such as those that help you move around your computer’s file system. In case you need a refresher, a quick introduction might be handy.
Often times, many open source projects do not have good Windows support. So I had to first figure out if Spark and PySpark would work well on Windows. The official Spark documentation does mention about supporting Windows.
Installing Prerequisites
PySpark requires Java version 7 or later and Python version 2.6 or later. Let’s first check if they are already installed or install them and make sure that PySpark can work with these two components.
Java is used by many other software. So it is quite possible that a required version (in our case version 7 or later) is already available on your computer. To check if Java is available and find it’s version, open a Command Prompt and type the following command.
If Java is installed and configured to work from a Command Prompt, running the above command should print the information about the Java version to the console. For example, I got the following output on my laptop.
Instead if you get a message like
It means you need to install Java. To do so,
Go to the Java download page. In case the download link has changed, search for Java SE Runtime Environment on the internet and you should be able to find the download page.
Click the Download button beneath JRE
Accept the license agreement and download the latest version of Java SE Runtime Environment installer. I suggest getting the exe for Windows x64 (such as jre-8u92-windows-x64.exe ) unless you are using a 32 bit version of Windows in which case you need to get the Windows x86 Offline version.
Run the installer.
After the installation is complete, close the Command Prompt if it was already open, open it and check if you can successfully run java -version command.
Python
Python is used by many other software. So it is quite possible that a required version (in our case version 2.6 or later) is already available on your computer. To check if Python is available and find it’s version, open a Command Prompt and type the following command.
If Python is installed and configured to work from a Command Prompt, running the above command should print the information about the Python version to the console. For example, I got the following output on my laptop.
Instead if you get a message like
It means you need to install Python. To do so,
Go to the Python download page.
Click the Latest Python 2 Release link.
Download the Windows x86-64 MSI installer file. If you are using a 32 bit version of Windows download the Windows x86 MSI installer file.
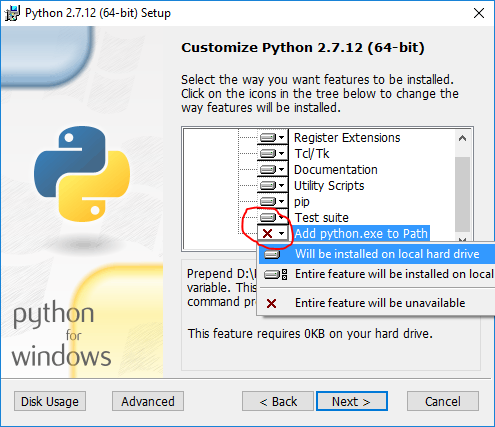
When you run the installer, on the Customize Python section, make sure that the option Add python.exe to Path is selected. If this option is not selected, some of the PySpark utilities such as pyspark and spark-submit might not work.
After the installation is complete, close the Command Prompt if it was already open, open it and check if you can successfully run python —version command.
Installing Apache Spark
Go to the Spark download page.
For Choose a Spark release, select the latest stable release of Spark.
For Choose a package type, select a version that is pre-built for the latest version of Hadoop such as Pre-built for Hadoop 2.6.
For Choose a download type, select Direct Download.
Click the link next to Download Spark to download a zipped tarball file ending in .tgz extension such as spark-1.6.2-bin-hadoop2.6.tgz .
In order to install Apache Spark, there is no need to run any installer. You can extract the files from the downloaded tarball in any folder of your choice using the 7Zip tool.
Make sure that the folder path and the folder name containing Spark files do not contain any spaces.
In my case, I created a folder called spark on my C drive and extracted the zipped tarball in a folder called spark-1.6.2-bin-hadoop2.6 . So all Spark files are in a folder called C:\spark\spark-1.6.2-bin-hadoop2.6 . From now on, I will refer to this folder as SPARK_HOME in this post.
To test if your installation was successful, open a Command Prompt, change to SPARK_HOME directory and type bin\pyspark . This should start the PySpark shell which can be used to interactively work with Spark. I got the following messages in the console after running bin\pyspark command.
The last message provides a hint on how to work with Spark in the PySpark shell using the sc or sqlContext names. For example, typing sc.version in the shell should print the version of Spark. You can exit from the PySpark shell in the same way you exit from any Python shell by typing exit() .
The PySpark shell outputs a few messages on exit. So you need to hit enter to get back to the Command Prompt.
Configuring the Spark Installation
Starting the PySpark shell produces a lot of messages of type INFO , ERROR and WARN . In this section we will see how to remove these messages.
By default, the Spark installation on Windows does not include the winutils.exe utility that is used by Spark. If you do not tell your Spark installation where to look for winutils.exe , you will see error messages when running the PySpark shell such as
This error message does not prevent the PySpark shell from starting. However if you try to run a standalone Python script using the bin\spark-submit utility, you will get an error. For example, try running the wordcount.py script from the examples folder in the Command Prompt when you are in the SPARK_HOME directory.
which produces the following error that also points to missing winutils.exe
Installing winutils
Let’s download the winutils.exe and configure our Spark installation to find winutils.exe .
Create a hadoop\bin folder inside the SPARK_HOME folder.
Download the winutils.exe for the version of hadoop against which your Spark installation was built for. In my case the hadoop version was 2.6.0. So I downloaded the winutils.exe for hadoop 2.6.0 and copied it to the hadoop\bin folder in the SPARK_HOME folder.
Create a system environment variable in Windows called SPARK_HOME that points to the SPARK_HOME folder path. Search the internet in case you need a refresher on how to create environment variables in your version of Windows such as articles like these.
Create another system environment variable in Windows called HADOOP_HOME that points to the hadoop folder inside the SPARK_HOME folder.
Since the hadoop folder is inside the SPARK_HOME folder, it is better to create HADOOP_HOME environment variable using a value of %SPARK_HOME%\hadoop . That way you don’t have to change HADOOP_HOME if SPARK_HOME is updated.
If you now run the bin\pyspark script from a Windows Command Prompt, the error messages related to winutils.exe should be gone. For example, I got the following messages after running the bin\pyspark utility after configuring winutils
The bin\spark-submit utility can also be successfully used to run wordcount.py script.
Configuring the log level for Spark
There are still a lot of extra INFO messages in the console everytime you start or exit from a PySpark shell or run the spark-submit utility. So let’s make one more change to our Spark installation so that only warning and error messages are written to the console. In order to do this
Copy the log4j.properties.template file in the SPARK_HOME\conf folder as log4j.properties file in the SPARK_HOME\conf folder.
Set the log4j.rootCategory property value to WARN, console
Save the log4j.properties file.
Now any informative messages will not be logged to the console. For example, I got the following messages after running the bin\pyspark utility once I configured the log level to WARN .
Summary
In order to work with PySpark, start a Windows Command Prompt and change into your SPARK_HOME directory.
To start a PySpark shell, run the bin\pyspark utility. Once your are in the PySpark shell use the sc and sqlContext names and type exit() to return back to the Command Prompt.
To run a standalone Python script, run the bin\spark-submit utility and specify the path of your Python script as well as any arguments your Python script needs in the Command Prompt. For example, to run the wordcount.py script from examples directory in your SPARK_HOME folder, you can run the following command
bin\spark-submit examples\src\main\python\wordcount.py README.md
References
I used the following references to gather information about this post.
Downloading Spark and Getting Started (chapter 2) from O’Reilly’s Learning Spark book.
Any suggestions or feedback? Leave your comments below.
How to install PySpark locally

Here I’ll go through step-by-step to install pyspark on your laptop locally.
Steps:
1. Install Python
2. Download Spark
3. Install pyspark
4. Change the execution path for pyspark

Step 1. Install Python
If you haven’t had python installed, I highly suggest to install through Anaconda. For how to install it, please go to their site which provides more details.
Anaconda install instruction:
Step 2. Download Spark
Spark is an open source project under Apache Software Foundation. Spark can be downloaded here:
First, choose a Spark release. If you don’t have an preference, the latest version is always recommended. Second, choose pre-build for Apache Hadoop. Third, click the download link and download. After installation, recommend to move the file to your home directory and maybe rename it to a shorter name such as spark. Now the spark file should be located here.
Step 3. Install pyspark
Now we are going to install pip. Pip is a package management system used to install and manage python packages for you. After you had successfully installed python, go to the link below and install pip.
After installing pip, you should be able to install pyspark now. Now run the command below and install pyspark.
Step 4. Change the execution path for pyspark
Under your home directory, find a file named .bash_profile or .bashrc or .zshrc. This name might be different in different operation system or version. Google it and find your bash shell startup file. Since this is a hidden file, you might also need to be able to visualize hidden files. Again, ask Google! Assume you have success until now, open the bash shell startup file and past the script below.
Save it and launch your terminal. Run the command below to test.
You should be able to see this:
Congrats! You have successfully installed PySpark on your computer.
Installation
PySpark is included in the official releases of Spark available in the Apache Spark website. For Python users, PySpark also provides pip installation from PyPI. This is usually for local usage or as a client to connect to a cluster instead of setting up a cluster itself.
This page includes instructions for installing PySpark by using pip, Conda, downloading manually, and building from the source.
Python Version Supported
Python 3.6 and above.
Using PyPI
PySpark installation using PyPI is as follows:
If you want to install extra dependencies for a specific component, you can install it as below:
For PySpark with/without a specific Hadoop version, you can install it by using PYSPARK_HADOOP_VERSION environment variables as below:
The default distribution uses Hadoop 3.2 and Hive 2.3. If users specify different versions of Hadoop, the pip installation automatically downloads a different version and use it in PySpark. Downloading it can take a while depending on the network and the mirror chosen. PYSPARK_RELEASE_MIRROR can be set to manually choose the mirror for faster downloading.
It is recommended to use -v option in pip to track the installation and download status.
Supported values in PYSPARK_HADOOP_VERSION are:
without : Spark pre-built with user-provided Apache Hadoop
2.7 : Spark pre-built for Apache Hadoop 2.7
3.2 : Spark pre-built for Apache Hadoop 3.2 and later (default)
Note that this installation way of PySpark with/without a specific Hadoop version is experimental. It can change or be removed between minor releases.
Using Conda
Conda is an open-source package management and environment management system which is a part of the Anaconda distribution. It is both cross-platform and language agnostic. In practice, Conda can replace both pip and virtualenv.
Create new virtual environment from your terminal as shown below:
After the virtual environment is created, it should be visible under the list of Conda environments which can be seen using the following command:
Now activate the newly created environment with the following command:
You can install pyspark by Using PyPI to install PySpark in the newly created environment, for example as below. It will install PySpark under the new virtual environment pyspark_env created above.
Alternatively, you can install PySpark from Conda itself as below:
However, note that PySpark at Conda is not necessarily synced with PySpark release cycle because it is maintained by the community separately.
Manually Downloading
PySpark is included in the distributions available at the Apache Spark website. You can download a distribution you want from the site. After that, uncompress the tar file into the directory where you want to install Spark, for example, as below:
Ensure the SPARK_HOME environment variable points to the directory where the tar file has been extracted. Update PYTHONPATH environment variable such that it can find the PySpark and Py4J under SPARK_HOME/python/lib . One example of doing this is shown below:
Installing from Source
To install PySpark from source, refer to Building Spark.


