- Learn Russian
- Learn Russian
- Installing russian keyboard windows
- How to activate standard Russian Keyboard layout
- Russian layout for Windows XP/2003
- Russiant keyboard layout for Windows 7 or Vista
- Russiant keyboard layout for Windows 8
- Russiant keyboard layout for Windows 10
- Typing Russian when system tune-up cannot be done: at work or in a hotel’s business center Windows or Mac computer
Learn Russian
Take the steps below to install the Cyrillic keyboard for Windows Vista on your system.
To be able to activate the Cyrillic keyboard for Windows Vista, you need to install the Russian Language Pack. Open Windows Update by clicking «Start» → «Control Panel» → «System and Security» → «Windows Update«.
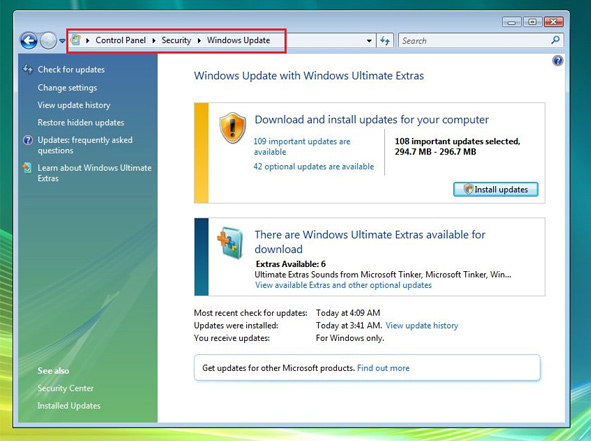
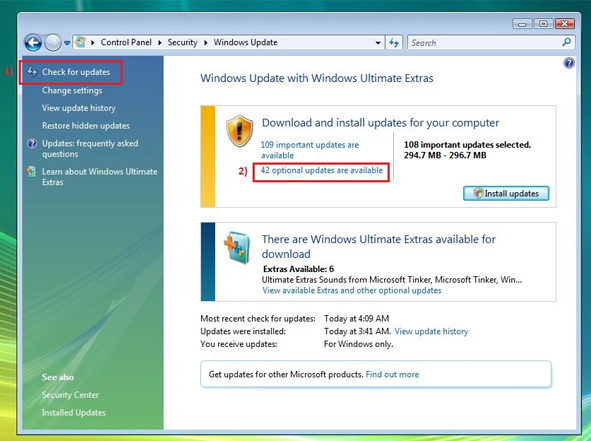
Click «Check for update«. Wait for the check to complete and click «Optional updates are available«.
In the window that opens locate «Russian Language Pack«.
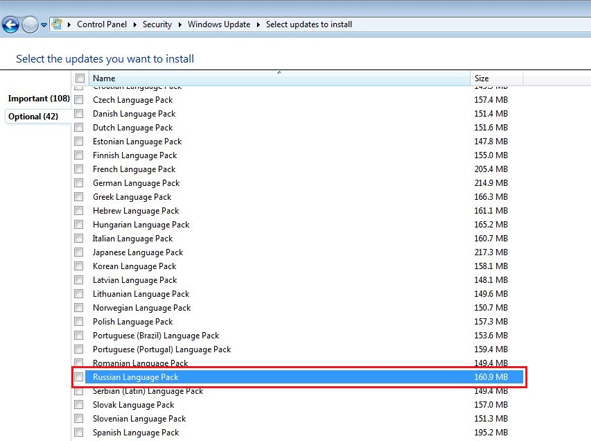
Check it and click «OK«.
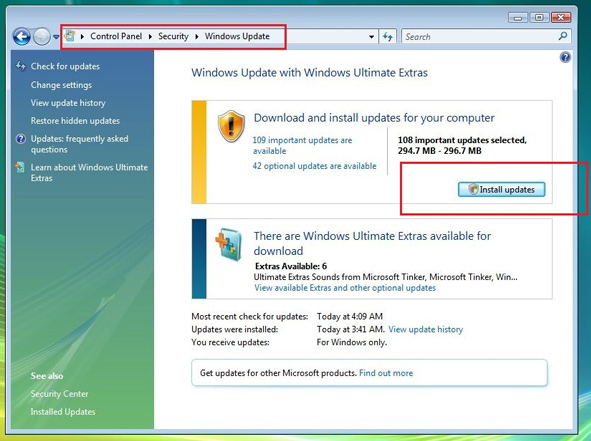
Click «Install update«.
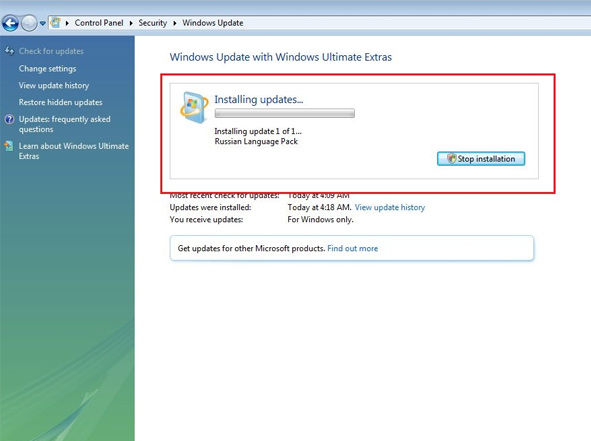
Wait for the update to install.
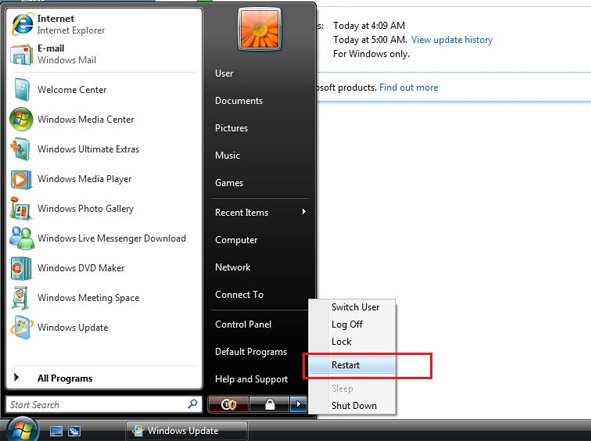
Restart your computer before taking further steps to activate Cyrillic keyboard for Windows Vista.
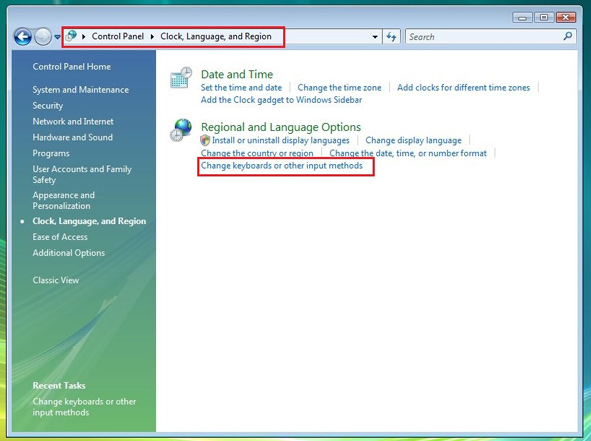
Open regional settings by clicking «Start» → «Control Panel» → «Clock, Language, and Region» and click «Change keyboards or other input methods«.
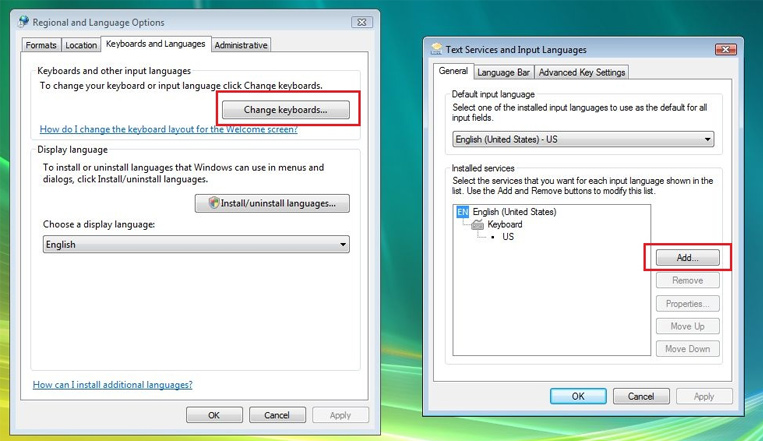
In the next window click «Change keyboards«. In the window that opens click «Add…«.
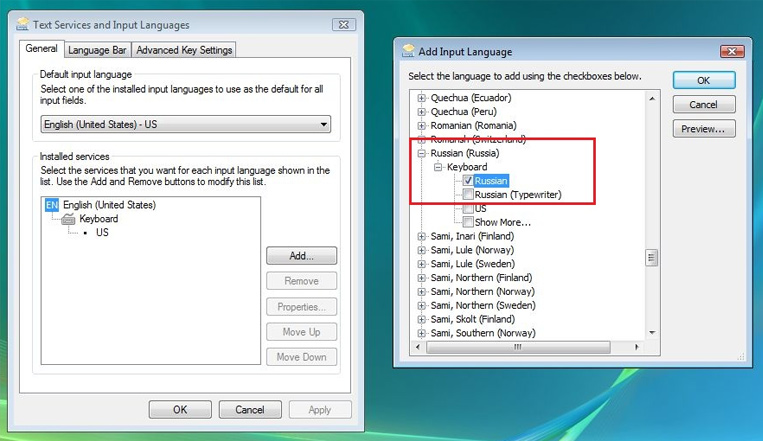
Activate Cyrillic keyboard for Windows Vista by clicking «Russia» → «Keyboards» → «Russia«.
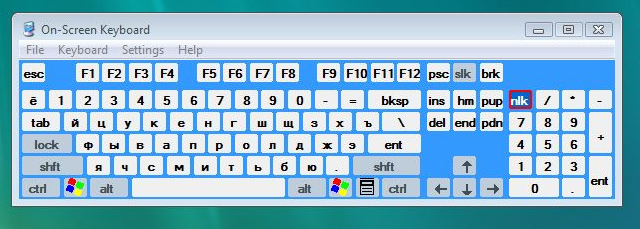
If your keyboard does not have Cyrillic characters on it, you can use the on-screen keyboard. Click «Start» → «All Programs» → «Accessories» → «Ease of Access» → «On-Screen Keyboard«. Use your standard method of switching between languages to change the layout from or to Cyrillic keyboard for Windows Vista.
Learn Russian
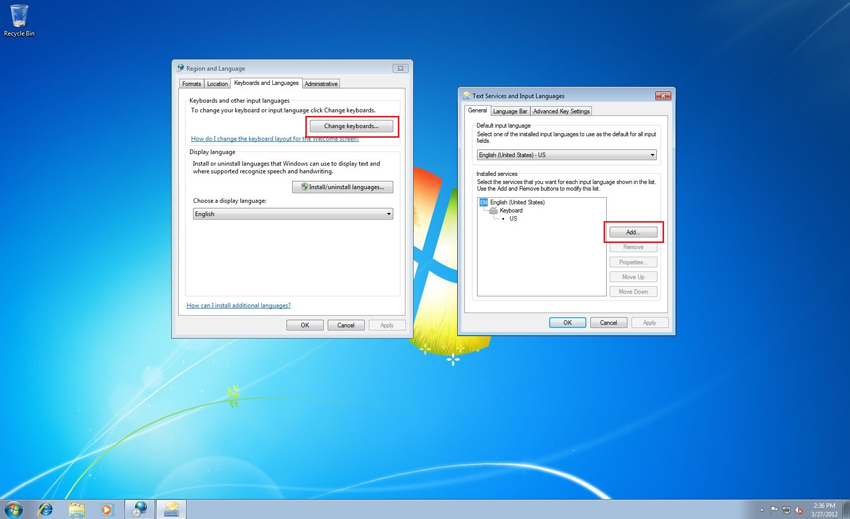
Activate the Cyrillic keyboard for Windows 7 layout by following these steps:
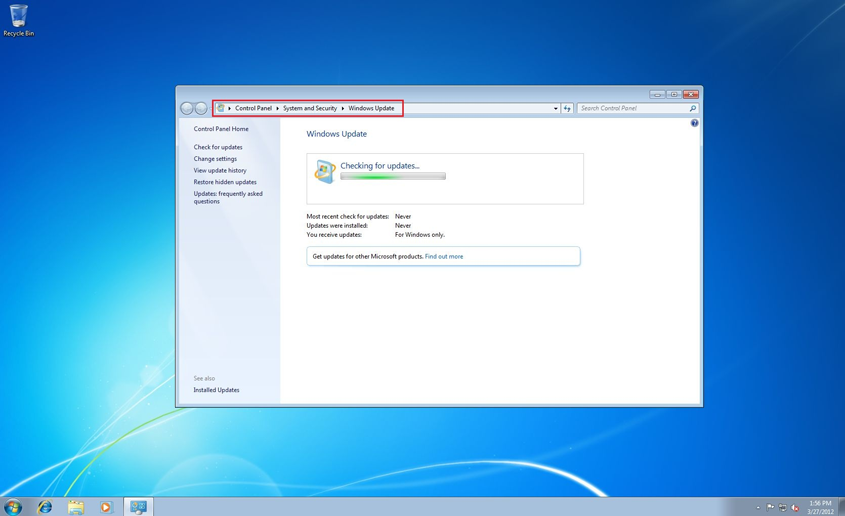
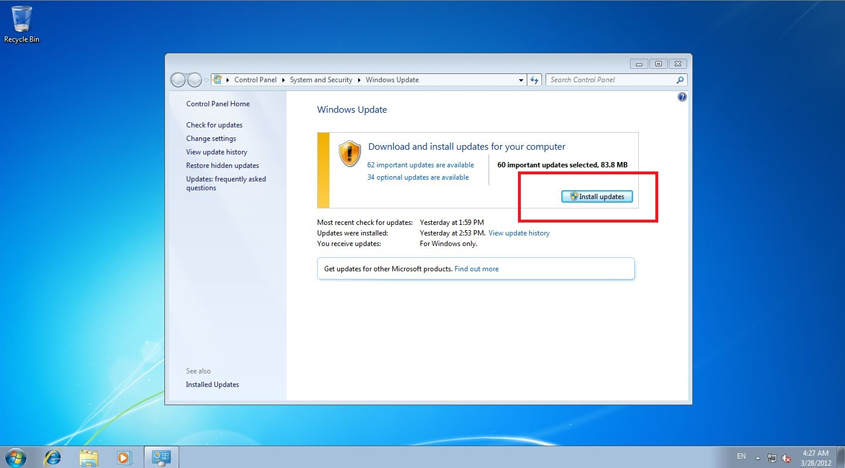
You must first install the Russian Language Pack. In a new window open Windows Update «Start» → «Control Panel» → «System and Security» → «Windows Update«
Click on «Check for update».
Wait until the update process finishes and click on «optional updates are available«.
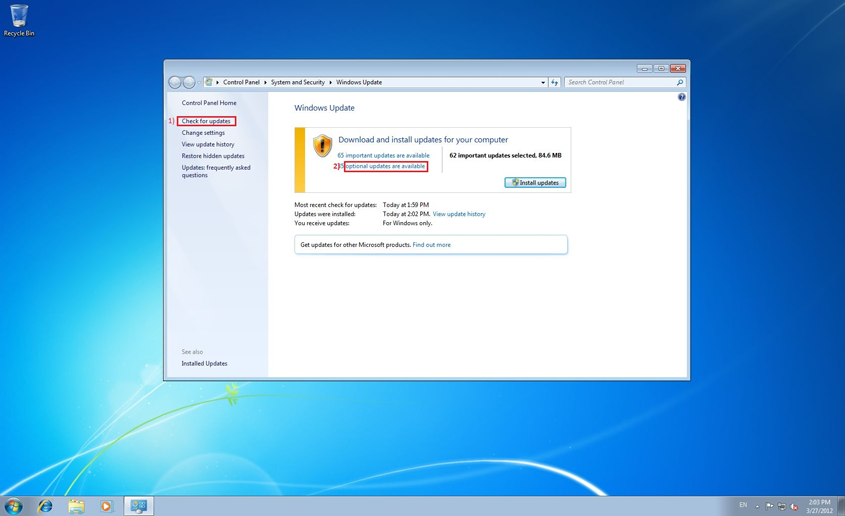
In the new window that opens find the «Russian Language Pack –Windows 7 Service Pack 1 (KB2483139)» update.

The next step to activate the Cyrillic keyboard for Windows 7 is to install the update. For that, check the empty box next to it and click «OK«.
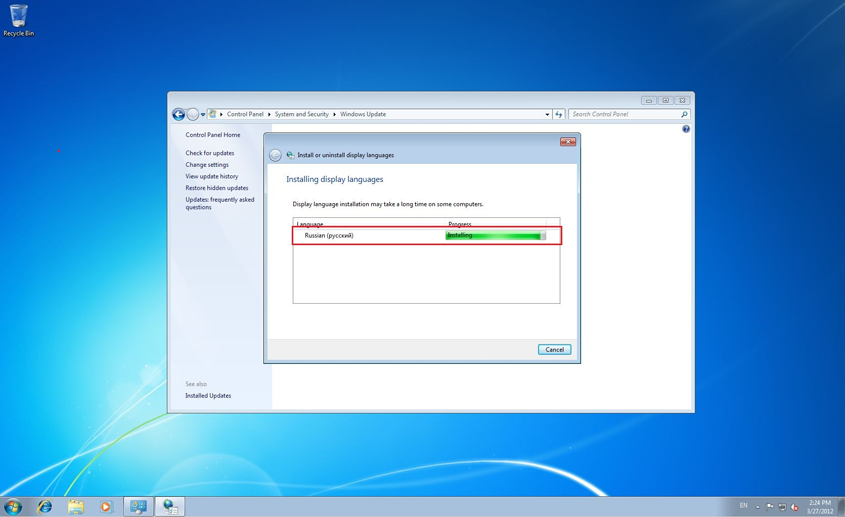
Click on «Install update«.
Wait for the installation process to complete.
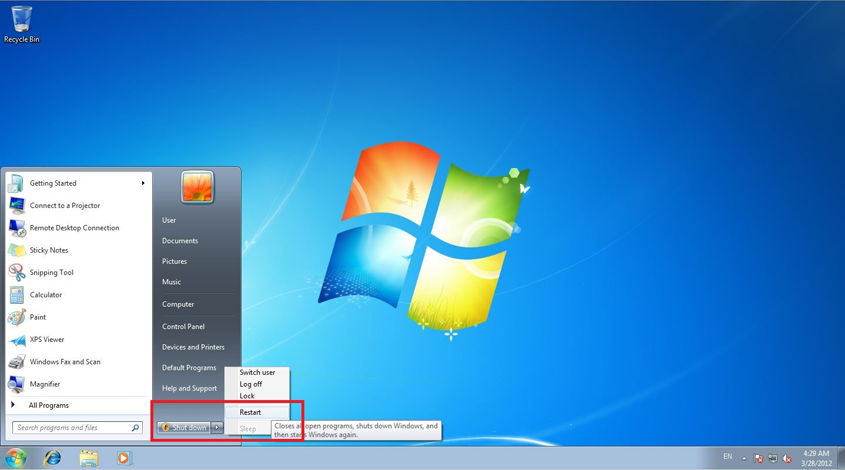
Restart your computer. «Start» → «Shut down» → «Restart«.
You are just one step away from activating the Cyrillic keyboard for Windows 7! Go to your Regional Settings. «Start» → «Control Panel» → «Clock, Language, and Region» and click on «Change keyboards or other input methods«.
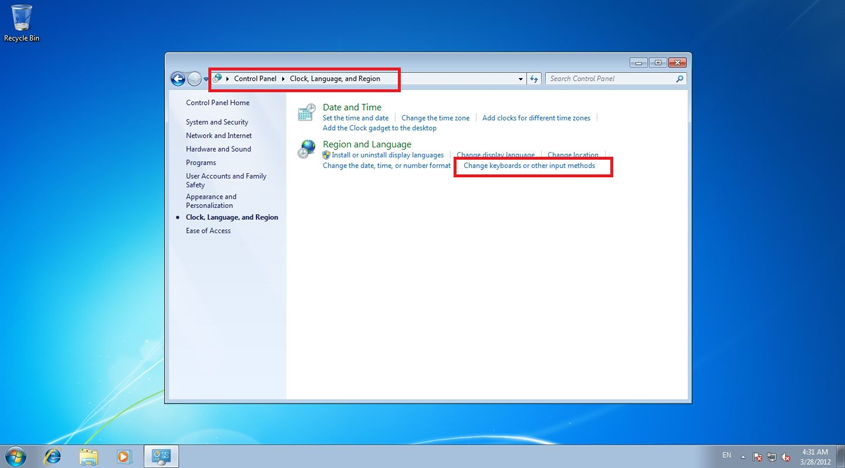
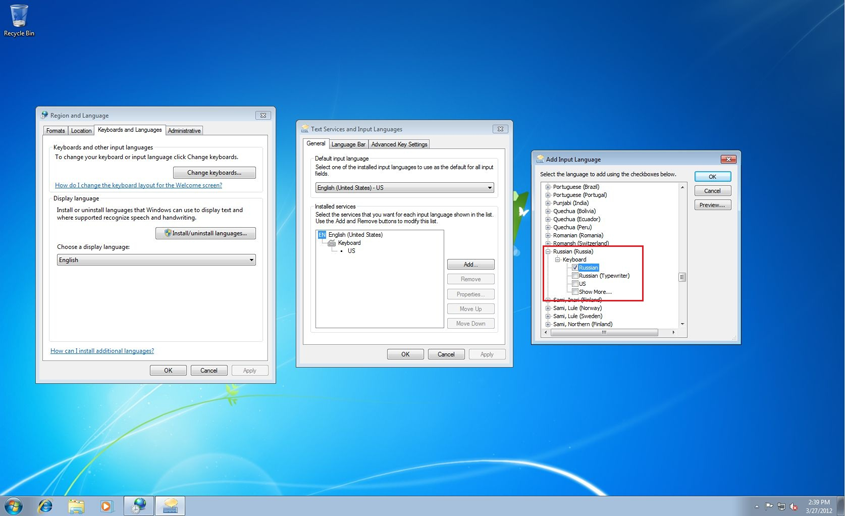
In the new window that opens click on «Change Keyboards«. In the new window that opens click on «Add…«
Activate Russian (Cyrillic keyboard for Windows 7) layout. «Russian» → «Keyboards» → «Russian«.
If your keyboard doesn’t have Cyrillic letters on it, you can use the virtual keyboard instead. For that, go to «Start» → «All Programs» → «Accessories» → «Ease of Access» → «On-Screen Keyboard«.
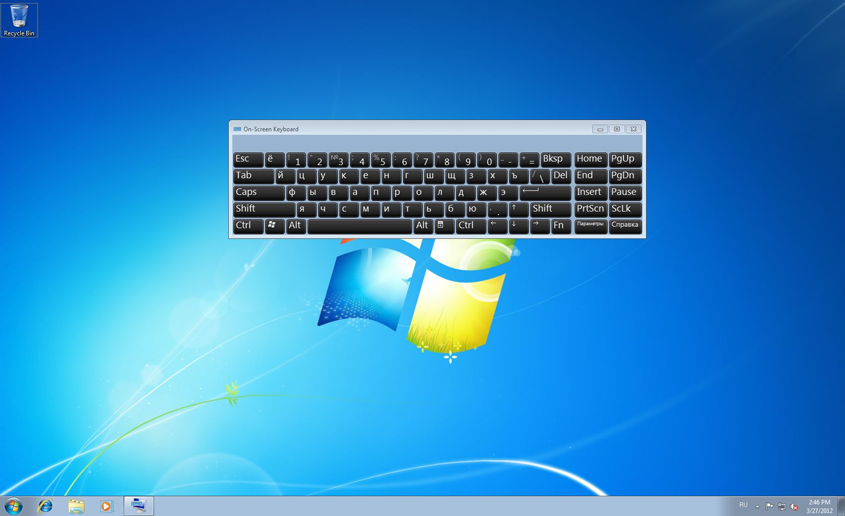
You can switch between the languages just like you would do on a fixed keyboard.
The installation of the Cyrillic keyboard for Windows 7 is now completed! You are now ready to use the Cyrillic keyboard for Windows 7 on your computer.
Installing russian keyboard windows
This page is a part of my site’s Chapter
Keyboard layout specifies how letters and symbols are located on the keyboard buttons for a given .
For example, when Input Language is English (shows as «EN» in the taskbar), Windows offers a set of layouts to choose from:
- US English
- Dvorak
- .
That is, for a given Input Language, system could offer several different layouts (different location of letters and symbols).
Here is Microsoft page that shows the layouts for each and every Input Language in the OOB system: http://www.microsoft.com/globaldev/reference/keyboards.mspx
A user opens Keyboard Layouts section of Control Panel if there is a need to add a layout or to check that desired layout is selected as active for an Input Language
(for example, check if it’s «US English» and not for «EN» if errouneously Shift-2 gives a quote instead of ‘@’)
Also, if user finds that say something is wrong/strange in the typing, s/he may want to visit that section to make sure that only one layout is selected for the Input Language.
The system must be presented with only one active layout per language otherwise how Windows would know what symbol to show when a button is pressed .
The steps needed to access Keyboard Layout section of Control Panel do vary from one Windows version to another and all variants are listed below. The steps use standard Russian Keyboard layout as an example ( «RU» becomes available in the taskbar via Alt+Shift switch from «EN»), but they are the same for any other European language.
Note. Windows offers two Russian keyboard layouts in OOB system (as you can see on Microsoft page mentioned above):
- standard, regular one called «Russian»
- alternative — «Russian, Typewriter» where digits are typed via Shift as on old mechanical typewriters in USSR.
Here is how standard, regular Russian keyboard layout looks like (location of letters and symbols — in red ):
How to activate standard Russian Keyboard layout
Russian layout for Windows XP/2003
- Start / Control Panel
(or if it’s Classic View — Start / Settings / Control Panel) - click Regional and Language Options
- open Languages section
- click Details in the «Text Services and Input Languages» frame
- click Add in the «Installed Services» frame
- find «Russian» in the list of Input Languages and click OK
- place a check mark at the next option «Keyboard layout»
(now you can see the list of available layouts and see by yourself that there is another layout for )
Important! This is all you need to do to be able to type in Russian. You should not use option on that screen, that is, do not choose Russian layout as your default.
As it was noted above, if you see not one but several layouts in the list of active layouts for Russian, then you must remove unneeded ones and leave only one layout active for Russian language.
click Apply down below at the right and Windows finds a layout file of standard Russian kbdru.dll .
The default method to switch keyboard from English typing («EN») to Russian typing («RU») is via (this key combination is listed on the same Layouts screen, just click on to see all available combinations.
Now you can switch your keybord to «RU» and start typing Russian Cyrillic!
Note. The steps above are for your own computer where you can perform such tune-up.
But you can type Russian even if you are in the businees center of a hotel and computer there does not allow any tune-up:
there are Web pages with so called «Virtual Russian Keyboard» that emulates your «home» input to let you type as you got used to.
See the information at the #v1 of this page.
Russiant keyboard layout for Windows 7 or Vista
- Start / Control Panel / Clock, Language, Region
- double-click on Regional and Language Options
- find «Keyboard and Languages» tab there
- click «Change Keyboard»
- click Add (
- find «Russian» in the list of languages and click ‘+’ to see the list of the layouts to choose from for «RU»
- click on «Russian» in that list of layouts (it’s standard, regular Russian layout) to add this layout as active for «RU»
Important! This is all you need to do to be able to type in Russian. You should not use option on that screen, that is, do not choose Russian layout as your default.
As it was noted above, if you see not one but several layouts in the list of active layouts for Russian, then you must remove unneeded ones and leave only one layout active for Russian language.
click Apply down below at the right and Windows finds a layout file of standard Russian kbdru.dll .
The default method to switch keyboard from English typing («EN») to Russian typing («RU») is via (this key combination is listed on the same Layouts screen, just click on to see all available combinations.
Now you can switch your keybord to «RU» and start typing Russian Cyrillic!
Note. The steps above are for your own computer where you can perform such tune-up.
But you can type Russian even if you are in the businees center of a hotel and computer there does not allow any tune-up:
there are Web pages with so called «Virtual Russian Keyboard» that emulates your «home» input to let you type as you got used to.
See the information at the #v2 of this page.
Russiant keyboard layout for Windows 8
- Control Panel — Language
- click «Add language»
- find Russian («русский») in the list of languages anden click on that ‘square’ to select. Then click «Add» down below that screen.
- now you are back to the screen with the list of active Input Languages and is now also in that list (where «English» is at the top of the list).
When you add Russian Input Language, the system automatically, by default, selected standard, regular Russian keyboard layout to be used for «RU».
To see other available Russian keyboard layouts, click «Options» at the right
Important! This is all you need to do to be able to type in Russian. You should not use option on that screen, that is, do not choose Russian layout as your default.
As it was noted above, if you see not one but several layouts in the list of active layouts for Russian, then you must remove unneeded ones and leave only one layout active for Russian language.
The way to switch keyboard from English typing («EN») to Russian typing («RU») is to press or to press pressing
Now you can switch your keybord to «RU» and start typing Russian Cyrillic!
Note. The steps above are for your own computer where you can perform such tune-up.
But you can type Russian even if you are in the businees center of a hotel and computer there does not allow any tune-up:
there are Web pages with so called «Virtual Russian Keyboard» that emulates your «home» input to let you type as you got used to.
See the information at the #v4 of this page.
Russiant keyboard layout for Windows 10
- Open the Start Menu and click on «Settings.» Within «Settings,» click on «Time & language.»
- Within «Time & language,» click on «Region & language» in the left sidebar. In the main part of the screen, click «Add a language.»
- This will bring up a list of all the languages you can install on your system. Scroll to the right until you find «Russian.» Once you click on it, you’re done with the installation
Important! This is all you need to do to be able to type in Russian. You should not use option on that screen, that is, do not choose Russian layout as your default.
As it was noted above, if you see not one but several layouts in the list of active layouts for Russian, then you must remove unneeded ones and leave only one layout active for Russian language.
The way to switch keyboard from English typing («EN») to Russian typing («RU») is to press or to press pressing
Now you can switch your keybord to «RU» and start typing Russian Cyrillic!
Note. The steps above are for your own computer where you can perform such tune-up.
But you can type Russian even if you are in the businees center of a hotel and computer there does not allow any tune-up:
there are Web pages with so called «Virtual Russian Keyboard» that emulates your «home» input to let you type as you got used to.
See the information at the #v5 of this page.
Typing Russian when system tune-up cannot be done:
at work or in a hotel’s business center Windows or Mac computer
If you need to write in Russian, but you are not using your own PC, say you are in an Internet-cafe or in the library, where you can read Russian but can not can not use Windows Control Panel to enable regular keyboard tools for Russian, then it’s still Ok, there is an easy
you can use special Web page with a Virtual Keyboard where you can input Cyrillic text (using mouse or physical keyboard) and then copy it to the place where you need it.
That is, even in that case you should not send a transliteration, latin text such as «privet» or that will bother the readers of that no, you can send normal Cyrillic text.
Virtual Keyboard allows you to input via regular keyboard (though mouse can be used, too) you can type choosing, in the menu below the image, same layout that you use (Standard or Phonetic explained in a parent page of this one)
While in Internet-cafe, you can use a short address of that Virtual Keyboard:
- TypeRus.com (=http://winrus.com/keyboard.htm)
Obviously, it’s not as handy as typing with regular Windows or Mac keyboard tools, so you should use such special Web page only in such as or library (or if you need to type Russian not too often).
That is, if it’s your own computer at home then you should spend 20 to read the instruction on this page, for regular Windows keyboard tools activation via Control Panel.
modify it as you wish while the layouts on the Keyboard Web page are not modifiable.


