- The Rust Programming Language
- Установка
- Нотация командной строки
- Установка rustup на Linux или macOS
- Установка rustup на Windows
- Обновление и удаление
- Устранение возможных ошибок
- Локальная документация
- The Rust Programming Language
- Installation
- Command Line Notation
- Installing rustup on Linux or macOS
- Installing rustup on Windows
- Updating and Uninstalling
- Troubleshooting
- Local Documentation
- Set up your dev environment on Windows for Rust
- Install Visual Studio (recommended) or the Microsoft C++ Build Tools
- Install Rust
- Install Visual Studio Code
- Hello, world! tutorial (Rust with VS Code)
- Rust for Windows
The Rust Programming Language
Установка
Первым шагом является установка Rust. Мы загрузим Rust, используя инструмент командной строки rustup , предназначенный для управлениями версиями Rust и другими связанными с ним инструментами. Вам понадобится интернет соединение для его загрузки.
Замечание: Если вы предпочтёте не использовать rustup по какой-то причине, пожалуйста, ознакомьтесь с другими вариантами на с странице the Rust installation page.
Следующие шаги устанавливают последнюю стабильную версию компилятора Rust. Стабильность Rust гарантирует, что все примеры в книге, которые компилируются, будут продолжать компилироваться с более новыми версиями Rust. Вывод может немного отличаться между версиями, потому что Rust часто улучшает сообщения об ошибках и предупреждения. Другими словами, любая более новая стабильная версия Rust, которую вы устанавливаете с помощью этих шагов, должна работать должным образом с содержанием этой книги.
Нотация командной строки
В данной главе и потом во всей книге мы покажем некоторые команды в терминале командной строки. Строки, которые нужно ввести в терминале, начинаются с $ . Вам не нужно вводить сам символ $ ; он только отображает, что это начало каждой команды. Строки, которые НЕ начинаются с $ , обычно показывают вывод предыдущей команды. В дополнение, специфичные для PowerShell примеры используют символ > вместо символа $ .
Установка rustup на Linux или macOS
Если вы используете Linux или macOS, пожалуйста, выполните следующую команду:
Команда скачивает скрипт и начинает установку инструмента rustup , одновременно с установкой последней стабильной версии Rust. Вас могут запросить ввести локальный пароль. При успешной установке вы увидите следующий вывод:
Дополнительно, вам нужен какой-то вариант программы «линковщика». Возможно какой-то у вас уже установлен, но если при попытке компиляции Rust программы вы получаете ошибки, что «линковщик» не смог выполнится, то это означает, что он не установлен в системе и вам необходимо установить его вручную. Компиляторы языка C обычно имеют в своём составе корректный линковщик. Поищите как установить на вашу платформу компилятор языка C. Также, некоторые общие Rust пакеты зависят от C кода и им тоже будет необходим компилятор C. Так что, имеет смысл его поставить сейчас.
Установка rustup на Windows
Для Windows, посетите ссылку https://www.rust-lang.org/tools/install и следуйте инструкциям для установки Rust. На некотором шаге установки вы можете получить сообщение, объясняющее необходимость инструментов сборки C++ для Visual Studio 2013 или более поздней версии. Самый простой способ получить их это инсталлировать Build Tools for Visual Studio 2019. Когда вас спросят, какие рабочие нагрузки установить, убедитесь, что выбраны «C++ build tools» и что включены Windows 10 SDK и компоненты пакета английского языка.
Остальные часть этой книги используют команды, работающие как в cmd.exe, так и в PowerShell. Есть некоторые отличия, которые мы объясним.
Обновление и удаление
После установки Rust с помощью rustup , обновление на последние версии выполняется с помощью следующего простого скрипта командой:
Чтобы удалить Rust и rustup , выполните
следующую команду:
Устранение возможных ошибок
Чтобы проверить, правильно ли у вас установлен Rust, откройте оболочку и введите эту строку:
Вы должны увидеть номер версии, хэш коммита и дату выпуска последней стабильной версии в следующем формате:
Если вы видите данную информацию, то вы установили всё успешно. Если нет и вы используете Windows, проверьте что путь к Rust находится в системной переменной %PATH% . Если он корректный, но Rust все ещё не работает, то есть множество мест, где можно получить помощь. Самое простое это канал #beginners официального Rust Discord сервера. Там можно списаться в другими пользователями Rust (Rustaceans — как мы себя называем) которые могут помочь. Другие хорошие ресурсы включают пользовательский форум и ресурс Stack Overflow.
Локальная документация
Установка Rust также включает локальную копию документации, поэтому вы можете читать её в автономном режиме. Запустите rustup doc , чтобы открыть локальную документацию в вашем браузере.
Каждый раз, когда тип или функция предоставляется из стандартной библиотеки и вы не знаете, что они делают или как их использовать, используйте документацию по интерфейсу прикладного программирования (API), чтобы узнать это!
The Rust Programming Language
Installation
The first step is to install Rust. We’ll download Rust through rustup , a command line tool for managing Rust versions and associated tools. You’ll need an internet connection for the download.
Note: If you prefer not to use rustup for some reason, please see the Rust installation page for other options.
The following steps install the latest stable version of the Rust compiler. Rust’s stability guarantees ensure that all the examples in the book that compile will continue to compile with newer Rust versions. The output might differ slightly between versions, because Rust often improves error messages and warnings. In other words, any newer, stable version of Rust you install using these steps should work as expected with the content of this book.
Command Line Notation
In this chapter and throughout the book, we’ll show some commands used in the terminal. Lines that you should enter in a terminal all start with $ . You don’t need to type in the $ character; it indicates the start of each command. Lines that don’t start with $ typically show the output of the previous command. Additionally, PowerShell-specific examples will use > rather than $ .
Installing rustup on Linux or macOS
If you’re using Linux or macOS, open a terminal and enter the following command:
The command downloads a script and starts the installation of the rustup tool, which installs the latest stable version of Rust. You might be prompted for your password. If the install is successful, the following line will appear:
Additionally, you’ll need a linker of some kind. It’s likely one is already installed, but when you try to compile a Rust program and get errors indicating that a linker could not execute, that means a linker isn’t installed on your system and you’ll need to install one manually. C compilers usually come with the correct linker. Check your platform’s documentation for how to install a C compiler. Also, some common Rust packages depend on C code and will need a C compiler. Therefore, it might be worth installing one now.
Installing rustup on Windows
On Windows, go to https://www.rust-lang.org/tools/install and follow the instructions for installing Rust. At some point in the installation, you’ll receive a message explaining that you’ll also need the C++ build tools for Visual Studio 2013 or later. The easiest way to acquire the build tools is to install Build Tools for Visual Studio 2019. When asked which workloads to install make sure «C++ build tools» is selected and that the Windows 10 SDK and the English language pack components are included.
The rest of this book uses commands that work in both cmd.exe and PowerShell. If there are specific differences, we’ll explain which to use.
Updating and Uninstalling
After you’ve installed Rust via rustup , updating to the latest version is easy. From your shell, run the following update script:
To uninstall Rust and rustup , run the following uninstall script from your shell:
Troubleshooting
To check whether you have Rust installed correctly, open a shell and enter this line:
You should see the version number, commit hash, and commit date for the latest stable version that has been released in the following format:
If you see this information, you have installed Rust successfully! If you don’t see this information and you’re on Windows, check that Rust is in your %PATH% system variable. If that’s all correct and Rust still isn’t working, there are a number of places you can get help. The easiest is the #beginners channel on the official Rust Discord. There, you can chat with other Rustaceans (a silly nickname we call ourselves) who can help you out. Other great resources include the Users forum and Stack Overflow.
Local Documentation
The installation of Rust also includes a copy of the documentation locally, so you can read it offline. Run rustup doc to open the local documentation in your browser.
Any time a type or function is provided by the standard library and you’re not sure what it does or how to use it, use the application programming interface (API) documentation to find out!
Set up your dev environment on Windows for Rust
In the Overview of developing on Windows with Rust topic, we introduced Rust and talked about what it is and what some of its main moving parts are. In this topic, we’ll set up our development environment.
We recommend that you do your Rust development on Windows. However, if you plan to locally compile and test on Linux, then developing with Rust on the Windows Subsystem for Linux (WSL) is also an option.
Install Visual Studio (recommended) or the Microsoft C++ Build Tools
On Windows, Rust requires certain C++ build tools.
You can either download the Microsoft C++ Build Tools, or (recommended) you might prefer just to install Microsoft Visual Studio.
We’ll be using Visual Studio Code as our integrated development environment (IDE) for Rust, and not Visual Studio. But you can still install Visual Studio without expense. A Community edition is available—it’s free for students, open-source contributors, and individuals.
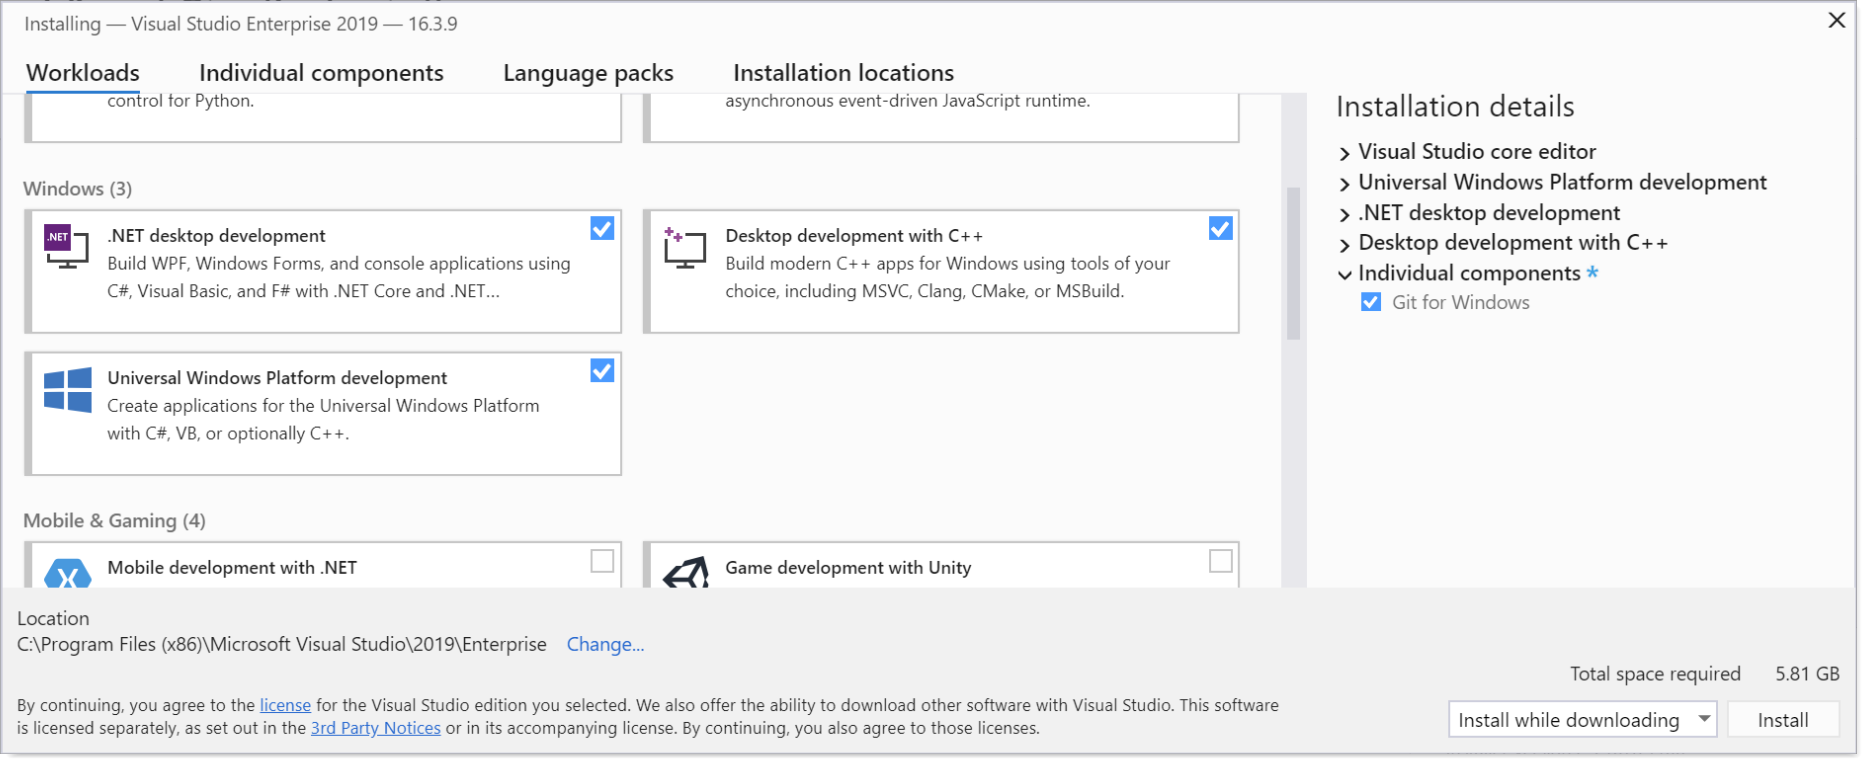
While installing Visual Studio, there are several Windows workloads that we recommend you select—.NET desktop development, Desktop development with C++, and Universal Windows Platform development. You might not think that you’ll need all three, but it’s likely enough that some dependency will arise where they’re required that we feel it’s just simpler to select all three.
New Rust projects default to using Git. So also add the individual component Git for Windows to the mix (use the search box to search for it by name).
Install Rust
Next, install Rust from the Rust website. The website detects that you’re running Windows, and it offers you 64- and 32-bit installers of the rustup tool for Windows, as well as instructions on installing Rust to the Windows Subsystem for Linux (WSL).
Rust works very well on Windows; so there’s no need for you to go the WSL route (unless you plan to locally compile and test on Linux). Since you have Windows, we recommend that you just run the rustup installer for 64-bit Windows. You’ll then be all set to write apps for Windows using Rust.
When the Rust installer is finished, you’ll be ready to program with Rust. You won’t have a convenient IDE yet (we’ll cover that in the next section—Install Visual Studio Code). And you’re not yet set up to call Windows APIs. But you could launch a command prompt (the x64 Native Tools Command Prompt for VS, or any cmd.exe ), and perhaps issue the command cargo —version . If you see a version number printed, then that confirms that Rust installed correctly.
If you’re curious about the use of the cargo keyword above, Cargo is the name of the tool in the Rust development environment that manages and builds your projects (more properly, packages) and their dependencies.
And if you really do want to dive in to some programming at this point (even without the convenience of an IDE), then you could read the Hello, World! chapter of the The Rust Programming Language book on the Rust website.
Install Visual Studio Code
By using Visual Studio Code (VS Code) as your text editor/integrated development environment (IDE), you can take advantage of language services such as code completion, syntax highlighting, formatting, and debugging.
VS Code also contains a built-in terminal that enables you to issue command-line arguments (to issue commands to Cargo, for example).
After you’ve installed VS Code, install the rust-analyzer extension. You can either install the rust-analyzer extension from the Visual Studio Marketplace, or you can open VS Code, and search for rust-analyzer in the extensions menu (Ctrl+Shift+X).
For debugging support, install the CodeLLDB extension. You can either install the CodeLLDB extension from the Visual Studio Marketplace, or you can open VS Code, and search for CodeLLDB in the extensions menu (Ctrl+Shift+X).
An alternative to the CodeLLDB extension for debugging support is the Microsoft C/C++ extenson. The C/C++ extension doesn’t integrate as well with the IDE as CodeLLDB does. But the C/C++ extension provides superior debugging information. So you might want to have that standing by in case you need it.
You can either install the C/C++ extension from the Visual Studio Marketplace, or you can open VS Code, and search for C/C++ in the extensions menu (Ctrl+Shift+X).
If you want to open the terminal in VS Code, select View > Terminal, or alternatively use the shortcut Ctrl+` (using the backtick character). The default terminal is PowerShell.
Hello, world! tutorial (Rust with VS Code)
Let’s take Rust for a spin with a simple «Hello, world!» app.
First, launch a command prompt (the x64 Native Tools Command Prompt for VS, or any cmd.exe ), and cd to a folder where you want to keep your Rust projects.
Then ask Cargo to create a new Rust project for you with the following command.
The argument you pass to the cargo new command is the name of the project that you want Cargo to create. Here, the project name is first_rust_project. The recommendation is that you name your Rust projects using snake case (where words are lower-case, with each space replaced by an underscore).
Cargo creates a project for you with the name that you supply. And in fact Cargo’s new projects contain the source code for a very simple app that outputs a Hello, world! message, as we’ll see. In addition to creating the first_rust_project project, Cargo has created a folder named first_rust_project, and has put the project’s source code files in there.
So now cd into that folder, and then launch VS Code from within the context of that folder.
In VS Code’s Explorer, open the src > main.rs file, which is the Rust source code file that contains your app’s entry point (a function named main). Here’s what it looks like.
When you open the first .rs file in VS Code, you’ll get a notification saying that some Rust components aren’t installed, and asking whether you want to install them. Click Yes, and VS Code will install the Rust language server.
You can tell from glancing at the code in main.rs that main is a function definition, and that it prints the string «Hello, world!». For more details about the syntax, see Anatomy of a Rust Program on the Rust website.
Now let’s try running the app under the debugger. Put a breakpoint on line 2, and click Run > Start Debugging (or press F5). There are also Debug and Run commands embedded inside the text editor.
When you run an app under the debugger for the first time, you’ll see a dialog box saying «Cannot start debugging because no launch configuration has been provided». Click OK to see a second dialog box saying «Cargo.toml has been detected in this workspace. Would you like to generate launch configurations for its targets?». Click Yes. Then close the launch.json file and begin debugging again.
As you can see, the debugger breaks at line 2. Press F5 to continue, and the app runs to completion. In the Terminal pane, you’ll see the expected output «Hello, world!».
Rust for Windows
Not only can you use Rust on Windows, you can also write apps for Windows using Rust. Via the windows crate, you can call any Windows API past, present, and future. There are more details about that, and code examples, in the Rust for Windows, and the windows crate topic.


