- ИТ База знаний
- Полезно
- Навигация
- Серверные решения
- Телефония
- Корпоративные сети
- Как пользоваться утилитой screen в Linux?
- Немножко теории
- Установка screen в Linux
- Установка screen в Ubuntu и Debian
- Установка screen в CentOS и Fedora
- Запуск screen в Linux
- Сессия screen с именем
- Как правильно работать с окнами в Windows
- Выход из screen сессии
- Возврат к screen сессии
- Немножко кастомизации screen под вас
- Типовой сценарий использования screen
- Выводы
- How to Install and Use Linux Screen?
- What Is Linux Screen?
- How to Install and Use Linux Screen?
- Using Linux Screen on Any Linux Distribution
- Working in a New Session
- How to Manage Multiple Sessions Using Linux Screen
- Conclusion
- How to Install and Use Screen on an Ubuntu Cloud Server
- Introduction
- Installation
- Basic Usage
- Managing Screen Sessions
- Managing Terminals Within Screen
- Screen Regions
- Using Byobu
ИТ База знаний
Курс по Asterisk
Полезно
— Узнать IP — адрес компьютера в интернете
— Онлайн генератор устойчивых паролей
— Онлайн калькулятор подсетей
— Калькулятор инсталляции IP — АТС Asterisk
— Руководство администратора FreePBX на русском языке
— Руководство администратора Cisco UCM/CME на русском языке
— Руководство администратора по Linux/Unix
Навигация
Серверные решения
Телефония
FreePBX и Asterisk
Настройка программных телефонов
Корпоративные сети
Протоколы и стандарты
Как пользоваться утилитой screen в Linux?
Окно в «новую жизнь»
Сейчас вы точно прочувствуете важное команды screen . Бывало ли у вас такое, что вы выполняете (очень долго) команду в консоли — CLI на удаленной машине, будучи подключенным через SSH? Команда долго выполняется и близится к завершению как вдруг пропадает подключение, рвется SSH подключение и все, что вы делали — пропало?
Мини — курс по виртуализации
Знакомство с VMware vSphere 7 и технологией виртуализации в авторском мини — курсе от Михаила Якобсена

Прости, что напомнили. Знаем, это болезненно. Что же, вытрем слезы. Для этих ситуаций есть команда screen о которой мы и поговорим.
Немножко теории
Так называемый screen это терминальный мультиплексор (нас тоже пугает это слово). Другими словами, оно дает нам возможность внутри действующей сессии открыть сколько угодно много виртуальных окон/терминалов. Что важно — процесс, запущенный внутри сессии через screen, будет продолжаться даже тогда, когда вы отключитесь от самой первой сессии.
Установка screen в Linux
Вообще, пакет screen предустановлен на большинстве современных Linux — дистров. Проверить можно командой:

Если случилось так, что у вас его нет — это можно быстро исправить простой установкой.
Установка screen в Ubuntu и Debian
Установка screen в CentOS и Fedora
Запуск screen в Linux
Чтобы запустить screen в консоли, просто наберите screen . Что может быть проще, не правда ли?
У вас откроется новая сессия в новом окне. Уже здесь вы можете вводить все нужные shell команды. Находясь в режиме скрина (screen) вы можете посмотреть список доступных вам команд управления этим режимом. Вот так:
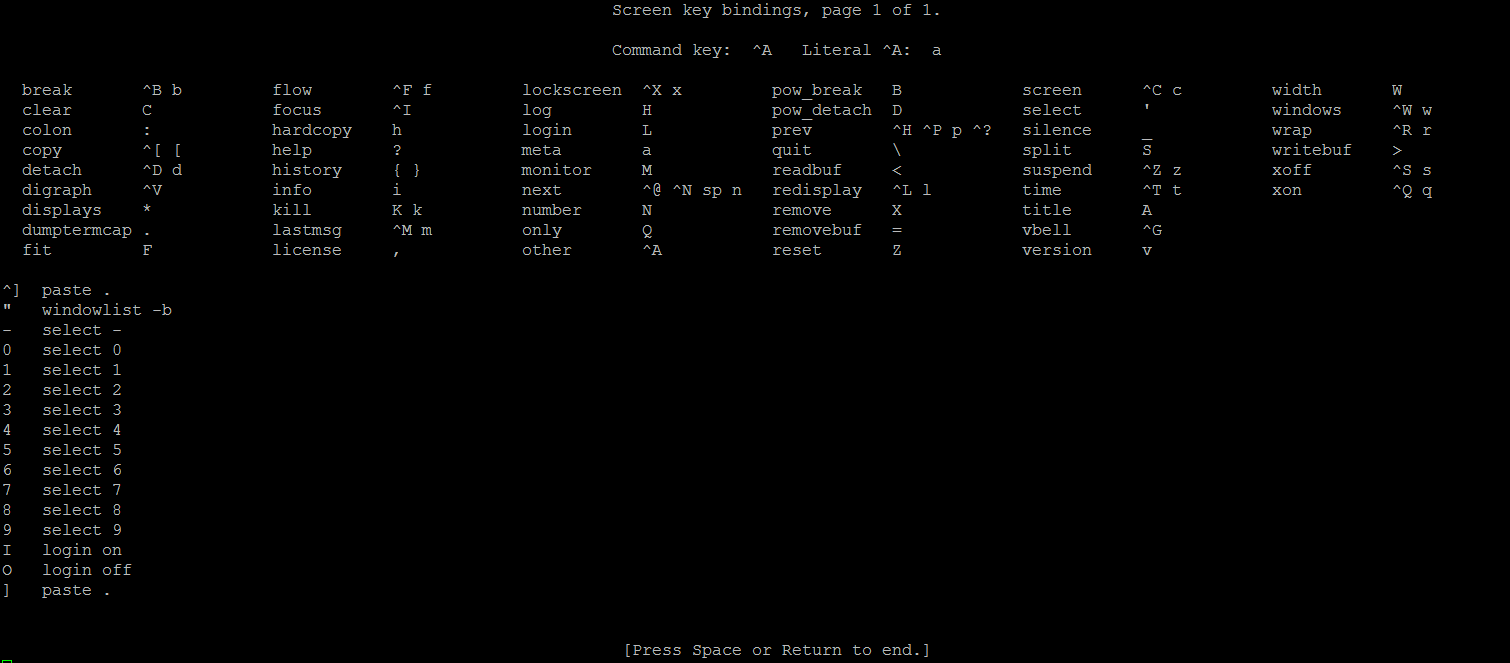
Если не получается нажать указанную выше комбинацию, можно поступить проще: нажмите отдельно Ctrl+a , отпустите, а затем в консоль наберите ? и нажмите Enter
Сессия screen с именем
Ну очень удобная фича. Если вы делаете несколько процессов параллельно, просто обзовите их так, чтобы потом понять, что и где выполняется. Синтаксис такой:
Например, вы можете запустить ping — замер хоста с 1С и назвать сессию так:
Всегда используйте скрин именно так. Будет значительно удобнее.
Как правильно работать с окнами в Windows
Как мы уже сказали, когда вы создаете новую screen — сессию, вы создадите новое окно с shell оболочкой внутри. И что интересно — внутри скрин сессии вы можете создать множество дополнительных окон. Чтобы это сделать, воспользуйтесь командой (внутри скрина) Ctrl+a и c . Новому окну будет назначен номер от 0 до 9 (первый свободный).
Ниже мы собрали все команды, которые понадобятся вам для управления скринами:
- Ctrl+a и c — создать дополнительное окно ;
- Ctrl+a и » — показать список всех имеющихся окон;
- Ctrl+a и 0 — переключиться на окно с номером 0 (номер может быть иной);
- Ctrl+a и A — переименовать текущее окно;
- Ctrl+a и S — разделить окно по горизонтали на две области;
- Ctrl+a и | — разделить окно по вертикали на две области;
- Ctrl+a и tab — переключить рабочий фокус на следующую область разделенного окна;
- Ctrl+a и Ctrl+a — переключить рабочий фокус на предыдущую область разделенного окна;
- Ctrl+a и Q — закрыть все разделенные области кроме;
- Ctrl+a и X — закрыть текущую область;
Выход из screen сессии
Вы можете легко выйти из screen — сессии набрав:
Самое важное: запущенная вами в этот момент команда не остановится и будет продолжать свое выполнение.
Возврат к screen сессии
Чтобы вернуть к screen — сессии используйте команду:
Если у вас запущено больше чем одна screen — сессия, то после ключа r нужно указать ее ID. Узнать его просто с помощью команды:
Вывод этой команды будет выглядеть вот так:
В выводе выше мы выделили ID — сессий. Например, чтобы вернуться к сессии 32328 (pings_towards_1C), дайте команду:
Немножко кастомизации screen под вас
Когда screen запускается, он считывает свои конфигурационные параметры из /etc/screenrc и
/.screenrc , если файл присутствует. Так вот — мы можем легко перенастроить предпочтения использования screen и сделать это в файле .screenrc .
Посмотрите пример с комментариями, как мы закастомили screen для себя:
Типовой сценарий использования screen
Общий случай, так сказать. Обычно он состоит из следующих шагов:
- После SSH подключения к серверу, набираем screen ;
- Запускаем интересующую нас команду в режиме screen — сессии;
- Выполняем команду Ctrl + a и d , чтобы выйти из режима работы с экран-сессией
- Через какое-то время возвращаемся к запущенному ранее экрану командой screen -r
Выводы
Мы разобрались, как создавать screen сессии, управлять ими внутри, открывая новые окна, выходить из их режима управления (без прекращения выполнения команды), делить горизонтально и вертикально экраны.
Ах да, ещё мы научились кастомизировать screen под себя. Профит!
Мини — курс по виртуализации
Знакомство с VMware vSphere 7 и технологией виртуализации в авторском мини — курсе от Михаила Якобсена
Источник
How to Install and Use Linux Screen?

Sysadmins generally work using the Linux terminal. However, you can get even more out of it by implementing the Linux Screen in your workflow. It’s a long-running favorite among developers and is a must for anyone who wants to become an expert.
It might seem intimidating at first, but the Linux Screen is easy to learn while providing limitless possibilities. It’s a very efficient and resourceful utility, making it an irreplaceable tool.
With this in mind, we will teach you how to enable and use Linux Screen to increase the flexibility of the Linux terminal further.
What Is Linux Screen?
A Linux Screen is a terminal application developed by the GNU project. Often official documentation calls it a GNU Screen and is used for terminal multiplexing.
In other words, Screen divides a physical terminal into multiple virtual sessions, stops and summarizes the activity in them.
Screen works like this – if you work on a terminal session while using Screen, once you’re finished with your work and turn off the computer, it will save at that point. When the terminal is reaccessed, the terminal will return to the very same screen you worked on before shutting down.
Linux Screen might be basic in its structure, but every Linux user should know how to use it.
How to Install and Use Linux Screen?
Screen is usually installed by default on all major Linux distributions. If your system doesn’t have it preinstalled, don’t worry, the installation process is easy.
First, we need to connect to our server using the SSH command. Open up your terminal and type:
In the case of Debian, Ubuntu or Linux Mint and its derivatives, you can execute the following command:
If you are using CentOS 7, you can install it using the following:
Or if the user can’t run sudo commands, we need to run it as a root user.
At the end of the installation, we can check the current version of Screen, using the following command line:
Congratulations, now you can finally use Screen.
Using Linux Screen on Any Linux Distribution
To run Linux screen, we just have to type the word in our terminal session:
After pressing the Space key, you will see the terminal again. Do not be worried, we have already started a new Screen session. To check it, just type exit in and press Enter.
So, we need to rerun the command by typing screen again.
We can also start a session and give it a name by using the -S variable. For example:
We recommend you give the session a descriptive name and you will have no problem identifying it.
Screen uses commands to perform terminal multiplexing and the commands are easy to learn. They all follow a Ctrl+* * structure, where * are the variables.
IMPORTANT: Take note of the lowercase and uppercase keys when performing commands.
Working in a New Session
Once we have started a new session it is necessary to learn how to use it. These are the main commands you’ll be using:
| Commands | Description |
| Ctrl+a c | Create a new window |
| Ctrl+a ” | List all the created windows |
| Ctrl+a a | Delete a Ctrl+a, which useful if you made a mistake |
| Ctrl+a Ctrl+d | Leave the session running |
It is also possible to split the terminal screen. For example, using Ctrl+a S splits the terminal horizontally:
To change to the next terminal, we press CTRL+a TAB. To close it, CTRL+a X.
How to Manage Multiple Sessions Using Linux Screen
One of the great qualities of Screen is the ability to perform actions and leave them in the background so that when we return to them they’re still there. This is especially great for server administrators.
For this example, I will use htop. We can install it on Debian, Ubuntu, Linux Mint and its derivatives with the following command:
You can run htop by simply typing the following command in your terminal:

Next, we will use both CTRL+a and CTRL+d commands to detach the execution from the terminal. From here you can work on something else, while the previous window will run in the background. If you want to open up the same htop terminal, first type in the following command:
It will show all of your saved sessions. To reopen htop, enter the following:
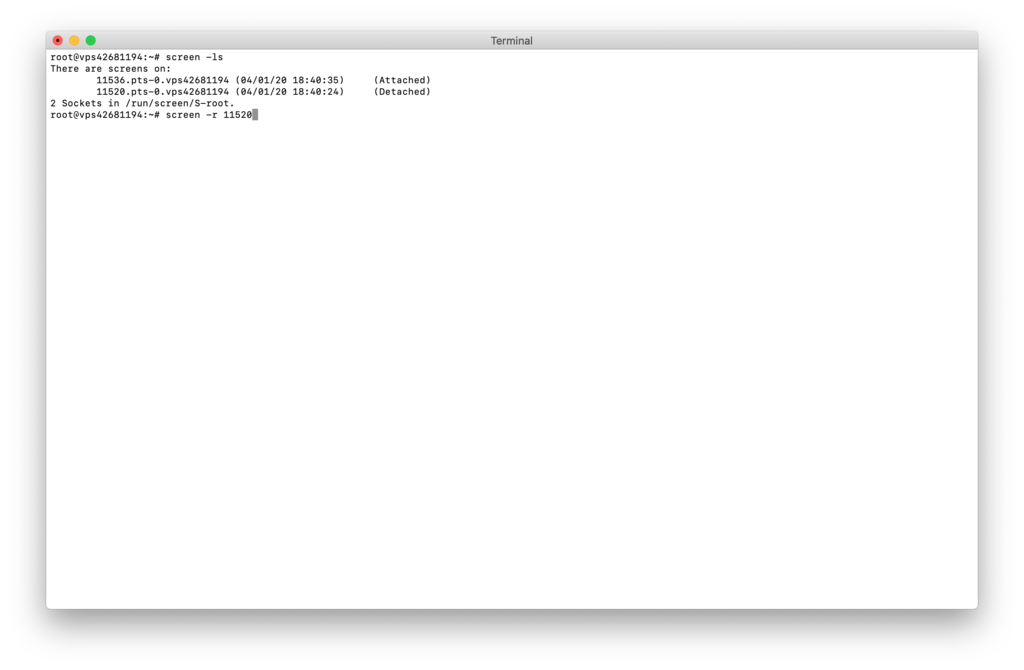
In this case, our process_number is 11520
Conclusion
It is really important to learn how to install and use Linux Screen, especially if you work as a server administrator. It’s a really handy tool that can greatly improve your overall workflow. Here you have learned how to both install Screen on your server and how to use its basic commands.
We hope you found this Linux tutorial helpful. Good luck!
Edward is an expert communicator with years of experience in IT as a writer, marketer, and Linux enthusiast. IT is a core pillar of his life, personal and professional. Edward’s goal is to encourage millions to achieve an impactful online presence. He also really loves dogs, guitars, and everything related to space.
Источник
How to Install and Use Screen on an Ubuntu Cloud Server
Published on July 1, 2013
Introduction
Screen is a console application that allows you to use multiple terminal sessions within one window. The program operates within a shell session and acts as a container and manager for other terminal sessions, similar to how a window manager manages windows.
There are many situations where creating several terminal windows is not possible or ideal. You might need to manage multiple console sessions without an X server running, you might need to access many remote cloud servers easily, or you might need to monitor a running program’s output while working on some other task. All of needs are easily addressed with the power of screen.
Installation
In this tutorial, we’ll be using Ubuntu 12.04, but outside of the installation process, everything should be the same on every modern distribution.
Use “apt-get” to install on Ubuntu:
Basic Usage
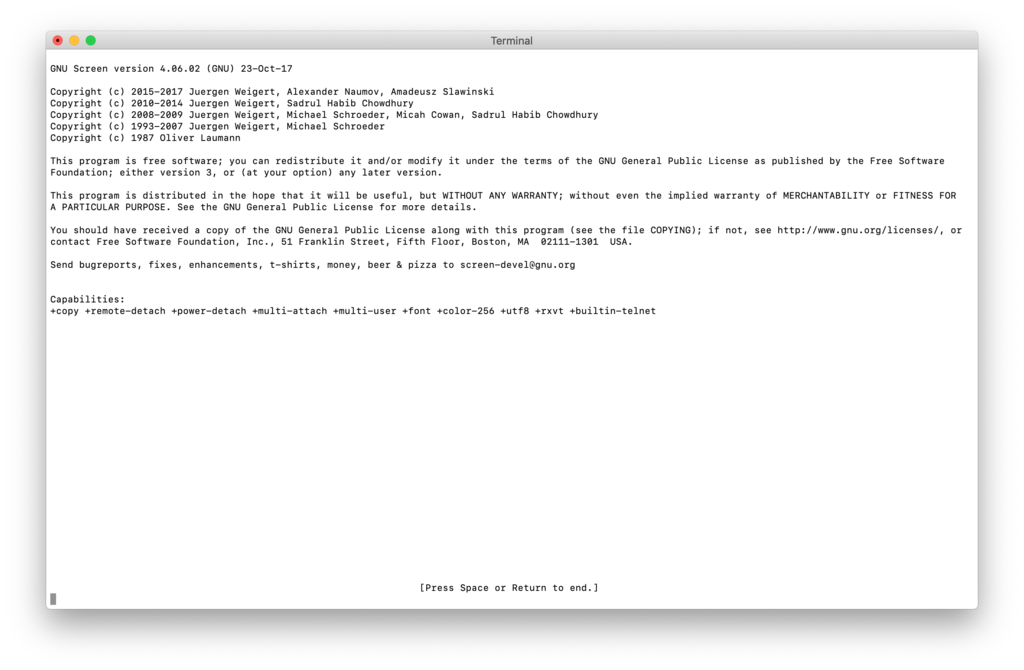
To start a new screen session, we simply type the “screen” command.
You’ll be greeted with the licensing page upon starting the program. Just press “Return” or “Enter” to continue.
What happens next may be surprising. We are given a normal command prompt and it looks like nothing has happened. Did “screen” fail to run correctly? Let’s try a quick keyboard shortcut to find out. Hold the control key, and then hit the “a” key, followed by the “v” key:
We’ve just requested the version information from screen, and we’ve received some feedback that allows us to verify that screen is running correctly.
Now is a great time to introduce the way that we will be controlling screen. Screen is mainly controlled through keyboard shortcuts. Every keyboard shortcut for screen is prefaced with “Ctrl-a” (hold the control key while pressing the “a” key). That sequence of keystrokes tells screen that it needs to pay attention to the next keys we press.
You’ve already used this paradigm once when we requested the version information about screen. Let’s use it to get some more useful information.
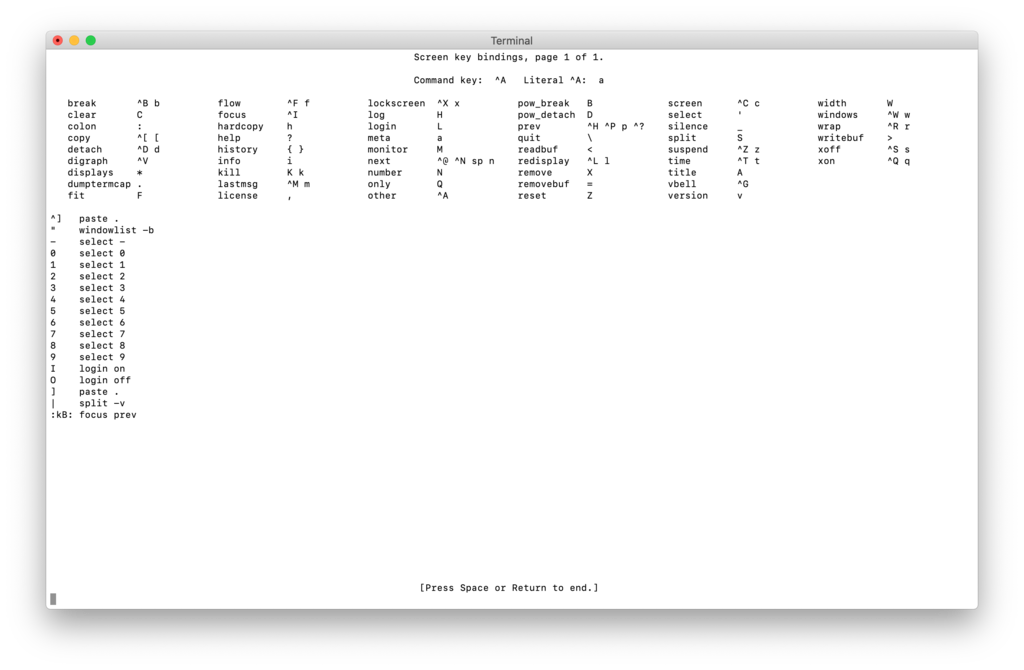
This is the internal keyboard shortcut screen. You’ll probably want to memorize how to get here, because it’s an excellent quick reference. As you can see at the bottom, you can press “space” to get more commands.
Okay, let’s try something more fun. Let’s run a program called “top” in this window, which will show us some information on our processes.
Okay, we are now monitoring the processes on our VPS. But what if we need to run some commands to find out more information about the programs we see? We don’t need to exit out of “top”. We can create a new window to run these commands.
The “Ctrl-a c” sequence creates a new window for us. We can now run whatever commands we want without disrupting the monitoring we were doing in the other window.
Where did that other window go? We can get back to it using a new command:
This sequence goes to the next window that we are running. The list of windows wrap, so when there aren’t windows beyond the current one, it switches us back to the first window.
This sequence changes the current window in the opposite direction. So if you have three windows and are currently on the third, this command will switch you to the second window.
A helpful shortcut to use when you’re flipping between the same two windows is this:
This sequence moves you to your most recently visited window. So in the previous example, this would move you back to your third window.
At this point, you might be wondering how you can keep track of all of the windows that we are creating. Thankfully, screen comes with a number of different ways of managing your different sessions. First, we’ll create three new windows for a total of four windows and then we’ll try out one of the simplest window management tools, “Ctrl-a w”.
We get some useful information from this command: a list of our current windows. Here, we have four windows. Each window has a number and the windows are numbered starting at “0”. The current window has an asterisk next to the number.
So you can see that we’re currently at window #3 (actually the fourth window because the first window is 0). So how do we get to window #1 quickly?
We can use the index number to jump straight to the window we want. Let’s see our window list again.
As you can see, the asterisk tells us that we’re now on window #1. Let’s try a different way of switching windows.
We get an actual navigation menu this time. You can navigate with either the up and down arrows or with “j” and “k” like you would in the vi text editor. Switch to a window by pressing “Return” or “Enter”.
This is pretty useful, but right now all of our windows are named “bash”. That’s not very helpful. Let’s name some of our sessions. Switch to a window you want to name and then use the “Ctrl-a A” sequence.
Using the “Ctrl-a A” sequence, we can name our sessions. You can now backspace over “bash” and then rename it whatever you’d like. We’re going to run “top” on window #0 again, so we’re going to name it “monitoring”.
Now we have a more helpful label for window #0. So we know how to create and name windows, but how do we get rid of them when we don’t need them anymore? We use the “Ctrl-a k” sequence, which stands for “kill”.
Managing Screen Sessions
When you want to quit screen and kill all of your windows, you can use this command sequence.
This will destroy our screen session. We will lose any windows we have created and any unfinished work.
But we want to explore one of the huge benefits of using “screen”. We don’t want to destroy the session, we simply want to detach it. Detaching allows our programs in the screen instance to continue to run, but it gives us access back to our base-console session (the one where we started “screen” from initially). The screen session is still there, it will just be managed in the background.
So our session is now detached. How do we get back into it?
The “r” stands for reattach. We are now back in our screen session. What if we have multiple screen sessions though? What if we had started a screen session and detached it, and then started a new screen session and detached that as well?
How do we tell screen which session to attach?
Now we have a list of our sessions. We can reattach the second one by typing its id number after the “-r” flag.
What if you want to attach a session on two separate computers or terminal windows? You can use the “-x” flag, which lets you share the session.
Managing Terminals Within Screen
There are a number of commands that help you manage the terminal sessions you run within screen.
To copy text, you can use this sequence:
This will give you a cursor that you can move with arrow keys or h,j,k,l keys (like vi). Move to where you want to start copying, and hit “Return” or “Enter”. Move to the end of where you’d like to copy and hit “Return” or “Enter” again. The text is then copied to your clipboard.
One thing to be aware of is that this is also screen’s mechanism for scrolling. If you need to see some text that is off the screen, you can hit “Ctrl-a [“ and then scroll up off of the screen.
We can paste text that we copied with the right bracket.
Another thing you might want to do is monitor programs that are executing in another screen window.
Let’s say that you’re compiling something in one window and you want to know when it’s completed. You can ask screen to monitor that window for silence with the “Ctrl-a _” sequence, which will tell you when no output has been generated for 30 seconds.
Let’s try it with a simpler example. Let’s have screen tell us when our window is finished pinging google 4 times.
Now we can do work in another window and be alerted when the task in this window is complete.
We can also do the opposite and be alerted when there is activity happening on a specific window. We accomplish this with the “Ctrl-a M” sequence.
We will now be alerted when the command produces output.
Let’s say we are going to be doing some important changes and we want to have a log of all of the commands we run. We can log the session with:
Screen Regions
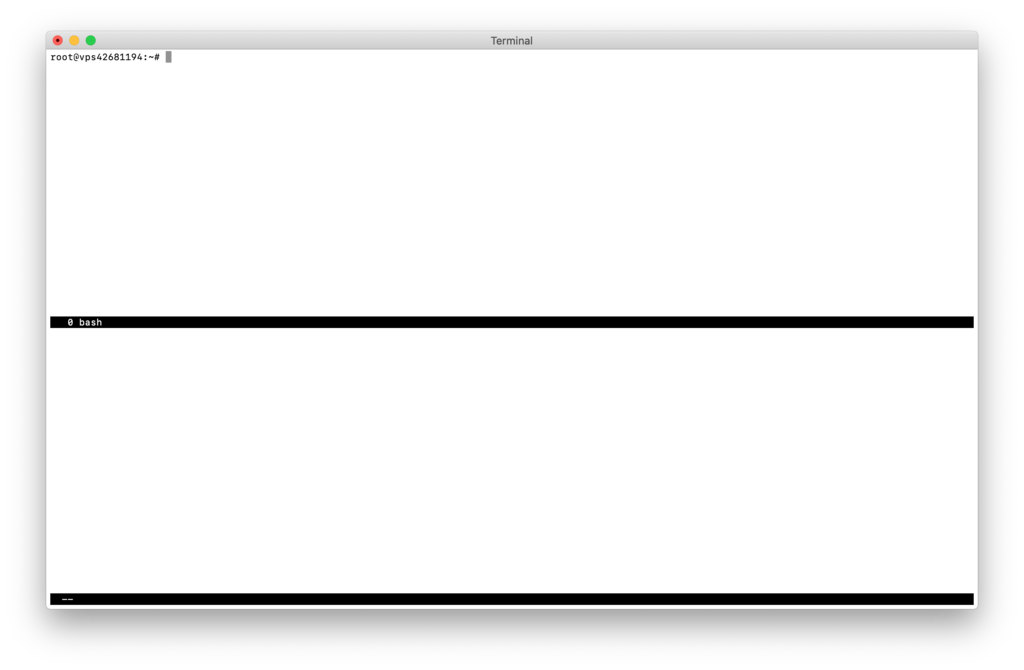
If we need to see multiple windows at once, we can use something that screen calls “regions”. We create more regions by splitting the current region. To split the current region horizontally, we can type:
This will move our current window to the top half of the screen and open a new blank region below it. We can get to the lower screen with the “tab” key:
We can then either create a new window in the bottom region or change the view to a different window in the normal way.
If we want to kill the current region, we can use this sequence:
That destroys the region without destroying the actual window. This means that if you were running a program in that region, you can still access it as a normal window, the view into that window was simply destroyed.
If we want to make a vertical split, we can use this sequence instead:
Note: that is not the 1 (number one) or L character. It is the “pipe” character, found on the same key as “\” on most keyboards.
The controls for vertical splits are the same as horizontal splits. If we’ve added a few different regions and want to go back to a single region, we can use this sequence, which destroys all regions but the current one.
Using Byobu
A great enhancement for screen is a program called “byobu”. It acts as a wrapper for screen and provides an enhanced user experience. On Ubuntu, you can install it with:
Before we begin, we need to tell byobu to use screen as a backend. We can do this with the following command:
We can choose screen here to set it as the default terminal manager.
Now, instead of typing in “screen” to start a session, you can type “byobu”.
As you can see, you now have screen wrapped in a nice interface. When you type “Ctrl-a” for the first time, you’ll have to tell byobu to recognize that as a screen command and not an Emacs command. Select “1” to use byobu as normal. The interface gives you a lot of useful information, such as a window list and system information. On Ubuntu, it even tells you how many packages have security updates with a number followed by an exclamation point on a red background. One thing that is different between using byobu and screen is the way that byobu actually manages sessions. If you simply type “byobu” again once you’re detached, it will simply reattach your previous session instead of creating a new one. To create a new session, you must type: Change “sessionname” to whatever you’d like to call your new session. You can see a list of current sessions with: And if there are multiple sessions, when you type “byobu”, you will be presented with a menu to choose which session you want to connet to.
You can select any of the current sessions, create a new byobu session, or even get a new shell without using byobu.
One option that might be useful on a cloud server you manage remotely is to have byobu start up automatically whenever you log into your session. That means that if you are ever disconnected from your session, your work won’t be lost, and you can simply re-connect to get right back to where you were before.
To enable byobu to automatically start with every login, type this into the terminal:
As it says, if you ever want to turn this feature off again, simply type:
Источник


