- SFML и Linux
- Введение
- Установка SFML
- Компиляция SFML программы
- Графическая библиотека SFML в Linux: как ее установить и использовать
- Устанавливаем зависимости
- Устанавливаем библиотеку SFML (в Ubuntu, Debian)
- Как компилировать программу с библиотекой SFML
- 2. Сборка
- SFML and Linux
- Introduction
- Installing SFML
- Compiling a SFML program
- Compiling SFML with CMake
- Introduction
- Installing dependencies
- Configuring your SFML build
- Building SFML
SFML и Linux
Введение
Этот урок первый который вы должны прочитать если используете SFML на Linux. Здесь описано как установить SFML и скомпилировать проект который его использует.
Установка SFML
Есть несколько способов установить SFML на Linux:
- Установка из репозитория вашего дистрибутива
- Загрузить скомпилированный SDK и вручную скопировать файлы
- Загрузить исходники, скомпилировать и установить
Первый способ предпочтительнее; если версия SFML которую вы хотите установить доступна в официальном репозитории , значит установите SFML используя ваш пакетный менеджер . К примеру, в Debian вы должны выполнить следующую команду:
Option 3 requires more work: you need to ensure all of SFML’s dependencies including their development headers are available, make sure CMake is installed, and manually execute some commands. This will result in a package which is tailored to your system.
If you want to go this way, there’s a dedicated tutorial on building SFML yourself.
Finally, option 2 is a good choice for quick installation if SFML is not available as an official package. Download the SDK from thedownload page, unpack it and copy the files to your preferred location: either a separate path in your personal folder (like/home/me/sfml), or a standard path (like /usr/local).
If you already had an older version of SFML installed, make sure that it won’t conflict with the new version!
Компиляция SFML программы
In this tutorial we’re not going to talk about IDEs such as Code::Blocks or Eclipse. We’ll focus on the commands required to compile and link an SFML executable. Writing a complete makefile or configuring a project in an IDE is beyond the scope of this tutorial — there are better dedicated tutorials for this.
If you’re using Code::Blocks, you may refer to the Code::Blocks tutorial for Windows; many things should be similar. You won’t have to set the compiler and linker search paths if you installed SFML to one of your system’s standard paths.
Источник
Графическая библиотека SFML в Linux: как ее установить и использовать
В операционной системе Linux, нередко, используется так называемая консоль. Это когда черный экран, командная строка и… все. Но, консоль бывает удобна, как правило, для обслуживания самой операционной системы, тогда как пользовательские приложения обычно используют графический интерфейс (так называемый GUI — Grafic User Interface). Для его реализации необходима, соответственно, та или иная графическая библиотека.
Вообще, в настоящее время графических библиотек просто масса – и больших и малых, и простых и многофункциональных, и т.д. Мы в этой не будем даже пытаться рассмотреть их все, а сосредоточимся на известной библиотеке SFML. Написано о ней достаточно, например, в Википедии.
По умолчанию, эта библиотека не является установленной в Linux (например, Ubuntu). Кроме того, не установлены и зависимости, требуемые для ее полноценной установки и работы.
Устанавливаем зависимости
Для установки зависимостей, равно как и для установки самой библиотеки, можно использовать команды apt-get , aptitude .
Настоятельно рекомендуется использовать именно aptitude , так как именно она позволяет установить зависимости корректно и без ошибок. Тогда как apt-get иногда не приводит к нужному результату.
Для того, чтобы установить зависимости, следует выполнить следующие команды:
- # sfml-window
- aptitude install libx11-dev -y
- aptitude install libxcb1-dev -y
- aptitude install libx11-xcb-dev -y
- aptitude install libxcb-randr0-dev -y
- aptitude install libxcb-image0-dev -y
- aptitude install libxrandr-dev -y
- aptitude install libgl1-mesa-dev -y
- aptitude install libudev-dev -y
- aptitude install libxrandr-dev -y
- # sfml-graphics
- aptitude install libfreetype6-dev -y
- aptitude install libjpeg-dev -y
- # sfml-audio
- aptitude install libopenal-dev -y
- aptitude install libflac-dev -y
- aptitude install libvorbis-dev -y
Например, в Ubuntu 16.04 LTS установка проходит без каких-либо проблем.
Устанавливаем библиотеку SFML (в Ubuntu, Debian)
Устанавливать библиотеку SFML на Linux можно по-разному:
Лучше всего выбрать первый способ, если есть возможность. Для этого используем команду
- sudo aptitude install libsfml-dev
Как компилировать программу с библиотекой SFML
Пример программного кода
Рассмотрим простейший пример:
// Подключаем заголовок модуля Graphics, а он автоматически подключает заголовок модуля Window
- #include
- int main()
- <
- // создаём окно
- sf::RenderWindow app(sf::VideoMode(800, 600, 32), «Hello World — SFML»);
- // основной цикл
- while (app.isOpen())
- <
- // проверяем события (нажатие кнопки, закрытие окна и т.д.)
- sf::Event event;
- while (app.pollEvent(event))
- <
- // если событие «закрытие окна»:
- if (event.type == sf::Event::Closed)
- // закрываем окно
- app.close();
- >
- // очищаем экран и заливаем его синим цветом
- app.clear(sf::Color(0,0,255));
- // отображаем на экран
- app.display();
- >
- return 0;
- >
1. Вначале следует создать объектный файл
Если все успешно, создастся файл main.o .
2. Сборка
Чтобы получить исполняемый файл, следует сделать сборку, т.е. связать скомпилированный файл с библиотекой SFML. SFML состоит из пяти модулей: system , window , graphics , audio и network и библиотек для каждого из них. Что бы собрать приложение с библиотекой SFML, нужно должны добавить опцию » -lsfml-xxx » к команде компоновки. Например, » -lsfml-graphics » для модуля graphics (префикс « lib » и расширение » .so » библиотеки должны быть опущены).
- g++ main.o -o sfml-app -lsfml-graphics -lsfml-window -lsfml-system
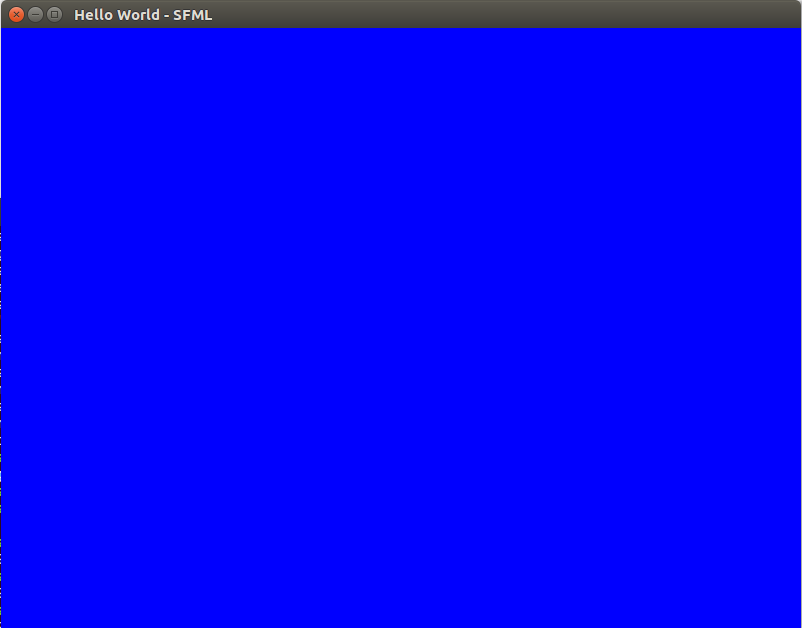
Если все будет нормально скомпилировано и собрано, то, будучи запущенной, эта программа выводит окно, залитое синим цветом, как на рисунке:
Запуск программы может производиться либо из консоли ( ./sfml-app ), либо путем двойного клика мыши на имени файла sfml-app в менеджере файлов.
Источник
SFML and Linux
Introduction
This tutorial is the first one you should read if you’re using SFML on Linux. It will explain how to install SFML, and compile projects that use it.
Installing SFML
There are different approaches to the installation of SFML on Linux:
- Install it directly from your distribution’s package repository
- Get the source code, build it and install it
- Download the precompiled SDK and manually copy the files
Option 1 is the preferred one; if the version of SFML that you want to install is available in the official repository, then install it using your package manager. For example, on Debian you would do:
Option 2 requires more work: you need to ensure all of SFML’s dependencies including their development headers are available, make sure CMake is installed, and manually execute some commands. This will result in a package which is tailored to your system.
If you want to go this way, there’s a dedicated tutorial on building SFML yourself.
Finally, option 3 is a good choice for quick installation if SFML is not available as an official package. Download the SDK from the download page, unpack it and copy the files to your preferred location: either a separate path in your personal folder (like /home/me/sfml), or a standard path (like /usr/local).
If you already had an older version of SFML installed, make sure that it won’t conflict with the new version!
Compiling a SFML program
In this tutorial we’re not going to talk about IDEs such as Code::Blocks or Eclipse. We’ll focus on the commands required to compile and link an SFML executable. Writing a complete makefile or configuring a project in an IDE is beyond the scope of this tutorial — there are better dedicated tutorials for this.
If you’re using Code::Blocks, you may refer to the Code::Blocks tutorial for Windows; many things should be similar. You won’t have to set the compiler and linker search paths if you installed SFML to one of your system’s standard paths.
First, create a source file. For this tutorial we’ll name it «main.cpp». Put the following code inside the main.cpp file:
Now let’s compile it:
In case you installed SFML to a non-standard path, you’ll need to tell the compiler where to find the SFML headers (.hpp files):
Here, is the directory where you copied SFML, for example /home/me/sfml.
You must then link the compiled file to the SFML libraries in order to get the final executable. SFML is made of 5 modules (system, window, graphics, network and audio), and there’s one library for each of them.
To link an SFML library, you must add «-lsfml-xxx» to your command line, for example «-lsfml-graphics» for the graphics module (the «lib» prefix and the «.so» extension of the library file name must be omitted).
If you installed SFML to a non-standard path, you’ll need to tell the linker where to find the SFML libraries (.so files):
We are now ready to execute the compiled program:
If SFML is not installed in a standard path, you need to tell the dynamic linker where to find the SFML libraries first by specifying LD_LIBRARY_PATH:
If everything works, you should see this in a new window:
Источник
Compiling SFML with CMake
Introduction
Admittedly, the title of this tutorial is a bit misleading. You will not compile SFML with CMake, because CMake is not a compiler. So. what is CMake?
CMake is an open-source meta build system. Instead of building SFML, it builds what builds SFML: Visual Studio solutions, Code::Blocks projects, Linux makefiles, XCode projects, etc. In fact it can generate the makefiles or projects for any operating system and compiler of your choice. It is similar to autoconf/automake or premake for those who are already familiar with these tools.
CMake is used by many projects including well-known ones such as Blender, CLion, KDE, Ogre, and many more. You can read more about CMake on its official website or in its Wikipedia article.
As you might expect, this tutorial is divided into two main sections: Generating the build configuration with CMake, and building SFML with your toolchain using that build configuration.
Installing dependencies
SFML depends on a few other libraries, so before starting to configure you must have their development files installed.
On Windows and macOS, all the required dependencies are provided alongside SFML so you won’t have to download/install anything else. Building will work out of the box.
On Linux however, nothing is provided. SFML relies on you to install all of its dependencies on your own. Here is a list of what you need to install before building SFML:
The exact name of the packages may vary from distribution to distribution. Once those packages are installed, don’t forget to install their development headers as well.
Configuring your SFML build
This step consists of creating the projects/makefiles that will finally compile SFML. Basically it consists of choosing what to build, how to build it and where to build it. There are several other options as well which allow you to create a build configuration that suits your needs. We’ll see that in detail later.
The first thing to choose is where the projects/makefiles and object files (files resulting from the compilation process) will be created. You can generate them directly in the source tree (i.e. the SFML root directory), but it will then be polluted with a lot of garbage: a complete hierarchy of build files, object files, etc. The cleanest solution is to generate them in a completely separate folder so that you can keep your SFML directory clean. Using separate folders will also make it easier to have multiple different builds (static, dynamic, debug, release, . ).
Now that you’ve chosen the build directory, there’s one more thing to do before you can run CMake. When CMake configures your project, it tests the availability of the compiler (and checks its version as well). As a consequence, the compiler executable must be available when CMake is run. This is not a problem for Linux and macOS users, since the compilers are installed in a standard path and are always globally available, but on Windows you may have to add the directory of your compiler in the PATH environment variable, so that CMake can find it automatically. This is especially important when you have several compilers installed, or multiple versions of the same compiler.
On Windows, if you want to use GCC (MinGW), you can temporarily add the MinGW\bin directory to the PATH and then run CMake from the command shell:
With Visual C++, you can either run CMake from the «Visual Studio command prompt» available from the start menu, or run the vcvars32.bat batch file of your Visual Studio installation in the console you have open. The batch file will set all the necessary environment variables in that console window for you.
Now you are ready to run CMake. In fact there are three different ways to run it:
- cmake-gui
This is CMake’s graphical interface which allows you to configure everything with buttons and text fields. It’s very convenient to see and edit the build options and is probably the easiest solution for beginners and people who don’t want to deal with the command line. - cmake
This is the direct call to CMake. If you use this, you must specify all the option names and their values as command line parameters. To print out a list of all options, run cmake -L.
In this tutorial we will be using cmake-gui, as this is what most beginners are likely to use. We assume that people who use the command line variants can refer to the CMake documentation for their usage. With the exception of the screenshots and the instructions to click buttons, everything that is explained below will apply to the command line variants as well (the options are the same).
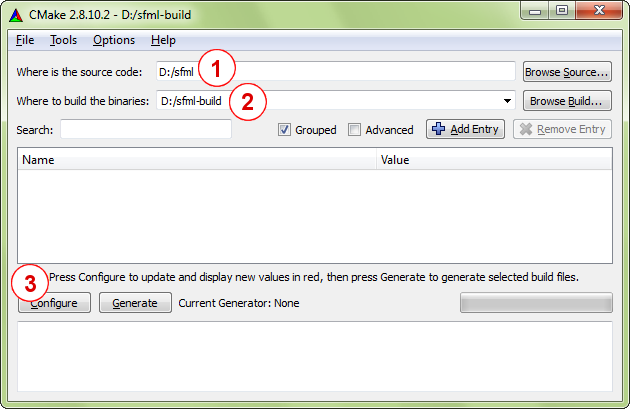
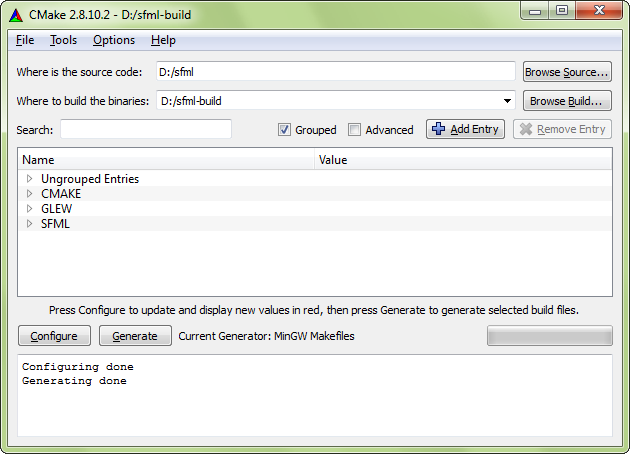
Here is what the CMake GUI looks like:
The first steps that need to be done are as follows (perform them in order):
- Tell CMake where the source code of SFML is (this must be the root folder of the SFML folder hierarchy, basically where the top level CMakeLists.txt file is).
- Choose where you want the projects/makefiles to be generated (if the directory doesn’t exist, CMake will create it).
- Click the «Configure» button.
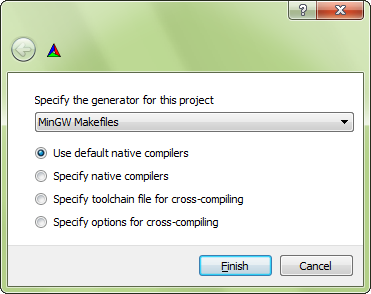
If this is the first time CMake is run in this directory (or if you cleared the cache), the CMake GUI will prompt you to select a generator. In other words, this is where you select your compiler/IDE.
For example, if you are using Visual Studio 2010, you should select «Visual Studio 10 2010» from the drop-down list. To generate makefiles usable with NMake on the Visual Studio command line, select «NMake Makefiles». To create makefiles usable with MinGW (GCC), select «MinGW Makefiles». It is generally easier to build SFML using makefiles rather than IDE projects: you can build the entire library with a single command, or even batch together multiple builds in a single script. Since you only plan to build SFML and not edit its source files, IDE projects aren’t as useful.
The installation process (described further down) may not work with the «Xcode» generator. It is therefore highly recommended to use the Makefile generator when building on macOS.
Always keep the «Use default native compilers» option enabled. The other three fields can be left alone.
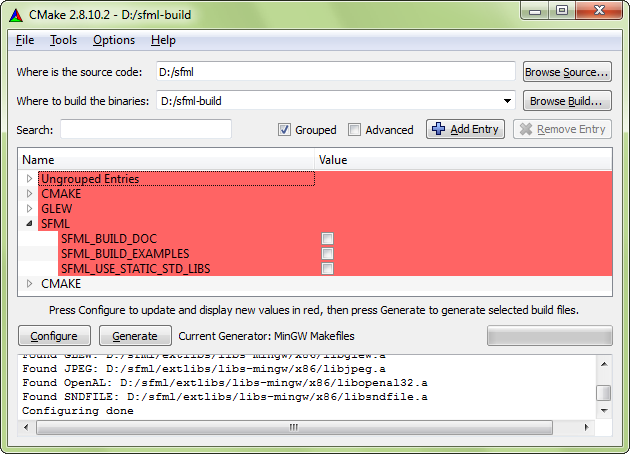
After selecting the generator, CMake will run a series of tests to gather information about your toolchain environment: compiler path, standard headers, SFML dependencies, etc. If the tests succeed, it should finish with the «Configuring done» message. If something goes wrong, read the error(s) printed to the output log carefully. It might be the case that your compiler is not accessible (see above) or configured properly, or that one of SFML’s external dependencies is missing.
After configuring is done, the build options appear in the center of the window. CMake itself has many options, but most of them are already set to the right value by default. Some of them are cache variables and better left unchanged, they simply provide feedback about what CMake automatically found.
Here are the few options that you may want to have a look at when configuring your SFML build:
| Variable | Meaning |
|---|---|
| CMAKE_BUILD_TYPE | |
| SFML_DEPENDENCIES_INSTALL_PREFIX | |
| BUILD_SHARED_LIBS | This boolean option controls whether you build SFML as dynamic (shared) libraries, or as static ones. This option should not be enabled simultaneously with SFML_USE_STATIC_STD_LIBS , they are mutually exclusive. |
| SFML_BUILD_FRAMEWORKS (macOS only) | This boolean option controls whether you build SFML as framework bundles or as dylib binaries. Building frameworks requires BUILD_SHARED_LIBS to be selected. It is recommended to use SFML as frameworks when publishing your applications. Note however, that SFML cannot be built in the debug configuration as frameworks. In that case, use dylibs instead. |
| SFML_BUILD_EXAMPLES | This boolean option controls whether the SFML examples are built alongside the library or not. |
| SFML_BUILD_DOC | This boolean option controls whether you generate the SFML documentation or not. Note that the Doxygen tool must be installed and accessible, otherwise enabling this option will produce an error. On macOS you can either install the classic-Unix doxygen binary into /usr/bin or any similar directory, or install Doxygen.app into any «Applications» folder, e.g. /Applications. |
| SFML_BUILD_AUDIO | This boolean option controls whether the SFML audio module is built or not. |
| SFML_BUILD_GRAPHICS | This boolean option controls whether the SFML graphics module is built or not. |
| SFML_BUILD_WINDOW | This boolean option controls whether the SFML window module is built or not. |
| SFML_BUILD_NETWORK | This boolean option controls whether the SFML network module is built or not. |
| SFML_USE_SYSTEM_DEPS | This boolean option controls whether the dependencies from the extlibs directory are used or whether the system dependencies are used. The stb_image_* header in the extlibs directory are used regardless of this option. |
| SFML_USE_STATIC_STD_LIBS (Windows only) | This boolean option selects the type of the C/C++ runtime library which is linked to SFML. TRUE statically links the standard libraries, which means that SFML is self-contained and doesn’t depend on the compiler’s specific DLLs. FALSE (the default) dynamically links the standard libraries, which means that SFML depends on the compiler’s DLLs (msvcrxx.dll/msvcpxx.dll for Visual C++, libgcc_s_xxx-1.dll/libstdc++-6.dll for GCC). Be careful when setting this. The setting must match your own project’s setting or else your application may fail to run. This option should not be enabled simultaneously with BUILD_SHARED_LIBS, they are mutually exclusive. |
| SFML_GENERATE_PDB (Visual Studio only) | The boolean option controls whether Visual Studio should or shouldn’t generate PDB files, which are separate files containing the debug symbols needed to debug SFML. |
| CMAKE_OSX_ARCHITECTURES (macOS only) | This boolean option defines which architecture SFML should be compiled for. The recommended value is «x86_64» as 32-bit compilation is not supported. |
| SFML_INSTALL_XCODE_TEMPLATES (macOS only) | This boolean option controls whether CMake will install the Xcode templates on your system or not. Please make sure that /Library/Developer/Xcode/Templates/SFML exists and is writable. More information about these templates is given in the «Getting started» tutorial for macOS. |
| SFML_INSTALL_PKGCONFIG_FILES (Linux shared libraries only) | This boolean option controls whether CMake will install the pkg-config files on your system or not. pkg-config is a tool that provides a unified interface for querying installed libraries. |
After everything is configured, click the «Configure» button once again. There should no longer be any options highlighted in red, and the «Generate» button should be enabled. Click it to finally generate the chosen makefiles/projects.
CMake creates a variable cache for every project. Therefore, if you decide to reconfigure something at a later time, you’ll find that your settings have been saved from the previous configuration. Make the necessary changes, reconfigure and generate the updated makefiles/projects.
Building SFML
Let’s begin this section with some good news: you won’t have to go through the configuration step any more, even if you update your working copy of SFML. CMake is smart: It adds a custom step to the generated makefiles/projects, that automatically regenerates the build files whenever something changes.
You’re now ready to build SFML. Of course, how to do it depends on what makefiles/projects you’ve generated. If you created a project/solution/workspace, open it with your IDE and build SFML like you would any other project. We won’t go into the details here, there are simply too many different IDEs and we have to assume that you know how to use yours well enough to perform this simple task on your own.
If you generated a makefile, open a command shell and execute the make command corresponding to your environment. For example, run «nmake» if you generated an NMake (Visual Studio) makefile, «mingw32-make» if you generated a MinGW (GCC) makefile, or simply «make» if you generated a Linux makefile.
Note: On Windows, the make program (nmake or mingw32-make) may not be accessible. If this is the case, don’t forget to add its location to your PATH environment variable. See the explanations at the beginning of the «Configuring your SFML build» section for more details.
By default, building the project will build everything (all the SFML libraries, as well as all the examples if you enabled the SFML_BUILD_EXAMPLES option). If you just want to build a specific SFML library or example, you can select a different target. You can also choose to clean or install the built files, with the corresponding targets.
Here are all the targets that are available, depending on the configure options that you chose:
| Target | Meaning |
|---|---|
| all | This is the default target, it is used if no target is explicitly specified. It builds all the targets that produce a binary (SFML libraries and examples). |
| sfml‑system sfml‑window sfml‑network sfml‑graphics sfml‑audio sfml‑main | Builds the corresponding SFML library. The «sfml-main» target is available only when building for Windows. |
| cocoa ftp opengl pong shader sockets sound sound‑capture voip window win32 X11 | Builds the corresponding SFML example. These targets are available only if the SFML_BUILD_EXAMPLES option is enabled. Note that some of the targets are available only on certain operating systems («cocoa» is available on macOS, «win32» on Windows, «X11» on Linux, etc.). |
| doc | Generates the API documentation. This target is available only if SFML_BUILD_DOC is enabled. |
| clean | Removes all the object files, libraries and example binaries produced by a previous build. You generally don’t need to invoke this target, the exception being when you want to completely rebuild SFML (some source updates may be incompatible with existing object files and cleaning everything is the only solution). |
| install | Installs SFML to the path given by CMAKE_INSTALL_PREFIX and CMAKE_INSTALL_FRAMEWORK_PREFIX . It copies over the SFML libraries and headers, as well as examples and documentation if SFML_BUILD_EXAMPLES and SFML_BUILD_DOC are enabled. After installing, you get a clean distribution of SFML, just as if you had downloaded the SDK or installed it from your distribution’s package repository. |
If you use an IDE, a target is simply a project. To build a target, select the corresponding project and compile it (even «clean» and «install» must be built to be executed — don’t be confused by the fact that no source code is actually compiled).
If you use a makefile, pass the name of the target to the make command to build the target. Examples: » nmake doc «, » mingw32-make install «, » make sfml-network «.
At this point you should have successfully built SFML. Congratulations!
Источник
