- Installing spark on windows
- Latest Preview Release
- Link with Spark
- Installing with PyPi
- Release Notes for Stable Releases
- Archived Releases
- Getting Started with PySpark on Windows
- Installing Prerequisites
- Python
- Installing Apache Spark
- Configuring the Spark Installation
- Installing winutils
- Configuring the log level for Spark
- Summary
- References
- Установка Apache PySpark в Windows 10
- 1. Шаг 1
Installing spark on windows
Choose a Spark release:
Choose a package type:
Verify this release using the and project release KEYS.
Note that, Spark 2.x is pre-built with Scala 2.11 except version 2.4.2, which is pre-built with Scala 2.12. Spark 3.0+ is pre-built with Scala 2.12.
Latest Preview Release
Preview releases, as the name suggests, are releases for previewing upcoming features. Unlike nightly packages, preview releases have been audited by the project’s management committee to satisfy the legal requirements of Apache Software Foundation’s release policy. Preview releases are not meant to be functional, i.e. they can and highly likely will contain critical bugs or documentation errors. The latest preview release is Spark 3.0.0-preview2, published on Dec 23, 2019.
Link with Spark
Spark artifacts are hosted in Maven Central. You can add a Maven dependency with the following coordinates:
Installing with PyPi
PySpark is now available in pypi. To install just run pip install pyspark .
Release Notes for Stable Releases
Archived Releases
As new Spark releases come out for each development stream, previous ones will be archived, but they are still available at Spark release archives.
NOTE: Previous releases of Spark may be affected by security issues. Please consult the Security page for a list of known issues that may affect the version you download before deciding to use it.
Getting Started with PySpark on Windows
I decided to teach myself how to work with big data and came across Apache Spark. While I had heard of Apache Hadoop, to use Hadoop for working with big data, I had to write code in Java which I was not really looking forward to as I love to write code in Python. Spark supports a Python programming API called PySpark that is actively maintained and was enough to convince me to start learning PySpark for working with big data.
In this post, I describe how I got started with PySpark on Windows. My laptop is running Windows 10. So the screenshots are specific to Windows 10. I am also assuming that you are comfortable working with the Command Prompt on Windows. You do not have to be an expert, but you need to know how to start a Command Prompt and run commands such as those that help you move around your computer’s file system. In case you need a refresher, a quick introduction might be handy.
Often times, many open source projects do not have good Windows support. So I had to first figure out if Spark and PySpark would work well on Windows. The official Spark documentation does mention about supporting Windows.
Installing Prerequisites
PySpark requires Java version 7 or later and Python version 2.6 or later. Let’s first check if they are already installed or install them and make sure that PySpark can work with these two components.
Java is used by many other software. So it is quite possible that a required version (in our case version 7 or later) is already available on your computer. To check if Java is available and find it’s version, open a Command Prompt and type the following command.
If Java is installed and configured to work from a Command Prompt, running the above command should print the information about the Java version to the console. For example, I got the following output on my laptop.
Instead if you get a message like
It means you need to install Java. To do so,
Go to the Java download page. In case the download link has changed, search for Java SE Runtime Environment on the internet and you should be able to find the download page.
Click the Download button beneath JRE
Accept the license agreement and download the latest version of Java SE Runtime Environment installer. I suggest getting the exe for Windows x64 (such as jre-8u92-windows-x64.exe ) unless you are using a 32 bit version of Windows in which case you need to get the Windows x86 Offline version.
Run the installer.
After the installation is complete, close the Command Prompt if it was already open, open it and check if you can successfully run java -version command.
Python
Python is used by many other software. So it is quite possible that a required version (in our case version 2.6 or later) is already available on your computer. To check if Python is available and find it’s version, open a Command Prompt and type the following command.
If Python is installed and configured to work from a Command Prompt, running the above command should print the information about the Python version to the console. For example, I got the following output on my laptop.
Instead if you get a message like
It means you need to install Python. To do so,
Go to the Python download page.
Click the Latest Python 2 Release link.
Download the Windows x86-64 MSI installer file. If you are using a 32 bit version of Windows download the Windows x86 MSI installer file.
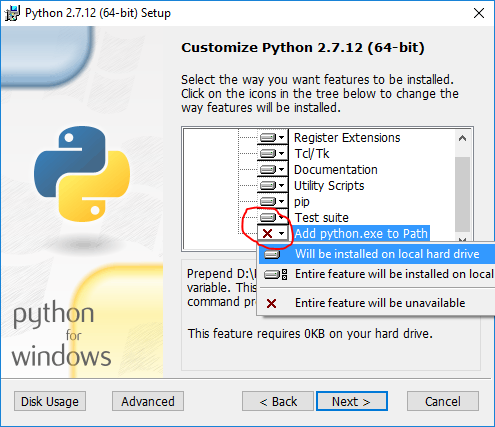
When you run the installer, on the Customize Python section, make sure that the option Add python.exe to Path is selected. If this option is not selected, some of the PySpark utilities such as pyspark and spark-submit might not work.
After the installation is complete, close the Command Prompt if it was already open, open it and check if you can successfully run python —version command.
Installing Apache Spark
Go to the Spark download page.
For Choose a Spark release, select the latest stable release of Spark.
For Choose a package type, select a version that is pre-built for the latest version of Hadoop such as Pre-built for Hadoop 2.6.
For Choose a download type, select Direct Download.
Click the link next to Download Spark to download a zipped tarball file ending in .tgz extension such as spark-1.6.2-bin-hadoop2.6.tgz .
In order to install Apache Spark, there is no need to run any installer. You can extract the files from the downloaded tarball in any folder of your choice using the 7Zip tool.
Make sure that the folder path and the folder name containing Spark files do not contain any spaces.
In my case, I created a folder called spark on my C drive and extracted the zipped tarball in a folder called spark-1.6.2-bin-hadoop2.6 . So all Spark files are in a folder called C:\spark\spark-1.6.2-bin-hadoop2.6 . From now on, I will refer to this folder as SPARK_HOME in this post.
To test if your installation was successful, open a Command Prompt, change to SPARK_HOME directory and type bin\pyspark . This should start the PySpark shell which can be used to interactively work with Spark. I got the following messages in the console after running bin\pyspark command.
The last message provides a hint on how to work with Spark in the PySpark shell using the sc or sqlContext names. For example, typing sc.version in the shell should print the version of Spark. You can exit from the PySpark shell in the same way you exit from any Python shell by typing exit() .
The PySpark shell outputs a few messages on exit. So you need to hit enter to get back to the Command Prompt.
Configuring the Spark Installation
Starting the PySpark shell produces a lot of messages of type INFO , ERROR and WARN . In this section we will see how to remove these messages.
By default, the Spark installation on Windows does not include the winutils.exe utility that is used by Spark. If you do not tell your Spark installation where to look for winutils.exe , you will see error messages when running the PySpark shell such as
This error message does not prevent the PySpark shell from starting. However if you try to run a standalone Python script using the bin\spark-submit utility, you will get an error. For example, try running the wordcount.py script from the examples folder in the Command Prompt when you are in the SPARK_HOME directory.
which produces the following error that also points to missing winutils.exe
Installing winutils
Let’s download the winutils.exe and configure our Spark installation to find winutils.exe .
Create a hadoop\bin folder inside the SPARK_HOME folder.
Download the winutils.exe for the version of hadoop against which your Spark installation was built for. In my case the hadoop version was 2.6.0. So I downloaded the winutils.exe for hadoop 2.6.0 and copied it to the hadoop\bin folder in the SPARK_HOME folder.
Create a system environment variable in Windows called SPARK_HOME that points to the SPARK_HOME folder path. Search the internet in case you need a refresher on how to create environment variables in your version of Windows such as articles like these.
Create another system environment variable in Windows called HADOOP_HOME that points to the hadoop folder inside the SPARK_HOME folder.
Since the hadoop folder is inside the SPARK_HOME folder, it is better to create HADOOP_HOME environment variable using a value of %SPARK_HOME%\hadoop . That way you don’t have to change HADOOP_HOME if SPARK_HOME is updated.
If you now run the bin\pyspark script from a Windows Command Prompt, the error messages related to winutils.exe should be gone. For example, I got the following messages after running the bin\pyspark utility after configuring winutils
The bin\spark-submit utility can also be successfully used to run wordcount.py script.
Configuring the log level for Spark
There are still a lot of extra INFO messages in the console everytime you start or exit from a PySpark shell or run the spark-submit utility. So let’s make one more change to our Spark installation so that only warning and error messages are written to the console. In order to do this
Copy the log4j.properties.template file in the SPARK_HOME\conf folder as log4j.properties file in the SPARK_HOME\conf folder.
Set the log4j.rootCategory property value to WARN, console
Save the log4j.properties file.
Now any informative messages will not be logged to the console. For example, I got the following messages after running the bin\pyspark utility once I configured the log level to WARN .
Summary
In order to work with PySpark, start a Windows Command Prompt and change into your SPARK_HOME directory.
To start a PySpark shell, run the bin\pyspark utility. Once your are in the PySpark shell use the sc and sqlContext names and type exit() to return back to the Command Prompt.
To run a standalone Python script, run the bin\spark-submit utility and specify the path of your Python script as well as any arguments your Python script needs in the Command Prompt. For example, to run the wordcount.py script from examples directory in your SPARK_HOME folder, you can run the following command
bin\spark-submit examples\src\main\python\wordcount.py README.md
References
I used the following references to gather information about this post.
Downloading Spark and Getting Started (chapter 2) from O’Reilly’s Learning Spark book.
Any suggestions or feedback? Leave your comments below.
Установка Apache PySpark в Windows 10
Дата публикации Aug 30, 2019

Последние несколько месяцев я работал над проектом Data Science, который обрабатывает огромный набор данных, и стало необходимым использовать распределенную среду, предоставляемую Apache PySpark.
Я много боролся при установке PySpark на Windows 10. Поэтому я решил написать этот блог, чтобы помочь любому легко установить и использовать Apache PySpark на компьютере с Windows 10.
1. Шаг 1
PySpark требует Java версии 7 или новее и Python версии 2.6 или новее. Давайте сначала проверим, установлены ли они, или установим их и убедимся, что PySpark может работать с этими двумя компонентами.
Установка Java
Проверьте, установлена ли на вашем компьютере Java версии 7 или новее. Для этого выполните следующую команду в командной строке.

Если Java установлена и настроена для работы из командной строки, выполнение вышеуказанной команды должно вывести информацию о версии Java на консоль. Иначе, если вы получите сообщение, подобное:
«Java» не распознается как внутренняя или внешняя команда, работающая программа или пакетный файл.
тогда вы должны установить Java.
б) Получить Windows x64 (например, jre-8u92-windows-x64.exe), если вы не используете 32-разрядную версию Windows, в этом случае вам нужно получитьWindows x86 Offlineверсия.
в) Запустите установщик.
d) После завершения установки закройте текущую командную строку, если она уже была открыта, снова откройте ее и проверьте, можете ли вы успешно запуститьJava — версиякоманда.
2. Шаг 2
питон
Python используется многими другими программными инструментами. Поэтому вполне возможно, что требуемая версия (в нашем случае версия 2.6 или более поздняя) уже доступна на вашем компьютере. Чтобы проверить, доступен ли Python и найти его версию, откройте командную строку и введите командуPython — версия
Если Python установлен и настроен для работы из командной строки, при выполнении вышеуказанной команды информация о версии Python должна выводиться на консоль. Например, я получил следующий вывод на моем ноутбуке:
C: \ Users \ uug20> python —version
Python 3.7.3
Вместо этого, если вы получите сообщение, как
«Python» не распознается как внутренняя или внешняя команда, работающая программа или пакетный файл ».
Это означает, что вам нужно установить Python. Для этого
а) Перейти к питонускачатьстр.
б) НажмитеПоследний выпуск Python 2ссылка.
c) Загрузите установочный файл MSI для Windows x86–64. Если вы используете 32-разрядную версию Windows, загрузите установочный файл MSI для Windows x86.
г) Когда вы запускаете установщик, наНастроить Pythonраздел, убедитесь, что опцияДобавить python.exe в путьвыбран. Если этот параметр не выбран, некоторые утилиты PySpark, такие как pyspark и spark-submit, могут не работать.
e) После завершения установки закройте командную строку, если она уже была открыта, снова откройте ее и проверьте, можете ли вы успешно запуститьPython — версиякоманда.
3. Шаг 3
Установка Apache Spark
а) Перейти к искрескачатьстр.
б) Выберите последнюю стабильную версию Spark.
с)Выберите тип упаковки: sвыберите версию, предварительно созданную для последней версии Hadoop, такую какПредварительно построен для Hadoop 2.6,
г)Выберите тип загрузки:ВыбратьПрямое скачивание,
д) Нажмите на ссылку рядом сСкачать Sparkзагрузить заархивированный tar-файл, заканчивающийся расширением .tgz, такой как spark-1.6.2-bin-hadoop2.6.tgz.
f) Для установки Apache Spark вам не нужно запускать какой-либо установщик. Извлеките файлы из загруженного tar-файла в любую папку по вашему выбору, используя7Zipинструмент / другие инструменты для разархивирования.
Убедитесь, что путь к папке и имя папки, содержащей файлы Spark, не содержат пробелов.
Я создал папку с именем spark на моем диске D и распаковал заархивированный tar-файл в папку с именем spark-2.4.3-bin-hadoop2.7. Таким образом, все файлы Spark находятся в папке с именем D: \ spark \ spark-2.4.3-bin-hadoop2.7. Давайте назовем эту папку SPARK_HOME в этом посте.
Чтобы проверить успешность установки, откройте командную строку, перейдите в каталог SPARK_HOME и введите bin \ pyspark. Это должно запустить оболочку PySpark, которую можно использовать для интерактивной работы со Spark.
Последнее сообщение содержит подсказку о том, как работать со Spark в оболочке PySpark с использованием имен sc или sqlContext. Например, при вводе sc.version в оболочке должна появиться версия Spark. Вы можете выйти из оболочки PySpark так же, как вы выходите из любой оболочки Python — набрав exit ().
Оболочка PySpark выводит несколько сообщений при выходе. Поэтому вам нужно нажать Enter, чтобы вернуться в командную строку.
4. Шаг 4
Настройка установки Spark
Первоначально, когда вы запускаете оболочку PySpark, она выдает много сообщений типа INFO, ERROR и WARN. Давайте посмотрим, как удалить эти сообщения.
Установка Spark в Windows по умолчанию не включает утилиту winutils.exe, которая используется Spark. Если вы не укажете своей установке Spark, где искать winutils.exe, вы увидите сообщения об ошибках при запуске оболочки PySpark, такие как
«ОШИБКА Shell: не удалось найти двоичный файл winutils в двоичном пути hadoop java.io.IOException: не удалось найти исполняемый файл null \ bin \ winutils.exe в двоичных файлах Hadoop».
Это сообщение об ошибке не препятствует запуску оболочки PySpark. Однако если вы попытаетесь запустить автономный скрипт Python с помощью утилиты bin \ spark-submit, вы получите ошибку. Например, попробуйте запустить скрипт wordcount.py из папки примеров в командной строке, когда вы находитесь в каталоге SPARK_HOME.
«Bin \ spark-submit examples \ src \ main \ python \ wordcount.py README.md»
Установка winutils
Давайте загрузим winutils.exe и сконфигурируем нашу установку Spark, чтобы найти winutils.exe.
a) Создайте папку hadoop \ bin внутри папки SPARK_HOME.
б) Скачатьwinutils.exeдля версии hadoop, для которой была создана ваша установка Spark. В моем случае версия hadoop была 2.6.0. Так что язагруженноеwinutils.exe для hadoop 2.6.0 и скопировал его в папку hadoop \ bin в папке SPARK_HOME.
c) Создайте системную переменную среды в Windows с именем SPARK_HOME, которая указывает путь к папке SPARK_HOME.
d) Создайте в Windows другую переменную системной среды с именем HADOOP_HOME, которая указывает на папку hadoop внутри папки SPARK_HOME.
Поскольку папка hadoop находится внутри папки SPARK_HOME, лучше создать переменную среды HADOOP_HOME, используя значение% SPARK_HOME% \ hadoop. Таким образом, вам не нужно менять HADOOP_HOME, если SPARK_HOME обновлен.
Если вы теперь запустите сценарий bin \ pyspark из командной строки Windows, сообщения об ошибках, связанные с winutils.exe, должны исчезнуть.
5. Шаг 5
Настройка уровня журнала для Spark
Каждый раз при запуске или выходе из оболочки PySpark или при запуске утилиты spark-submit остается много дополнительных сообщений INFO. Итак, давайте внесем еще одно изменение в нашу установку Spark, чтобы в консоль записывались только предупреждения и сообщения об ошибках. Для этого:
a) Скопируйте файл log4j.properties.template в папку SPARK_HOME \ conf как файл log4j.properties в папке SPARK_HOME \ conf.
b) Установите для свойства log4j.rootCategory значение WARN, console.
c) Сохраните файл log4j.properties.
Теперь любые информационные сообщения не будут записываться на консоль.
Резюме
Чтобы работать с PySpark, запустите командную строку и перейдите в каталог SPARK_HOME.
а) Чтобы запустить оболочку PySpark, запустите утилиту bin \ pyspark. Когда вы окажетесь в оболочке PySpark, используйте имена sc и sqlContext и введите exit (), чтобы вернуться в командную строку.
б) Чтобы запустить автономный скрипт Python, запустите утилиту bin \ spark-submit и укажите путь к вашему скрипту Python, а также любые аргументы, которые нужны вашему скрипту Python, в командной строке. Например, чтобы запустить скрипт wordcount.py из каталога examples в папке SPARK_HOME, вы можете выполнить следующую команду:
«bin \ spark-submit examples \ src \ main \ python \ wordcount.py README.md«
6. Шаг 6
Важно: я столкнулся с проблемой при установке
После завершения процедуры установки на моем компьютере с Windows 10 я получал следующее сообщение об ошибке.
Файл «C: \ Users \ uug20 \ Anaconda3 \ lib \ site-packages \ zmq \ backend \ cython \ __ init__.py», строка 6, в от . import (константы, ошибка, сообщение, контекст, ImportError: сбой загрузки DLL: указанный модуль не найден.
Решение:
Я просто разобрался, как это исправить!
В моем случае я не знал, что мне нужно добавить ТРИ пути, связанные с миникондами, в переменную окружения PATH.
C: \ Users \ uug20 \ Anaconda3
C: \ Users \ uug20 \ Anaconda3 \ Scripts
C: \ Users \ uug20 \ Anaconda3 \ Library \ bin
После этого я не получил никаких сообщений об ошибках, и pyspark начал работать правильно и открыл записную книжку Jupyter после ввода pyspark в командной строке.


