- Инструкция по установке Android SDK
- How To Install Android SDK Tools On Windows
- Step 1 — Download SDK Tools
- Step 2 — Install Command Line Tools
- Step 3 — Install Platform Tools
- Step 4 — Configure Environment Variable
- Step 5 — Configure Commands
- Step 6 — Using the SDK Manager
- Step 7 — Using the Emulator and AVD Manager
- Summary
Инструкция по установке Android SDK

Эта статья поможет всем новичкам, владельцам Андроид устройств ознакомиться с SDK. Вы узнаете как установить android sdk. Для чего это нужно: во первых для взлома, во вторых для доступа к системной части прошивки и ее последующего изменения, в третьих для получения root прав.
В SDK есть инструмент ADB (Android Debug Bridge) отладочный Мост для Android или по другому интерфейс для отладки Android, с помощью него можно:
- Просматривать log системы Android.
- Просмотреть какие Андроид устройства подключены и могут работать с ADB.
- Устанавливать программы на Android устройствах.
- Удалять программы на Android устройствах.
- Копировать файлы с Android устройства.
- Копировать файлы на Android устройство.
- Удалять раздел data на Android устройстве.
- Очищать раздел data на Android устройстве.
- Прошить раздел data на Android устройстве.
- Перезаписать раздел data на Android устройстве.
- Осуществить разные скрипты управления Android устройством.
- Управлять некоторыми сетевыми параметрами Android устройства.
- И многое другое.
SDK (software development kit) — комплекс средств разработки, позволяющий специалистам по программному обеспечению создавать приложения для определённого пакета программ, программного обеспечения базовых средств разработки, компьютерной системы, игровых консолей, аппаратной платформы, операционных систем и других платформ.
Установка Software Development kit (SDK)
Заходим на страницу сайта https://developer.android.com/sdk/index.html и скачиваем SDK для вашей операционной системы. Скачав zip архив SDK вам необходимо разархивировать его содержимое, в архиве находится папка adt-bundle-windows которая и содержит сам SDK, распаковываем ее на наш компьютер в корень диска С:\. Путь к SDK у нас будет такой C:\adt-bundle-windows
Установка Java Development Kit (JDK)
Для Android SDK требуется JDK версии 5 или выше. Если на вашем компьютере уже установлена одна из этих версий JDK, то смело переходите к следующему шагу. Если JDK не установлен, то зайдите на сайт oracle.com , выбираем вкладку Downloads, потом JAVA for developers, далее выбираем JDK как на рисунке, вам нужно найти версию JDK, которая установится на ваш компьютер – выберите операционную систему и разрядность. Скачиваем и устанавливаем.
oracle.com вкладка downloads:
Выбираем версию JDK
Заходим в папку adt-bundle-windows, затем в папку sdk и запускаем SDK Manager.exe. В появившемся окне предлагается выбрать компоненты для закачки через интернет. В правой части для каждого компонента указано, установлен он уже или нет. Выбираем нужные пакеты для работы. Желательно как на рисунке. Если у вас другие версии Android, то выбираем нужные. Когда все нужные пакеты выбраны — жмем кнопку Install X packages справа снизу. В новом окне подтверждаем, что согласны все это скачать — Accept All. И здесь же можно посмотреть размер пакета и отказаться от чего-либо. Жмете Install — побежал индикатор и открылся лог — началась закачка. Через некоторое время (зависит от количества выбранных пакетов) появится надпись: Done loading packages. Установка завершена. Закрываем лог и SDK Manager.
Затем мы идем в папку C:\adt-bundle-windows\platform-tools этот адрес нужно скопировать (в этой папочке должны лежать файлы adb.exe и другие)
Папка с программой
Для Windows XP: заходим в панель управления, свойства системы, дополнительно, переменные среды
Для Windows Vista/7: заходим в панель управления, система, дополнительные параметры системы
Находим пункт переменные среды и находим пункт Path, нажимаем изменить и ничего не удаляя через точку с запятой добавляем свой путь C:\adt-bundle-windows\platform-tools (смотрим рисунок). Нажимаем ОК.
Теперь проверяем все ли работает: заходим в пуск, запускаем командную строчку (желательно от имени администратора для Windows Vista/7) и вводим команду adb и получаем следующее.
How To Install Android SDK Tools On Windows
It provides all the steps required to install Android Platform Tools and SDK Manager on Windows 10 without using Android Studio.
In this tutorial, we will discuss all the steps required to install Android Platform Tools and SDK Manager on Windows 10. This tutorial provides the steps for Windows 10, though the steps should be the same on other versions of Windows.
This post is useful for the developers using Android Platform Tools and SDK manager without installing Android Studio for the use cases including hybrid app development using Ionic. It also assumes that a valid JAVA_HOME environment variable exists pointing to the installation directory of Java.
You can follow How To Install Java 8 On Windows 10, How To Install Java 11 On Windows, How To Install Java 15 On Windows, or How To Install OpenJDK 15 On Windows to install Java on Windows. In case you are interested in developing Android applications using Android Studio, you can also follow How To Install Android Studio On Windows.
Step 1 — Download SDK Tools
Open the download tab of Android Studio and scroll down to the Command line tools only section. This section shows various options to download the SDK tools as shown in Fig 1.
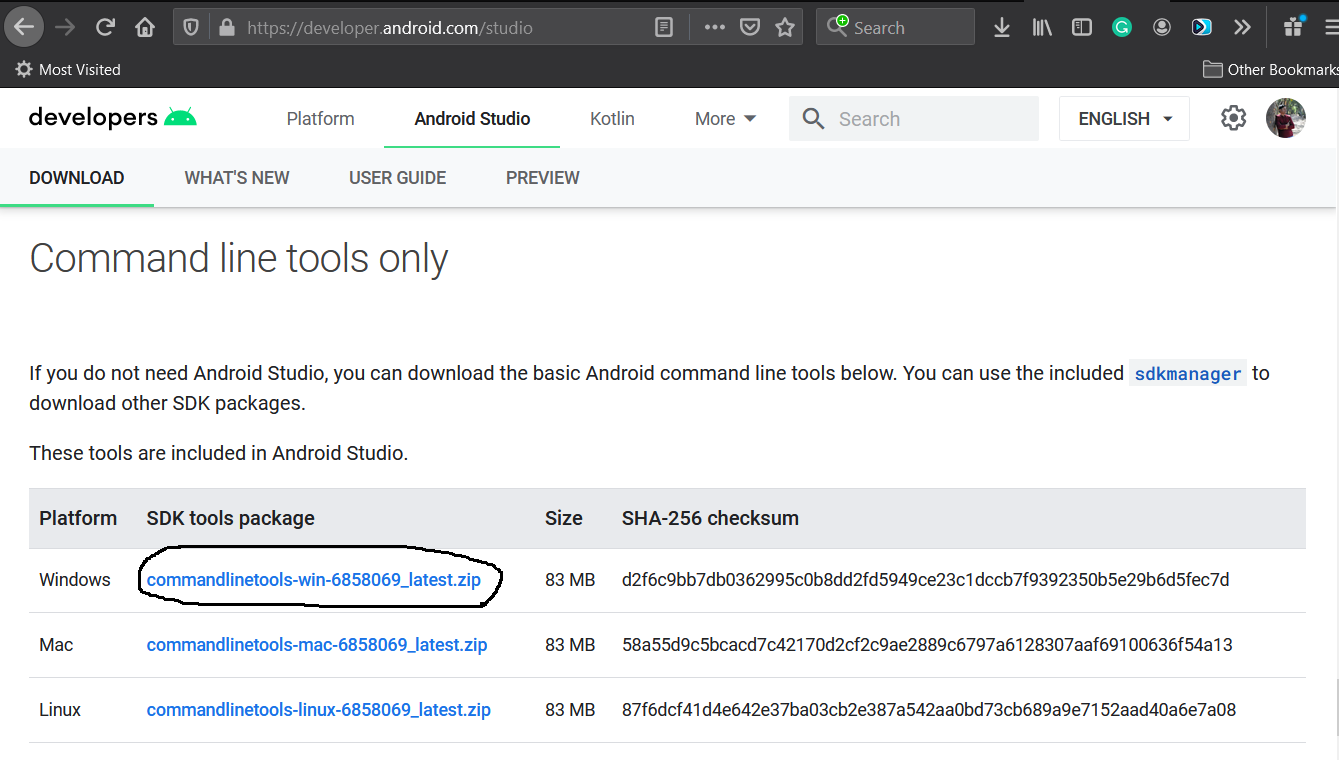
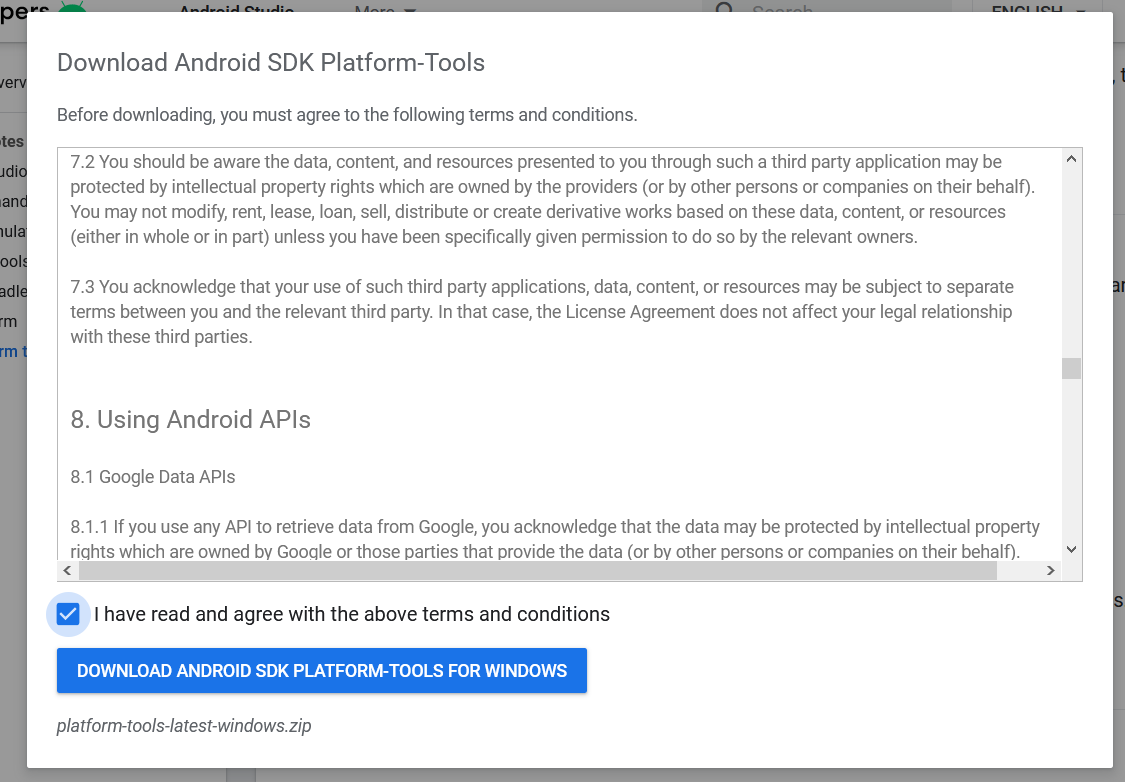
Click the first link having the download option for Windows as highlighted in Fig 1. It will ask to accept to terms and conditions as shown in Fig 2.
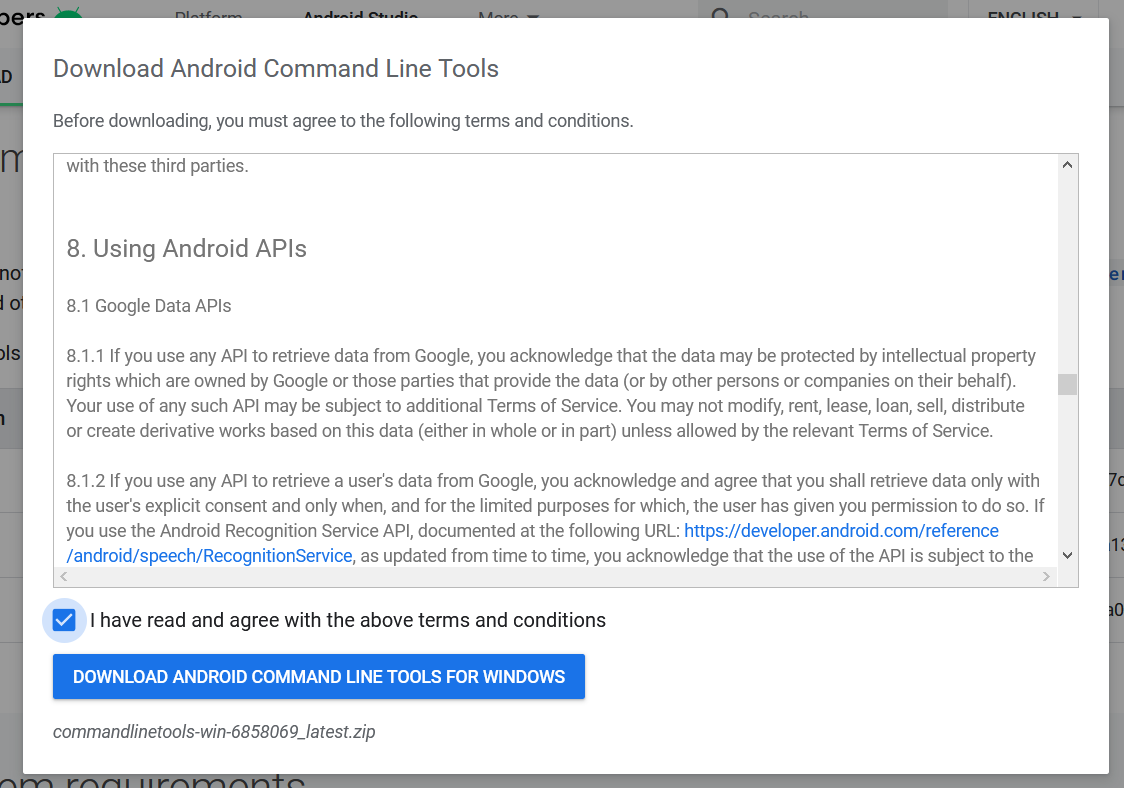
Go through the details, agree on the terms and conditions and click the Download Button to start the download.
Step 2 — Install Command Line Tools
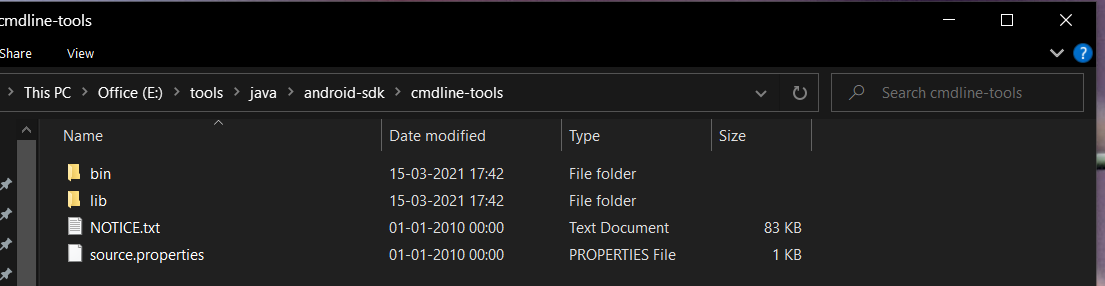
In this step, we will install the Android Command Line Tools on Windows 10. Create the directory android-sdk at your preferred location and extract the content of the downloaded SDK Tools zip to this directory. Make sure that the extracted content is available within the android-sdk directory created by us as shown in Fig 3.
Step 3 — Install Platform Tools
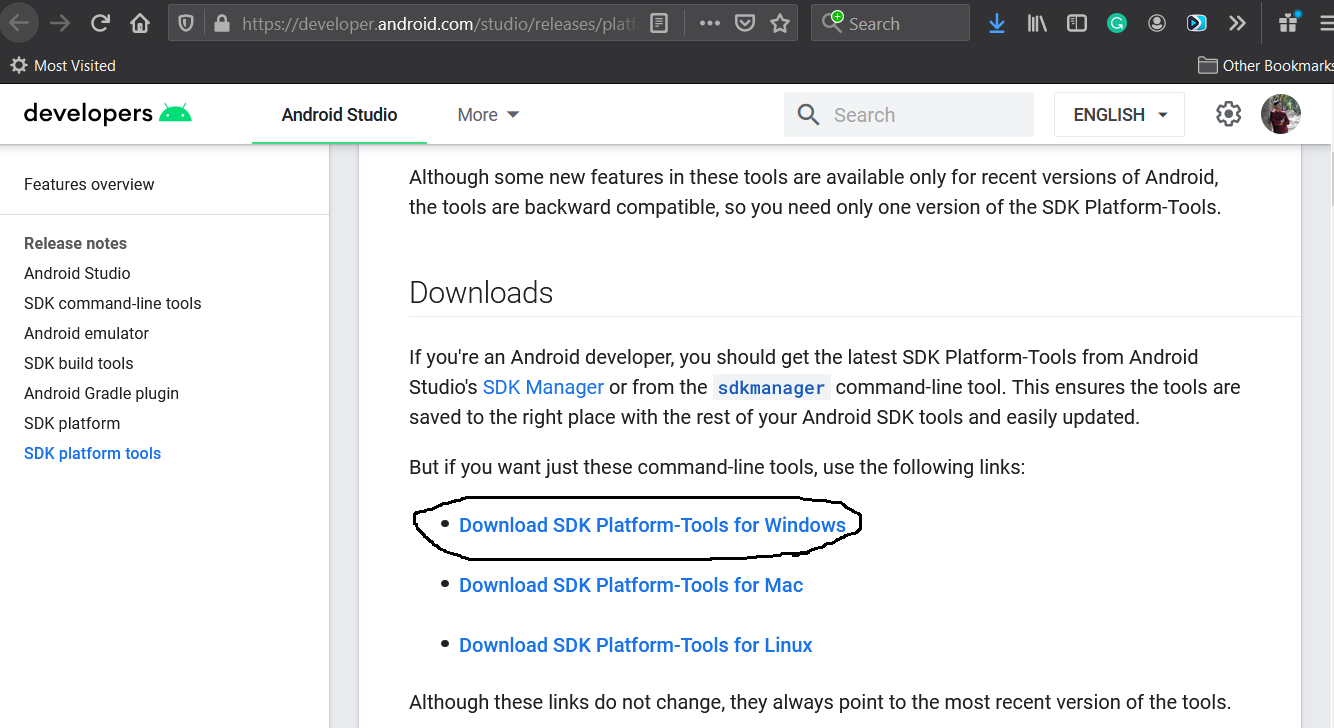
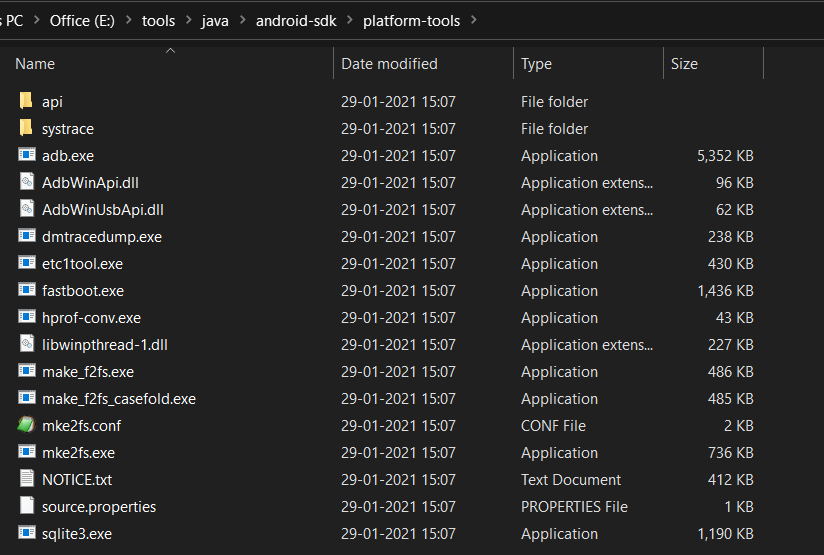
In this step, we will install the Android Platform Tools on Windows 10. Follow the same steps similar to Android SDK Tools to install Android Platform Tools using the download link as shown in Fig 4, Fig 5, and Fig 6.
Step 4 — Configure Environment Variable
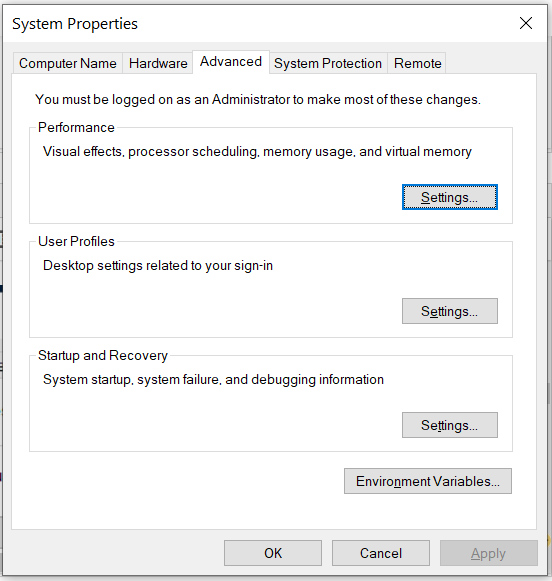
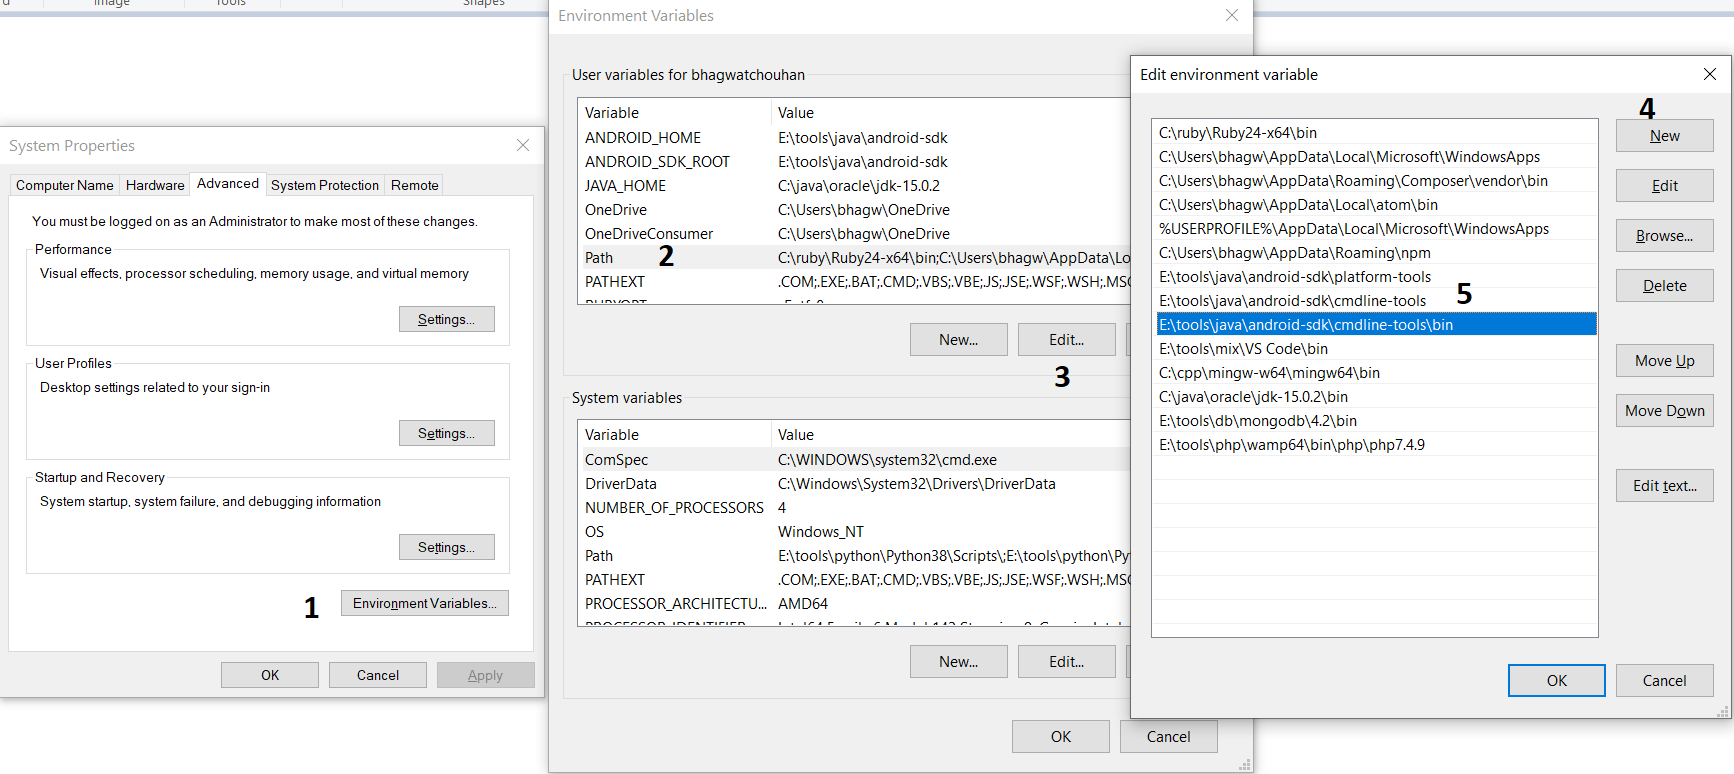
Right-click the My Computer or This PC on the desktop and click the Properties Option. Now click the Advanced system settings. It will show the System Properties dialog having Advanced Tab options as shown in Fig 7.
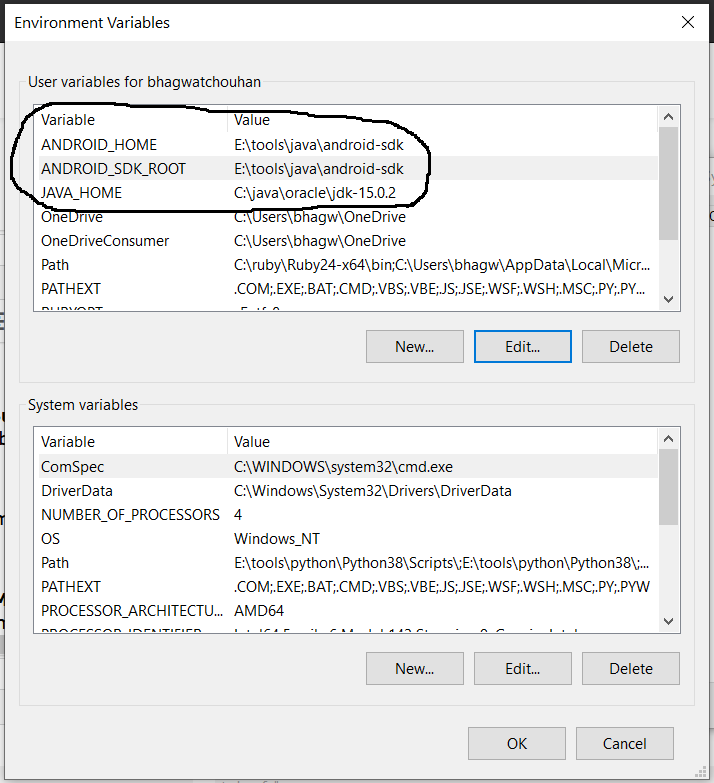
Click the Environment Variables Button and click the New Button in the first section. Set the Variable Name field to ANDROID_HOME and Variable Value to the android-sdk directory created by us in the previous step.
Similarly, also configure the environment variable ANDROID_SDK_ROOT to the android-sdk directory.
Also , make sure that the JAVA_HOME environment variable is set to the JDK installation directory. It must not end with the bin as we do with the system path variable.
Step 5 — Configure Commands
In previous steps, we have downloaded and extracted the Command Line Tools and Platform Tools to the android-sdk directory. Both the tools provide several command-line utilities which we need to run by going to the appropriate directory having the executable files.
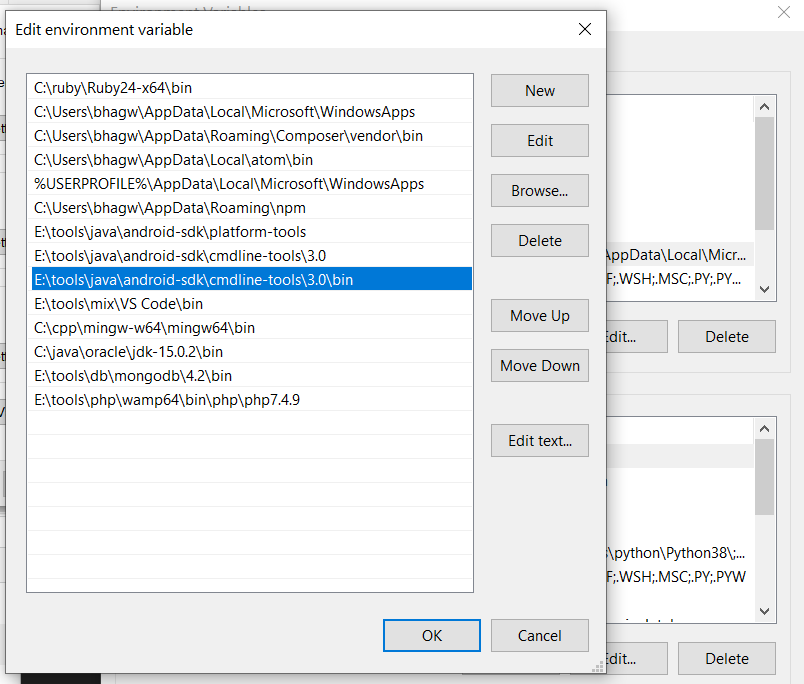
We can make these commands available at the system level without going to these directories by adding the path to tools, tools\bin, and platform-tools to the system path as shown in Fig 9. Make sure that these executables do not break other commands having the same name before adding these paths to the PATH environment variable.
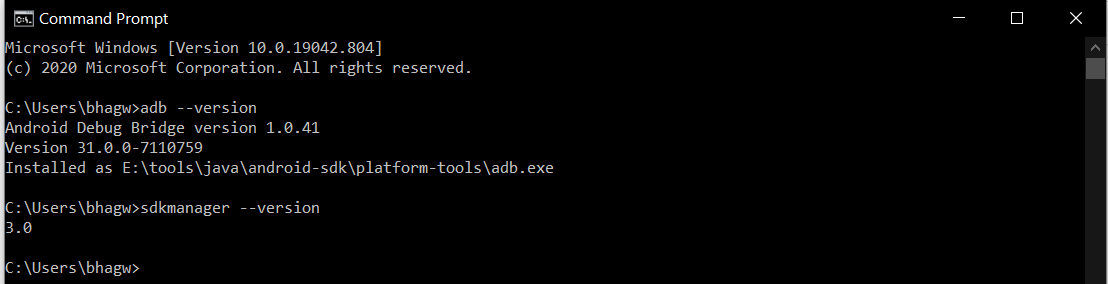
Now open the Command Prompt and check the ADB and SDK Manager versions as shown in Fig 10. You might be required to restart the system to apply the environment variables set by us.
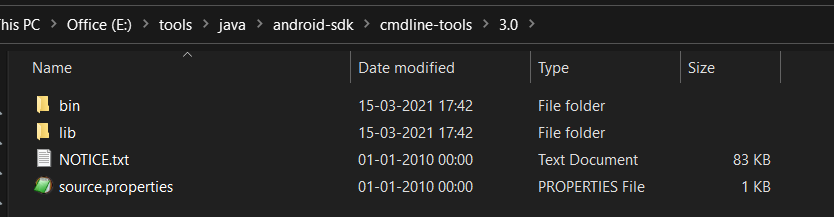
We can see that the ADB command works well and shows the version details, but the sdkmanager shows an error — «error: could not determine sdk root. error: either specify it explicitly with —sdk_root= or move this package into its expected location: \cmdline-tools\latest\» since it expects the Command Line Tools in a version-specific directory. Now open the source.properties file from the cmdline-tools directory to check the version. It will show the version details as shown below.
Now move all the files to the directory cmdline-tools/3.0 as shown in Fig 10.
Also, update the system path as shown in Fig 11.
Now close and open the Command Prompt. Also, check the ADB and SDK Manager versions as shown in Fig 12.
Step 6 — Using the SDK Manager
List — We can list the installed and available packages and images using the list command as shown below.
Install Platform — Use the below-mentioned command to install the Android 10 (API level 30) using the SDK manager.
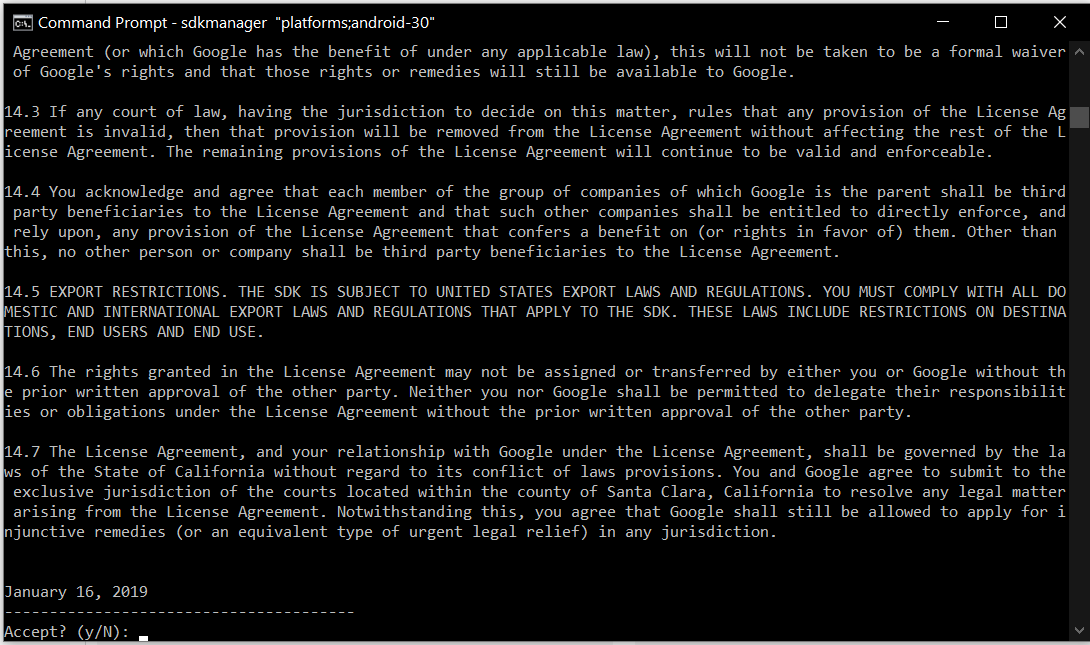
It will ask to accept the terms and conditions as shown in Fig 13. Enter y and hit Enter Key to accept the terms and conditions. This command creates the directory platforms within android-sdk and installs the package android-30 having all the required files to run the emulator for Android 10.
If we again check the installed packages, the list command shows the installed options as shown below.
Update SDK Manager — Update the SDK manager using the below-mentioned command.
Add System Image — We can add system images from available images shown by the list command using the SDK manager as shown below. We are adding the most recent default 64-bit system image.
Accept the License Agreement to complete the download.
There are several projects which need Google Play Services. We need system images specific to Google Play Services as shown below.
Accept the License Agreement to complete the download.
Install Emulator — We need to install the emulator before creating the AVD using SDK Manager.
Accept the License Agreement to complete the download.
Install Build Tools — Install the most recent build tool listed by the list command.
Step 7 — Using the Emulator and AVD Manager
Create Android Emulator — Create the emulator using the system image downloaded in the previous step as shown below. Replace with the actual name preferred by you.
The above commands ask a bunch of questions to configure the AVD if we choose the custom hardware profile option. We have excluded the details of these options from this tutorial since these configuration details depend on the actual needs. After completing all the configurations, it creates the AVD using the name provided by us while configuring it.
Similarly, we can also install the AVD of older versions as shown below.
List Android Emulators — Now go to the tools directory on the command line and check the installed platform as shown below.
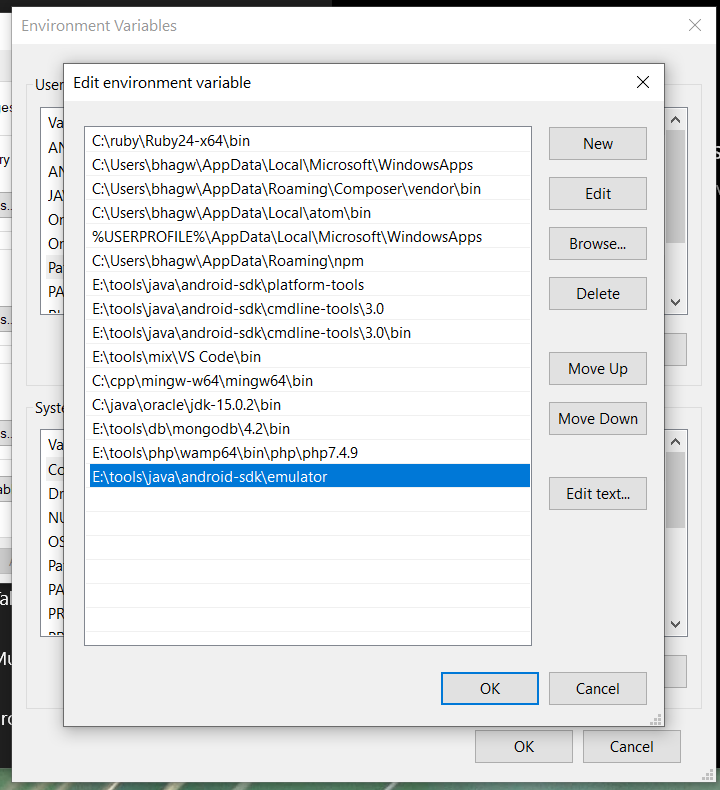
Notes: Add Emulator to the system path as shown in Fig 14.
Close and re-open the Command Prompt to check the AVDs created by us in the previous steps.
It will list all the AVDs installed by us.
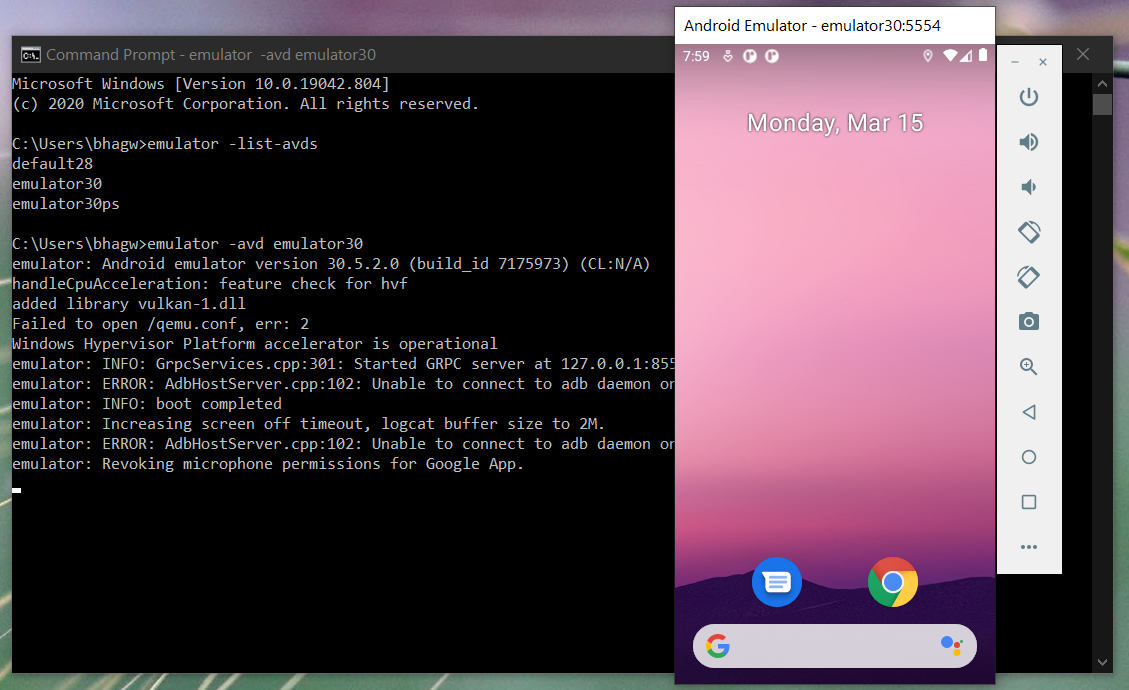
Run Emulator — We can run the emulator created by us as shown below.
The emulator will take some time to completely launch the AVD. The final results should look similar to Fig 15.
Delete Emulator — We can also delete an existing emulator as shown below.
Summary
This tutorial provided all the steps required to install Android Platform Tools and Android SDK Manager on Windows 10. It also provided the steps required to create and launch the AVDs using the Emulator.


